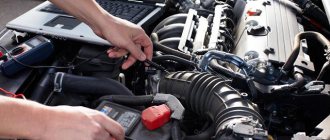
Hi all! It will be much better if the car owner notices traces of oil on the air filter before side effects begin to appear in the form of engine problems. Therefore, they consider it necessary to talk about the oil in the air filter, the reasons for the occurrence and elimination of such a problem.
Usually, an uncharacteristic condition of the filter is noticed as part of routine vehicle maintenance. But if the machine shows signs of unstable operation, you can pay attention to the filter element in advance, even before it has completed its intended life. By the way, here I can recommend you material about the zero filter.
I will say right away that you cannot operate an engine, be it a diesel or a gasoline internal combustion engine, if there are traces of oil on the air filter. This is dangerous from the point of view of the safety of the motor. Simply replacing the consumable will not work, and after a while the new filter will become dirty. First you need to eliminate the cause of the appearance, find out why the lubricant gets there.
Diagnostics and repair procedure
The scooter does not develop speed; this is generally a very popular problem among scooter owners, regardless of capacity and manufacturer. Moreover, its manifestation is quite diverse. For some people right away, for others after a run or after warming up. But there is always a reason.
There are many reasons why a scooter does not gain momentum.
So, why doesn’t the scooter gain or develop momentum?
The scooter simply doesn't have enough power. Don't be alarmed, it's just a set of mechanisms that obey the laws of mechanics, which means they can be understood and repaired. And since the scooter is a simple device, you can identify the problem yourself and fix it.
The operation of a scooter is determined by 3 components: fuel, compression and spark. Therefore, if the scooter does not gain momentum, then you must definitely check the condition of these components. And, ruling out the presence of faults sequentially, we will find the cause and eliminate it.
Checking and cleaning the air filter
When the air filter is clogged, the air flow into the carburetor is greatly reduced, which leads to an over-enrichment of the mixture with gasoline, as well as increased fuel consumption, loss of power at the bottom, and increased formation of soot in the combustion chamber. This is the most common reason why a started scooter does not gain momentum.
The first thing we check is the air filter if we detect unstable operation of the scooter.
Removing the filter
If we detect unstable operation of the scooter, first of all we check the air filter:
1.Remove the filter, carefully removing along the way all parts that interfere with this process
2. We clean the filter housing from dirt.
3. Dismantle the housing, being careful not to damage it.
4. We check for damage: through holes, cracks, tears, insufficient adherence to the cover or edges of the case.
5. Carefully remove the filter from the lid.
6.If the filter is damaged or its service life has been exceeded, then simply install a new one in its place. There is no point in wasting time trying to restore it; it is not economically feasible.
Cleaning the filter
Ways to clean the scooter air filter:
- Washing the filter in gasoline. Gasoline changes occur at least 2 times. Complete drying is not required.
- Rinse the scooter's air filter in water using ordinary detergents intended, for example, for washing dishes, and then dry until completely dry. Drying should be natural, without heating.
Installing the filter in place
We saturate the filter with oil
After washing and drying the filter, it must be impregnated with a special impregnation or engine oil. This will save your carburetor and CPG from small dust particles that may remain on the surface of the filter. Without oil impregnation, the functionality of the filter is extremely low, so the ENTIRE surface of the filter must be covered with a thin but visible layer of oil.
If you use a special impregnation, it is enough to cover the entire surface with a thin layer. Even the smallest dust particles stick to this liquid.
Or you can just get by with regular motor oil. But the use of special impregnation is more effective.
Reinstall the filter.
API classification
According to the API (American Petroleum Institute) classification, lubricants are divided into classes marked with two letters, the first of which is S (Service), the second indicates the category of vehicles for which this composition is suitable. For modern bikes, products of the SG and SH classes are most often recommended, and somewhat less frequently - SJ and SL. This is due to the fact that the latter two are capable of increasing engine power, but due to the content of anti-friction additives they can worsen the performance of the motorcycle clutch.
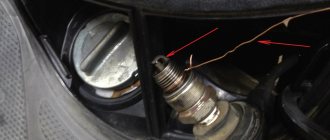
Checking the spark plug
The condition of the spark plug provides a lot of information for understanding the causes of the malfunction and, accordingly, for choosing repair actions.
Acceptable view
The appearance is light, slight precipitation or electrocorrosion is possible.
To understand the causes of a malfunction, the condition of the spark plug provides a lot of information.
Carbon deposits on the candle
Recommended actions:
- adjustment of the working mixture;
- adjust the cold start system of the scooter engine;
- replace the air filter;
- Cleaning the spark plug or replacing it with a new one. In this case, it is important to select the correct heat number.
Overheat
Recommended actions:
- change the torque of the scooter's spark plug;
- debug the scooter engine cooling system;
- understand the ignition system;
- understand the glow number of the spark plug (a value characterizing the spark plug, proportional to the average pressure at which glow ignition begins to appear during testing of the spark plug on a motor calibration unit).
Carbon deposits on the spark plug may cause the scooter to malfunction.
Oil contamination
Recommended actions:
- change the ratio of gasoline and oil in the fuel mixture, replace the spark plugs of the scooter (for two-stroke engines);
- Check the condition of the scooter engine; you may have to repair it.
In general, it is believed that if a Chinese scooter does not start well and does not gain momentum, then, unlike European and Japanese scooters, the problem is most often in the ignition system.
Troubleshooting your scooter's battery charging system
This article will focus on troubleshooting the charging system of a scooter battery. If your scooter's battery is constantly draining, this may be due to a problem with the battery power system. To test this system you will need a multimeter.
When the scooter's on-board voltage is 12 volts, the battery is simply necessary for the normal operation of the moped, since it provides electricity to its starter and carburetor starting enrichment.
The scooter's generator begins to produce electricity (alternating current) when the engine is running starting from 2000-3000 rpm. With the help of a converter-stabilizer, alternating current is converted into direct current, which is needed to charge the battery. The stabilizer ensures that the battery does not overcharge. If the battery needs charging, the stabilizer passes current to it. When the battery is fully charged, the stabilizer seems to turn off and no current is supplied to the battery.
If the power supply system is damaged and no current is supplied to the battery, it will not charge. Until the battery is completely discharged, the scooter's motor will continue to operate. When the battery is completely discharged, the engine will stall and will no longer start (either with an electric or kickstarter).
On the other hand, if the stabilizer does not turn off the current, this will lead to the battery being overcharged, it will heat up and “boil”, and the acid in the battery will leak out. As a result, the battery will fail and may burst.
Rice. 1 Schematic diagram of the scooter battery charging system
Troubleshooting algorithm
Problem: Scooter battery is not charging.
1. Check the fuse and its contacts (clean if necessary). If the fuse is blown, it must be replaced. If the fuse is blown, the engine will not start.
2. Check the battery contacts. If necessary, clean with sandpaper and tighten the fasteners.
3. Check all wires and plugs of the battery charging system. First of all, check the ground - the blue or black (usually) wire that connects the negative terminal of the battery to the scooter frame. Sometimes cleaning the battery terminals is all it takes to get your scooter working again.
Checking compression in the cylinder
If the scooter engine does not pick up speed, but everything is in order with the carburetor, you need to check the cylinder compression.
The compression diagnostic process will help assess the condition of the cylinder-piston group without disassembling it. As a rule, damage to the piston rings occurs with reduced compression. For four-stroke engines, it may also mean that the valves are not tightly seated in the seats.
Compression is measured with a compression gauge, which can easily be replaced with an ordinary pressure gauge with a check valve. The compression gauge is mounted in place of the spark plug in the cylinder. To purchase it, you can visit any auto store, it’s inexpensive.
The condition of the cylinder-piston group will help evaluate the compression diagnostic process
Possible reasons for low compression (less than 6 atm) or its absence:
- non-working reed valve - for 2 tons of engines;
- leakage through the crankcase, usually through the crankshaft seals - for 2 tons of engines;
- severely burnt or insufficiently tight valves - for 4 tons of engines;
- damaged cylinder head gasket;
- burnout or wear of the piston, cylinder or ring;
- microcracks in the cylinder head.
Do-it-yourself voltage regulator for a scooter
You can make a relay regulator yourself; this requires a little knowledge and a scooter voltage regulator circuit. We will make a voltage regulator for a Chinese scooter with our own hands. The cheapest option is to use a shunt voltage regulator. The caveat is that for proper operation you need to disassemble the generator and remove the wire from ground with a separate wire.
It was decided to make a voltage regulator with your own hands for the reason that the Chinese analogues are so lousy that there are simply no words. Look at the photo of the Chinese voltage regulator circuit:
We will assemble a single-phase generator according to this circuit:
In order to make a relay regulator, you must first disassemble the generator and remove the stator from the engine. Now we see this picture:
The photo shows a mass that needs to be unsoldered, and to it we need to solder a separate wire to the winding. After which it needs to be taken outside. This wire will be one end of the winding. The other end is the white wire.
After this, carefully reassemble the generator in reverse order. Why was all this going on?! We now have 2 wires coming out of the generator, which we will use (there are 3 wires in total). All the changes that have occurred can be seen in the photo below:
The voltage regulator connection is shown in this scooter voltage regulator diagram:
OK it's all over Now. Our DIY scooter voltage regulator is almost finished. Now you need to connect the yellow wire from our old relay regulator to the “+” terminal of the scooter battery.
After all the work done, we got constant voltage on our board. networks.
Another homemade voltage regulator for a scooter in the video:
Checking the carburetor and fuel system
Possible malfunctions:
- Gasoline is contaminated, old or contains water, i.e. substandard .
- The gas tap has problems with passage, with the lid, and often with the fuel filter.
- The carburetor is not adjusted or cleaned.
- The air filter is damaged or wet (and this happens).
- Severe ruptures or cracks in gaskets or carburetor pipe.
Checking the carburetor if the scooter malfunctions
How to clean the muffler
Manually
With a metal cable, acting like a brush. Convenient, fast, but not for long.
Heat treatment
With a blowtorch or in an oven or barbecue (but then be sure to remove the muffler from the scooter). The muffler warms up as much as possible. With blows, the soot resulting from calcination is shed off, and it is blown out using a compressor. Effective, but the result will look unaesthetic.
Chemical treatment
Dismantle the muffler. Wash with pipe cleaner or other caustic liquid, such as sodium hydroxide. Rinse with clean water. Dry well. The end result is a very high quality one. But it’s long and difficult.
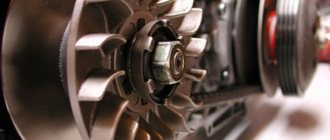
What to do if the variator belt is worn out
Both longitudinal and transverse cracks require replacement of the variator. Moreover, it is better not to delay it in order to avoid serious consequences.
Muffler cleaning
It is easy to replace the variator belt if you do not delay this procedure before the belt fails. If you tighten until the weights fall apart, you will most likely need to completely replace the entire mechanism. It’s cheaper and easier not to delay.
To change the belt, all you need is a gas wrench. But it will be difficult to completely replace the mechanism without special tools.
Garage
This post will be of interest to fans of the “crazy hands” entertainment. Anyone who thinks that repairing plastic is not something worth bothering with, and that you only need to buy new and only original plastic, can safely skip this post and not spoil your mood and my mood.
Preface
I ask you in advance not to judge strictly, because...
I’m not an expert in this matter and I don’t have much experience, but what I have, in my opinion, may be valuable to someone. I also want to say that the plastic is NOT PAINTED at the current stage, but only its integrity is restored. There are plenty of articles on painting on the Internet, and doing it yourself in the garage is a collective farm of pure water (this statement does not apply to those who have experience and equipment for professional painting). So where do we start? Let's start, as always, with the background. As I mentioned in my post, I initially bought the motorcycle seeing that the plastic was cracked and would either have to be replaced or restored. Naturally, changing this is not for me, otherwise you would not be reading this mini report. In fact, from the moment I bought Zyuzik, I periodically scoured the Internet and collected information on methods for restoring ABS plastic. There weren’t that many of them, except for the “masters” who “repair” anything from hot melt glue to cold welding. The most “correct” way to repair plastic, according to the Internet, is considered to be soldering with a hair dryer with plastic electrodes, but for such work you need to have the hair dryer itself, electrodes and sufficient experience in using these tools. Since I didn’t have anything from the list above, especially experience, without which repairing plastic with a hairdryer could have ended with the purchase of new plastic, I decided to resort to a simpler but lower quality (again, according to the Internet community) method - namely soldering soldering iron But if soldering was only done with a soldering iron, then I probably wouldn’t write this post, because... There seems to be nothing new here, and besides, you can’t grow pieces of plastic that don’t exist with a soldering iron. Also on some forum I found a review of gluing plastic with the same plastic. It sounds strange but in essence it is true. Its essence is that the same plastic (abs) is taken and dissolved in 746 solvent (if I’m not mistaken with the number), and the plastic dissolves well, as my experience has shown, then the seam is filled with this “glue”. To be honest, there is something in this, but for the most part, vegetable oil is bullshit and a little later I will give reasons for my statement. I did not use gluing plastic with epoxy resin reinforced with fiberglass fabric, because... There is experience that in some cases this is not reliable enough and under strong vibrations the eboxy peels off from the plastic. I’ll say right away: I haven’t made the plastic of the entire motorcycle yet; this weekend I only worked on three pieces that go “around the tank.” And one of these pieces had the most serious damage, in comparison with the rest of the plastic, therefore, using its example, I will tell you what I did and how, because the repair of the remaining pieces is actually only a part of the actions that were applied to this piece. Perhaps and only POSSIBLY, I will write another post closer to March-April where I will tell you what nuances there were in restoring the rest of the plastic and about painting it or covering it with vinyl.
Main roles
Well, we're done with the preface. So now let’s look at the main characters: Plastic:
- "displaced fractures"
- a piece of the wall (it doubles as a stiffener) is missing
- general view of the plastic part from the inside, traces of repair with hot-melt adhesive are visible
- detailed photo of the “hole” (it’s hard to call it a hole) for the cigarette lighter (obviously ripped out of some VAZ).
- The “ear” into which the shaft that holds the glove compartment lid is inserted is also broken off
Patient review completed. Now a review of the “medical staff”:
- Soldering iron 80 W
- A Chinese straight grinder bought back in the summer for $10 along with a set of attachments purely to see if it would work (it did, but didn’t really make it into the frame).
- Two-component putty for plastic (purchased at the auto department of Epicenter, I don’t include photos because it’s an advertisement for the company
 and it’s not a problem to find, there are many manufacturers)
 - A set of sandpaper with different grains (the smallest grain is 150 or 180, the largest is 80)
- A brass mesh that was taken from the granaries of my grandfather’s homeland (also not included in the frame, below is a similar mesh, only mine has just wire vertically and cables horizontally).
- Cyanoacrylate glue for temporary bonding of parts, you can easily do without it (I didn’t take a photo, any one you sell will do)
- Steel wire 0.5-0.7mm
Let's start the renovation
Unfortunately, I don’t have any photos from each stage of the repair, because... Often your hands are dirty and your camera/phone is not always at hand. Where did I start? I started by tearing off the hot-melt adhesive from my plastic with mats, for the most part it didn’t really stick, but in some places it stuck so much that it was problematic to tear it off. The part without this glue looked like this:
Then we had to completely break through the crack in order to be able to align the planes relative to each other. Simply breaking through was not enough, because... the one who repaired the plastic before me didn’t bother with this and soldered the plastic (apparently also with a soldering iron) “as it happened”, after which he filled the whole thing on top with hot glue. After the crack was broken, its inner edges had to be processed with a grinder to remove irregularities that were not allowing level the planes. After this matter was leveled, the position of the part was fixed with glue, and this glue was also poured into inaccessible places in the crack for a more reliable fixation during soldering. After this, a similar procedure was done with the remaining cracks, the only difference being that the cracks were not broken completely, but were sanded down to plastic and fixed in the “correct” position with glue. After all the cracks were processed, it was time for soldering. Because It was planned to paint the plastic later, so the cracks were soldered both from the outside and from the inside. Yes, I want to note that soldering is not just “sticking” a soldering iron tip into the plastic; you need to melt the plastic so that each time you melt the plastic, you partially weld it to the previous place where you melted it before.
Crack fixed with glue:
The same crack, but already soldered (but not yet smoothed) from the outside
After all the required seam was soldered, I smoothed out the crack with a soldering iron, actually leveling all the burrs left earlier, at the same time thoroughly heating all the plastic under the soldering iron (my fingers got quite hot on the back side of the part). In this simple way, all the cracks on both sides of the part were sealed.
Now it’s time to start making the missing pieces of plastic, or, as some call this process, artistic sculpting, and I sculpted using a metal frame and two-component plastic putty. In my case, it was restoring a piece of the wall with a stiffener + sealing the hole in the hole from the cigarette lighter. In the video that I will post at the end, it was recommended to use soldered wire to create a frame for the lost parts of the plastic. I tried this option (on another part) and I must say that this allows you to achieve the goal, but there is no convenience, because... the putty is quite “liquid” for such purposes, and tends to fall on one side or the other. Now, if I had worked with a mass resembling plasticine, then such a problem would not have arisen. Therefore, I used a metal mesh. Its advantage is that:
- firstly, it can be soldered over the entire contact area of the restored piece with the “original” plastic, and not just soldered 2 ends of the wire
- secondly, the mesh can be immediately bent into a frame of the desired shape (in my case, stiffeners)
- thirdly, the putty does not fall through the split so much and it can be applied more accurately, so as not to clean off a lot of excess later.
And so I cut the stack, soldered it along the entire fault line of the wall to which my piece adjoins, bent it as needed, cut off the excess.
For the glove compartment with a hole with a cigarette lighter, a mesh patch with a diameter slightly larger than the hole itself was cut out and soldered into the roughness of the plastic (somewhere to the middle of the thickness of the plastic). After that, all the soldered pieces were sealed with putty + putty was added in those places where cracks had previously been soldered and too large unevenness resulted. wall with stiffener
glove compartment view from outside
glove compartment inside view
general view of the detail
The putty is very smelly and polymerizes quickly only at temperatures above about 20 degrees, so it is better to apply it outside and dry it anywhere but in the house. I did everything in the garage and dried it in front of the heater.
It takes about 8 minutes for the putty to harden according to the instructions; it took me more than an hour, because... I dried it in the garage near the heater and the temperature there was far from +20 (as recommended). Once the putty has hardened, it can be safely processed, namely, cleaned off with coarse sandpaper.
A small digression: don’t even think about spot-cleaning, because... If you draw and transfer the entire work again, or the edges of the part will float, which is not beautiful. Either make a flat long base for the emery (a trivial wooden block on which the emery is stretched) or buy a ready-made mount for the emery at a hardware store.
After the part is given the desired shape, we grind the part with fine sandpaper until a completely smooth surface is obtained.
The mount for the glove compartment lid shaft was made from steel wire, which was soldered deeper into the plastic. It looks like this:
Now as for strengthening weak points. After everything was done, a “bending” test was carried out, which revealed a structurally weak spot on the part, next to which there had previously been a whole scattering of small cracks. Although all the other seams performed well, this was the area where there was a risk of breaking the part or getting new cracks. To strengthen this place, an overlay was made from the same mesh and soldered into the plastic with a soldering iron, but so that parts of the mesh were visible from above. Then the same dissolved plastic was poured onto the place with the mesh. As summer practice has shown (and in the summer I soldered a plow that broke on a stump in the forest), a mesh sealed and filled with the same solution holds very tightly, and despite the fact that I reached the asphalt very well with the plow a couple of times (I erased the bolts on the asphalt like this , that I couldn’t insert a screwdriver) not a single crack appeared in the places with the mesh, despite the decent load. So, the mesh and plastic filled with such “glue” represent a single whole. But if such “glue” is simply poured over the top of the sealed cracks, then nothing will work, because... the layer of glue turns out to be quite thin and while the solvent is evaporating, the layer of plastic under the glue does not have time to soften and properly contact the “glue”. In general, some of this “glue” had to be peeled off from my part. So I don’t recommend pouring it without a mesh.
In conclusion, I would like to ask you not to judge harshly.
Now a very useful video about repairing plastic, which helped me a lot: