on “Repair and maintenance manual for electrical equipment of the Suzuki Let's 2 scooter”
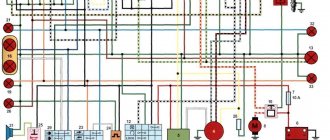
help me figure out the Suzuki Lets 2 scooter with the battery there is a spark without it no I can’t find the reason I changed the ignition winding magnet relay-regulator no changes help me figure it out I’ll be very grateful
Isay replied: July 11, 2013 at 11:49 pm
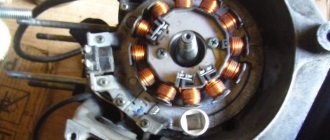
Hello, as I understand it, you start it, then remove the battery, and the spark starts, i.e. he stalls! there is only one reason - the battery is not charging, here you first need to ring the relay, stand under the beak, the tester is in the diode position, there are 4 contacts they do not ring between each other and the ground, then the relay is intact, but if they show resistance in any position, then the relay 1 died, then you need to call the wiring, if the relay is intact, look at the diagram
help me figure out the suzuki lets 2 scooter I have speed protection when I go over 40 and it starts to reset how to remove the protection
Hello everyone, help on the Suzuki on the instrument panel there is a red light until it goes out, you can’t start the engine, but it’s not clear why this light starts flashing when driving and turns off the engine
Hi all. Guys, please tell me which belt is the suzuki lets 2 butterfly, otherwise I bought it with a non-original belt. The belt is new but slips
Terraflops replied: April 23, 2014 at 08:14
belt suzuki lets 2 16.5×664
Good day! I have a question. I bought a moped, Suzuki Lets 2, from the honest words of an equally honest owner, the scooter started and worked, but after the last start, it stood for 1.5 years. I took it to the garage, disassembled the plastic, sprayed everything I needed with WD, contacts with contact cleaner, connected the car battery, since the original one naturally died, but there was no response from the button. Moreover, after turning the key, the turn signals don’t work, the signal doesn’t work, the brakes don’t light up, but when you turn the key, somewhere in the middle position, the red lights come on, whether it’s oil or the speed limit, it’s not clear. If you start it with a kickstarter, the headlight comes on during cranking, but there is still no spark, so it won’t start. I changed the fuse just in case, a completely new spark plug. What else to watch? so visually, all the wiring is intact. The scooter generally arrived from Vladivostok in perfect condition. Thank you in advance.
Maxim replied: September 5, 2015 at 09:39 pm
you don’t have enough power, try pulling the kickstarter more than once, but several times; if that doesn’t work, put a toggle switch on the wiring to the headlight; when you start it, turn off the headlight; when you start it, you can turn it on
Oleg replied: April 24, 2022 at 11:12
The battery from the car cannot be taken to the moped. The amperage there is not the same. The wiring may burn out. If there is no fuse...
Review of Suzuki Lets 2 (tuning)
Pokazuvati elementi keruvannya progravachem
- Published 30 hrs 2019
- Track: DaniLeigh-No Limits Instagram: _n_a_z_a_r_m_
COMMENTS • 24
The device is top, but the quality of filming needs work!)
Hello, my friend, can you tell me which CVT to install on the Lets2 so that it doesn’t drive badly and doesn’t hurt your pocket?
I, too, from fastova, my Suzuki top speed is 80 km/h
bro tell me where it’s fashionable to order sax for lets 2 new
Throw away the line
IGORILA ML Lets was sold a long time ago, so there’s nothing left to throw away
Is the pipe overcooked? Or did you get up without any problems?
What kind of switch is it?
it’s really a bit dead somehow I also had stock from Japan))
what kind of gasoline do you use?
Maxim Akulin A95
Throw a stiffer spring and the load is much lighter
What is a scooter?
One of the most popular vehicles in many countries, especially in the south, is the scooter. It is also called a scooter, moped or bike. The scooter is similar in appearance to a motorcycle, but is slightly smaller and lighter. Therefore, it is more maneuverable and easy to control. Motor scooters are especially popular in urban areas, where this two-wheeled vehicle can easily overcome traffic jams and will not take up much space in any parking lot.
Owners of modern high-quality scooter models admit that they have some disadvantages. For example, they are easy to steal. Also, due to their small size, they are a bit cramped for two people and have little power. But still, these vehicles have more advantages:
- they are inexpensive and do not require large operating costs, therefore they are accessible to many;
- it’s easy to get a license for a scooter and learn how to drive it;
- scooters are quite maneuverable, so they are not afraid of city traffic jams;
- have a modern design;
- consume little gasoline;
- they are easy to park;
- There is a spacious luggage compartment.
Good day to all. In this post I would like to talk about my experience in repairing a 1200 bandit switch. In advance, I will ask all sensitive individuals who accept “only the original and nothing else!!!11” to move away from the screens. I'll probably start from the very beginning. I decided to change two old coils on my bandit and replace them with one from VAZ in order to get a more powerful spark and make it easier to access the valve cover. I took it apart, installed it and everything worked. But, as they say, the music didn’t play for long, the guy didn’t dance for long, the motorcycle didn’t work for long. After 5 minutes the tachometer turned off and 2 cylinders disappeared. My further attempts to revive it by reinstalling the wires, replacing the coils with old ones, cleaning the contacts, studying the spark plugs and a bunch of checks were unsuccessful. Only 2 cylinders were working. All I found out was that although there was voltage on the coil, it did not produce a spark. I poked some more wires and went home sad. As a result, after studying the Internet, I came to the conclusion that something happened to the switch. This did not bring me any joy. My search for the damaged part on the Internet was disappointing due to either the lack of the switch model I needed or the overpriced one. It was decided to try to do everything myself, and if it didn’t work out, then break the piggy bank and, with a sad face, take the money to the good guy from a dismantling shop or eBay. Armed with the World Wide Web and my knowledge of electronics, I began to dissect the patient. First, it was necessary to disassemble the non-separable (sic!) plastic case. Yes, they will have to sacrifice. To do this, I used a utility knife, making cuts in the plastic and deepening them. I recommend making cuts more often to make it easier to break off the plastic from the internal sealant. And don’t break it in large pieces, otherwise you risk tearing off too much and ruining everything. Then I saw a wonderful picture of a board filled with silicone or sealant. The great Internet advised me to pick it out with a screwdriver and solvent. I’ll add that I achieved the best results using a container of acetone, in which I left the board overnight, and a toothbrush with a screwdriver. The operation to partially clear the board took almost a week. The main thing is to be extremely careful and do not rip the elements off the board, as I did) In the end, I tore off one SMD capacitor and an incomprehensible thing, which, after using Google, turned out to be some kind of strange quartz resonator (marked in red) with three terminals. The transistor track has peeled off a little, but that's not a big deal. Having gone to Google, I found out that the Darlington transistors marked in blue (mn638sa) are responsible for the spark. Checking them with a tester showed that I apparently did something wrong when checking, so I was simply satisfied with the fact that the same positions of the probes show different values on them) They are checked in the same way as bipolar transistors. But thanks to phaserclub, I found an old post there and analogues of these transistors. bu941 and IRGS14C40LPBF are suitable. I purchased bu941, simultaneously torturing the sellers in one well-known and expensive radio parts store. After 10 minutes, the most experienced friend told me what the mysterious letters and numbers on the quartz resonator (8000 MHz) meant and told me where to look for it. Naturally he was not there. But it’s okay, I went to a cheaper radio parts store near my home and bought a three-terminal SMD quartz resonator that matched the parameters. So, apparently I had no reason to worry, although of course it would have been better not to break it) It’s time for soldering. You will need a small soldering iron, MGTF wire (I took 0.75mm) and all sorts of fluxes with tin, as well as tweezers and heat shrink with thermal paste. I also had old radiators from some kind of board. The quartz resonator was attached to the board with glue and, due to the impossibility of removing the old case (I honestly tried), it was decided to connect its leads to the old ones by using copper strands from the wire. The SMD capacitor was installed in its rightful place and the time had come for transistors. They are located on a small substrate, which acts as a small radiator. Having soldered them out, I installed a temporary installation of freshly purchased beauties in their place and quickly ran to the garage. The motorcycle refused to start for a long time due to fouled spark plugs, but after installing the tap on forced feed and 5 minutes of swearing, it finally started and started on all 4 cylinders! My happiness knew no bounds. By this point, I had already spent about 2 weeks searching for a solution, and you yourself understand perfectly well how I feel at the end of the season. Next, a march to the house and an attempt to improve everything. I soldered the mgtf wires to the terminals and put the ends in heat shrink. A glue gun was used to fill the board with hot glue, since I did not want to use epoxy or sealant. God bless the creator of this device) The board was “carefully” filled, especially the quartz resonator, capacitor and places where the transistors were soldered. I didn’t skimp on the glue, since so that the elements do not spontaneously dismantle from the board during the trip, they must be securely fixed + a lightweight board resonates more when the engine is running, as I understood from the description of one of the reasons for using such an amount of silicone mass in the production of the switch. Two radiators found in the box were connected together and stuck (surprise) with hot glue to the remaining part of the case, which was also glued to the board. Next, the radiators were coated with a small amount of thermal paste and transistors were screwed to them. In order to test this design, all this horror was wrapped in cling film, tape and electrical tape in order to weigh it down and protect it from moisture and vibrations. This beauty was crucified under the saddle using zip ties so as not to touch the body of the motorcycle. While I test my creation and think through housing options, everything will remain as is. Yesterday I drove around the area, and then got bolder in a circle on the third transport, a total of about 100 km. Everything worked like clockwork. So I’ll drive around like this for another week and think about the body, although they say there is nothing more permanent than temporary) Summing up, I can say that I spent about 2 weeks solving this problem, spent about 400 rubles purely on spare parts + acetone. Of course, it is necessary to modify the case a little and give the board additional resistance to shaking and vibration, but I think that’s all after the end of the season. It remains a mystery to me why the switch suddenly died, apparently it shorted somewhere to ground or the old transistor died due to replacing the coil. But apparently this will remain a mystery to me. I'll ride with the old coils for now. I think that's all I wanted to tell you. If you have any questions, I will be happy to answer them in the comments. Smooth roads, good health and fewer breakdowns to everyone!
Suzuki Lets 2 scooter repair
The Michio Suzuki company was founded in 1909. The first to be built was a small factory that produced textile machines; it was located near the village of Hamamatsu. In 1920, the young company changed its name and became Suzuki Loom Manufacturing Co., and Suzuki himself assumed the presidency of the company.
The company's success was obvious; the state granted the company an award for high-performance product samples. The first Suzuki motorcycle was released in 1952. It was called Power Free and had an original design, namely, there were two pedals with which the motorcyclist could help his iron horse. The development of this model was so successful that the state allocated funds for their continuation.
Over the course of several years, motorcycles were released that became incredibly popular in just a few years. In 1953, a model was released with a two-stroke engine and a volume of 60 cubic meters. see. It was this motorcycle that helped win the race and win the Mount Fuji Hill Climb tournament. In 1954, the company produced 6,000 motorcycles.
By 1980, the Suzuki name would have a strong presence in the market and would produce motorcycles sold all over the world. Today, an incredibly popular motorcycle is the Suzuki Lets 2 scooter.
, which has several varieties and a reasonable price for the buyer.
The history of Suzuki Let's begins in February 1996, when the first example of this motorcycle was released. After a short period of time, Suzuki Let's became incredibly popular, largely because the model was almost ideal at that time. The motorcycle had beautiful and neat shapes, which distinguished it from analogues of that time. The maximum speed is 62 km/h, the scooter was ideal for city traffic jams.
Almost immediately, despite the success of the first model, the developer releases Suzuki Let's 2. The main difference between this model is in the external design, since the power and hardware have remained virtually unchanged. The suspension performed well, the energy intensity is quite enough to move comfortably on city roads. Unfortunately, buy a Suzuki Lets 2 scooter
you will not succeed, since it was produced only for the Japanese and New Zealand markets.
Suzuki Let's 2L will appeal to those who love driving fast. The drum brake system and front disc brake allow you to feel confident on the roads, while the weight of the rider does not play a big role. This model was released in 1997; already in 1998, an analogue, SUZUKI Let's 2DX, was offered in which a combined braking system was introduced.
The last of the Suzuki Let's 2 series was the NEW model, which went on sale in 1999. The biggest changes occurred in the design, after which minor mistakes of the developer were finalized in the scooter. Until 2008, the motorcycle successfully occupied a niche in the world market. In 2008, the two-stroke engine was recognized as not environmentally friendly and production was curtailed. Several years later, we can say with confidence that the Suzuki Lets 2 scooter has not lost its popularity, price
This motorcycle is pleasant to many motorcyclists.
Review of the Suzuki Lets 2 scooter, characteristics and photos
History of the Suzuki lets scooter
Let's I
Let's II
Actually, the changes affected his appearance. While the rear remains visually the same, the front has been redesigned. So the headlight was moved to the steering wheel. The manufacturer has made some unification with parts from the Suzuki Sepia (AF50N), thereby reducing development and production costs. This determined the final price of the Suziki Let's II scooter. It is worth noting that Suzuki tried to make it as affordable as possible, reducing the price from 144,000 yen to 99,800 yen compared to its predecessor. While other 50cc scooter manufacturers set the price range for their products around 150,000 yen. As for the functionality of the new generation scooter, the manufacturer has made a spacious underseat trunk that can easily accommodate a motorcycle helmet.
Let's II New
1. Redesigned. The new scooter has been given a facelift with a deep overhaul of the front end. In addition, the optics have been updated. The manufacturer has changed the design and efficiency of the headlight. Also, the orange turn signal lenses were made in a transparent version with amber caps.
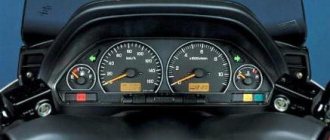
2. Considerable attention was paid to safety. First of all, this concerns the new high-power halogen lamp (40W) for the headlights. The design of the dashboard has also been changed. In the new scooter it was made in white and in a more readable form. This facilitates quick perception and clear readings, which is important while driving. Another important point was the update of the ignition switch with a steering wheel and lock cylinder locking system, which provides increased protection of the vehicle against theft.
3. Additional equipment in modification with a combined brake system. The center stand can be locked when parked at the touch of a button. The engine starting system in the parking lot has been changed. Now there is no need to remove the step to start the engine. This also allows you to start moving faster and more conveniently when stopping frequently and placing the scooter on the side stand. The large capacity (20L) underseat luggage rack is equipped with a lampshade for use in the dark.
What does the scooter look like?
The Suzuki Let's 2 scooter model is considered a single-seater. But it can easily accommodate two people. Its stylish appearance makes it attractive to active young people. Streamlined shapes and smooth lines make its style harmonious and very modern. In any traffic flow, the chic appearance of this scooter always attracts the eyes of passers-by and other drivers. This scooter is ideal for girls.
At the front, the scooter protects the driver from dust and splashes of dirt. There is a spacious luggage compartment under the seat. And for large cargo you can use the rear trunk. The dashboard is simple. All devices have large scales and the necessary indicators.
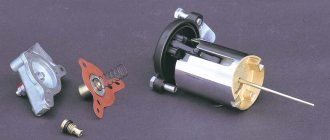
Setting the gasoline level and the correct position of the float in the chamber
A correctly adjusted fuel level in the float chamber does not allow the spark plugs to get wet and the engine to stall. In the chamber where the floats and jets are located, there is a valve that provides fuel supply. The correct position of the floats determines the closing or opening phase of the valve and prevents fuel overflow in the carburetor. The position of the floats is changed by slightly bending the fastening bar.
The closing or opening phase of the valve is determined by the correct position of the floats
Gasoline level is monitored with the engine running using a tube made of transparent material attached to the drain point and raised up. The gasoline level should be a few millimeters below the flange mounting of the cover. If the level is insufficient, remove the cover and adjust the needle firing phase by slightly bending the metal antennae.