Hello, dear readers. From the previous four posts, we realized that modern carburetors are very complex devices, and we have much more to discuss in their design. Today we will find out what else is included in the carburetor design in addition to the main metering system and the idle system, which have already been discussed.
If you do not make special requirements for mixture formation, the carburetor will work well, having in its design only the main metering system and the idle system. However, their capabilities are not enough to simplify starting a cold engine, eliminate dips in the dynamics of speed gain when opening the throttle sharply, or maintain the best throttle response without losing maximum power. To eliminate these effects and further improve engine performance, a number of carburetor auxiliary devices are used, which will be discussed in this article.
Purpose of the starting enrichment
To ensure the start of a cold scooter engine, a rich fuel mixture is necessary, that is, if the optimal ratio of gasoline and air in the mixture is 1:15, then at the time of starting a cold engine, the amount of gasoline in the mixture should be greater.
This is due to the fact that cold gasoline evaporates worse, and its ignition in the combustion chamber is more difficult. A larger amount of gasoline allows you to get more vapors, as a result of which the engine starts normally. On old motorcycles, when starting a cold engine, the air damper was covered or completely buried, thus enriching the mixture. After starting the engine and warming it up, the damper was opened, the mixture became normal, and the engine began to operate as usual. On modern technology, including scooters, the process of enriching the mixture when starting a cold engine is fully automated, thanks to a device such as a starting electric enricher, or, as scooterists often call it, a carburetor electric valve, and it is installed directly on the carburetor.
Acceleration pump
The accelerator pump is designed to compensate for the lean mixture when the throttle is opened sharply.
Over-depletion occurs due to a sharp decrease in vacuum due to a sharp increase in the cross-sectional area of the diffuser. As a result, there is a dip in engine speed. General view of a diaphragm accelerator pump. Number 1 marks the diaphragm adjustment screw
To eliminate the dip when accelerating, an accelerator pump is introduced into the carburetor design, which injects a strictly defined amount of fuel directly into the carburetor diffuser when the throttle is sharply opened.
There are two types of accelerator pumps: plunger and diaphragm. The accelerator pump is driven by the throttle valve directly or through a lever system. For example, on Dellorto carburetors of the PHF and PHM series, the diaphragm accelerator pump is driven by lever 3 sliding along an inclined plane in a special groove 4 of the throttle valve. When the throttle valve rises, the lever slides along the inclined plane of the groove, bends back and presses the diaphragm.
Pump diaphragm drive system: 1 - accelerator pump housing; 2 - diaphragm; 3 - lever; 4 - groove with an inclined plane
The engine may need enrichment at the initial moment of a sharp rise in the throttle, or a less intense but longer enrichment throughout the lift. By changing the angle of inclination and the length of the inclined plane, you can adjust the beginning of the injection moment and its duration. In another way, the amount of injected fuel can be adjusted with a screw that sets the diaphragm stroke. By rotating the screw clockwise, the stroke of the diaphragm decreases, which leads to a decrease in the amount of injected fuel; rotation counterclockwise increases it.
With other pump settings unchanged, the injection duration can be adjusted by the nozzle through which fuel is supplied to the diffuser. A large jet gives shorter injection time, a small one gives a longer injection time. In this way, the pump flow can be adjusted to the specific engine requirements.
Accelerator pump nozzle: The nozzle in the housing is fixed with a special screw 1, which is accessible from outside the carburetor, which makes it easy to replace during the setup process.
How to make a relay regulator with your own hands?
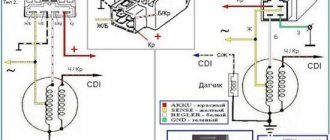
To make a relay regulator with your own hands, you need a diagram and a little knowledge. The model of a homemade regulator is based on the principle of disassembling the generator and outputting a separate end of the wire from ground.
To collect the stabilizer you need:
- disassemble the generator and remove the stator from the engine;
- then you need to unsolder the ground from the generator, solder a separate additional wire for the winding to it and bring it out. This wire will be one end of the winding. The second end is the generator wire;
- After removing the wires, you need to reassemble the generator in reverse order.
With this device, the generator has 2 wires (there should be 3 in total). You can connect the stabilizer according to this scheme:
Do-it-yourself relay-regulator manufacturing diagram
At the end of the process, you need to connect the yellow wire from the old regulator to the “+” terminal in order to obtain a constant voltage on the sides of the network. Check the resulting voltage regulator on the scooter. At this point, the process of creating a homemade device can be considered complete.
The relay regulator is a very useful thing and necessary for the normal operation of the moped. However, it requires attention and constant monitoring of its work. Therefore, if the device fails or its performance is unsatisfactory, it is better to replace it with a new one, the cost of which today ranges from 300 to 500 rubles.
Carburetor overflows: possible reasons
Fuel overflow in the carburetor is a common phenomenon, and certainly causes considerable inconvenience to those motorists or motorcyclists who have suffered from it. Most often, such a “sore” is found on Solex and Azon carburetors, installed on many models of cars from AvtoVAZ and on all fuel supply units for mopeds, motorcycles or lawn mowers.
Of course, there is nothing good in the fact that the carburetor is flooded, but if the problem has overtaken you, then you need to get rid of it. To do this, it is enough to understand the essence of this malfunction, the reasons for its occurrence and methods of elimination. We will talk about this and much more regarding fuel overflow in the carburetor in the article below.
Signs of problems with the fuel level in the carburetor
Before starting to repair any component of a car or other vehicle, it is important to make sure that the problem is caused by a particular component. In the case when the carburetor is flooded, checking the malfunction of this particular unit is very simple - just analyze the behavior of the car and pay attention to some aspects of its functioning. In particular, if there is a problem with fuel supply, the following will be observed:
- difficulty starting the engine, especially with a well-warmed-up engine;
- unstable or high idle speed;
- problems with setting “idles”;
- streams or real puffs of black smoke from the exhaust pipe;
- dips with medium and strong pressure on the gas pedal; .
Note that such symptoms are also observed when fuel is overflowed from the carburetor of a chainsaw, a motorcycle, a moped, a car, and even on a walk-behind tractor. However, in units with a small and, as a rule, parallel fuel system, such as a multicultivator, moped or scooter, another sign is also observed - the presence of gasoline in the air filter. If such a symptom occurs, then we can guarantee that the carburetor is overflowing and requires taking some measures.
Causes of overflow
Let’s say that there is no doubt that the carburetor began to pour gasoline mercilessly. What to do next? First of all, it is important to determine the cause of the problem. By answering the question “Why is the carburetor flooding?”, any vehicle owner will be able to fix the problem on their own. Often the cause of such a breakdown is one of the following:
- There is a malfunction in the needle valve. A similar “sore” often affects the carburetor on a moped and similar components on a trimmer or similar devices. A malfunction of the needle valve often occurs due to its loss of a sealed state, in which it promptly and completely closes the fuel channels, thereby dosing its supply. If the valve is heavily worn or “stuck” in the open position, gasoline overflows cannot be avoided. This unit can be checked for correct functioning by supplying discharged air to it; during normal operation, the needle should stably close the fuel paths and not allow air to pass through;
- The float in the float chamber is either leaking or touching the walls of the carburetor. The owner of any carburetor unit is not insured against this kind of problem. You can check the normality of the float by removing the float chamber cover and conducting a detailed inspection of the unit;
- The level in the float chamber has increased or the one that was present all the time has ceased to be relevant. This often happens when a motorcycle, moped or car has had a faulty component for a long time that increases fuel consumption. The part has been replaced or successfully repaired, but gasoline continues to be supplied in the same quantities. As a result, it turns out that the carburetor is “flowing”. Checking for the presence of such a problem is carried out exclusively by an empirical method, that is, by “playing” with the fuel level in the float chamber;
- The fuel pump is faulty. Perhaps this is also a problem from which it is impossible to insure yourself. It appears for only one reason - the fuel pump has failed due to some of its elements. In such a situation, all that remains is to disassemble, inspect and repair the broken part;
- The check valve that returns gasoline to the fuel line when there is overflow in the float chamber has broken down. Relevant for any Solex carburetor and similar components. You can check for a problem with the “return” by disassembling it, visually inspecting it, and blowing it with compressed air. If such manipulations do not correct the situation and no other problems are observed, then you should think about replacing the check valve.
Signs that a check is needed
If difficulties arise with starting the engine and in a number of other situations, it is necessary to be able to check the functionality of the starting enrichment. Thoughts about a malfunction of the solenoid valve may arise in different cases.
Let's take a closer look at the main reasons:
- the first morning start of a cold scooter engine is problematic;
- it is difficult to start a cooled scooter engine after a long stay;
- fuel consumption significantly exceeds the consumption indicated in the passport;
- The scooter's power unit is quite unstable at idle;
- a warm engine does not maintain speed, and a cold engine functions intermittently.
A faulty enrichment device can be in two positions:
- with the solenoid valve needle constantly extended;
- in the initial state, when the needle does not protrude.
It is necessary to be able to check the functionality of the starting enrichment if difficulties arise with starting the engine. Each case has a different effect on the operation of the motor. The first situation makes it difficult to start the engine of a cold scooter. An attempt to start the engine by pressing the kickstarter, as well as starting with an electric starter, are unsuccessful. In the second case, the engine starts without problems, but during operation it consumes an increased amount of gasoline. Increased fuel consumption is associated with engine operation on a highly enriched mixture.
Starting enrichment on a 4t scooter - description and purpose
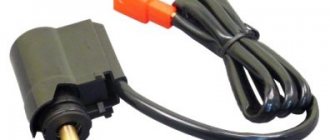
Not all motorcycle enthusiasts know what an electric valve on a scooter is for. This device is also called a starting enricher. It is responsible for the volume of the air-fuel mixture, which fills the cylinder chamber through a nozzle when starting a cooled scooter engine. A feature of small-capacity motorcycles is the engine’s need for a rich mixture during a cold start of the scooter engine. The fuel entering through the carburetor is mixed with air in a certain concentration thanks to an electric valve connected to the carburetor.
The starting enricher is responsible for the volume of the air-fuel mixture
If the starting enrichment is functioning and there are no breakdowns of the power unit, starting the engine is not a problem even in the cold season. There is no doubt about the importance of the electric valve in ensuring trouble-free starting of the engines of modern mopeds and scooters. However, if difficulties arise with starting the engine, interruptions in operation and excessive power consumption of the engine, it can be assumed that problems have arisen with the starting enrichment. That is why it is important to know its structure and be able to check its functionality.
How to check the starter enrichment of a scooter for serviceability
https://youtube.com/watch?v=X_qyxX-ylfI
The importance of starting enrichment on modern scooters and mopeds has been discussed many times. Today we will not delve into the intricacies of the design and details of the purpose of the enrichment; we will look at this in another article. Today we will just determine how to properly check the starting enrichment for serviceability, what methods this can be done and whether it is necessary to check the enrichment in specific situations, because the cause of a certain malfunction may be completely different. So, what should make you think that your starting concentrator is faulty
Let's look at the main reasons:
The scooter is difficult to start in the morning; The scooter is difficult to start after parking; The scooter consumes an excessive amount of gasoline; The scooter does not idle;
After warming up it works normally, but when cold it works with significant interruptions.
These points may indicate a faulty starting enrichment.
The enrichment malfunction also has two positions: when the solenoid valve is constantly in the extended needle position (1) or in the initial position of a cold engine - that is, when the needle is constantly retracted (2).
Both cases have completely different consequences for engine performance. In the first case, the scooter does not start when cold, several kick movements do not produce results, and the scooter does not start with the wiper. In the second case, the scooter starts up normally, but consumes a lot of gasoline and constantly operates in a rich mixture mode, with consequences arising from this.
It’s very easy to check whether the starting enrichment system works on your scooter; let’s start with the basics: Let’s check whether the solenoid valve needle closes the enrichment channel. After starting the engine, when cold, the idle speed of the engine should be slightly increased, and then gradually decrease to the desired level. If this phenomenon occurs consistently for you, then the starting enrichment is working and there is no need to disturb it anymore. If the scooter starts normally, but the idle speed does not decrease after warming up, remaining at a constantly high level, you should think about a possible breakdown of the starting enrichment and, of course, check it.
If the scooter starts after a long and exhausting use of the kickstarter, but the compression is normal, the carburetor is clean, and the fuel level in the float chamber is in the correct position, you should also think about a faulty starting enrichment and check it.
So, how to check the starter enrichment of a scooter for serviceability. To do this, disconnect the power supply to the enricher from the scooter's electrical network, unscrew the attachment of the enrichment to the carburetor and remove it.
Prepare two small wires with insulation. Bare the ends of the wires by connecting them on one side to the battery terminals. Make sure that the bare ends of the wire on the other side do not touch. Next, apply 12 volts to the enricher from the scooter battery, and the polarity, as a rule, does not matter
It is important to carefully connect the wires to the connectors in the chip that you disconnected from the scooter's electrical network. You can first connect the wires to the chip, and then connect to the battery, it will be even easier
After this, after 1-2 minutes, the needle will begin to gradually move out of the body of the enrichment agent, this can be seen with the naked eye. If this is difficult to determine, you can measure the length before and after applying voltage.
If even after 5 minutes have passed after applying voltage, the needle remains motionless, then the enrichment device is faulty or has defects in the wiring.
If the wiring is intact, then the solenoid valve must be replaced with a new one. Fortunately, the price of a new starting enrichment for a scooter ranges around 6-8 dollars. Naturally, they are different for each model of scooter and when purchasing you need to take it with you or check with the seller whether the spare part belongs to a certain brand and model of the scooter.
In this article, we learned how to check the starting enrichment of a scooter for serviceability. If you have any difficulties in repairing a scooter, you can always use the comments field or on the site forum. Good luck with the renovation!
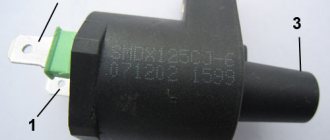
The principle of operation of the scooter carburetor solenoid valve
When the engine is cold, the valve with the spool needle 6 is raised as high as possible (open). The needle opens the fuel supply channel, and the flap opens the air supply hole. At the first engine revolutions, a vacuum is created in the emulsion channel and gasoline located in chamber 7 is sucked into the engine through channel A, causing a strong enrichment of the mixture and facilitating the first flashes in the engine. After the engine has started, but has not yet warmed up, it still needs a rich mixture. The enricher works like a parallel carburetor - gasoline enters it through jet 9, mixes with air and enters the engine.
When the engine is running, alternating current from its generator is always supplied to the contacts of the ceramic heater 2 of the thermoelectric valve of the starting system. Heater 2 warms up drive 3. As the engine and drive warm up, the rod gradually extends by 3 ... 4 mm and drives the damper through pusher 5. Thus, the engine warms up along with the thermoelectric valve, the spool with the needle drops and closes the air and fuel channels, and the mixture gradually becomes leaner. After 3...5 minutes, the damper closes completely and the degree of enrichment of the mixture on a hot engine is regulated only by the carburetor idle system .
When the engine stops heating of the valve stops , the damper drive cools down (the powder is compressed) and under the action of spring 10, pusher 5, rod 4 and damper 6 return to their original position, opening the channels for subsequent start-up. Cooling down and returning to its original position also occurs within a few minutes.
The disadvantage of this type of enrichment is that it operates separately from the engine. For example, very often, especially in warm weather, while the engine is still hot and there is no need to enrich the mixture, the thermoelement is already cooling down. We start the engine and it gets a rich mixture.
Operating principle of the second type of starting enrichment (with a membrane)
When cold, the valve is open . After starting the engine, a vacuum occurs in the manifold and is supplied to the membrane through a thermal valve. As a result of low pressure, the membrane rises and opens a channel for additional air supply. As the cylinder head warms up, the valve closes and the valve with the needle is lowered under the action of a spring, cutting off the additional fuel supply.
With this design principle, the connection with the actual engine temperature is maintained, and fuel dosage is carried out more correctly.
Source: skuterov.ru
Troubleshooting
Malfunctions of electrical equipment and fuel systems are the most regular of all problems that arise among scooter owners.
It often happens that a breakdown suddenly occurs to the scooter. Repairing the carburetor, as a rule, allows you to resume the functioning of your “faithful horse”.
Usually, to do this, it is enough to remove the carburetor, clean the dust from the outside and the tarry deposits of gasoline and other debris inside. Clean and blow out the air and fuel channels and jets, check the condition of the fuel needle and throttle valve, and then reassemble and adjust it.
Fixing more complex breakdowns at home is not always possible, since specific tools are often required that are not widely available.
Thus, for a technically literate person, repairing a scooter with your own hands will not be very difficult if you have minimal knowledge and skills in handling equipment, as well as the necessary tools.
Signs that a check is needed
If the battery on your scooter often runs out, and it is still quite new, this means that there is a problem with the operation of the relay regulator. As practice shows, it burns out quite often. If the device is faulty, the battery stops charging completely and loses its capacity. This means you won’t be able to start the scooter with a button; you’ll have to start it with a kickstarter.
Another characteristic sign of incorrect operation of the device may be the frequent burnout of incandescent light bulbs. They themselves are durable and have a good durability, but are quite sensitive to voltage changes. This happens because the optimal voltage in the scooter network is considered to be 12-13 V. Increasing this value even by 2 V reduces the service life of electronics and components by 2 times.
Signs of a malfunctioning regulator are identical for all models of Chinese scooters. They are especially typical for charging relays for scooters of Chinese models with an engine capacity of 50 cc. Therefore, before making a decision to replace something in electronics, testing systems and devices should begin with the relay regulator.
For all models of Chinese scooters, the symptoms of a malfunction of the regulator are identical.
Design and principle of operation of the starting enrichment
An integral part of every scooter (motorcycle, car, etc.) is a starting enrichment. What is a starting enrichment? The fact is that while the engine is cold, an enriched fuel mixture is required to start it successfully. The starting enricher supplies additional gasoline and air to the engine until it warms up.
Most scooters have an automatic enrichment device. We start the scooter and don't suspect or worry about anything, we just sit down and eat. On some scooters, the enricher is controlled by a separate lever on the steering wheel. While the engine is cold, we move the lever to the enrichment position, and as it warms up, we return it back, thereby stopping the enrichment.
To more fully understand the operation of the enricher, first familiarize yourself with the principle of operation of the carburetor
In the figure we consider the principle of mixture enrichment. The engine is cold. The valve with the spool needle is raised as high as possible. The needle opens the fuel supply channel, and the flap opens the air supply hole:
Next, the mixture of air and fuel is supplied through channel 1 to the manifold and then to the engine. As it warms up, the spool with the needle lowers and closes the air and fuel channels:
Let's look at the design of the most common automatic enrichment machine. The bulk of them are built on the basis of powder, which expands when heated. The powder is placed in a chamber around which a heating element is placed. It is powered by a generator or battery. The lower part of the vessel is connected through a rod to the spool and needle of the additional fuel supply system. When heated, the powder expands, and the needle with the spool begins to extend as shown in the figure, thereby stopping the supply of the fuel mixture. When we turn off the ignition, the voltage on the heating element disappears and the powder, cooling, shrinks again.
The time until the additional fuel supply is completely shut off can vary within fairly wide limits. On average from 2 to 7 minutes. This depends on the ambient temperature, the voltage at the heater terminals, and the characteristics of the device itself.
The disadvantage of this type of enrichment is that it operates separately from the engine. For example, very often, especially in warm weather, while the engine is still hot and there is no need to enrich the mixture, the thermoelement is already cooling down. We start the engine and it gets a rich mixture.
The second type of enrichment does not have this drawback, but is more complex in design, and was used mainly on scooters of the 80s. They were equipped with the Honda Lead 50 and 80SS scooters, Yamaha Salient, Honda Tact and some others. Instead of a powder with a heating element, a membrane is used. One cavity of the flask, where it is located, is connected through a thermal valve to the intake manifold, which is mounted on the cylinder head. When cold, the valve is open. After starting the engine, a vacuum occurs in the manifold and is supplied to the membrane through a thermal valve. As a result of low pressure, the membrane rises and opens a channel for additional air supply. As the cylinder head warms up, the valve closes and the valve with the needle is lowered under the action of a spring, cutting off the additional fuel supply. With this design principle, the connection with the actual engine temperature is maintained, and fuel dosage is carried out more correctly.
The last type of enrichment is manual. The simplest and most reliable. The flap and needle are connected to the lever on the steering wheel using a cable. The adjustment is made by hand, which is not entirely convenient. But with some experience, it is possible to dose the enrichment more accurately, thereby reducing fuel consumption. And of course, reliability; such systems rarely fail.
How does an electric valve work on a scooter?
To enrich the fuel-air mixture, a fuel enrichment device with a mechanical drive and an automatic control system is used. Let us consider the operating principle and features of each of these enrichment systems.
Manual
The manual enrichment system, which requires precise adjustment, is inconvenient to use. To start the scooter engine after parking overnight, you need to press the lever on the steering wheel, which transmits force through the cable to the pusher. After the power unit starts, warms up and reaches operating temperature, it is necessary to return the manual enrichment lever so that the volume control flap and needle return to their original position. As experience in operating scooters shows, such a system has a number of inconveniences.
Most models of modern mopeds are equipped with an automatic starting enrichment
Auto
An automatic type start-up enricher, called a thermoelectric valve, is installed in most models of modern mopeds with two-stroke and four-stroke engines.
The device consists of the following parts:
- housing in which the solenoid valve is located;
- ceramic heater powered from the on-board network;
- spring-loaded drive with a rod connected to a pusher and a valve.
The device is connected to an air channel that saturates gasoline from an additional float chamber before feeding it into the combustion chamber of the cylinder. One feature of scooter carburetors should be noted. They have two float chambers - additional and main, connected to each other by a starting jet.
A small tubular channel from the additional float chamber is connected to the mixing chamber, which is responsible for supplying air with gasoline to the engine. The cross-section of the mixing chamber is blocked by a valve, structurally similar to the throttle valve in a carburetor. Lowering the damper causes the spring-loaded needle to move, closing the fuel supply channel. The solenoid valve body is thermally insulated and located in a rubber boot. All modern scooters have a similar thermoelectric valve design.
Old scooter models are equipped with a starting enrichment without electric heating
Older scooter models are equipped with a starting enricher without electrical heating. The transfer of thermal energy to the drive is carried out thanks to a copper heat-conducting cylinder connected to the scooter motor. Instead of a powder drive, a membrane drive is installed. In this case, the intake manifold of the cylinder head is connected to one cavity of the bulb.
Troubleshooting
The first and main sign that the equipment needs repair is the inability to start the engine. Scooter repair begins with identifying the fault and then eliminating it. In this case, the breakdown must be looked for starting from the place where the thermal energy of the burnt fuel is converted into mechanical energy of the rotating crankshaft of the engine. So let's get started:
— determine whether fuel enters the combustion chamber,
— is there a spark between the spark plug contacts?
If all of the above factors are present, then the following malfunctions are possible:
1. There was a breakdown of the spark plug insulator. To do this, simply replace the spark plug.
2. The ignition timing is off, and the fuel mixture does not ignite at the moment when the piston almost reaches its top dead center (TDC). Here you can no longer do without an indicator, with the help of which the position of the piston in the cylinder relative to TDC is determined, and at what moment a spark appears on the spark plug, igniting the fuel mixture. In this case, repairing the scooter will consist of setting the correct ignition timing recommended for this type of engine.
If there is no spark at the spark plug, then the following problems may occur:
1. The spark plug is faulty.
2. The candle holder is faulty.
3. The armored wire is broken.
4. The ignition coil has burned out.
5. If the ignition is electronic, then either the ignition unit or only the Hall sensor may be damaged.
If the fuel mixture does not enter the combustion chamber, this may be caused by such problems.
If the scooter is two-stroke:
1. fuel filter clogged;
2. The carburetor is clogged or broken.
If it is a four-stroke engine, then a malfunction of the gas distribution system (burnouts or bent valves) may be added to the breakdowns.
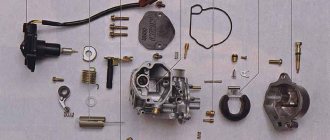
Adjusting the carburetor Honda Dio 27
The carburetor is a unit whose importance cannot be overestimated.
Since it is in the carburetor that gasoline is mixed with air and, thus, a fuel mixture is formed before it is directly supplied to the scooter cylinder. The quality and correct composition of the fuel mixture determines fuel consumption, wear of the cylinder-piston group and spark plugs, maximum speed and dynamics of the scooter, and much more. This is why it is so important to take a responsible and comprehensive approach to setting up the carburetor. A properly adjusted carburetor will ensure stable, reliable and productive engine operation, as well as make driving comfortable and safe. Unfortunately, scooter riders often, due to ignorance or lack of experience, underestimate the importance of comprehensive carburetor tuning. For example, there is an extremely widespread misconception that adjusting the degree of richness of the mixture only means adjusting the quality screw on the carburetor. In fact, this setting allows you to achieve the correct mixture only at idle and low speeds. At the same time, at medium and high speeds the proportions of the fuel mixture can be completely disrupted. Let's figure out how to properly configure the carburetor. Before proceeding directly to adjusting the carburetor, you need to make sure that such adjustment is necessary. There are several sure signs that will help you understand whether the mixture is over-rich or, on the contrary, it is too lean. For different engine operating modes, these signs are slightly different.
Carburetor adjustment at idle and low speed
You can determine a lean mixture at low and idle speeds by the following signs:
- The scooter is hard to start and keeps trying to stall.
- Turning the throttle does not lead to the expected level of increase in speed. Information content is extremely low
- When the throttle valve is opened very sharply, the carburetor begins to make characteristic popping noises.
- The surest and most reliable sign: with a lean mixture, the spark plug will remain white, even after prolonged operation.
A too rich mixture at low speeds also has several characteristic signs:
- Rough, floating engine idle
- Significant increase in fuel consumption compared to the parameters specified by the manufacturer
- The spark plug will be a pronounced black color with noticeable carbon deposits, since the fuel mixture simply does not burn out in the cylinder.
If you notice the presence of one of these groups of symptoms on your scooter, then the quality of the mixture and idle speed need to be adjusted. This is done quite simply, using adjustment screws.
The vast majority of scooter carburetors have two of these screws. One is responsible for the quality of the mixture, and the other for the number of crankshaft revolutions at idle. When the quality screw is tightened, more gasoline is added to the fuel mixture and, accordingly, it is enriched. And, conversely, when this screw is unscrewed, the mixture becomes leaner. As for the quantity screw, by tightening it you increase the idle speed, and by unscrewing it, on the contrary, you decrease it.
Correct carburetor tuning at idle is achieved by setting the optimal ratio between the quality of the fuel mixture and the number of revolutions. In order for the scooter engine to work correctly, you must first tighten the quality screw as much as possible with the engine turned off, and then turn it one and a half to two turns. This value is considered the best for most types of engines, although it should be said that the optimal value may vary depending on the degree of engine wear and other factors.
After you have set the quality screw to the desired position, you need to start the scooter and use the speed screw to find the point at which the idle speed will be the smoothest.
Adjusting the carburetor at medium speeds
Having achieved normal engine operation at low and idle speeds, proceed to adjusting the carburetor at medium engine speeds. In general, the signs of a too lean and too rich mixture for medium and low speeds are the same, so we will not list them again.
It is important to understand that the quality screw has virtually no effect on the fuel mixture in the average engine operating mode. Here, the throttle needle located in the throttle valve is used for adjustment. Usually it can be moved up and down. Most scooters have five needle positions. In the stock version, the needle is at a medium value. When the needle is raised up, the mixture at medium speeds becomes richer, and vice versa, if the needle is lowered, the mixture becomes poorer.
Carburetor adjustment at high speeds
Adjusting the quality of the mixture at high engine speeds (with the throttle fully open) is possible only by selecting the size of the main jet. If the engine does not have enough fuel (lean mixture), then a larger nozzle should be installed, and vice versa, if the mixture is too rich, a smaller nozzle should be installed. The size of the jet is usually stamped right on it. Of course, replacing the jet is a procedure that requires certain labor costs, and therefore it is worth doing it only if it is really necessary. Here are the signs to look out for.
Starting Electric Scooter Fuel Enhancer
To ensure the start of a cold scooter engine, a rich fuel mixture is necessary, that is, if the optimal ratio of gasoline and air in the mixture is 1:15, then at the time of starting a cold engine, the amount of gasoline in the mixture should be greater. This is due to the fact that cold gasoline evaporates worse, and its ignition in the combustion chamber is more difficult. A larger amount of gasoline allows you to get more vapors, as a result of which the engine starts normally.
On old motorcycles, when starting a cold engine, the air damper was covered or completely buried, thus enriching the mixture. After starting the engine and warming it up, the damper was opened, the mixture became normal, and the engine began to operate as usual.
On modern technology, including scooters, the process of enriching the mixture when starting a cold engine is fully automated, thanks to a device such as a starting electric enricher, or, as scooterists often call it, a carburetor electric valve, and it is installed directly on the carburetor.
The principle of operation of the enrichment
Inside its plastic body there is an electric heating element through which electric current begins to flow as soon as the scooter's motor starts running. At this moment, the thermal element begins to heat up, and from its heat the capsule with a special composition is heated, which expands as the temperature rises and pushes out the enrichment needle.
When the current flow to the heating element of the enrichment unit stops, the capsule cools down and the needle rises to the upper position.
When starting a cold engine, the scooter's generator begins to produce current, and at the same moment the thermoelement of the enrichment begins to heat up, receiving current from the generator. Until the enrichment needle drops to the bottom position, the channel in the carburetor remains open for an additional portion of gasoline entering the engine, this makes it easy to start a cold engine.
But the engine should not constantly run on a rich mixture, if only because this will lead to excessive fuel consumption. In fact, with an enriched mixture, the scooter motor only works for the first few minutes, because after the motor starts working, the heating element of the enrichment heats up more and more (after all, the generator is running and current is supplied to the heating element), the needle of the enrichment gradually lowers, and blocks the path to the additional flow of gasoline, as a result of which the fuel mixture acquires a normal composition.
From this moment on, the motor can operate normally. In turn, after the engine stops, the generator stops producing current, the enricher thermoelement stops heating, it cools down, the needle rises to the upper position, and now, when starting, the enriched mixture will again be supplied to the cylinder.
Concentrator check
You can be sure that the enrichment is working normally if, when starting a cold engine, it first runs at high speeds, and then, after one to two minutes, the speed drops to idle.
You can also check the enricher by removing it from the carburetor and connecting its contacts directly to the battery terminals (the polarity in this case is not important). If, when the enrichment is heated, its needle gradually begins to move out, then the enrichment is working.
Faulty enrichers are usually replaced with new ones, but when selecting, it must be taken into account that the enricher must exactly match the carburetor installed on the engine.
Source: www.50kubovihyjskuter.ru
How to check PP with a multimeter on a moped?
The relay regulator on a Chinese scooter is checked using a multimeter with a voltmeter function. For this purpose, a simple DT-830 (or equivalent) is usually used. It is better to carry out diagnostics and measurement of output voltage with the device removed.
Verification algorithm:
- You need to unscrew the fairing with the central phase and find on the frame a device with 4 wires: red, green, yellow and white.
- Then start the scooter and check the voltage at idle: measure it between the green and red wires, setting the multimeter to the maximum value of 20 V.
- If the multimeter display shows a figure of 14.6-14.8 V, this is normal. For stabilizers on Chinese mopeds, this is the operating standard voltage. If at idle the multimeter shows a value of 15-16 V, this is a high voltage indicator. This indicates a malfunction of the relay regulator.
- Then you need to check the voltage supplied to the lighting lamps. An alternating voltage is supplied to the central low beam (high beam) lamp, so the multimeter should be switched to the alternating current measurement mode with a parameter of 20 V.
- Next, we measure the voltage between the green and yellow wires (green is the general electrical network of the moped). If the multimeter shows a network voltage of up to 12 V, then the electrical appliances are operating without additional load.
- If at idle this value is 16 V or higher, and with a sharp increase in engine speed it jumps to 25 V, the device does not stabilize the voltage and, therefore, does not work. With such readings, the device must be replaced with a new one.
Using a multimeter, they check the relay regulator on a Chinese scooter.
In order to make a measurement, you need to:
- switch the device to the “KiloOhm” mode and remove the regulator;
- then place the probes on the first pair of terminals (AB). The tester should show a value of no more than 18 kOhm;
- after that, we change the position of the probes on the terminals in the opposite direction (VA) and measure the voltage again - the arrow on the device should show 0;
- then we install the probes on the next pair of terminals (SD) and measure the readings on this pair;
- swap the probes (DS) and measure the indicator again;
- the remaining measurements have no contact and are not checked. The indicator when checking them should be zero.
In this way, regulators are tested on popular Japanese models with small engine volumes from brands such as Honda (Leard, Dio, Tact), Suzuki, Yamaha.
Replacing a faulty relay regulator on a scooter is not difficult.
How to reduce fuel consumption on a scooter?
Basic rules for economical operation of a scooter:
- Avoid aggressive driving with sudden acceleration and braking;
- maintain an average cruising speed of no higher than 50 km/h;
- the weight of the driver, equipment and luggage should not exceed the values specified in the technical specifications.
22 Dec
2012 Interesting materials:
What is an apostrophe used for? What is potassium hydroxide used for? What is confiture used for? What is lactic acid used for? What is oleum used for? What are vector graphics used for? What are telescopes used for when observing the Moon and planets? Why is nicotinic acid injected intramuscularly? Why are Cane Corso ears cropped? What can peat be used for?
Application area:
- Medical institutions - prevention of iodine deficiency
- Municipal children's institutions, including: kindergartens, schools, boarding schools for mentally retarded children, orphanages, health schools - prevention of iodine deficiency, combating delayed mental and physical development.
- Private schools and kindergartens - prevention
- Private sanatoriums - prevention
- Sports schools
- Large hotels in Moscow - increasing hotel ratings
- Commercial enterprises – increasing staff efficiency
- Fitness centers
- Transnational companies in the region – increasing the physical and intellectual performance of employees
- Private cottages
- Private clients - with thyroid diseases, pregnant women, parents of frequently ill children, people suffering from various bronchopulmonary diseases, allergy sufferers, parents of newborn children, elderly people.
Troubleshooting
What to do if the hoverboard does not charge? Here are some simple tips for troubleshooting:
- First, disassemble the hoverboard.
To remove the bottom panel, use a screwdriver or screwdriver with the appropriate bit. This will allow you to get to the inside of the vehicle and try to find the problem of poor charging.
The side of the scooter with the charging port is the area you need to work on. Be careful during disassembly. Do not lose screws or washers, or use a drill to remove screws or bolts that will not come loose. There will be several wires directly on the inside of the plastic cover you just unscrewed.
They are responsible for charging the hoverboard: they connect the charger ports and the lithium-ion battery. The other wire line goes to the motherboard. You can temporarily disconnect it to avoid an unexpected power surge (only if the board is disconnected by a connector). If the wires are soldered, it is better not to touch them.
Is there blackening of the wire or oxidation of the contacts, is there a large amount of dust present? This may well be the reason for the device to not work correctly. Accumulations of dust must be removed, damaged wires must be replaced, and contacts must be cleaned to a metallic shine.
Having completed such an impromptu diagnosis, screw the cover back to the hoverboard, tightening all the removed bolts one by one.
They will help you make diagnostics more efficiently and without risk to the scooter. True, it is no longer free.
If, despite all this, your scooter continues to work incorrectly, you will need to contact the manufacturer and request repair instructions. In the worst case, the hoverboard will have to be sent back to the manufacturer under warranty. It may be that the device was initially faulty and will be replaced under warranty. It often happens that a newly purchased hoverboard does not charge.
More detailed diagnostics
To avoid problems with the moped and be completely confident in the serviceability of the scooter, you need to conduct a more complete check. One of the main characteristics of a working scooter motor is normal compression. More on this indicator of the condition of the piston group later.
Scooter compression check
- Unscrew the spark plug (at the same time assess its condition)
- Screw the compression gauge tightly into the spark plug hole
- We press the kickstarter lever several times, thereby creating pressure in the piston
Attention! During diagnostics, you should not try to start the scooter engine using an electric starter.