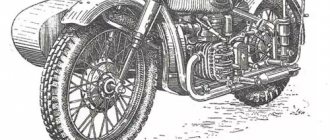
A Ural motorcycle has been in the garage since 1998. The motorcycle is separate, the engine is separate, the gearbox is in a completely different corner. I spent my entire childhood on this motorcycle, after buying a car, they forgot about it. And so I decided to restore it...
First, it was decided to deal with the engine, since, according to the owner, the crankshaft was knocking. Therefore, we immediately began disassembling the engine.
Removing the cylinders
I removed the heads, checked the piston clearances in the cylinders, everything was fine, only the right cylinder had a rusty emulsion - apparently moisture had gotten in. But fortunately the cylinder mirror was not damaged.
I checked the gaps on the fingers - everything is within normal limits. I pressed out the fingers, marked where the right and left parts of the cylinders were and put them aside.
Removing the clutch
Then I started disassembling the clutch to remove the flywheel. A simple screwdriver and hammer blows were not enough to unscrew the screws the first time. There is no point in buying an impact screwdriver just for one use. I turned on my ingenuity. And so he pressed the engine from the frontal side into the opening of the garage door, and pressed the screwdriver to the bolt with the help of a block and a jack, and with a gas wrench tore off the metal beads. And then everything opened without problems. I removed the clutch and started disassembling the frontal part, since I didn’t have a 36mm socket wrench on hand to unscrew the flywheel.
Removing the timing belt
In the frontal part, everything is disassembled simply, the cover is unscrewed, the ignition is removed, the ignition coil is removed, then the windshield is unscrewed. I unscrewed the two bolts that hold the camshaft and placed two mounting brackets under the camshaft gear using rags. And he pulled out the camshaft and gear. Upon inspection, no wear was found in the timing gears. The bearing is also in excellent condition. I secured the pushers with electrical tape to prevent them from falling into the crankcase and getting tangled.
Then I went to a friend and took from him a three-legged puller and a 36mm socket wrench. I unscrewed the bolts that hold the crankshaft main bearing in place at the front. And as in the video, I decided to grab the pressure washer with the puller, since the puller’s legs do not fit under the gear. The result is that the gear is removed, the pressure washer is bent and torn. Conclusion, it was necessary to tie steel wire around the gear and pull it. It will be a lesson for the future.
Removing the flywheel
After disassembling the timing belt, I started working on the flywheel. For the flywheel, you need a wrench so that the working edge is straight away, and not, like most heads, slightly recessed, since the flywheel bolt has thin edges. To fix the flywheel, I used a 12mm wrench and inserted one end into the clutch bolt and the other into the stud securing the box to the engine. I’ll say right away that it’s better not to do this, since I bent the pin. It’s better to take a 19-size open-end wrench, insert one end into the hole in the flywheel, and the other into the rod that you need to insert the lugs for attaching the engine to the frame. This is what was done when assembling the flywheel.
When I unscrewed the flywheel bolt, I pulled off the flywheel using a puller. Next, unscrewing the 9 bolts that hold the rear main bearing cover in place, I used the same puller to remove the cover itself. And now the reason for the knocking crankshaft was discovered - the main bearing separator had crumbled.
Removing the crankshaft
To remove the crankshaft, you need to remove the oil pump. To do this, I drained the oil and unscrewed the pan. I unscrewed the top cover of the oil pump and took out the gear. From the bottom of the pan, I removed the pump mesh and unscrewed it and removed it along with the rod, which will not allow the crankshaft to be removed.
Using a wooden mandrel and a hammer, I removed the front main bearing. To do this, the engine was placed on the floor with its back side. I placed a wooden mandrel against the front shank of the crankshaft and, using gentle and gentle blows of a hammer on the mandrel, knocked out the crankshaft from the front main bearing.
Next, to pull the crankshaft out of the engine, I took it by two connecting rods and put it in the position in which the connecting rods are at bottom dead center, then after twisting it a little inside, I pulled it out through the rear cover, and put it in place in the reverse order.
I cleaned the front crankshaft oil catcher of slag with steel wire, and I removed almost the entire main bearing cage from the rear oil catcher. The crankshaft itself had no wear above normal. I washed the inside of the engine with solarium to remove any chips that had formed during operation.
Ural motorcycle engine assembly
I found 207 bearings and assembly began. The first thing I did was put the crankshaft inside, I can’t explain exactly how it gets there, well, a few manipulations and it’s there. It didn’t work the first time, because I didn’t move the connecting rods correctly, and the right connecting rod ended up in the left window, and the left one in the right, so I had to pull it out again and put it back in place.
Then, heating the main bearings with a gas burner, I installed them in place. They finally fall into place when you install the pressure washer on the front (I replaced it with a new one, I did not restore the old one). And on the back is the back cover. To do this, they are first seated with long bolts, and then the original bolts are put in their place. I installed the back cover with sealant so that I wouldn’t have to worry about cutting out a new gasket.
When assembling the back cover, while tightening one of the bolts, it broke off. I had to drill a hole in the broken bolt. I tried to unscrew it first, but it didn't work, so I drilled the hole larger and cut a new thread. In the future, these bolts need to be replaced with new ones, as they tend to break off when tightened.
After that, I installed the timing gears, don’t forget about the lock washers. I did not use thread locker, but pinned the bolts with wire. Since this is my first time assembling and disassembling a Ural engine, I suddenly have to disassemble it again.
The timing gears are placed strictly according to the mark. Next, the breather is installed, the windshield is on top, and I bolt it on. I install the ignition in place, approximately according to the marks where it was. After that, I installed the rear main bearing seal. I installed it at the last moment, only after everything was assembled and checked. In order not to disassemble it again, rubber products do not like this.
I took the oil seal from a repair kit purchased back in the “dashing 90s”, it’s good that it was preserved.
Reinstalled the oil pump. Installed the flywheel and tightened it. Reassembled the clutch. Since there were no long bolts or studs on hand, in order to install the clutch as per the book, I had to press on the discs with my knee and tighten them with the original bolts “cross to cross”. This suggests once again that Soviet equipment can be repaired in the field.
I installed the pistons and cylinders, and mounted the engine on the motorcycle frame. The iron bushings on the engine mounting studs should be on the left. I started to put the box down, but at first it didn’t fit. After the first presses on the kickstarter, the clutch discs clicked, the gearbox shaft entered both discs and the box fell into place. And they started dancing with a tambourine to get him going.
Restoring a motorcycle Ural tuning
Many motorcycle owners take up the task of remaking their iron horses, trying to give them individuality. At the same time, the final result obtained due to the changes made is not always satisfactory. A striking example of this is the legendary Ural motorcycle, tuning of which is associated with certain difficulties. Due to the significant prices for components, such an operation will cost more than, for example, tuning an IZH 5 Jupiter.
A little history
The products of the Irbit Motorcycle Plant are well known not only in our country. Various models, whose design originates from the pre-war BMW R71, have retained their parental genes for seventy years. True, the prefix “Ural” appeared in their name a little later. Since 1961, it has been assigned to the following modifications:
- M-62 (1961 – 1963).
- M-63 (1963 - 1971) - this was the so-called Ural-2.
- M-66 (1973 – 1975) received the Ural-3 marking.
Next, it was decided to limit ourselves to the name Ural, removing the additional digital index and leaving only the factory designation.
- M-67 (1973 – 1976).
- M-67-36 (1976 – 1983).
- IMZ-8 (this model has been produced since 1985 and has many different versions).
And this is not counting special versions and limited editions. But in the process of tuning a motorcycle, any of the listed modifications have a lot in common. Despite the changes in the name, all models are similar in design and have similar technical characteristics.
Tuning or restoration?
Remaking new equipment is not very justified financially. It is cheaper to purchase a used, or even broken, copy, and first restore it. If you get your hands on a rare Ural motorcycle, restoration and repair of the rarity will bring greater dividends than the most advanced tuning. After all, in this way we restore and bring history itself back to life.
If the model is ordinary, then there will be nothing wrong with turning an ordinary Ural into a tuned one. In any case, the first step will be to restore the Ural motorcycle to working condition.
Ural motorcycle engine assembly
After the repair, assembly should be carried out based on the diagram described above; it is carried out in the reverse order. Please note that not only the repair itself, but also the accuracy of assembly affects the reliability of the motor. Owners often complain that the engine performs even worse than before the repair, forgetting that the reason for this behavior of the engine was precisely poor-quality repairs.
After the engine is assembled, check the ignition adjustments, carburetor settings and valve clearances. If everything is in order, you can start the engine and make adjustments to the settings at idle and while driving. Don't forget that new parts should be run in. Properly worn parts are less likely to fail during the season. If everything was done correctly, then the repair of the Ural motorcycle will pleasantly surprise you, first of all, with improved acceleration, gas response and maximum speed.
Choosing a case that suits your needs
Having set the goal of tuning a Ural motorcycle with your own hands, it is important to understand that there are modifications that are relatively painless and do not require documentary evidence to register the vehicle and undergo a technical inspection.
And there are changes that, in order not to conflict with the law, must be agreed upon with the manufacturer or other regulatory authorities. Based on this, tuning for a Ural motorcycle should be divided into two categories:
- Painless, after which there will be no additional paper problems.
- Complex, ideally requiring official paper approval.
We will consider each of these categories separately.
Reasons for repair
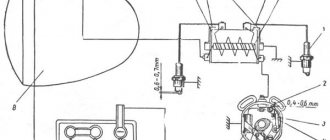
The most popular reason to repair a Ural motorcycle is considered to be insufficient dynamics of the motorcycle, smoke from the muffler, loss of traction at high speeds, and a decrease in maximum speed. Reasons that even inexperienced riders can note include increased fuel and oil consumption. If such problems appear, there is no need to disassemble the engine right away; first you should check the ignition, then the carburetor settings, measure the compression and check the valve adjustment, and after eliminating all other problems, you should get into the engine and repair the Ural motorcycle engine.
You might be interested in how to tune a Ural motorcycle. A detailed description of possible directions for tuning a bike!
More experienced owners may suspect a problem by the sound of the engine. Specific noise reveals a number of problems that are determined with high accuracy.
There are also a number of reasons to repair the engine that are not related to its breakdown. For example, the engine can be rebuilt during a long period of inactivity, during restoration, after a long mileage, and so on.
Painless changes
You should not assume that any painless tuning for a Ural motorcycle will be easy to do. But, as they say, hunting is worse than bondage. For clarity, we will divide possible alterations into external and internal. The external ones are aimed at correcting the veteran’s appearance, while the internal ones will affect his driving performance and technical characteristics.
Appearance correction
Classic shapes, characteristic of all models without changing, go well with an abundance of chrome parts. Since chromium has good anti-corrosion resistance, it is not forbidden to use it even in the most unexpected places. After this processing, many details will look good:
- Front and rear wings.
- Fuel tank.
- Side panels.
- Engine crankcase, cylinders and cylinder heads.
- Frame and suspension elements.
But if there is no opportunity or desire to do chrome plating, high-quality painting of a Ural motorcycle can be an alternative. There will be room to turn around, especially if you have a modification with a stroller.
Good results can be achieved by installing wings of a different style and size, a different fuel tank, roll bars and even optics. Many favorite modifications - installing a high steering wheel and new control handles, altering the seat - without the right approach, they worsen the rider's position, making it less comfortable. Such changes should be made with caution.
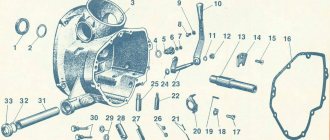
Dismantling the Ural motorcycle engine
Repair of a Ural motorcycle should be carried out in stages. The first step is to prepare your garage and the engine itself. All dirt and oil must be washed off the engine so that they do not get inside. Laying a film on the floor will help protect the garage floor, because it is easier to throw away a piece of cellophane than to remove the remaining grease from the garage floor. Disassembly process:
- Unscrew the nuts holding the cylinder cover and remove it. Next, unscrew the nuts securing the cylinder head, put the rocker arms and rods into the box and pull the head off the studs.
- Remove the cylinder mounting nuts and, shaking, carefully remove the cylinder from the studs.
- We remove the retaining rings and press out the piston pin with a special puller.
- Unscrew the screws securing the gas distribution mechanism and remove the crankcase cover.
- Unscrew the camshaft flange, remove the plug in the upper part of the crankcase and the oil pump drive.
- Using mounting blades, remove the camshaft.
- We bend the lock washer and then unscrew the screw securing the gear on the crankshaft journal. Using mounting blades, remove the drive gear.
- Unscrew the screws of the upper clutch disc.
- We mark the disks in the position they were in.
- Remove the bolt securing the flywheel to the crankshaft.
- Remove the flywheel from the conical part of the shaft.
- Remove the bolts from the rear main bearing housing.
- We remove the engine sump, and with it the filter and oil pump.
- We press the crankshaft out of the front bearing and remove it from the crankcase.
Following this diagram, you will be able to get to the main parts of the engine in order to conduct a full diagnostic of the gaps and, if necessary, replace the parts with new ones. It is worth noting that if a part has a gap close to wear, then it is better to replace it, since most new spare parts lead to increased load on the entire engine while it is running in. Such increased pressure on old components can lead to their wear, which means the appearance of noise.
We recommend carrying out comprehensive repairs before the start of the season. This approach will allow you to get rid of all problems with mismatched gaps and skate several seasons without worries. Otherwise, the motorcycle engine may break down at the height of the season and make it impossible to move on two wheels for a long time.
Complex modifications
It is not difficult to guess that this category does not include external changes. But the internal ones are quite enough. Carrying out tuning with their own hands, some owners make adjustments to the design of the motorcycle that are prohibited by law.
Motor defective
The process of disassembling the motor is quite complicated, but what is more important is that the existing gaps “go away.” Thus, if you disassemble the motor and then reassemble it without repair, extraneous noise is likely to appear due to the increase in gaps. Therefore, experienced mechanics advise, first of all, to assess the condition of the motor without disassembling the main elements, or to carry out a partial disassembly, then carry out troubleshooting and, based on its results, decide whether to make repairs or not. A malfunction can be determined “by ear” if:
- The engine rings loudly during operation, in all speed ranges, and the ringing partially turns into loud noise when the engine is warm and at high speeds.
Reason: wear of the piston pin and the appearance of an excessively large gap between the pin and the bushing. Solution: first of all, you can set the ignition later, in some cases this either completely eliminates the noise, or it becomes insignificant, which allows you to use the motorcycle for some time. If this does not help, then the old pins are replaced with new ones, as well as the connecting rod bushings with their subsequent development.
- The engine rings, tapping is slightly audible, the sound is dull, increasing under load and at high speeds.
Reason: the appearance of a gap between the pin and the piston boss. Solution: replace the pin + piston set with new ones of the same group.
- The engine knocks metal on metal at idle, and at high speeds there is a strong ringing and vibration.
Reason: clearance between piston and cylinder. Solution: selecting a new piston of the next repair size and boring the cylinder for a new piston group.
- A dull knock in the crankcase area, clearly audible at idle and when releasing gas.
Reason: This sound may indicate an increase in the gap between the lower end of the connecting rod and the crankshaft crank pin.
By the behavior of the motorcycle you can find out about the following problems:
- High oil consumption, loss of power and excessive exhaust smoke.
Cause: worn piston rings. Solution: complete replacement of the piston rings, and if there is damage to the cylinder plane, boring it, with subsequent repairs.
Owners of the Ural motorcycle most often encounter similar problems. As you can see, most problems are diagnosed by craftsmen “by ear”, and despite all the primitiveness, the result turns out to be very accurate. Assuming there is a problem with the motor, you should stock up on a set of necessary pullers, keys and repair parts, and only then begin disassembly.
avtorep.ru
A Ural motorcycle has been in the garage since 1998. The motorcycle is separate, the engine is separate, the gearbox is in a completely different corner. I spent my entire childhood on this motorcycle, after buying a car, they forgot about it. And so I decided to restore it...
First, it was decided to deal with the engine, since, according to the owner, the crankshaft was knocking. Therefore, we immediately began disassembling the engine.
Removing the cylinders
I removed the heads, checked the piston clearances in the cylinders, everything was fine, only the right cylinder had a rusty emulsion - apparently moisture had gotten in. But fortunately the cylinder mirror was not damaged.
I checked the gaps on the fingers - everything is within normal limits. I pressed out the fingers, marked where the right and left parts of the cylinders were and put them aside.
Removing the clutch
Then I started disassembling the clutch to remove the flywheel. A simple screwdriver and hammer blows were not enough to unscrew the screws the first time. There is no point in buying an impact screwdriver just for one use. I turned on my ingenuity. And so he pressed the engine from the frontal side into the opening of the garage door, and pressed the screwdriver to the bolt with the help of a block and a jack, and with a gas wrench tore off the metal beads. And then everything opened without problems. I removed the clutch and started disassembling the frontal part, since I didn’t have a 36mm socket wrench on hand to unscrew the flywheel.
Removing the timing belt
In the frontal part, everything is disassembled simply, the cover is unscrewed, the ignition is removed, the ignition coil is removed, then the windshield is unscrewed. I unscrewed the two bolts that hold the camshaft and placed two mounting brackets under the camshaft gear using rags. And he pulled out the camshaft and gear. Upon inspection, no wear was found in the timing gears. The bearing is also in excellent condition. I secured the pushers with electrical tape to prevent them from falling into the crankcase and getting tangled.
Then I went to a friend and took from him a three-legged puller and a 36mm socket wrench. I unscrewed the bolts that hold the crankshaft main bearing in place at the front. And as in the video, I decided to grab the pressure washer with the puller, since the puller’s legs do not fit under the gear. The result is that the gear is removed, the pressure washer is bent and torn. Conclusion, it was necessary to tie steel wire around the gear and pull it. It will be a lesson for the future.
Removing the flywheel
After disassembling the timing belt, I started working on the flywheel. For the flywheel, you need a wrench so that the working edge is straight away, and not, like most heads, slightly recessed, since the flywheel bolt has thin edges. To fix the flywheel, I used a 12mm wrench and inserted one end into the clutch bolt and the other into the stud securing the box to the engine. I’ll say right away that it’s better not to do this, since I bent the pin. It’s better to take a 19-size open-end wrench, insert one end into the hole in the flywheel, and the other into the rod that you need to insert the lugs for attaching the engine to the frame. This is what was done when assembling the flywheel.
When I unscrewed the flywheel bolt, I pulled off the flywheel using a puller. Next, unscrewing the 9 bolts that hold the rear main bearing cover in place, I used the same puller to remove the cover itself. And now the reason for the knocking crankshaft was discovered - the main bearing separator had crumbled.
Removing the crankshaft
To remove the crankshaft, you need to remove the oil pump. To do this, I drained the oil and unscrewed the pan. I unscrewed the top cover of the oil pump and took out the gear. From the bottom of the pan, I removed the pump mesh and unscrewed it and removed it along with the rod, which will not allow the crankshaft to be removed.
Using a wooden mandrel and a hammer, I removed the front main bearing. To do this, the engine was placed on the floor with its back side. I placed a wooden mandrel against the front shank of the crankshaft and, using gentle and gentle blows of a hammer on the mandrel, knocked out the crankshaft from the front main bearing.
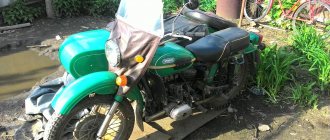
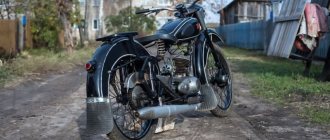
Restoration and second life of the Ural M63 motorcycle 1970. part 1
Restoration, restoration, second life, renovation. How much time, money, running around for the sake of glands.. But wait, what other glands!? For me, for example, this is something more that has already become a part of my life. Anyone who is not indifferent to pain, financial losses, beats, misalignments and leaking oil mixed with sealant, please use cat.
Ural-2 or Ural M-63. Late, brown color. Almost an economic council, but with many pleasant, significant differences. Its own frame, much more beautiful than the “stool”, its own lighting equipment and closed shock absorbers, six-volt electrics, which by its very presence automatically transfers the motorcycle to the “Retro” category. And I also came across a rare tank, a “nut” without nigrips... Yes, it also comes with documents, almost complete and inexpensive! This is what it looked like after purchase. Oh yes, I completely forgot, again I was carried away to the wrong steppes... The story began spontaneously, almost suddenly. I kept driving my godless Jeep, lived an ordinary life and, like all normal people, I didn’t know at all that it turns out Jap is cal, and the Ural is true! Basically, I bought a motorcycle for the dacha, to go fishing there, just for rides in the forest and to pick mushrooms. And let’s be honest, I like to tinker with technology, but Jap just doesn’t allow me to do that. I monitored Avito and found a good option. I bought it, registered it, and sympathetically gave me all the documents and a number in the window. Traffic cop.. His look! The look was full of sympathy, in his eyes I saw a whole miniature, where I am on the side of the road, kneeling in front of the left pot, trying to understand where the compression disappeared? It happened once, but that's a completely different story. At that time I didn’t really understand models, and I never had any scooters. I played tricks, changed the fluids and moved on. But after riding through the summer, reading the boxer at night, I began to develop a burning desire to restore this motorcycle over the winter. And not just restore, but make everything look beautiful, almost like it came from the factory. Then I naively assumed that I could do it quickly and inexpensively, oh, I was wrong... I drove it from the dacha to the garage in the fall, printed out the book and put the still warm book in the prayer corner. I started disassembling the motorcycle, little jars with nuts, bolts and other rusty junk... Oh, it turns out that rust is the best thread locker! We need to take note. After disassembly, we send what needs to be chrome-plated and galvanized. I had a hard time finding it for reasonable money. And we had to take everything to the Kaluga region.. Well, for a mad dog - you yourself know that this is not a detour. I went through the engine, gearbox and gearbox according to all the canons, threw out all the hammers from the garage before assembly, bought AT pistons, bored the cylinders, KIA pins, a new Soviet KV, a new camshaft (which was redone and mounted on a needle bearing) with round pushers, studs from 40x steel with appropriate heat treatment, new heads from the times of the USSR, corteco oil seals, koyo bearings, everything is ground in, washed, blown and lubricated a hundred times, assembled on paper gaskets with a nanolayer of Vitaly Reintz.. Looking ahead, I will say that the engine turned out to be quite good and did not cause any problems completely, even in the first kilometers of the run. It was decided to paint it in its original color. It suits this motorcycle very well, there is no need to invent anything. The worst thing that could be done is to paint it some kind of metallic... Brrr, it was already scary. They don’t produce this kind of brown paint now, so I had to go to a computer selection. To be continued…