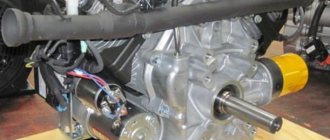
Homemade products from a washing machine engine:
1. How to connect a motor from an old washing machine through a capacitor or without it 2. Homemade emery from a washing machine engine 3. Homemade generator from a washing machine engine 4. Connecting and adjusting the speed of a commutator motor from an automatic washing machine 5. Potter's wheel from a washing machine machines 6. Lathe from an automatic washing machine 7. Wood splitter with an engine from a washing machine 8. Homemade concrete mixer
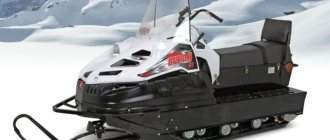
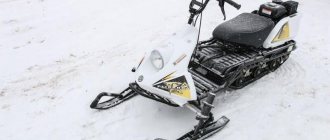
We make a snowmobile with our own hands - it couldn’t be easier!
I made this snowmobile literally in a couple of weekends in the garage at the dacha. Although its design at first glance looks very simple, nevertheless, in terms of cross-country ability in deep loose or wet snow, it is not inferior to most industrially produced snowmobiles.
Several years ago, I built a snowmobile for my nine-year-old daughter with a homemade track made from conveyor belts and plastic water pipes as lugs. At first I had doubts about the reliability of such a track and how the plastic parts would behave in the cold. But during two years of winter operation, no breakdowns or severe wear of the pipes occurred. This inspired me to create a light snowmobile for myself with the same homemade track.
Understanding full well that the smaller the mass of the snowmobile and the larger the supporting area of the caterpillar, the better its cross-country ability in loose and deep snow, I tried to make the design as light as possible. The operating principle of the snowmobile is very simple (Fig. 1). There are four wheels installed inside the caterpillar, which, when moving, roll along a conveyor belt on which lugs are attached. And the caterpillar drive from the motor is carried out by a chain through the driven shaft using special drive sprockets. I took them from the Buran snowmobile.”
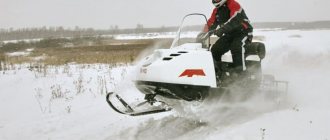
With an engine from a conventional walk-behind tractor with an automatic clutch with a power of only 6 hp. you won't accelerate quickly. I planned to ride the snowmobile not on compacted paths, but on loose snow, so I abandoned the soft track suspension and skis to reduce the weight of the snowmobile and simplify the entire design.
First I made the caterpillar. A plastic water pipe with a diameter of 40 mm was cut into blanks for lugs 470 mm long. Then I sawed each piece lengthwise with a circular saw into two equal parts. Using the device shown in Fig. 2, I used a wood circular saw to cut plastic pipes for lugs lengthwise.
I attached the lugs to the conveyor belt with two 6 mm diameter furniture bolts with a large semicircular head. When making a caterpillar, it is very important to maintain the same distance between the lugs, otherwise they will run into the teeth of the drive sprockets and the caterpillar will begin to slip and slide off the rollers.
To drill holes in the conveyor belt for mounting bolts with a diameter of 6 mm, I made a jig. The holes in the tape were drilled using a wood drill with a special sharpening.
Using such a jig, you can drill 6 holes in the conveyor belt at once to attach three caterpillar lugs.
At the store I purchased four inflatable rubber wheels from a garden cart, two drive sprockets from a Buran snowmobile and two sealed bearings No. 205 for the caterpillar drive shaft.
I asked a turner to make the drive shaft of the caterpillar and supports for the bearings. I made the snowmobile frame myself from 25x25 mm square pipes.
Since the axes of the ski and steering hinges are on the same line and in the same plane, you can use a continuous tie rod without ball ends.
Ski turning bushings are easy to make. I welded 3/4″ female plumbing couplers to the front cross member of the frame. I screwed pipes with external threads into them, to which I welded the bipod of the ski steering rack.
I recommend using skis from the Argomak children's snow scooter. They are lighter and more flexible, but they need to be equipped with corners for attaching to the snowmobile's rotating stand and a metal undercut at the bottom - for better control of the snowmobile when moving on crusty or compacted snow.
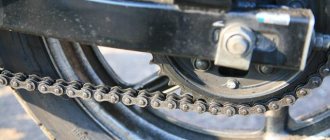
The chain tension is adjusted by moving the motor.
Driving a snowmobile is very easy. When you increase engine speed with the throttle handle located on the steering wheel, the automatic centrifugal clutch is activated and the snowmobile begins to move. Since the estimated speed of a snowmobile is low (only about 10-15 km/h) and depends on the density of the snow, the snowmobile is not equipped with brakes. It is enough to reduce the engine speed and the snowmobile stops.
I will share a few tips that may be useful when repeating this design.
1. I cut the pipe for the tracks lengthwise using a hand-held circular saw for wood, first on one side, then on the other. This makes it smoother than cutting both walls at once. It is more convenient to process small workpieces. If you immediately cut a long pipe lengthwise, then the plastic will melt and the saw blade will jam.
2. Caterpillars can be made of any width. And each designer has the right to choose what is more convenient for him: to make a wide but short track or a narrow and long one. Just remember that with a large caterpillar the snowmobile will be difficult to control and the engine will be more loaded, and with a small one it may fail in loose deep snow.
3. Some of my photos show that there are plastics installed inside the tracks.” These are guide stops for the slide, which should prevent the caterpillar from sliding off the rollers. But during the operation of the snowmobile, the caterpillar did not slide off the rollers even without slipping, so “barrels” can not be installed, which will reduce the weight of the snowmobile.
4. At the end of winter, I completely disassembled the snowmobile to determine its weight. The weight of its individual components turned out to be as follows: caterpillar - 9 kg; drive shaft assembly - 7 kg; two pairs of wheels with axles - 9 kg; engine and steering wheel - 25 kg; pair of skis - 5 kg; frame - 15 kg; double seat with posts - 6 kg. In total, everything together weighs 76 kg. The weight of some parts can be further reduced. Nevertheless, the weight indicator for a snowmobile with a track of this size is quite satisfactory.
The geometric dimensions of my snowmobile are as follows: snowmobile frame length - 2 m; the distance between the axes of the support wheels (rollers) is 107 cm; The width of the caterpillar is 47 cm. The pitch of the caterpillar lugs depends on the thickness of the conveyor belt and it must be selected experimentally (I got 93 mm). I do not provide exact dimensions and drawings of the snowmobile parts, since anyone who plans to repeat the design will be guided by those parts and components that they can purchase or manufacture on their own.
Sergey KHOMYAKOV, Moscow ([email protected])
Source: eurosamodelki.ru
SAshoK763 › Blog › Building a homemade snowmobile | All the work done in one record
Hi all! As promised, I’m posting the entire process of building our snowmobile in one post.
Let me start with a preface: this is the third snowmobile we are building. The first one was 13 horsepower and looked like this:
You can read more about its construction in this post: www.drive2.ru/c/1482657/ The driving performance of the snowmobile is demonstrated in the video:
Later, the idea came to build another snowmobile, which would be lighter and more powerful (with a 15 horsepower engine).
It turned out like this:
Electrical circuit diagram of the Ant scooter
Hai! This wiring diagram of the Ant equipment will be useful to those who restore old Soviet scooters. On our website All about motorcycles, such biker mechanics will find many useful images, as well as texts with tips on tuning iron horses, etc.
This resource also provides news from the world of biker sporting events.
The famous domestic scooter has become a rarity these days. Only occasionally is he encountered on the endless roads of his great homeland. You can buy it for relatively little money. On this motorcycle site you can study the technical characteristics of this utility vehicle.
Explanations for the Ant Moto wiring diagram:
1) Direction indicators with bulbs.2) Battery (battery).3) Scooter speedometer.4) Speedometer dial backlight bulb.5) Motorcycle ignition system spark plug.6) Ignition system coil.7) Ignition system capacitor.8) Switching mechanism/ turning off the high beam and the sound signal. 9) Front parking light bulb. 10) Main lighting bulb (low/high beam). 11) Turn signal switch.
12) Sound signal playback device.
13) Scooter turn signal relay. 14) Switch. 15) Night light switch. 16) Generator operation identification indicator light. 17) Neutral transmission identification indicator indicator. 18) Identification mechanism for engaging neutral gear in the gearbox.19) Motorcycle clutch.20) Bike dynastarter.21) Interrupter for the ignition system of a Soviet scooter.22) Ignition system lock.23) Ignition system fuse.24) Stop switch/switch signal.25) Moto Ant relay-regulator.26) Switch block.27) Brake light bulb.
28) Rear marker lamp.
DIY snowmobile rear suspension
In the cold, snowy regions of our country you simply cannot do without a snowmobile. The market offers a large selection of these devices; sometimes it is very difficult to find a unique and exclusive option. But after purchasing a specific model, so that this vehicle becomes unique, which no one else will have, you can tune it. One of the parts that are often modified on these vehicles is the suspension. What role does it play in operation? Let's look at all this further.
t0shkan › Blog › My BSZ in Tula
There is no need to convince anyone that contactless ignition is a really necessary thing. Every owner of a motor vehicle puts it on literally everything that moves, even on hunchbacked Cossacks. But if you google about installing BSZ on Ant, then complete trash comes up. Someone came up with the idea of screwing a round curtain directly onto the shaft, which of course is logical. But there is not enough space for the sensor itself, as a result the casing is subjected to wild grinding, and all this hell sticks out outside the motor. It looks very ugly, and while in “Ant” there may be nothing, then in Tula it definitely looks like a collective farm. This solution requires the manufacture of an axis for attaching the curtain, and it is proposed to manufacture the curtain itself as follows: All videos on YouTube are dedicated to this particular implementation. I was able to find only one video where a motor with a BSZ is briefly shown, with nothing sticking out of the casing, but exactly how the author did it is left behind the scenes.
By purchasing the figure eight ignition components and playing with them, anyone can see that the dimensions and angles in the curtain drawing above are complete nonsense. They are absolutely unnecessary; a spark jumps out even if you rustle the sensor slot with the tip of a slotted screwdriver. In fact, when installing the BSZ you need to know only 2 things: 1) A spark jumps when the curtain halfway opens the sensor. 2) For the Ant motor, this moment should occur 3 mm before TDC. That's it, this information is enough to install the BSZ. After removing the impeller casing and examining possible mounting locations, it became clear that the sensor needed to be mounted from above. It won't interfere with air flow, and there's just enough room to mount the sensor to the crankcase, while the shutter can be attached to the flywheel. There are two options here: either attach the sensor without an adapter directly to the crankcase, in which case the curtain will have to be made in a Z-shape, or attach the sensor through an adapter, then the curtain will be a simple corner. I chose the first option. I drilled a couple of holes here:
And screwed the sensor into the standard holes
The curtain was made from an old mount for a three-inch drive. You can use an old case from any desktop, there is a good tin of just the right thickness, and there are ready-made neat grooves for adjusting the position of the curtain, if necessary. For mounting, I drilled a couple of holes in the flywheel and cut an M4 thread there (drill carefully so as not to drill through and damage the dynostarter winding). The depth of the hole is 7 millimeters. A long crank is convenient for cutting threads; in the photo there is a tin from which the curtain is cut.
How it all spins is clear from the video
Final view - the central hole of the casing is closed with a standard rubber band, everything is beautiful
Source
The role of the rear suspension in the movement of a snowmobile
Most often, the rear suspension is equipped with a linear force element, which is located outside the vehicle's track. The linear force element mounts are located on the frame and on the corner arm of the vehicle. Also, sliding rails are connected to the corner lever and supporting rollers are attached to it. When folding the sliding rails using an angular lever, the linear force element is advanced, after which the suspension moves smoothly in its range. The rear suspension system of a snowmobile works on this principle.
These processes in the vehicle suspension mechanism ensure comfortable vehicle control. Thanks to a well-tuned suspension, the snowmobile moves smoothly. The purpose of the rear suspension is to support the track and motor drive while driving. When the snowmobile travels over uneven surfaces, strong shocks may be felt. It is in such situations that the rear suspension will show its effect? she will take all the possible impacts and shaking.
Homemade tricycle from the Urals
The main advantages of a tricycle based on the Ural:
- good handling;
- the ability to develop sufficiently high speed;
- high power;
- comfort during long trips;
- a spacious body for transporting cargo weighing several hundred kilograms.
The predominant part of the components belong to motorcycles; the engine for the trike is suitable from a ZAZ-968. The most labor-intensive process is making the frame. In the design, it is a kind of connecting link on which all components and parts are installed.
Design Features
For inexperienced designers, when assembling a tricycle, the drawing will be an excellent guide to action. It is important to think carefully about the size issue.
The rear shock absorbers, which are similar to their automobile counterparts, are mounted on the upper beam. When driving on a road with uneven surfaces, the shock absorbers will react sensitively to them. The glasses are fixed to the beam by welding, which provides the desired comfort. The pipes are welded at the end together with reinforcing gussets - the fastening will be reliable.
Due to the fact that the power unit is installed in the rear, the center of gravity is there. With a sharp increase in engine speed, the front wheel lifts off the road and the tricycle rears up. This effect can be eliminated by placing the balance closer to the front wheel.
If the engine is slightly tired, it needs to be repaired a little. The exhaust system in this case is homemade, and the cooling system can be chosen as water or oil type.
Since the right hand is busy adjusting the gas, the gear shift lever, naturally, should be on the left side.
Assembly sequence
- The frame is constructed according to the drawing. Anything made of ferrous metal must be coated with a layer of primer and then paint.
- The rear axle must be in good condition. It can be removed from a Zaporozhets or Moskvich car.
- All main components and assemblies, represented by the engine, filters, exhaust system and oil cooler, are mounted on the rear axle.
- To have easy access to all parts and ensure ease of assembly, it is recommended to use a jack or lift. The frame must provide a reliable connection between the front fork, rear axle and engine.
- When fixing the elements, no backlash should be allowed; there should be no clattering. To avoid vibrations, make connections using locknuts.
- Fastening by welding is considered the most reliable. This must be taken into account when fixing it to the frame, rear axle and cross members.
- Attaching the fuel tank, seats, trunk and other accessories is done at the very end of the assembly, when the homemade trike is already put on wheels.
Why does the rear suspension need modification or replacement?
Whether a snowmobile needs tuning, in particular changes to the rear suspension parameters, is determined by the purpose for which the vehicle will be used.
Are there two types of snowmobile suspensions? connected and unrelated. A connected suspension has two main advantages:
- she shares the toughness;
- controls weight transfer if the vehicle picks up speed.
Often this type of rear suspension is installed in snowmobiles that will be used for sporting purposes or for transporting cargo. This is necessary in order to cope well with sharp turns, strong shaking and frequent redistribution of weight.
Unconnected pendants have their own characteristics. Their front and rear elements are independent. Therefore, if the front part deviates, the rear either deviates only a little or remains in place.
Unlinked harnesses are best attached to snowmobiles that are used in deep snow or have long tracks. They are more capable of increasing traction and also distribute weight well. Also, improving the performance of the suspension may be necessary if the snowmobile engine has been tuned. After all, in order for a vehicle to cope with new loads, a comprehensive modification is necessary, and the suspension in this case? not an exception.
First of all, suspension tuning includes replacing shock absorbers. The main types of shock absorbers for vehicle suspensions:
- simple shock absorber;
- telescopic shock absorber;
- shock absorber for enduro;
- shock absorber for crosses.
In case the main purpose of the snowmobile is? normal riding, then enduro shock absorbers are needed. They are applicable in production 440 Pro vehicles, but the price of such shock absorbers is also considerable. Shock absorbers for tuning sport snowmobiles are often equipped with additional volume gas chambers that allow them to be tuned for specific applications.
Also, the rear suspension often needs adjustment. The choice of adjustment level depends on what kind of physical load is planned for this vehicle, what the weight of the driver and passengers is, how the driver is used to driving the vehicle, what his personal preferences are, the speed mode and the condition of the roads. Each part of the rear suspension is responsible for specific functions. Therefore, in order to know what you will achieve by adjusting the suspension, you need to decide which part needs to be adjusted.
- The job of the rear springs is to ensure smooth movement.
- The purpose of the extension cord? provide reverse movement, taking into account the loads and condition of the snow paths.
- The shackle is adjusted taking into account the condition of the snow path and what the loads will be.
- How comfortable it will be to drive the snowmobile depends on the adjustment of the central spring.
- The tape limiter controls the redistribution of weight.
- Thanks to the shock absorbers, the snowmobile is easy to control and comfortable to ride and sit on.
Adjustment and tension of snowmobile tracks
How to properly tension - adjust the snowmobile , because adjusting the caterpillar affects the durability of its use, fuel consumption, speed and cross-country ability of the snowmobile. The main points in adjusting the caterpillar are: tension and centering of the web; these points are connected to each other, like a thread with a needle. Especially often, the need to adjust tracks arises on new snowmobiles, since parts of the suspension, the hooks of the pair: track/drive sprockets are grinding in, and the track web is being pulled out. The adjustment, regardless of the brand of snowmobile, should be carried out on the suspension and track warmed up while in motion. Those. immediately after running a snowmobile in natural conditions. Also, before adjusting, it is necessary to clear the suspension from snow and ice and check the condition of the suspension. These requirements are mandatory.
- The influence of a tight track on the behavior of a snowmobile: the snowmobile starts hard, slowly picks up speed, the engine can get hot - that is, additional effort is spent on rotating the caterpillar. In addition, in snowmobiles with slip suspension, due to excessive friction, intensive wear of the slips occurs.
- Weak tension of the caterpillar leads to the drive shaft sprockets slipping relative to the caterpillar during intense acceleration or load, the caterpillar also has the ability to move, “walks” and often does not rotate within the treadmills, the slips rub the rubber, moving not along the brackets, tearing the perforation (blizzard) , can break the spokes, there is wear on the side edges (the cord is climbing), the road wheels turn over (buran), the caterpillar falls off under lateral loads.
What is better: replacing the suspension with a factory one or a homemade one?
Should I buy a ready-made suspension for a snowmobile or make it myself? This is a question that must be decided by the vehicle owner himself. Several factors may influence the decision. If the snowmobile is purchased and not made yourself, then most likely it is better to buy a suspension for it. It will be easier to do this, because for each factory model of snowmobiles there is a certain type of suspension.
However, the rear suspension on a homemade snowmobile should most likely also be homemade? It can be difficult to find a factory one. Also taken into account is the purpose for which the snowmobile will be used. What if its purpose? professional winter sports, then you definitely need to take a professional factory suspension. If the main purpose of the snowmobile is to transport its owner, then it is quite enough to make the suspension yourself. In addition, if you make the suspension yourself, you can save a lot of money.
Bleeding the brakes
When the brake fluid is drained from the system, each of the existing calipers will need to be bled. When this procedure is completed, you need to put the tank cap in its original place. Before doing this, you need to assess the condition of the rubber gasket. If it is worn out, the oil seal will need to be replaced.
There should be no brake fluid left in the system at all. After the procedure, you will need to pour a new product into the tank. This will take several hours. The fluid is poured into the reservoir and then waited until it reaches the caliper. At this time, the fitting must be open.
If everything is done correctly, there will be a slight resistance to the lever when you press the brake. If air gets into the system, it will sag a little.
In this case, you will need to unscrew the fastener that secures the brake hose. You need to try to bleed air out of the system. Next, you need to press the brake again, which should be moderately hard. If so, then the procedure was successful.
Is it necessary to register such changes with Gostekhnadzor?
Probably everyone already knows that when purchasing a snowmobile, it must be registered. You also need to have a category A license to drive such a vehicle. Using a snowmobile without a license or while intoxicated is strictly punishable by law. However, are there rules regarding the registration of small changes to the design of a snowmobile, such as rear suspension changes?
The law establishes the rule that owners of any vehicle must present it for technical inspection from time to time. Snowmobile? not an exception. The interval at which this needs to be done is determined depending on the terrain and type of vehicle. If a tracked vehicle is designed for eight or more seats for passengers, then it must be presented for technical inspection every six months. If this is an ordinary snowmobile, then it needs to be inspected every year. When undergoing regular technical inspection, there is no need for additional registration of minor changes in the design. Main ? ensure safe movement on a snowmobile.
Source: motoaria.ru
What is the effect of a loose track?
Weak tension will also not have a very good effect on the operation of the vehicle. Failures will mainly occur in the chassis system, but they will harm the entire snowmobile.
A loose gooseneck will result in:
- slipping of drive shaft sprockets under load or during strong acceleration;
- the caterpillar moves and often rotates outside of the treadmills;
- rubber is wiped with slimes;
- perforation breaks;
- spokes break;
- The wear of the side edges increases, the cord simply climbs;
- the road wheels turn over.
The most dangerous thing is that with a side load the caterpillar can simply fly off.
Snowmobile front suspension - its types and schematic representation
The shock absorption system on a snowmobile consists of rear and front suspension. I would like to focus my attention specifically on the front suspension, since there is not so much information regarding this unit. What are the challenges facing the nose suspension of a snowmobile? - This is, first of all, ensuring the smoothest possible ride so that the pilot does not feel any vibrations from moving over various uneven surfaces. We’ve sorted out the main function, now it’s worth considering the types of front suspensions.
Contactless ignition Ant, Tula (FULL set of BSZ Muravey 2.5)
Topic of the section Homemade electronics, computer programs in the General Questions category; Hello everyone, I have an idea to install a spark ignition on my engine, I don’t have money to buy a specialized ignition, I want to make Forum Rules. Rules Advanced search. Forum General questions Homemade electronics, computer programs Electronic ignition circuit. Dear readers! Our articles talk about typical ways to resolve legal issues, but each case is unique. If you want to find out how to solve your particular problem, please use the online consultant form on the right or call the numbers provided on the website.
Source
Telescopic suspension
Perhaps this is one of the most common and simplest types of suspension based on the principle of operation. Most often, this suspension is used on snowmobiles of the “utilitarian” class. The design of the telescopic fork consists of a spring and shock absorber, which are located directly in the strut. Thus, the telescopic stand is able to smooth out shock-type loads. It is worth noting that the stroke of this type of suspension is limited according to the stroke of the shock absorber itself. As a rule, snowmobiles with such suspension have incredible maneuverability in dense forest conditions, since the ski base is small.
Also, one of the simplest and most common suspensions is the spring system. This engineering solution was used on the legendary domestic car "Buran". This model has one ski track, as a result of which the equipment does not have the necessary maneuverability. It is generally extremely difficult to enter the required turn at speed. But in general. The suspension performance itself is quite acceptable.
Ignition installation
Installing the ignition on an Ant scooter, as on any motorcycle with a single-cylinder engine and a battery ignition system, does not require special knowledge or effort. All you need is very thin paper, a narrow rod and a set of keys. So, how to set the ignition on an Ant scooter:
- Remove the spark plug and set the piston to top dead center (hereinafter referred to as TDC).
- Insert a rod through the hole from which the spark plug was removed and press it against the piston head. Make a notch at a length of 4.5-5 mm
- Close the breaker contacts when the piston is at TDC. Place paper between them and pinch.
- Turn the crankshaft counterclockwise as slowly as possible and pull the piece of paper at the same time.
- When the paper is released when the piston is lowered to the depth of the mark made, the ignition will be set correctly.
DSA suspension
This suspension is characterized as the first long-travel system that was used in the construction of snowmobiles. To be more precise, it was installed on the F2000 and S2000 chassis. The shock absorbers and springs are located between the levers (arranged in parallel) and the chassis. The inclination of the springs and shock absorbers towards the central part of the snowmobile is maintained. Due to this, the travel of the suspension itself is greater than that of the shock absorber. The shock-absorbing system consists of a snow frame and a trailing arm to which two transverse arms are connected. Levers located transversely must have the same length. There are snowmobile models on which the length of the levers can be adjusted. This adjustment is relevant when it is necessary to overcome an icy section of the route. There is no point in adjusting the length of the levers when moving in deep snow. The disadvantage of this suspension is the lack of controllability of the snowmobile due to the horizontal movement of the skis.
How to install a magneto on an Ant scooter. How to set magneto ignition on ant
History of models. Who's online? You are an Anonymous user. You can register by clicking here. Soviet scooters: Forum. Previous topic :: Next topic. Matroskin Interested Registered: Dec 16, Messages: Explain how to do this on your fingers, the instructions say about some kind of meter, etc.
To come back to the beginning. First, you need to write on what engine. Everything written below concerns Tula ones. If I'm not mistaken, the opening of the contacts should begin 2. If the ignition is normal: we hook a 12V light bulb with one end to ground, the other to the terminal of the coil to which the wire from the contacts goes, take an iron rod about 6 mm, about 10 cm long, unscrew the spark plug, stick the rod into hole, lightly resting on the piston, rotate the rotor counterclockwise until TDC, set TDC, put a notch on the rod with a needle file, pull out the rod, and put a second mark at a distance of 2.
Now we turn on the ignition, stick the rod back with the same side, and turn the rotor counterclockwise, when the SECOND risk mark that you made the 2nd time appears, it is at THIS moment that the light bulb that you connected to the coil should light up, if it lights up earlier or later, then loosen the screws and turn the ignition to the correct position. Well, it seems to be something like this on the fingers. Labuh wrote:. Now turn on the ignition, stick the rod back with the same side, and turn the rotor counterclockwise, when the SECOND mark appears, it is at THIS moment that the light bulb that you connected to the coil should light up, if it lights up earlier or later, then loosen the screws and turn the ignition , choosing the correct position.
Damn, how intricate! It’s all true, but in practice it practically doesn’t work! PLAY is inherent in this ignition. I usually adjust it while moving, achieving the best traction. In general, we have known about electronic ignition for a long time. We have written and rewritten a lot about this. Or do you mean a breaker? Matroskin wrote:. Andrey wrote:. Guys, I keep turning and turning the impeller, but the lamp is still on.
I closed the breaker with a screwdriver and it still lights up. Taxes in order. How should it stand, with the armor wire socket closer to the frame or vice versa? Or from the coil directly to the breaker? Do not swear! A person turns on the ignition for the first time, and even an experienced one sometimes grabs his head. Matroskin, if you take a photo of the ignition unit installed on your scooter, the eccentric, the breaker and its contacts, the wire going to the coil, the coil and its terminals, then it will be more convenient for us to show everything in the pictures.
And so again point by point: 1. Secure the breaker eccentric to the dyno starter housing. Install the fan grille and secure it with 4 M6 screws. The slot for the wire coming from the breaker contacts should face up.
Install the breaker contacts into the recess of the fan grille. Secure them with screws. The contacts should look down and be located to the left of the eccentric.
Connect the wire coming from the contacts to the minus terminal of the ignition coil. Attach the capacitor wiring to the same terminal, and secure the capacitor itself to the fan volute housing. Connect the positive wire coming from the ignition switch to the coil to the “plus” terminal. If there are no markings on the coil terminals, it means it doesn’t care where its plus and minus are. Connect the temporary light bulb with one wire to the negative terminal of the coil, and the other to ground. Turn on the ignition.
Loosen the screws securing the base of the breaker and turning it counterclockwise or clockwise, find the moment when the “temporary” lamp lights up, this is the moment of ignition, the moment of the spark.
If everything works out, carefully secure the base of the breaker and start it. It happens that the lamp is constantly on or does not light up at all. The reason for this may be: a large gap on the breaker contacts, a short circuit of the contacts to ground, misalignment, or the fan grille is not installed correctly.
If for some reason you cannot install the ignition, start reading everything from the beginning. Non-motorized flea market Motorized flea market – Archive What-where-how much Swamp Closed forum Comments on the operation of the site and forum.
ADSA suspension
In essence, this is the same DSA type suspension, only in this case the length of the wishbones is different. There are snowmobile models where, due to the use of ADSA suspension, it is possible to adjust the camber angle. This type of suspension found its way onto the S2000 chassis. The ZX chassis already featured the next generation of suspension, called the ADSA ZX. It is characterized by the ability to adjust the camber, and the movement of the transversely located levers has also been significantly changed. Owners of snowmobiles using this suspension system unanimously note a high level of controllability compared to DSA.
Models of chainsaws for conversion
We choose a model for remodeling - Ural, Druzhba, Husqvarna, Shtil. You can use an old tool with a worn saw blade.
The most popular option is the Druzhba saw, which has a simple device with a minimum number of components and components. The disadvantages include the heavy weight of the unit (12 kg) and the low level of safety. In addition, this technique is low-power 1 kW and is far from meeting the requirements of today - it is morally outdated even for creating a snowmobile from a chainsaw.
If we consider the Ural, then this is a more suitable modification, since it was originally developed as a powerful machine for felling forests. Therefore, in terms of technical parameters, the Ural is fully consistent with the expected loads on the snowmobile. With almost the same weight as Druzhba, the Ural saw is much more powerful - 3.7 kW.
A homemade snowmobile from a chainsaw, Shtil, Husqvarna, are very suitable options, given the sufficient power of 1.5 -3.0 kW with a low weight of 4 kg and the modern design of the tools.
RAS SUSPENSION
This type of suspension found its application on the REV chassis. The design of this suspension is based on double A-arms. The principle of operation of this suspension is as follows - the main part of the shock load falls directly on the spring and shock absorber and only a small part on the chassis itself. Typically, a snowmobile with a REV chassis has a pyramidal frame shape. Due to this, the design of the snowmobile is incredibly durable, capable of withstanding heavy loads and the movement of the snowmobile on the most extreme trails.
Video
Source: topkarting.ru
Other creation options
There are other ways to build a snowmobile using skis or a crawler rear. These makeshift snowmobiles and snowbikes use bicycle wheels.
Snowmobile from scooter
One of the simplest homemade options you can create yourself from any scooter or moped. The only differences here are the frames, the sizes of the tracks, and other parts. Such a snowmobile is unlikely to be powerful and will have difficulty moving through snow-covered snowdrifts. Therefore, they use wheels of a smaller diameter and increase the frame. This homemade moped moves well on light snow or crust. In the spring, you can replace the ski or track back with wheels and get a scooter or moped again.
Chainsaw snowmobile
Using a motor from a trimmer, many craftsmen can independently make various devices: cultivators, motorbikes, snowblowers and, of course, snow scooters (or snowmobiles).
The product is not particularly powerful, but reliable, lightweight and easy to use.
Snowmobile from a motorized dog
It is even easier to get a snowmobile from a motorized towing vehicle or a motorized dog; there is practically no need to reassemble it - just add skis with steering and make minor changes.
Snowmobile from ATV
The ATV undergoes even less alteration for better maneuverability in winter snowy terrain. Essentially, everything is limited to tuning, which consists of installing tracks, although this process is expensive and time-consuming.
Snowmobile on tubes
About homemade products using cameras or pneumatics has already been noted above. The homemade device consists of a control support ski and a leading support pneumatic.
The advantages include the high cross-country ability of the vehicle, and the disadvantages include low maneuverability.
Transformable snowmobile
A folding snowmobile is called a mini snowmobile or transformer. Its main difference is convenience and ease of use. It easily fits when folded in the trunk or even on the seat of a car.
Snowmobile from a cultivator
And another savvy option for inventive use - a snowmobile made from a cultivator. Usually, every farm has a cultivator and sits idle in the winter. Using the engine according to the assembly diagram, we make an apparatus for winter movement. The power is small, but in reality it is practical and effective.
Homemade snowmobile designs popular among craftsmen
With the arrival of winter, some people successfully replace two-wheeled vehicles with homemade snowmobiles. This equipment is capable of overcoming large snowdrifts and is convenient for moving on snow-covered roads. It is expensive and not everyone can afford to buy it, so many assemble snowmobiles on their own using scrap materials.
Pros and cons of wide tracks
- A homemade motorized dog, made with your own hands, is more maneuverable and lighter with a narrower track (380 mm) than with 500 mm or more. This is important when you have to drive through the forest among trees and stumps, turn over or get out a car that has sunk (stuck) in the snow. It will be better if you can do it yourself without outside help.
- At high speeds, motorized dogs with wide tracks are more stable.
- On narrow tracks the speed is lower. Less cravings. The fact is that when using a gearbox, gear ratios can only be changed on sprockets. And here you have to sacrifice either speed or traction. If you use 12/40 chainrings, you can reach speeds of up to 20 km/h without loss of power.
- A more compact motorized dog is cheaper. If a motorized dog on 380 mm tracks can cost 25-30 thousand rubles, then on 500 mm it will cost no less than 60 thousand.
- More compact motorized dogs are cheaper to maintain. They are lighter - less fuel consumption.
- The cross-country ability even on loose snow is approximately the same for both options. But more compact motorized dogs are lighter: the track is lighter, even with the same length, and the engine weighs less (because it may be less powerful). This is important when you have to drive on frozen bodies of water - there is less danger of falling through the ice. If such a danger exists, then it is better to play it safe and purchase inflatable PVC cylinders (their volume is enough so that the towing vehicle and you do not fall under the water).
General structure of the snowmobile
A snowmobile is a sled that is powered by an engine. They are agile, agile and capable of speeds in excess of 85 mph. Middle-class equipment can overcome inclines of 20°. Steep slopes up to 65° can be passed by snowmobiles with a higher class. General structure of the snowmobile:
- The equipment is controlled via steering handles. The handles are connected to the skis that stand in front.
- The steering wheel is equipped with drives: gas and brake. These levers control the speed and braking of the snowmobile.
- There are no rear wheels, but instead a solid rubber band (track) is installed that moves the snowmobile. It is connected to the engine through a chain and belt.
- Some models can be made using inner tubes from tractor wheels.
Thanks to their design, snowmobiles overcome difficult places that cars cannot pass. With their help, food is delivered to snowy areas where there are no roads. But most people are used to using them for entertainment.
Homemade ATV from the Urals
Heavy Ural motorcycles are not very popular. One of the reasons is the huge consumption of gasoline. Many motorcyclists and bikers are not satisfied with the large dimensions of the Urals. Despite this, folk craftsmen are interested in such motorcycles. Points such as the presence of reverse gear and a fairly powerful four-stroke engine are very tempting in terms of converting an old Ural into an ATV. Its cost is ultimately much lower than its European counterpart, and the engine power is much higher. Such homemade products from the Ural motorcycle will appeal to everyone who likes to create with their own hands.
Design Features
Craftsmen from the city of Barnaul received a successful version of a homemade ATV:
- The Ural motorcycle was taken as a basis; in particular, the frame with the engine was left.
- The reinforced gearbox was removed from the motorcycle of another model of the domestic motorcycle - “Dnepr”.
- The drive had to be made of a cardan type, due to the fact that options with sprockets and chains are less reliable.
- Two pairs of wheels fit well from the Gazelle car. The appearance of the ATV turned out to be rough and uncouth.
The engine power of a homemade ATV allows you to pull a load weighing up to 500 kg. Without a load on an asphalt road, the wheels slip during the start.
The management of Russian automobile factories should think about the issue of producing domestic ATVs and tricycles, taking advantage of the excellent experience, for example, of Barnaul craftsmen. Moreover, most of the components had already rolled off the assembly lines of these enterprises at one time!
Homemade Ural motorcycles can look different. In any case, this technique is impressive.
Manufacturing of structural elements
Before starting to manufacture structural elements, prepare a drawing, required materials and tools. You can take ready-made drawings based on the Bullfinch or Vepr snowmobiles. Tools you will need:
- welding machine;
- pipe bender or finished frame;
- hammer;
- screwdrivers.
Since the design of the mini snowmobile is low, the seat is made of durable waterproof material. The fuel tank is made of metal. Its volume should be from 10 to 15 liters. You can use a motorcycle chain as a drive.
Contactless ignition at Tula TMZ. Easily!
Any lover of domestic motorcycles knows that the original cam ignition is a rare slag and needs to be changed. What to change to is a rhetorical question. Of course, for normal operation you need to install contactless optical ignition.
You can come up with something with a Hall sensor, it will work. But this is already the last century. The most modern and technologically advanced solution is optical ignition based on LEDs.
I found a seller on a well-known domestic social network and signed up. The reviews are good, it doesn't look like a scam.
The trading approach is my favorite. These people clearly know how to sell a product.
The main product is the optical ignition elements themselves. If you want, you can buy only them, and buy the rest yourself.
I’m not sure about the straightness of my hands - buy the extended set, there are more details, you don’t have to do anything yourself. But for some spare parts you will have to run to the Zhiguli store.
If you don’t want to run anywhere, buy the richest set, it has everything. This is definitely enough, you don’t need to look for anything except electrical tape.
Of course, I didn’t frown at the overpayment of 200 rubles, I value my time more, and ordered everything at once, including a handful of candles, some repair kits and spare rubber bands. Everything that was available in Tula.
We carefully study the instructions. Let's go! Nothing complicated. Even the right ATV tires were more difficult to buy and install.
We dismantle the grille and unscrew the standard cam ignition. Goodbye source of unstable idle, we won't see you again.
Here, in fact, is the most important detail in contactless ignition - the optical sensor. In the center lies a beautiful one. For motors, scooter “Ant”, “Tulitsa” and “Tourist”) - it looks like this. For IZH motorcycles and sidecars, SZD is almost the same, very similar.
We also throw out the standard coil (ignition coil in a smart way) and the capacitor. There is no place for them in the new system.
First of all, we mount a tricky-shaped curtain made of an equally tricky material onto the flywheel. Two screws and it's in place.
Then we screw on the sealing rubber. Again two screws, again everything is simple and clear.
We install the grille, and then screw on the heart of the contactless ignition - an optical sensor with an LED.
It's time to think about where to put the switch. It is advisable to install it on some kind of massive piece of hardware so that there is good heat dissipation. The most massive piece of iron in Tula is the frame.
We drop the tank and see that there is a lot of space under it, there is even a hole very suitable for a threaded rivet (comrade engineers, forgive me, of course, a hole). We drill another hole and install two threaded rivets.
Great! There's simply no better place for a switch. The perfect place.
We put the wires in a special “snake skin” type insulation and connect them according to the instructions. Again, everything is simple, if you distinguish colors, connect it.
Don’t forget to install a Zhiguli bobbin instead of the standard bobbin. They say it will be much better. There is no reason not to believe.
We adjust the ignition at top dead center. Again, everything is according to the instructions. You know what top dead center is, right? If you know, there shouldn't be any problems. If you don’t know, go play on the computer; oil-fired motorcycles are not for you.
Snowmobile assembly
You can make your own snowmobile from a moped, chainsaw or motorcycle. The circuit for a homemade snowmobile made from a chainsaw needs to be developed independently, since each part has its own characteristics. The equipment is assembled in stages, adhering to the drawings:
- First, the frame is assembled. The middle part of the structure is made from steel corners measuring 50x36 cm. The front and rear parts are assembled from steel sheets with a thickness of 2 mm or more.
- To install the track mechanism and guides, 2 holes are made. They must be end-to-end. Tensioners for track wheels are mounted on both sides of the side members. The tensioner helps adjust the track and creates tension in the second stage tensioner.
- To install track rollers, special brackets are required. They are welded to the side members, on the bottom side at the same distance from each other.
- The rollers are installed in the open slots of the brackets. Installation is carried out from the bottom. The rollers are positioned on 5 axes.
- Bushings are made from pipes of suitable diameter and installed between each roller.
- The bracket axes are secured with nuts and locknuts. This fastening will allow you to maintain the required distance between the side members and strengthen the frame.
- Mounting stands are made for the chainsaw gearbox. They are made from 3 metal corners. Then the intermediate shaft of the chain drive is mounted.
- The frame is ready. A seat is installed between the rear and middle parts. You can use a car seat or a simple box as a seat.
- Control handles are welded to the pipe - this will be the steering wheel. It is installed on the front of the frame, after drilling a hole.
- To create additional strength, the area where the racks are attached is equipped with metal gussets.
- The drive shaft is made from a pipe. To attach the gears, a round flange is inserted into it.
- A steering mechanism for a snowmobile is created from an old motorcycle that has a three-lever control.
The finished snowmobile has simple controls and can be used for children's parties. This is a lightweight and compact equipment that can be transported in the trunk of a car. If snowmobiles are made on the basis of a walk-behind tractor, then they are divided according to the material of the snow hooks: “pipe bugs” and “stick bugs”. Here, simple plastic water pipes are used for the tracked structure. This protects it from deformation, but at the same time reduces the level of adhesion between the tracks and snow.
Source: specmahina.ru
Crawler all-terrain vehicle Ural
Dear visitors of the site “ Samodelkin Friend ”, from the material provided by the author, you will learn how to make a Ural all-terrain motorcycle with your own hands.
Step-by-step assembly photos and videos are attached. This all-terrain vehicle has a wheel-tracked base, which increases its off-road and snow capability several times, and due to the tracks, the weight of a heavy-duty motorcycle is evenly distributed. Wheeled-tracked motorcycles were used during the Great Patriotic War by Germany, many probably remember from the films. In Peaceful Life, a motorcycle is used exclusively for economic purposes, for transporting goods on a small body from a walk-behind tractor and for fishing and hunting trips.
The motorcycle remains unchanged except for its rear part, VAZ wheels were used as road wheels, the tracks were originally made from tires from a GAZ truck, but during testing they turned out to be too heavy and narrow, the author decided to replace and make homemade tracks from conveyor tires tapes and professional pipes, the width of the caterpillar increased and became equal to 40 cm.
And so, let's take a closer look at the design and features of the tracked all-terrain vehicle.
Materials
- VAZ wheels 4 pcs
- conveyer belt
- professional pipe
- bolts, nuts, washers
- checkpoint
- clutch disc
- rear axle VAZ
- axle shafts 2 pcs
Tools
- welding inverter
- Angle grinder (grinder)
- drill
- set of wrenches
- plumbing and measuring tools
Photos and videos of a homemade caterpillar all-terrain vehicle assembled with your own hands.
Author: Anatoly Semagin from Krasnoyarsk DRIVE2.RU
Principle, device diagram, theory, how everything should work out
All work begins with a plan and drawings, which can then be relied upon. Diagrams and drawings will be required in order to take into account all the components and their location, the relationship between each other and the operation of the mechanism as a whole. Pay close attention to the location of each unit, as if you make a mistake, the snowmobile simply will not move.
Work plan:
- First, the chainsaw motor is attached to the made frame.
- Skis are installed in the steering part of the snow scooter, which are the main element of movement.
- Then the steering is installed.
- To set the mechanism in motion, it is necessary to install tracks at the rear.
- Connect the track disk and the chainsaw motor sprocket.
- Finally, the driver’s seat is installed, which is mounted on a specially equipped place.
To equip the steering on a snowmobile, borrow the handlebars from a moped or bicycle. The main task will be to properly secure the steering wheel so that when you turn, the skis also turn.
This is interesting: How to make a snow blower with your own hands from a chainsaw (video)