These problems can be eliminated by switching to BSZ. Make the adjustment with the low beam on in accordance with the screen markings in Fig. Ignition coil 5.
As a result, a charge of less than 12 V appears on the spark plug, which poorly ignites the combustible mixture in the cylinders. Photo gallery: IZH Planet 5 generator and its design IZH Planet 5 generator Generator design Battery To supply all components, a low-power 12-volt energy storage device is required, since IZH Planet 5 does not have a starter. WIRING TO IZH (PLANET 5)
The wire must be screwed into the lug until it stops. Wiring diagram for IZ Planet 5: connecting instruments and controls Tip: a video on servicing a particular motorcycle component is a good help these days.
It is unable to hold the ignition angle advance settings for a long time, has failures in operation and low accuracy. The sound strength can be adjusted using an adjusting screw located on the body.
Battery for IZH 7 motorcycles.
You can create a modulator with your own hands. Elementary about the complex wiring of IL
Most common problems
Most often, the motorcycle in question loses or shifts poorly in second gear.
This may be due to careless turning on of speeds. For example, when picking up high speeds in first gear without neutral, when engaging the second speed gear, an impact occurs, which contributes to intensive wear of the unit. Therefore, it is not recommended to “spin” the first speed too much. If, nevertheless, problems with the second position continue, there are several options for resolving them. In some cases, the simplest method will help, without completely disassembling and then reassembling the Izh-Planet 5 box. It is necessary to place the motorcycle on the right side, and then remove the kick starter and gear shift foot along with the shaft. Next, the crankcase cover and clutch basket along with the discs are dismantled.
When the gears of the box wear out, the meshing of the teeth deteriorates. In turn, this leads to slipping, jerking and failure of the second gear. Another reason could be wear on the input shaft bearings. Since it moves slightly to the left due to vibration, it is necessary to move it into place with light blows using a mallet. The installation of washers of suitable diameter will allow you to fix the element in the desired position. Then the bearing stopper and other dismantled parts are reassembled in the reverse order.
Checking the motor transmission circuit
We install the sprocket and the outer drum of the clutch basket on the shafts, tighten the bolt on the drive sprocket and check the chain for deflection.
- If the chain sags by more than 20 mm, replace it with a new one.
My chain is new and therefore has minimal deflection.
Maintenance Features
Often during operation it is necessary to correctly set the gap between the contacts of the breaker. To do this, you need tools and a diagram to see which elements need to be dismantled.
The algorithm of actions is as follows:
- place the motorcycle on the stand;
- turn on neutral;
- unscrew the spark plug from the cylinder;
- remove the engine crankcase cover;
- turn the crankshaft until the contacts are as open as possible;
- using a screwdriver, loosen the locking screw;
- using a special feeler gauge, set the gap to 0.35-0.45 mm and fix it with a screw;
- we collect everything in reverse sequence;
- turn on the ignition and start the engine. Its stable operation at idle indicates that the adjustment has been correctly performed.
In general, all the wiring of IZH Planet 5 is very easy to do with your own hands.
The need for such work often arises when operating a motorcycle:
- in wet weather, driving in the rain for a long time (oxidation or dampness of electrical contacts);
- when traveling over rough terrain, replete with vegetation and bushes (mechanical damage to wiring);
- when used in winter (snow and slush stick to the wires and can damage them).
Often the sound signal suffers during operation. Its malfunctions manifest themselves in the form of deterioration in sound quality.
To restore its functionality, you must perform the following procedure:
- loosen the locknut using an open-end wrench;
- turn on the ignition;
- press the button to turn on the sound signal;
- use a screwdriver to adjust the tone;
- repeat the procedure until we get a clear and loud sound;
- tighten the control nut.
Conclusions: we are confident that this article will help you in servicing motorcycles of the IZH family (see also the article about). Both the attached diagrams and description will help you avoid making mistakes during operation.
While easily fixing mechanical failures, motorcyclists experience difficulties if the electrics fail. It’s completely in vain, the wiring diagram of the planet Izh 5 is not complicated, it’s easy to figure out.
There is no need to have special stands and equipment for repairs. A minimum knowledge of electrical engineering and a simple avometer (tester) is enough; even often you can get by with just a test lamp.
We will tell you in more detail about the main electrical wiring components and possible malfunctions. The Izh Planet wiring diagram makes it easy to find a broken wire or damaged insulation (for example, a bad contact always gets hot).
In this case, we look to see if there is a spark at the coil output and at the output at the spark plug contact. Let's take a closer look at the main wiring components of the Izh Planet.
conclusions
We express confidence that the IZH Planet 4 motorcycle, which has been preserved in use, will still serve its owners well. Especially if they have video and photo materials that reveal the operating features of electrical wiring and main components. And our article will help you understand all the technical nuances of the motorcycle.
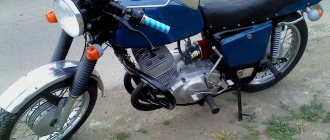
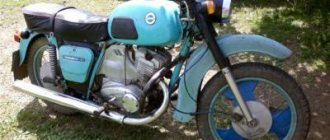
“IZH Planeta-4”, the photo of which is presented below, is a classic version of a middle-class road motorcycle, designed for riding on roads of completely different surfaces. The production of this model was carried out by the Izhevsk Machine-Building Plant. The popularity of the motorcycle speaks for itself, because almost everyone had (and still has) one.
Motorcycle Izh Jupiter 5 - technical specifications and photos
Soviet motorcycles today are considered valuable transport, because back then they produced really high-quality and fast equipment. The Izh Jupiter 5 motorcycle is considered one of these legends of the USSR.
The Izhevsk plant produced several models, including Planet 5 and others. But Jupiter 5 was remembered primarily for its unpretentiousness on roads and maneuverability. With its small dimensions, the model was able to achieve low fuel consumption.
pros
- powerful engine;
- sharp at start;
- spare parts for Izh Jupiter 5 are inexpensive and available;
- soft suspension;
- low cost;
- has 2 cylinders.
Minuses
- weak front fork;
- requires good ignition settings;
- high fuel consumption;
- Motorcycles today require frequent repairs.
Technical characteristics of Izh Jupiter 5
The design of the motorcycle was created in such a way that in the end Izh could ride equally comfortably both on the highway and on uneven roads. Unlike its brother IZH Planet 5, this model had 2 cylinders, which means more power. Also, the owner of the motorcycle could start the engine more easily, which is explained by the absence of the leg returning when started.
Review
Classic transport has always been valued since the USSR, and 20 years ago Jupiter 5 was one of the best.
Today, most riders ride foreign fast motorcycles, but occasionally you can meet a former legend of the 80s and 90s.
In those years, only his brother Planet 5 competed with Jupiter, but he could not compare with the motorcycle in terms of characteristics. Their main difference was the difference in cylinders, and therefore power.
If we continue to compare these two competitors, we can highlight the fact that both models had almost the same data.
For example, they had one tubular frame, and a special subframe was installed to better secure the rear wheel.
In general, the entire design of Jupiter 5 was quite standard and simple, the engine was attached to the frame, the fuel tank was located above, and the headlight and dashboard were installed on the steering wheel.
There were also 2 exhaust pipes installed that ran through the entire motorcycle. Sometimes the pipes got hot and could cause a burn, but the manufacturer installed them below the footpegs to keep the passenger as safe as possible.
Even the first models of the Izh Jupiter 5 motorcycle had simple drum brakes with a mechanical drive, but subsequent modifications received a front disc brake with a hydraulic drive.
Motorcycle appearance
When the Jupiter 5 model came out, its design was already well-known, because it was inherited from the Jupiter 4 motorcycle. But soon the Izh Planet 5 appeared on sale, and the developers saw that they could borrow several design elements.
The first modification had a square-shaped dashboard, which consisted of several indicators, an ignition switch and a speedometer. But soon its appearance was redesigned, and instead of one dashboard there were two. On the first part they placed warning lamps, and on the second part they decided to put a speedometer.
The design of the fuel tank has also been slightly redesigned, with rubber pads on the knees and the shape of the tank itself has become slightly different. Accordingly, in the new modifications of the Moto Izh Jupiter 5, it received a different, longer seat that ended at the brake light. This innovation is still considered stylish and modern.
Being a workhorse, the motorcycle had a fairly sporty appearance and excellent top speed. With a power of 25 hp. the motorcycle could accelerate to 120 km/h.
This is a completely standard indicator, because another representative of the Dnepr could give a maximum speed of 110 km/h. In severe frosts down to 30 degrees, the unit started up perfectly, which cannot be said about the current new products.
Unfortunately, many owners complain of frequent engine breakdowns due to their long lifespan.
Price
Today, a motorcycle of this model is not so difficult to find; in Soviet times it was bought in large quantities, so today you just need to find out how much the Izh Jupiter 5 costs. Of course, the price depends on the condition, because over such a long period many parts could become faulty.
Even during the release of the Izh Jupiter 5 motorcycle, its price was quite high - 1,050 rubles. But this did not stop buyers; they wanted a comfortable and fast motorcycle, which was the best then. But still, compared to other motorcycles, this model had a relatively low price. For example, then new Ural motorcycles had a price of 1,870 rubles.
If you want to buy a legend of the USSR today, be prepared to pay 55,000 rubles for a new motorcycle. Yes, they are still being reliably produced. If this price is too high for you, buy a used model - its price ranges from 5 to 40 thousand rubles.
checkpoint
The four-speed gearbox is three-shaft and is located in the same block with the engine. The gear ratio to the clutch from the engine is 2.17, while to the rear wheel from the gearbox it is 2.33. A little more detail about the remaining gear ratios: 1st - 3.88; 2nd – 2.01; 3rd – 1.26; 4th – 1.0. The suspension of the front part of the motorcycle is telescopic type, and the rear part is of a lever type, with shock absorbers (spring-hydraulic). The rear brakes are drum type, the front brakes are hydraulically driven disc.
Ignition system
The ignition chopper is used to ignite a spark at a certain point in the piston stroke. In early modifications of the electrical wiring of Izh Planet 5, contact was mounted, later electronic.
The main malfunctions of this unit:
- Burning of breaker contacts is determined visually.
- Failure of a sensor or switch elements - the easiest way to detect it is to use the method of installing a known-good unit. The lubrication system sensor valve is also checked using the same method.
- An incorrectly set ignition timing is visible from the fuzzy operation of the engine. It can be eliminated by adjustment using special probes.
The ignition coil increases the voltage to several kilovolts so that the discharge can ignite a spark at the spark plug electrodes. The secondary winding is made of a fairly thin wire; most often it burns out. Although a breakdown between the turns or onto the housing is also possible. The same troubles can (but less often) happen to the primary circuit. Everything is revealed using resistance measurements.
Comments and reviews
The standard wire should be re-soldered from terminal 5 to terminal 6. How to switch to contactless SZ?
It is unable to hold the ignition angle advance settings for a long time, has failures in operation and low accuracy. Thus, the changes made will make the electrical wiring of the IZH Jupiter 5 motorcycle more reliable and efficient.
That, in turn, is responsible for the spark that detonates the fuel. Egnition lock. Spark plug for IZH 7 motorcycles. Wiring diagram for IZH Planet 5: connecting instruments and controls Tip: a video on servicing a particular motorcycle component is a good help these days. The device of the recycled generator is to produce a modulator-breaker of the electrical circuit; install a breaker on the rotor shaft or generator. They can occur in the primary circuit between the coil and the 12V battery or due to operating conditions. The disadvantages of this system can be listed for a very long time, so owners switch to electronic ignition, thereby increasing power, reducing consumption and getting a flat torque and power curve. The sound strength can be adjusted using an adjusting screw located on the body. Photo gallery: IZH Planet 5 generator and its design IZH Planet 5 generator Generator design Battery To supply all components, a low-power 12-volt energy storage device is required, since IZH Planet 5 does not have a starter. Motorcycle fuse IZH 7.
Wiring Problems
For the created ignition system, it is necessary to modify the IZ Jupiter 5 generator, the circuit of which will not require major changes. When operating the IZH Planet 4 motorcycle, the operation of the rectifier-regulator had a positive effect. IZH 7 motorcycle fuse. Any electrician can handle this task. The author of the video is Viter Electronic.
The turn signal switch is located on the frame under the gas tank. Spark plug tip for IZH 7 motorcycles. Before adjusting, install the motorcycle on a horizontal platform perpendicular to the Screen at a distance of 10 m. Ignition installation for IZH 7 motorcycles. An additional toggle switch is installed that turns off all consumers when the engine starts.
For example, on our website there are materials on servicing several brands and models, and you can get the information you need from them, see: Replacing the head light Riding Jupiter 5 at night is the lot of the most daring and experienced bikers. A visual inspection of the primary circuit can reveal problems with connections, contacts and the ignition switch. Wiring diagram IZH Planet 5
System assembly and installation
The contacts in the breaker, the capacitor, the ignition bobbins and the armor wires, which are part of the previous ignition device, are probably eliminated. The switch should be installed in the glove compartment on the right, and the ignition coil directly under the tank. There are no gaps for fastening on the reel, which means it can be attached using a thick layer of adhesive tape. The standard bolt is also eliminated along with other parts.
In place of the bolt, install a pin of the specified size and put on a washer. Then, the rotor is tightened with a nut located at its end. The hall sensor is attached to the stator by any means. The basic rule when installing it is to set the optimal cross-sectional distance of the modulator and the ratio of the radius and line of symmetry.
When the hall sensor can be secured, we apply the modulator. It should fit into the hole made in the sensor. In most situations, there is a discrepancy between the sizes, so it is necessary to place washers on the stud. If you manage to maintain the required gap, it is recommended to install an engraver and tighten the modulator with a third-party nut.
Specifications.
The serial Planet 5 had the following main characteristics:
- base – 1.45 m;
- frame – welded, tubular;
- dimensions;
- Length – 2.20 m,
- Width – 0.81 m,
- Height – 1.20 m,
- weight – 160 kg;
– 175 kg;
engine – two-stroke single-cylinder; cooling option – air; cylinder diameter – 72 mm; working volume – 345 cubic meters. cm engine power > – 22.0, hp; maximum speed – 120 km/h; fuel consumption - 5.0 l (90 km/h); oil and gasoline mixture ratio (A 76) - 1/30; battery voltage – 12 volts; clutch - multi-disc; gearbox – four-speed.
These parameters and engine performance provided the motorcycle with high traction characteristics at low speeds, which allowed for confident movement, especially on rural roads.
Electrical diagram of the car IZH - MOTORCYCLE
Electrical circuits of the ignition systems of the IZH Jupiter 5 motorcycle
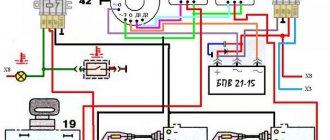
1 – parking light lamp – A 12-4; 2 – high-low beam headlight lamp – A 12-45:40; 3 – control lamp for generator operation – A 12-1; 4, 5 – speedometer scale illumination lamps – AMN 12-3; 6, 16, 17, 20, 23, 30 – lamps for the direction indicators of the motorcycle and side trailer; 7 – combination switch (right switch); 8 – brake light switch for the front wheel brake; 9 – breaker; 10 – spark plug; 11 – ignition coil; 12 – generator; 13 – rectifier-voltage regulator BPV14-10; 14 – brake light switch for the wheel brake; 15, 19 – side trailer clearance lamps – A 12-5; 18 – brake light lamp for side trailer – A 12-21-3; 21 – motorcycle brake light lamp – A 12-21-3; 22 – motorcycle rear marker lamp – A 12-5; 24 – battery; 25 – fuse; 26 – “neutral” lamp switch; 27 – ignition switch; 28 – sound signal; 29 – alarm switch (left switch); 31 – turn signal switch; 32 – control lamp for high beam headlights – A 12-1; 32 – control lamp “neutral” – A 12-1; 33 – control lamp for direction indicator lights – AMN 12-3; Symbols on the BPV14-10 block (items 12,13): XI – “-” field windings; X2 – “-” battery (“ground”); ХЗ – “+” output to the control lamp; X4, X5, X7 – phases of the stator winding of the generator; X8 – “+” of the battery.
IZh Planeta-5 (electronic ignition system) 1, 13, 28, 32 – lamps A 12-21-3 turn signal lamps; 2, 14, 27, 33 – direction indicator lights; 3 – control lamp A 12-1 “high beam”; 4 – lamp A 12-4 – parking light; 5 – headlight; 6 – lamp A 12-45-40 high beam – low beam headlights; 7 – indicator lamp AMN 12-3-1 direction indicator; 8 – control lamp A 12-1 “neutral”; 9 – control lamp A 12 “oil”; 10 – lamp AMN 12-3-1 speedometer lighting; 11 – speedometer; 12 – instrument panel; 15 – combination switch (right switch); 16 – brake light switch for the front wheel brake; 17 – ignition switch; 18 – sound signal; 19 – turn signal switch; 20 – spark plug; 21 – spark plug tip; 22 – ignition coil; 23 – switch; 24 – fuse; 25 – generator; 26 – sensor; 29 – lamp A 12-21-4 brake lights; 30 – rear light; 31 – lamp A 12-5 of the rear marker light of a motorcycle; 34 – brake light switch for the rear wheel brake; 35 – rectifier-voltage regulator; 36 – capacitor 2200 uF 63V; 37 – battery; 38 – oil supply valve-sensor; 39 – lamp switch “neutral”; 40 – alarm switch (left switch).
3710; 7 – electric fan; 8 – lamp switch “neutral”; 9 – lamp A 12-4; 10, 13 – lamp AMN 12-3-1; 14 – combination switch (right switch); 15 – switch IZHVK 103; 16, 28, 32, 35, 39 – lamps A 12-21-3; 17, 29, 34, 38 – direction indicator lights; 18 – overheat indicator sensor TM111; 19 – ignition switch; 20, 23 – spark plugs; 21, 24 – spark plug tips; 22, 25 – ignition coils; 26 – generator GP7; 27 – rectifier-voltage regulator BPV14-10; 33 – lamp A 12-5; 30 – switch IZHVK107; 31 – rear light 111.3716; 36 – battery; 37 – fuse; 40 – alarm switch (left switch); 41 – turn signal switch.
IZ Jupiter electrical circuit - second option
Wiring diagram IZH 49
Electrical circuit of the IZH Junker motorcycle
CAR ELECTRONICS REPAIR BATTERY CHARGERS
Brief general information
The engine that was installed on the IZH Planet-4 motorcycle had quite a lot of thrust. At the same time, the work was carried out at relatively low speeds. It was possible to attach a side trailer (passenger or cargo type) or a universal module directly to the motorcycle itself. In addition, it was possible to attach additional knee pads and a trunk. In order to reduce the effort when disengaging the clutch, IZH Planet-4 uses a multi-plate clutch. Together with the air cleaner, vibration dampers for the cylinder fins of increased volume help reduce the noise level produced by the motorcycle. The front wheel of this model is equipped with a hydropneumatic suspension with a disc brake.
Do-it-yourself engine tuning for IZH Planet 5
Having figured out what the tuning of the IZH Planet 5 motorcycle will look like, the rider may find the power insufficient. So it is, because the factory ones are 20 - 25 hp. The original engine is enough for tight streets, but on the highway the engine stops the speedometer at 120, beyond which it is quite difficult to get out. That is why, the next step is to tune your engine. The first step is to conduct a complete audit of the main elements that affect power: ignition, air filter, carburetor, exhaust. 50% of success lies in the correct setup and maintenance of these “capricious” motor components. If everything is in order, but there is still not enough power, then there are two further options:
- The first is modification of existing units;
- The second is a comprehensive tuning of the IZH Planet 5 engine with replacement of parts.
The first option is suitable for those who are trying to maintain the factory condition of their bike. Then, to drive a little faster, you can clean the exhaust, which inevitably becomes clogged with oil residue. The next step may be to install higher flow jets on the carburetor. At the same time, we inspect the filter element; it should fully cope with its task; monitor the oil level. The last item will be replacing the spark plugs and fine-tuning the ignition. With the right approach, you can get the most out of your engine. The maximum speed will not increase, but the engine response will definitely improve. Some models have a “traction” drive sprocket with a large number of teeth; if you replace it with a “high-speed” one, you can add at least 10 km/h to the maximum speed. Riders who are primarily concerned about the sense of speed should prepare to study a lot of specialized literature, because in order to noticeably improve the engine's power, its main components will have to be replaced. It’s worth starting with an audit of the cylinder-piston group. It is best to immediately replace the crankshaft with bearings, connecting rod and piston with rings with analogues from Japanese models. New spare parts will be stronger and lighter than the old IL Planet 5 tuning will significantly improve the engine, allow it to spin up more easily and preserve its service life. Next we replace the intake system, this is a new, more efficient carburetor. Behind it is installed a low-resistance filter and another important intake element - a reed valve. The exhaust should also be replaced. Only part of the knee will remain from the old spare parts, and a special resonator will be welded behind it (diagrams with dimensions can be found on the Internet).
Due to the characteristics of 2T engines, the exhaust cannot be direct-flow; it must provide a reverse impulse, which will prevent the air-fuel mixture from splashing out of the combustion chamber. After the resonator, a muffler is installed, which in general may be absent if you prefer a loud roar of the engine. Last but not least is the ignition system. It is better to immediately replace it with an electronic one, because the contact one almost always gets lost and has to be adjusted very often. The electronic system eliminates the need for regular inspection of the mechanism and allows you to maintain the power and torque curve at any speed.
Maintenance
The owner can independently perform some maintenance procedures:
- check the motorcycle generator if the battery loses charge;
- set the gap between the breaker contacts;
- adjust the quality of the sound signal.
The need to inspect and adjust the wiring arises if:
- the motorcycle moves in the rain for a long time, as this causes oxidation of the contacts;
- a motorcyclist rides in an area with a lot of vegetation that damages wiring;
- The driver rides in snow in winter, which can stick to electrical wiring parts and damage them.
Self-check of the Planet 5 motorcycle generator in case of loss of charge
The cause of loss of charge in the IZH Planet 5 battery is most often a breakdown of the generator.
To check it yourself you need:
- multimeter device;
- straight screwdriver.
Step-by-step instruction
The following steps must be followed:
- Disconnect the wires from the battery and remove the generator cover.
- Disconnect the top 5 wires from the generator, first unscrewing their fastenings. In order not to mix up the wires during assembly, it is worth marking them.
- Measure the winding resistance using a multimeter in ohmmeter mode. To do this, you need to touch the body with one probe, and the other should be connected in turn to the 3 wires of the winding. There should be no short circuits, as indicated by the inscription on the multimeter screen.
- Test the resistance between the stator contacts: you need to touch them one by one with the multimeter probes. The value on the screen should be 8 ohms.
The presence of a short circuit in the 3rd stage or a discrepancy in the indicators in the 4th will indicate problems with the generator.
Photo gallery: stages of checking the IZH Planet 5 generator in case of loss of charge in pictures
How to correctly set the gap between the contacts of the breaker?
In order to set the gap between the breaker contacts, you will need:
- straight screwdriver;
- wrench 10;
- candle key;
- probe 0.4 mm thick (+/– 0.05 mm).
Next, you need to follow the steps sequentially:
- Place the motorcycle on a stand and place the gearbox in neutral.
- Remove the right crankcase cover and unscrew the spark plug.
- Using a 10mm wrench, grab the generator rotor mounting bolt and turn the crankshaft to a position where the contacts are as far apart as possible.
- Loosen the screw securing the contact.
- Place the probe between the contacts and adjust the tightening of the eccentric screw until the probe passes the contacts with little resistance.
- Tighten the contact fixing screw.
Photo gallery: adjusting the gap between the breaker contacts
Troubleshooting the audio signal and improving signal quality
Poor sound signal quality is mainly caused by improper adjustment.
The following tools will be needed for setup:
- wrench 7;
- a simple screwdriver.
Step-by-step instruction
To adjust, do the following:
- Loosen the locknut with a wrench.
- Turn on the ignition.
- Press the button to turn on the sound signal.
- Adjust the sound by rotating the adjusting screw.
- When the desired result is achieved, tighten the locknut.
Electrical circuits of the ignition systems of the IZH Jupiter 5 motorcycle
1 - parking light lamp - A 12-4; 2 - high beam - low beam headlight - A 12-45:40; 3 - indicator lamp for generator operation - A 12-1; 4, 5 — speedometer scale illumination lamps — AMN 12-3; 6, 16, 17, 20, 23, 30 — lamps for the direction indicators of the motorcycle and side trailer; 7 - combination switch (right switch); 8 — brake light switch for the front wheel brake; 9 - breaker; 10 — spark plug; 11 — ignition coil; 12 - generator; 13 — rectifier-voltage regulator BPV14-10; 14 — brake light switch for the wheel brake; 15, 19 — side trailer clearance lamps — A 12-5; 18 — brake light lamp for side trailer — A 12-21-3; 21 — motorcycle brake light lamp — A 12-21-3; 22 — motorcycle rear marker lamp — A 12-5; 24 - battery; 25 - fuse; 26 — neutral lamp switch; 27 — ignition switch; 28 — sound signal; 29 — alarm switch (left switch); 31 — turn signal switch; 32 - high beam headlight control lamp - A 12-1; 32 — control lamp “neutral” — A 12-1; 33 - control lamp for direction indicator lights - AMN 12-3; Symbols on the BPV14-10 block (items 12,13): XI - “-” excitation windings; X2 - “-” battery (“ground”); ХЗ - “+” output to the control lamp; X4, X5, X7 - phases of the stator winding of the generator; X8 - “+” of the battery.
Head lighting
In European countries, there is a requirement that motorcycles and similar equipment must be equipped with a battery with permanent magnet generators. There are no such restrictions in the Russian Federation. With the generator installed, the IZH Planet-4 motorcycle does not require a removable current source to start the engine. Accordingly, this is why the basic package does not include a rechargeable battery.
The headlight circuit consists of a rear brake light, a parking light, and a blue warning light. The motorcycle is equipped with a speedometer with mileage indicators (daily and total), a tachometer, indicator lamps for turn signals and head lights, a voltmeter and an engine temperature sensor. Very often during operation it is necessary to adjust the gap between the contacts of the breaker. To do this, it is best to use a diagram and special tools to know which elements need to be dismantled.
The wire must be screwed into the lug until it stops. Wiring diagram for IZ Planet 5: connecting instruments and controls Tip: a video on servicing a particular motorcycle component is a good help these days.It is unable to hold the ignition angle advance settings for a long time, has failures in operation and low accuracy. The sound strength can be adjusted using an adjusting screw located on the body.
Battery for IZH 7 motorcycles.
You can create a modulator with your own hands.
Elementary about the complex wiring of IL
Required Parts
In order for the ignition system to work correctly, a number of auxiliary parts are required. They are listed below:
- Switch for BSZ VAZ cars. You should not choose exclusively from the low price segment. The Astro switch has a lot of positive reviews;
- Hall Sensor. The best option for Jupiter 5 is a similar manufacturer VAZ. By purchasing it in branded packaging, you protect yourself from counterfeits;
- Ignition coil with two terminals. You should choose between the gazelle engine number 406 or Oka with an electronic ignition system;
- A pair of silicone armor wires with rubber caps;
- The modulator is a butterfly-shaped plate made of iron.
Modulator
The most difficult stage is the production of the modulator
It is important to maintain the required shape. The more reliably the required dimensions are observed, the lower the likelihood of problems occurring after implementing the system, that is, there will be no need to adjust it using a file
The ignition timing must match on any cylinder used.
The bolt hole must be located in the middle. Otherwise, the engine operation will not be synchronized. It is also recommended to check the integrity of the crankshaft bearings. If you find defects, you should immediately replace it.
The contact ignition is not able to work normally if the bearings are damaged. The thickness of the part should not exceed one and a half millimeters. If it is thin, it will not be possible to avoid deformation, and if it is thick, it will come into contact with the surface of the hall sensor housing.
To create the plate, it is allowed to use any material except steel. Aluminum and others should not be used as they are not magnetic. The drawing that must be followed can be found in the public domain. The presented diagram will be useful to those people who decide to modernize the vehicle ignition device. Below are methods for installing electrical ignition devices in Jupiter.
It must be turned by a professional turner. He will make a simple disk and draw on it the markings of elementary distances between the corners. Then, in accordance with it, you will cut out the necessary sectors at home. The cost of the modulator is seventy rubles.
It is not advisable to use an ordinary plate, since its width is less than twelve millimeters. This will not be enough to fully accumulate the energy resource in the coil. Of course, it can be installed, but achieving four thousand revolutions per minute will become impossible.
In addition to the above you will need:
A stud with an applied thread of seven millimeters, pitch 1, as well as a pair of nuts with washers of the corresponding parameters. The priority material for these components is brass. This is explained by the least magnetization of the plate from the generator rotor.
If you use a standard bolt, then difficulties may arise with the implementation of the ignition. The bolt tends to follow the modulator as it is tightened. However, it is necessary to observe the leading indicator, maintain the same position of the rotor and modulator, and tighten the bolt. It is advisable to use a pin, since many are not able to perform all the necessary actions in total;
A set of wires with connectors for ignition without contact from VAZ. This part can be purchased or made with your own hands.
Dashboard
The new instrument panel fits well into the appearance of the new motorcycle model, combining:
- Speedometer;
- Automotive type ignition switch;
- Control and warning lamps.
The display of warning lamps separately from the instrument scales had a positive effect on the information content. Now the driver can easily see their readings, additionally provided with inscriptions.
It is also easy to replace burnt out lamps:
- Using a Phillips screwdriver;
- Remove 3 screws (in the diagram above under No. 3);
- Remove the cover;
- Remove the failed lamp;
- Install working;
- Reassemble the shield in reverse order.
Battery
The battery in the motorcycle is low-power. The motorcycle does not have a starter, so its task is only to supply voltage to the ignition system and the generator excitation winding during starting. Thanks to the battery, designed for 12 volts, a stable start of the fifth Planet is ensured; up to the third model, the wiring was 6 volt, and the ignition was not always clear.
Possible battery malfunctions:
- - housings, plates, leakage of electrolyte.
- - determined by measurements using a hydrometer.
- - detected by measuring resistance.
- minus not on the body (frame) of the motorcycle - all the electronics will not work.
Generator
The motorcycle is equipped with a 3-phase alternator, which has an electromagnetic excitation circuit. The principle of its operation is based on some features. So, the electrical circuit of IZH Planet-4 looks like this: the current is supplied to the rectifier, which, in turn, converts it into direct current, then supplies it to consumers through the ignition switch. The factory instructions for the generator contain the following elements:
— voltage regulator with rectifier “BPV-14-10”;
— cam of the battery ignition system and contact unit of the ignition system;
For reference: the windings on the three-phase generators of the IZH Planet-4 motorcycle are connected in a “star” or “delta” type, and the rectifier is installed as a separate unit, and the electrical wiring is directly connected to it.
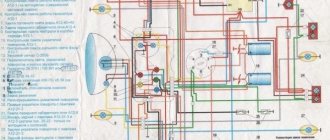
Wiring diagram IZH Planet 5
Detailed color wiring diagram for motorcycle IZH Planet 5
Explanations for the diagram
The numbers on the electrical diagram correspond to the following elements:
- Light switch, dimensions/low.
- Light switch, direction indicators and horn buttons.
- Front turn signals.
- Instrument panel lighting.
- Indicator lamp for generator operation.
- Oil pump operation indicator.
- A light indicating the operation of the neutral gear in the gearbox.
- Direction indicators.
- High beam headlight indicator.
- Front parking light bulb.
- Headlight lamp.
- Sound signal.
- Hall Sensor.
- Generator.
- Egnition lock.
- Turn signal interrupter relay.
- Neutral gear warning lamp sensor.
- Block BPV 14-10.
- Switch.
- Battery.
- Fuse.
- Relay block.
- Ignition coil.
- Foot brake light sensor.
- Rear direction indicators.
- Rear light with lamps.
Description of the symbols for the terminals on the rectifier-regulator block BPV 14-10:
- –x1 — “minus” of the generator excitation winding;
- –x2 — “minus” of the battery (“ground”);
- x2 - “positive” wire to the control lamp of the instrument panel;
- x3 - “positive” wire to the panel indicator;
- x4, x5, x7 - phases of the stator winding;
- x8 - “plus” of the battery.
Modernization
The production of the IZH Planet-4 motorcycle has undergone a number of changes. Thus, the design used a generator whose operation is based on permanent magnets. This part also has a contactless ignition system, which, in turn, operates independently of the battery. In addition, the engine itself is equipped with a special separation-type lubrication system pump. This eliminated the need to use a gasoline-oil mixture. The IZH Planeta-4 motorcycle is equipped with a four-speed gearbox with an eccentric mechanism for disengaging the clutch and a more powerful motor chain. The front disc brake is hydraulically actuated, and the suspension system uses improved shock absorbers. In addition, changes also affected the kinematics of the brake drive for the wheel located at the rear.