Are you going to learn how to ride a motorcycle? For this reason, did you go to a driving school to gain initial skills and learn the rules of the road in order to obtain a driver’s license of category “A” or “A1”? But for some reason, you need more knowledge and simple explanations that will help you learn how to ride a motorcycle easily? Our online publication offers you a small “Step by Step” guide, with the help of which anyone can understand how to quickly learn how to operate a motorcycle.
A motorcycle, just like a car, attracts a lot of attention. Many would dream of mastering it, but they mistakenly believe that driving a motorcycle is difficult and dangerous. In fact, it is quite simple, and if you follow all safety precautions and traffic rules, a motorcycle becomes no more dangerous than a car.
However, a motorcycle is still considered a vehicle with an increased risk of getting into an accident. But despite this, our tips will help you make the process of learning and gaining initial experience of driving motorcycles more enjoyable and comfortable.
001_MOTO_0210_062
Getting into any, even the simplest car for the first time, every driver intuitively looks for the handles and buttons for adjusting the seat and after a series of manipulations, as a rule, finds a position that is convenient for him. Then comes the turn of the mirrors, and in expensive cars, the steering wheel, radio, climate control, suspension functions, and so on. You can customize a modern car “for yourself” for a long time and selflessly.
But, watching those who are going to ride a motorcycle, sometimes you see a completely different picture - having hastily adjusted the mirrors, the newly minted test pilot takes off right off the bat. Often the results of such a “test” are extremely biased. A motorcycle that is not tuned for the driver, just like a musical instrument that is not tuned, is no fun!
We often forget that modern motorcycles, like their ancestors, have a rich arsenal of adjustments that can improve the driver’s comfort, and, therefore, the degree of his active safety.
ROAD MOTORCYCLES. Classic design, headlight mounted on the fork legs, straight, comfortable fit. Once you're in the saddle, place your hands on the handlebars and your fingers on the clutch and brake levers. Comfortable? Sure? The hands on the steering wheel should lie naturally, continuing the straight line of the forearms, and the strength of the index and middle fingers should be sufficient to confidently depress both the clutch and the front brake.
Driving a motorcycle and using vision
Due to evolution, even an untrained person (and even more so a trained person) is capable of determining the distances and speeds of movement of various objects relative to himself with satisfactory (in the range of “civilian” conditions) accuracy. However, to do this, both eyes must be directed at the observed area. In other words, to get a good estimate of the distance and speed of movement, you can’t just squint your eyes, you need to turn your head and look in the direction of the observed area. Since the priority area of observation when driving a motorcycle is obviously its trajectory, most of the time the head and gaze should be directed precisely along the planned trajectory of movement. To be able to
When braking heavily in a straight line, the gaze is directed far in a straight line. Don't look at the obstacle
plan the trajectory in advance - you should look along the trajectory as far as possible. Typically, to effectively plan your movement, it is recommended to view the distance from one to twelve seconds.
005_MOTO_0210_063
On road motorcycles, the landing should be natural: the back is almost straight, the arms are slightly bent at the elbows and relaxed, the hands rest freely on the handlebars.
The seating position should not restrict the movement of the steering wheel—the outer handle should not be reached for, and the inner handle should not push or pinch your hand. If you cannot sit comfortably, try adjusting the position of the steering wheel. On road motorcycles, the landing should be natural: the back is almost straight, the arms are slightly bent at the elbows and relaxed, the hands rest freely on the handlebars. The seating position should not restrict the movement of the steering wheel—the outer handle should not be reached for, and the inner handle should not push or pinch your hand. If you cannot sit comfortably, try adjusting the position of the steering wheel.
As a rule, there is a mark on the steering wheel in the area of the attachment point, which, according to the designers, should coincide with the parting plane of the steering wheel bed covers. But if your hands are uncomfortable, you can turn the steering wheel slightly from the base position (away from or towards you). Remember that on the steering wheel covers you need to tighten the front bolts first (to the specified torque), and only then the rear ones. As a result, at the back, between the covers and the crossmember, a small but necessary gap is obtained. After adjustment, carefully turn the steering wheel from lock to lock. Make sure that in the new position it rotates freely and does not interfere with motorcycle parts.
A little effort
The classic way to start the engine when there is no battery charge is with a pusher. It is used by bikers of all ages and nationalities as this method is effective for all manual transmission motorcycles. Unfortunately, the latest technology with semi-automatic and robotic transmissions cannot be started in this way - you can only damage its expensive components.
A motorcycle with a low compression ratio or with an engine capacity of up to 350 cubic centimeters can be started from a pushrod yourself. But modern Japanese sportbikes or choppers with huge engines will require a lot of effort - so you will have to find an assistant. If you are in a remote area where you cannot expect help, try to find a slope at least 100 meters long - this will make solving the problem much easier.
002_MOTO_0210_062
Markers for the “middle” position of the steering wheel in the brackets of the upper yoke.
Instead of risks on some motorcycles - period. Markers for the “middle” position of the steering wheel in the brackets of the upper yoke. Instead of risks on some motorcycles - period.
Also make sure your fingers don't get caught between, say, the handlebars and the tank (though this is more common on road bikes). Check whether the throttle cable is stretched excessively in the extreme positions of the steering wheel and whether the handle returns freely. One of my friends shamefully decomposed in front of the visitors of a fashionable cafe because of a tight throttle cable. When turning, the cable itself “added the throttle”, and the surprised owner of a fashionable naked bike stretched out in the parking lot with a roar and a roar.
How to start a moped in cold weather
There is no snow at all on some highways in the winter, so you can drive on them without any problems. But the “iron horse” is not always ready to start easily at subzero temperatures. Now we will tell you how to properly operate a moped in winter.
The first step in winter is to refuel with fresh gasoline, and also be sure to replace mineral oil with synthetic oil. If you leave it, the mineral oil will always be thick in the engine, and this will have a detrimental effect on its performance. To start, it is better to use a kickstarter rather than an electric starter, since the battery voltage sags greatly when exposed to cold. When starting, add a little more gas than usual, so the engine will not stall. Sometimes, when the oil thickens, some smart people heat it up using a gas burner. In modern vehicles this usually does not happen if the oil is synthetic.
If you follow all starting recommendations, the moped will start at a temperature not lower than -20 degrees Celsius. When you are able to start it, we recommend letting the engine warm up for at least 5-10 minutes.
The wires may vary in color, so you perform all actions at your own peril and risk. Remember, if done incorrectly, all electronics may fail.
004_MOTO_0210_062
Option for adjusting the angle of the steering wheel on a sports motorcycle: 1 - axis of rotation;
2 — clamping bolt; 3 - adjustable eccentric; 4 — pointer label. Option for adjusting the angle of the steering wheel on a sports motorcycle: 1 - axis of rotation; 2 — clamping bolt; 3 - adjustable eccentric; 4 — pointer label.
If adjusting the steering wheel is impossible or the desired effect cannot be achieved, play with the position of the clutch and brake lever brackets. As a rule, you can turn them a little on the steering wheel, finding the most comfortable position for your hands. After adjustment, you also need to make sure that the arms do not rest against the fairing (if equipped) or the hand guards (on enduro). Having figured out the position of the hands, we pay close attention to the fingers.
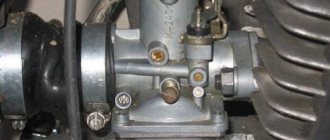
On most modern motorcycles, the front hydraulic brake lever is adjustable. A wheel with numbers from one to five is the most common option, but there is also an option with a stop screw.
How to start a moped without an ignition key
We strongly recommend that you always have a spare key just for such cases. If you purchased a moped secondhand, then immediately make a couple of duplicates.
If you have such a situation, but there are no keys, then you will have to find a way out of it. It is best to call a specialist - he will be able to competently replace the ignition switch, and it will take him a little time to do such work. If you are sure that you can handle it without specialists, then below we will share with you information on how you can start a moped without a key.
To get to the ignition switch, first remove the shield protecting it. There you will see 2 bolts that secure the contactor. Unscrew them carefully. Insert a flat and strong screwdriver into the contactor, and then slowly but firmly turn the core. This position is also called “safe start”, the fact is that in this mode the moped will not take off quickly.
If you were unable to disassemble the ignition switch, then carefully remove the chip from it. There should be a contact pair underneath it. By connecting the contacts with a piece of wire, you can start the moped. Remember, all recommendations do not guarantee 100% success; you perform all actions at your own peril and risk, because with such manipulations you can completely break the ignition switch.
There is another method, but it is more dangerous, since it turns off all the electrics of the moped. To do this, you need to remove the headlight and find under it a bunch of wires coming from the ignition. Among them, there is usually black and white (or completely green). That's what we need. We just pull it out and try to start the moped from kickstarter.
008_MOTO_0210_063
...and knurled nuts (along the length of the cable).
...and knurled nuts (along the length of the cable).
Remember: by adjusting the lever, you do not change the performance of the brake system in any way. All this adjustment allows is to move the lever further or closer to the steering wheel grip. People with long fingers move it further away. Those who have a smaller hand - for example, girls - choose the closest position of the lever. At the same time, on older motorcycles (especially with one brake disc and especially a drum), you need to make sure that in the close position the lever has enough travel left: squeeze it with force and make sure that it does not rest against the gas handle. If it gets stuck, you will have to move it away from the steering wheel. The situation can be corrected by bleeding the brakes or replacing the brake hoses with reinforced ones. I'm not talking about the cable drive - only replacing the motorcycle assembly will help here. By the way, to change the adjustment of the position of the lever, you must first slightly press it away from the steering wheel and only in this position rotate the regulator. Do not try to adjust the lever while moving, it is very dangerous!
If the clutch is a cable drive, all you can do is increase or decrease the free play of the lever by rotating the adjusting wheel at the end of the cable sheath.
The norm is a gap of 1–2 mm between the plane of the lever and the bracket. If with such a gap it is still difficult for you to reach the lever with your fingers, you can increase the free play. The main thing is that the lever travel is enough to fully depress the clutch: with the lever fully depressed and first gear engaged, the motorcycle should stand confidently in place without trying to move (the oil in the box must be warmed up).
To maintain full control of the motorcycle, it is better to depress the clutch with your middle and index fingers, and leave the rest on the handlebars. That is why a full squeeze should be considered not the moment when the lever rests on the steering wheel, but the position in which it touches the ring finger lying on the steering wheel handle. Precise clutch operation is very important for a motorcyclist, especially when maneuvering in traffic jams, turning on narrow streets, and crossing obstacles. Many motorcyclists, forgetting about this, try to achieve high traction at low speeds by changing gear ratios in the chain drive or even applying the rear brake when cutting through city traffic jams. I often hear complaints: “My sportbike jerks in second gear when I drive slowly in traffic, and in first it is too sharp. Do something about the engine." Instead, it is enough to skillfully use the potential of a properly adjusted clutch. By the way, a complete lack of free play on the clutch lever is unacceptable, as it can lead to rapid and fatal wear of the friction discs.
If the clutch drive is hydraulic, we adjust it in the same way as the brake. Free play in this case does not matter.
The free play of the throttle handle can also be adjusted. Many fans of fast driving believe that the less free play on the throttle, the more accurate the engine control.
How to ride a motorcycle? How to drive a motorcycle?
Perhaps you already know what type of motorcycle you are interested in and would like to learn how to ride this particular type of motorcycle. Here we can please you - almost all of these types are the same in management. Or perhaps you have already spotted the most interesting device to buy. In any case, below you can read the basics on how to ride a motorcycle, and remember that there is no substitute for practice - you can't teach how to ride a motorcycle with just an article - it's like trying to teach a child to ride a bicycle by telling him about the physics of riding on two wheels. However, you need to be able to ride at least a bicycle to learn how to ride a motorcycle, and we can only note that the technique of riding a motorcycle is very similar to riding a bicycle, with the only differences being that the former is much heavier, and therefore feel It's not just about feeling your own weight, but when cornering you need to make much more body movements to tilt the motorcycle.
In addition, no matter how well you know how to drive a motorcycle, if you neglect safety - sooner or later it can still end in failure - always remember this, even when it seems to you that you have become a real pro! In addition, when you trust your life to a motorcycle, you will probably want to make sure that it is in good working order and safe to ride.
So how to ride a motorcycle? Let's look at this question step by step!
Don't skimp on equipment
Falling on a motorcycle is always painful; even when parked at a speed of less than 10 km/h, you can seriously injure yourself. Make sure you are protected by wearing as much protective equipment as possible, including:
- gloves,
- “shell” (corpus clothing on the torso),
- comfortable (or special motorcycle) boots,
- helmet (it is required by law in our country, and you have no right to drive a motorcycle without it).
Get on the bike and get to know it better
Depending on your height and the height of the motorcycle, throwing your leg over it can be a rather awkward maneuver. Remove the motorcycle from the stand, stand on the left side of the motorcycle if you are right-handed (and vice versa for left-handers), stabilize your balance by resting your hands on the handlebars of the motorcycle. Stand with all your weight on your left leg, lift your right leg up and throw it over the bike. Be careful not to touch the motorcycle with your right foot, otherwise you may lose your balance (similar to kicking) and fall along with the motorcycle. Once you have mounted the bike, you can relax on the seat and get an idea of the ergonomics of the motorcycle. This is a good time to make sure the mirrors on it are adjustable. Familiarize yourself with the position of the running boards and the location of the turn signal, horn and headlight switches. Every bike is different in this regard and you need to take the time to familiarize yourself at this stage - it's much safer than doing it while riding it fast.
Learn how to control the gas and brakes on a motorcycle
The right hand is usually responsible for two key functions on a motorcycle: acceleration and braking. When you turn the right handlebar toward you (when your wrist moves down), you open the engine throttle and accelerate the motorcycle. Keep in mind that you are generally dealing with a very good power-to-weight ratio of the machine, so be gentle with this control as sudden increases in engine speed can cause you to try to accelerate too quickly, which in turn will cause to instability of the motorcycle or even accidental separation of the front wheel due to sudden acceleration (everyone is driven by a motorcycle on the rear wheel).
The right hand also controls the front wheel brake. The pull lever applies to the front brakes, and smoothness and precision are also critical here: If you pull the lever too hard, the front brakes can lock up, causing the bike to skid, most likely resulting in a fall. Although most bikers only need two fingers to press the brake lever (as you can see in the photo above, and this is considered the most correct technique), some, especially the fair sex, require the strength of their entire hand to wrap around the lever.
The right foot controls the rear brake (pictured in the bottom half of the split photo), but keep in mind that when the front brakes are in use, the rear brakes become less effective (as the weight of the bike tends to move forward during braking). Rear braking is more useful during low-traction situations and low-speed maneuvering, and while rear brakes are sometimes more effective on cruising types of motorcycles (choppers, touring bikes - because they carry more of their weight on the rear wheels), front brakes are like rule is the most effective way to stop a motorcycle.
How to operate the clutch on a motorcycle?
The clutch lever is similar to the front brake lever, but is located in front of the left handlebar of the motorcycle. Most sportbikes only require two fingers to operate this lever (pictured above), while touring, cruiser and other types of bikes often require your entire hand to grasp the lever (bottom of photo).
The way a clutch works on a motorcycle differs from how it works on a car. Think of the clutch as a way to connect and disconnect the engine from the gears—like neutral gear. When you press the clutch lever, you put the motorcycle into neutral (even if the shift lever is in gear). When you release the clutch, you allow the engine to rotate the transmission and rear wheel.
However, just like in a car, the clutch on a motorcycle is not just “On/Off” modes - it is, first of all, a smooth release of the lever after squeezing it. It will take you a little practice to get the hang of doing this.
How to change gears on a motorcycle?
Motorcycles also operate a little differently than cars when it comes to shifting gears. While the gearbox in them works on the same principle, the shift itself is performed by moving the shift lever up or down with your left foot. The most common order of the shift lever (straight from top to bottom):
- 6th gear (if equipped),
- 5th gear
- 4th gear
- 3rd gear
- 2nd gear
- neutral gear
- 1st gear
The vast majority of motorcycles have this shift pattern, often referred to as “One in Five” or “One Down, Five Up.” Finding neutral with your left foot will take some getting used to, and as you press the shift lever forward and reverse, you may be looking at the green "N" indicator on the instrument panel. Although most motorcycles can shift without using the clutch, it is still a good habit to use the clutch every time you shift.
The gear shift itself should be carried out in the following order:
- Disengage the clutch (using your left hand, press the clutch lever all the way).
- Change gear with your left foot.
- Smoothly release the clutch.
You see, just like in a car - and here it is also important to switch in the desired engine speed ranges.
How to start a motorcycle?
Now that you are familiar with the basic functions of the motorcycle, it's time to start it. Unlike the established image of a guy kicking a special lever, trying to start an old Jupiter or Minsk in this way, almost all modern motorcycles are started using a starter without the need. The bike won't start if the switch is in the "off" position, so flip it down before turning the key on (the switch is usually a red toggle switch that is operated by your right thumb, as shown in the top half of the photo). Now turn the key to the "ignition" position, which is usually achieved by turning it to the right (clockwise, as shown in the bottom half of the photo). Most bikes, like their older cousins cars, will perform a self-test to ensure that the sensors are in working order. When the self-test is completed, make sure the motorcycle is in neutral (double check this by making sure the green "N" light is illuminated on the instrument panel).
Then, using your right thumb, press the start button, which is usually located below the switch and is marked with a circular arrow logo surrounding a lightning bolt. Many bikes will require you to depress the clutch while starting the engine - this is simply a precaution to prevent the bike from suddenly jerking forward if it is in gear.
Warming up the motorcycle engine
Any internal combustion engine will achieve optimal performance when it is sufficiently warm, but the practice of warming up automobile engines is largely obsolete. Riding a motorcycle, however, requires the rider to ensure that the engine will produce a predictable amount of power (a cold engine is unstable as the gasoline flows unevenly) when needed, so warming up a motorcycle engine is still an important part of the riding ritual - especially , when the motorcycle is carbureted, as opposed to a bike with fuel injection. Once the engine has started, let it idle for 45 seconds to several minutes.
Remove the running board
Most modern motorcycles will automatically stall if you try to shift into gear while the kickstand is still down. If your bike is not equipped with this feature, make sure you remove the kickstand - just one slight movement of your left foot allows the kickstand to fit neatly under the bottom of the motorcycle.
And finally, how to ride a motorcycle?
Once you have completed all the previous steps, all of the motorcycle's systems are ready to send you on your way. This is the time when you will have to remember the functions of the throttle, brakes, clutch and gear shift, and develop the relationship of your limbs between them. Lean your motorcycle on your right leg, pull the clutch lever, push the gear lever down into first gear, slowly release the clutch lever and feel the motorcycle start to move forward. You may need to add a little gas to get the bike moving. After the motorcycle has moved, place both feet on the special footpegs.
Congratulations, you are riding a motorcycle! Most beginners, afraid to immediately accelerate, may fall - just like on a bicycle, the lower the speed, the lower the speed, the more difficult it is to control a motorcycle, so you will need to accelerate it to at least 15-20 km/h. Next, if you want to turn right, you will have to lean slightly to the right, turning the steering wheel to the right as well. Once you try it, you will realize that riding a motorcycle is no more difficult than riding a bicycle, except that you will feel like you have to control a much heavier machine.
But shifting gears is a little more complicated and requires practice - it is not always possible to immediately achieve optimal speeds and engine speeds in relation to the shift speed, but this, of course, is a matter of time.
010_MOTO_0210_064
By adjusting the free play of the cable, you can achieve minimal play in the throttle handle.
After adjustment, you must make sure that the handle returns freely to its original position at any angle of rotation of the steering wheel. By adjusting the free play of the cable, you can achieve minimal play in the throttle handle. After adjustment, you must make sure that the handle returns freely to its original position at any angle of rotation of the steering wheel.
I won’t argue, but I want to warn you that on motorcycles with a throttle drive using two cables (main and reverse), attempts to completely remove the free play of the handle lead to excess friction in the system. Because of this, the throttle no longer returns freely to the “zero” position. And sometimes this does not happen right away. Therefore, I advise you to protect yourself from unpleasant surprises by leaving a small gap.
Method for Alpha mopeds, Japanese mopeds and scooters
The method is to disable the switch, but it only works on scooters and mopeds from Japanese and, sometimes, Chinese manufacturers.
To disable it, you will need to remove the ignition switch protective shield. Under it there are 4 wires according to the standard, white, black, red and green - these wires supply power. The remaining wiring is the switch; after disconnecting it, the moped can be started using the kickstarter.
Attention!
Be careful as removing this wiring may turn off all other wiring on the moped (turn signals, headlights, etc.)
You can see more about this method in the video:
011_MOTO_0210_064
You should be especially careful with a two-cable drive.
It’s better to leave a little play than to catch a runaway motorcycle one day. You should be especially careful with a two-cable drive. It’s better to leave a little play than to catch a runaway motorcycle one day.
Once you've adjusted the steering controls, it's worth a ride. Preferably at least half an hour. The body does not immediately find a comfortable position, and those settings that at first seemed comfortable need to be tested in practice. And if everything is fine with the upper limbs, you should turn your attention to the gearbox foot and the foot brake pedal.
I think motorcycle brake manufacturers should pay kickbacks to motorcycle shoe designers for thick welts on their boots. In my memory, how many rear pads have been worn out and brake discs burned because the next owner of size 45 shoes had a shoe resting peacefully not only on the footrest, but also on the brake pedal. The unsuspecting “teapot” drove, sometimes tens of kilometers, smoking with its rear brake pads, like that blonde with the handbrake. So, the following advice is especially useful for giants. When getting on the motorcycle, make sure that your right foot is not trying to press the brake. And if he tries, we try to lower the brake foot. Many motorcycles allow you to do this thanks to an adjustable link between the pedal and the brake cylinder.
Two ways to start a moped with the ignition key
First, you need to make sure that there is gasoline in the gas tank. Now you need to put the moped on the stand and turn the ignition key to the “on” position (sometimes marked in English with the letters “on”). If everything is done correctly, the panel should light up and the needle on the speedometer will rise and fall. Then fold back the kickstarter foot and press it sharply with your foot, continue until the engine starts. This method of starting a moped always works; for the most part it is used when the battery is very discharged. Also, after winter, the moped needs to be started only with a kickstarter, since the battery could have lost a lot of charge.
The standard way to start a moped
If there is gasoline in the tank and the battery is normal, then starting is usually done with an electric kickstarter. Be sure to turn the ignition key to the “ON” position, then hold down the brake handle, and only then can you press the start button. Do not release the brake until the engine starts.
013–014_MOTO_0210_065
The position of the brake pedal 1 can be adjusted by changing the length of the rod 2. The free play is adjusted by the eccentric 3 or screw 4 (depending on the design).
The position of the brake pedal 1 can be adjusted by changing the length of the rod 2. The free play is adjusted by the eccentric 3 or screw 4 (depending on the design).
The same applies to the gearbox foot. Make sure you feel comfortable shifting and don't have to strain your ankle until it hurts. After all, the switching foot can be easily adjusted by rotating the connecting rod or rearranging it in the slots on the axle.
Don't forget about adjusting the headlights. Otherwise, it will not illuminate your path, but will blind the oncoming driver. Please note that motorcycle headlights are usually located higher than car headlights and are very blinding. Have pity on motorists who already have a hard time in their tin boxes!
To adjust the light, first of all, let's remember the rear shock absorber. I hope I didn't surprise you? On most motorcycles, spring preload is adjusted using a rotary knob or nut on the shock absorber itself.
Vandal way to start a moped
This method should be used in the most urgent case, when you really need to go somewhere. The fact is that you will be able to start the moped, but only in the future you will have to replace the ignition switch.
The roughest way to start a moped without an ignition key
To implement this starting technique, we only need a screwdriver. It should be pushed forcefully into the well and then turned. You don’t have to remove the screwdriver, in which case the engine will definitely start and not stall. This option is also used by some motorists when there are no other solutions.
017–018_MOTO_0210_065
Rear spring pretension adjuster: on the left - with a screw, on the right - with nuts on the shock absorber body.
When the motorcycle is heavily loaded, it is necessary to tighten the adjuster. If this is not done, the headlight beam will shine upward and blind oncoming traffic. Moreover, the motorcycle will handle worse, since the main load will fall on the rear axle. Rear spring pretension adjuster: on the left - with a screw, on the right - with nuts on the shock absorber body. When the motorcycle is heavily loaded, it is necessary to tighten the adjuster. If this is not done, the headlight beam will shine upward and blind oncoming traffic. Moreover, the motorcycle will handle worse, since the main load will fall on the rear axle.
So, if the headlight starts to shine into the sky, try adjusting the height of the rear of the motorcycle first. Perhaps the reason is not the headlight, but the large number of Big Macs eaten by the driver or passenger. In this case, by restoring the horizontal position of the motorcycle, you will bring into compliance not only the light adjustment, but also the suspension geometry. If adjusting the shock absorber was not enough, find a plastic adjuster on the headlight housing (as a rule, it looks like a large bolt) and twist it to achieve the desired result.
How to start a moped from a pusher
While there are two main ways to start an engine, there are many other options as well.
With a rope
The first step is to get to the generator, which is located on the back side, in any way that is harmless to the equipment. We find the impeller there - you need to wrap a rope around it 5 times clockwise, to do this you can tie a knot at the end of the rope and insert it from the very beginning between a pair of blades. And then you will need to pull it hard, you may not succeed the first time, so most likely you will have to make several attempts.
You can learn more about this method from the video:
From the pusher
People have the opinion that if a moped has a CVT, then it cannot be started in this way. In fact, this is just a myth; experts have carried out tests many times - nothing bad will happen.
For this method to work, you need to get to the clutch bell; to do this, carefully remove the protective cover of the variator. Next, we will need to lock the bell and clutch together. This is done as follows: take the nut from the variator protective cover, and then insert it with force so that it is fixed there. To implement this method you will definitely need an assistant. He will push the moped, and you must press the variator strap at the right time during acceleration, so you will be able to turn the wheel. When the engine starts, the nut will fall to the ground by itself, so you won't lose it - no need to worry about that.
019_MOTO_0210_065
Headlight direction adjustment screws.
(If adjusting the rear shock absorber does not help.) Headlight leveling adjustment screws. (If adjusting the rear shock absorber did not help.)
Sometimes the adjusting screws are located directly on the headlight rim (for example, Japanese enduro). On the simplest motorcycles, there are no special correction devices on the headlight, and the direction of the beam is adjusted simply by turning its body up or down. Be sure to slightly loosen the mounting bolts before adjusting and tighten them after.
CRUISERS AND TOURISTS. Once you've practiced on a road bike, you'll be able to handle cruisers and touring bikes with ease. True, on some cruisers, seating comfort is sacrificed for style. And if you choose a motorcycle to make a lasting impression on others, you need to be prepared to make sacrifices.
However, don't go too far. Often, inexperienced chopper owners look very funny, struggling to perform a simple maneuver only because they are very uncomfortable in sitting. By the way, this often applies to novice sport bikers. It's easier with tourists. Moreover, many tourist motorcycles, in addition to the adjustments described above, also have additional ones: height-adjustable steering wheels, windshields, seats, and CD radios so beloved by motorists.
Basic requirements for a motorcycle in winter:
- The engine should start easily in any weather.
- Since the battery will discharge faster due to cold temperatures, it must be fully charged at least once a week.
- The oil should be taken more liquid , since under the influence of temperatures, it tends to become thicker. Alternatively, you can dilute the oil with a small amount of kerosene. With the arrival of spring, the oil will need to be replaced with regular oil.
- The cables must be generously lubricated as they may freeze. It is better to use lubricant with silicone.
- If the design of the motorcycle provides for the presence of casings for the carburetor, they must be installed in winter. This will reduce the amount of snow that will get into the carburetor, and then melt and freeze in the cold.
- It has been proven in practice that any serviceable engine starts well at temperatures down to -15°C. With lower temperatures, starting a motorcycle in winter can be quite difficult. In this case, the crankcase should not be heated. It would be better to warm up the candle.
- For winter, it is better to adjust the engine a little. You can enrich the mixture a little by raising the carburetor needle.
- You should always have a spare candle with you.
Starting a motorcycle in winter, especially if it has been sitting in the garage for several months, is quite problematic. The problem may lie in the fuel or ignition system. Many people do not drain the gas tank when it is idle, and then wonder why the vehicle does not start. The problem is obvious - gasoline tends to stagnate. Fans of winter trips should play it safe in advance and refill the fuel.
009_MOTO_0210_064
The unnatural fit is a tribute to chopper culture.
But safety also has to be partly sacrificed. The unnatural fit is a tribute to chopper culture. But safety also has to be partly sacrificed.
SPORTBIKES. They differ from road motorcycles, cruisers and tourers primarily in their concept. They are not made for movement. These are sports equipment. Like alpine skis or a barbell. Therefore, such a motorcycle should be comfortable only in one case - when riding delightfully fast and active. City, serpentine, track - it doesn’t matter. The sportier the motorcycle, the less comfortable it is. How do you understand which control adjustments are correct and how to find the optimal ones?
Let's start with mirrors. In general, mirrors for sports are a rudiment. Firstly, they spoil aerodynamics. Secondly, what’s the point of looking in the mirrors if you’re driving at least 50 km/h faster than the rest of the traffic (if you’re not going, that means you need to sell your sportbike and buy a cruiser). Thirdly, on a sportbike, especially in urban driving, you constantly have to change your body position from more or less sitting to lying on the tank. Particularly nimble guys also actively hang when cornering. That is, it is almost impossible to adjust the mirrors so that something is visible in them on a sportbike. So you shouldn't spend a lot of time on this. It is better to configure the steering wheel, levers, pedals, instrument panel and, possibly, the suspension as clearly as possible (about it in a separate article). This is very important for active driving. For example, all motorcycles at the world championship level have a wheel under the pilot’s left hand that adjusts the distance from the brake lever to the steering wheel - for quick adjustments. But the main thing is to make sure that the brake can be pressed comfortably with two, or maximum three, fingers. By the way, the handlebars, or rather the clip-ons—separate tubes screwed to the fork stays—are adjustable only on top versions of sports motorcycles. There you will also find the opportunity to adjust the driver’s footrests vertically and horizontally, the length of the brake pedal and the gearbox foot, and the dashboard allows you to configure the “shift lamp”, which tells you when to change gear. On advanced devices, you can adjust the speed of the lamp separately for each gear.
Why doesn't the moped start with the button?
This problem is very common among owners of motorcycles, mopeds and scooters. If you cannot start the engine from the button, then the problem lies in the fuse. It is located in the battery compartment; to check its functionality we will need a multimeter.
The multimeter handle must be turned to measure DC current. Measure the voltage at the ignition key without and with a fuse. The instrument readings should be the same in both cases. If you detect a voltage deviation of 2 volts or more, the fuse must be replaced immediately. The malfunction may also be hidden in the engine start circuit; to do this, you need to determine the integrity of the wires going to it. The multimeter has such a function, so you can check it yourself. To know which wires to check, you can find the moped's wiring diagram on the manufacturer's website. But you need to be able to read such diagrams correctly; if you do not have this knowledge, then it is better to seek help from professionals.
Now you know various ways to start a moped if you have lost the key. All options can only be used for your own benefit; we do not recommend using them for fraudulent purposes, as this is punishable by law. Make yourself duplicate keys, and then you will not have problems if you lose them, we wish you success!
How to start a moped (or scooter) without an ignition key: 7 different ways
4.4 (88.57%) 7 voted
012_MOTO_0210_065
You can adjust the position of the footpegs on a sportbike by moving them along the holes in the bracket.
You can adjust the position of the footpegs on a sportbike by moving them along the holes in the bracket.
For those who are lucky enough to own such a device, the rules are simple: you are just going to ride on the streets - the steering wheel is higher, the footpegs are lower. If you want to train on the track, it’s the other way around. Owners of “simple” devices, as a rule, have to get used to the fit and settings chosen for them by the manufacturer. And if the driver’s dimensions differ significantly from the average size of a resident of, say, Japan, it is difficult to do without tuning parts. I just want to warn novice athletes: if after buying a sports motorcycle you still lag behind the bulk of cars on the ring road, you don’t need to bury your head in catalogs in search of equipment that can improve the performance of the motorcycle. You just need to ride and train more. And riding motorcycles of the class can bring very serious benefits...
CROSS AND ENDURO. These motorcycles are also more like sports equipment. Therefore, each is customized for a specific driver and specific operating conditions. Enduro is mostly ridden standing. In this regard, it is important that the position of the steering wheel creates a comfortable stance. As a rule, the steering wheel is tilted slightly forward, and the clutch and brake levers with brackets are turned down.
How to start a moped (or scooter) without an ignition key: 7 different ways
A person who has just bought a moped does not know how to start this equipment in other ways besides using the ignition keys. But sometimes situations happen when you have lost the keys to it, and at the same time you urgently need to go somewhere. In this article we will tell you in detail about known methods of starting the engine without a key.
020_MOTO_0210_066
Enduro should be comfortable to ride in a standing position.
In this case, there should be enough space to move the body forward (when accelerating and overcoming climbs) and backward (when braking and on descents). Enduro should be comfortable to ride in a standing position. In this case, there should be enough space to move the body forward (when accelerating and overcoming climbs) and backward (when braking and on descents).
It is not recommended to tighten the bracket clamps too much. After all, off-road you can easily fall or simply drop your motorcycle. A slightly tightened bracket will simply rotate around the steering wheel and the lever will not break! The brake pads and gearbox also need to be adjusted. After all, when you stand on the pegs in motocross boots, the toes look more horizontal, and not at an angle downward. But don't overdo it. The control test is simple - accelerate to a speed of 40 km/h while standing and try to lock the rear brake. If this was achieved without any extra effort, the presser foot is adjusted correctly.
Choosing the right method
You can start a motorcycle using various methods, but it is worth remembering that all of them, from starting at speed to using starting ether, harm the engine. If we talk about removing the ignition switch and independently connecting the wires to each other, then in this case there is a very high probability of a short circuit with dire consequences for electrical and electronics. Therefore, you should first find out if there are other options, for example, recharging the battery, taking a spare key, or contacting a specialized workshop. It is also not recommended to install various devices that bypass the motorcycle security system or move wires outside. If you can use them, then the motorcycle will be easily stolen by criminals who always target such easy prey.
015_MOTO_0210_065
Some enduro bikes have adjustable pedals for different riding styles.
This adjustment is for riding in a standing position. Some enduro bikes have adjustable pedals for different riding styles. This adjustment is for riding in a standing position.
When adjusting the position of the gearbox lever, when shifting gears up, do not try to push the motorized boot completely under the paw - this is almost impossible. Just hook the paw with the welt of the boot, and the gear will change without difficulty.
016_MOTO_0210_065
With this adjustment, it is more convenient to ride while sitting.
With this adjustment, it is more convenient to ride while sitting.
Of course, it often happens that you immediately feel comfortable on a motorcycle. If so, great, but if something causes discomfort, even if it’s just the wrong time on the electronic clock, it’s better not to be lazy and eliminate the annoying factor in advance so that it doesn’t distract from the main thing - the pleasure of driving the most beautiful of all vehicles.
Closer to the body - adjusting the controls
Quick start - will it save the engine and how to use it
Quick Start is a fluid that helps internal combustion engines run properly. It is often used to start cars whose engines are not running properly, or to start older cars when temperatures drop below freezing. To use the quick start, simply spray the air filter with fluid, then try to start the engine. Always be careful as jump starting is extremely flammable and too much of it can damage your engine.
How to use Quick Engine Start.
What is quick start liquid
Engine Quick Start is a volatile, flammable liquid that is used to facilitate starting of internal combustion engines, especially in cold weather or in engines that are difficult to start using normal procedures. It is usually available in an aerosol can and can sometimes be used to start ether direct injection or alcohol-fuelled spark combustion engines.
Which composition to choose
Quick Start fluid contains mainly volatile hydrocarbons such as heptane (the main component of natural gasoline) with a small amount of diethyl ether and carbon dioxide (as a diesel propellant). In some cases, the carburetor propellant may contain butane or propane. Historically, diethyl ether with a small amount of oil, stabilizer and hydrocarbon fuel was used to start internal combustion engines due to its low auto-ignition temperature of 160 C. Diethyl ether is different from petroleum ether (a crude oil distillate consisting mainly of pentane and other alkanes) , which was also used to start engines.
How to use it correctly
Find your air filter - these are the devices on all cars that allow the engine to mix air with fuel, making combustion possible. The air filter will always be attached to the engine and located under the hood. But different manufacturers manufacture their vehicles using different technologies, so the air filter on different cars may be located in different places. To locate it, refer to your vehicle's owner's manual.
IMPORTANT! The air filter often looks like metal tubes. They can be powder coated or painted in the same color as the car.
Spray a small amount of aerosol into the air filter. Hold the starting fluid bottle vertically. Point the can nozzle at the air filter from a distance of approximately 20 centimeters. Spray the engine to quickly start the engine for about two seconds, then try to start it. If the engine still does not start, repeat the Quick Start spray procedure for 2 seconds. To do this, you need to remove the air filter cover. If the car does not start even after using the Quick Start, you should contact your mechanic. If the engine does not start even with the correct application of starting fluid, the problem may not be the engine itself. For example, the ignition or some other system may be faulty.
Four-stroke engines
Quick Start is sprayed onto the engine near the air filter, carburetor hole or engine spark plug hole to quickly add fuel to the combustion cylinder. Using starting fluid to speed up the engine helps prevent wear on the starter, especially on rarely used vehicles. Other uses include cold weather starting, vehicles that are starved of fuel and therefore require extra time to repressurize, and sometimes with flooded engines. Mechanics sometimes use a spray to diagnose starting problems, determining whether the vehicle's spark and ignition system is working; if the spark is sufficient but the fuel supply system is missing, the engine will run until the quick start vapor is consumed. Most often the product is used with fuel injection systems. Caution must be used when using starting fluid on diesel engines that have a preheating system, as rapid starting may catch fire, causing engine damage.
Two-stroke engines
Quick Start is not recommended for regular use on some two-stroke engines as it does not have lubricating properties on its own. Lubrication for two-stroke engines is achieved using oil that is either mixed with the fuel or automatically introduced into the fuel supply system; engines that require preliminary injection of fuel are started exclusively at a quick start and do not receive sufficient lubricant supply to the cylinder(s). Engines that have not been started for a long time are especially vulnerable; Quick Start is a strong solvent and removes residual oil, further reducing lubrication in the absence of fuel.
Dangers of using aerosol quick start
Store the can correctly. It is flammable and easily ignites. Store and use it according to the manufacturer's recommendations on the packaging. For example, do not use quick start on a hot engine or do not spray it near it. Do not use excessive amounts of liquid. Too much of the substance can damage your engine. To determine the appropriate starting fluid volume for your vehicle, use the owner's manual and directions included with the Quick Start.
IMPORTANT! Typically, a couple of short quick start sprays should be enough to start your engine.
Make sure you can use Quick Start with your car. The fluid cannot be used on all vehicles. For example, if your car is equipped with glow plugs or if your vehicle uses diesel fuel, you will not be able to use starting fluid. Check your vehicle's owner's manual to ensure Quick Start is suitable for use with your vehicle. The quick start also cannot be used in two-stroke engines, such as lawn mowers. If quick start isn't right for your car, try an alternative like carburetor cleaner. Choose a quality starting fluid. When choosing, pay attention only to proven brands. A good fluid should start the engine quickly with minimal spray.
Adjust the throttle
If your car has a carburetor (the device that mixes air and fuel) and it won't start, check the throttle. If your throttle is closed when you try to start the car, open it. If it was open when you tried to start the engine, close it. Throttle adjustment should also be used if your car starts but then stalls. If you can't find your throttle, consult your vehicle's owner's manual.
Check the humidity
If your car is difficult to start on rainy days, look under the distributor cap. If you see moisture inside the dispenser cap, turn the cap upside down and spray solvent into it (or, if you have liquid in a bottle, just pour some of the solvent into the cap). Open the solvent, then pour it out. Use a clean rag to wipe off any remaining solvent before replacing the cap.
IMPORTANT! The distributor cap is a small cover that protects your vehicle's electrical box.