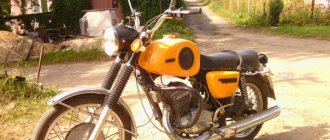
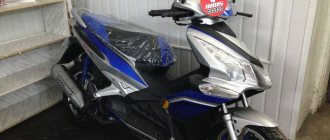
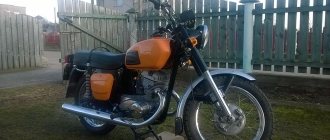
In today's article we will talk about the Izh Planet 4 motorcycle, one of the best representatives of its class, developed in the Soviet Union. It is precisely this model with one cylinder that will go down in the memory of all lovers and connoisseurs of domestic technology.
IZH Planet 4 is appreciated among amateurs as well as professionals primarily due to its exceptional reliability and ease of maintenance. In this regard, this transport vehicle is fundamentally different from its two-cylinder Jupiter counterparts, manufactured in Udmurtia. Specialists in the maintenance and repair of motorcycle equipment are confident that this steel horse turned out to be one of the best of all models produced.
Engine
Engine type - two-stroke, single-cylinder Displacement, cm cubed - 346 Cylinder diameter, mm - 72 Piston stroke, mm - 85 Compression ratio - 7.8 - 8.2 Maximum power, kW - 14.7 Maximum power, l. With. — 20 Lubrication system — together with fuel Ignition system — battery Rotation speed of the crankshaft at maximum power, rpm. — 4850 Carburetor — K-62I Fuel used — gasoline with an octane number of at least 76 Air cleaner — contact oil.
Back to contents — ↑
Technical features
The IZH Planet 4 motorcycle is a medium-sized car. It feels equally at home on asphalt and dirt. That is why the model turned out to be so popular in the USSR, where it was loved in small towns. This model received a modified ignition. As a result, problems with this system have decreased significantly.
The wiring was also slightly redesigned, which also increased the reliability of the equipment. Here, for the first time in the series, a 12-volt circuit was used. This added advantages to the motorcycle. First of all, this had a positive effect on the dashboard; using lamps with a higher voltage made the backlight more expressive.
When describing the technical characteristics, it is impossible not to mention the chassis. It has been thoroughly reworked here. If you look at Izh Planet 4 reviews, you will notice that all the owners praise this structural unit. The main change was new shock absorbers.
Power transmission
Double-row bushing chain Gear ratio from the engine to the clutch - 2.17 Clutch - multi-plate in an oil bath Gearbox - four-speed From the gearbox to the rear wheel - closed bush-roller chain Gear ratio from the gearbox to the rear wheel - 2.33 Shift - foot lever Gearboxes box ratio: at first speed - 3.17 at second speed - 1.81 at third speed - 1.26 at fourth speed - 1.0 General gear ratios: at first - 16.03 at second - 9.16 at third - 6.37 in fourth gear - 5.05.
Back to contents — ↑
Tuning options
This motorcycle provides great opportunities for modifications. As a rule, tuning an Izh motorcycle concerns the following components:
- Engine;
- Ignition;
- Gear box;
- External tuning.
In general, Izh Planet 4 12 volts is quite simple. This allows even less experienced craftsmen to remake it. First, you need to determine what you want to get in the end. In many cases, modifications are made to all components of the motorcycle. But, this is quite labor-intensive.
It is often easier to simply rework one or two nodes that will give you the desired effect. The most popular is engine tuning. Also, in many cases, owners change the equipment visually, making it almost unrecognizable.
Adjustment data in millimeters - mm
Gap between breaker contacts - 0.4 - 0.6 Gap between spark plug electrodes - 0.6 - 0.75 Free play at the end of the clutch lever - 5 - 10 Free play at the end of the handbrake lever - 10 - 20 Free play at the end foot brake lever -10 – 25 Free play of throttle and corrector cables – 1 – 2 Ignition timing to t.m.t. — 3.0 — 3.5 Rear wheel drive chain slack — 20 — 30 Air pressure in tires, MPa: front — 0.15+0.01 rear — 0.21+0.01.
Back to contents — ↑
Electrics
All features of electrical equipment can be found in the documentation for the motorcycle. The operating instructions give a clear idea of all the features of the electrical system. There is also a wiring diagram. After reading the description, you can easily understand how the Izh Planet 4 wiring works.
Please note that in some places the wires may be damaged, so the Izh Planet 4 wiring diagram should be on hand to determine the location of the breakdown.
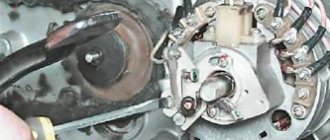
The most common problem on many motorcycles of this model is the “no charge” condition. This is connected with the Voshodov generator, which is installed here. If the problem occurs on the way, you can try to reconnect directly with your own hands. If this does not help, then you will definitely need to change the generator.
The instructions contain a detailed description of how to configure the ignition. This will help install the ignition with minimal labor.
In general, ignition is the main problem of this motorcycle. Therefore, many people modify this particular node. Electronic ignition is usually installed. Minsk tuning is done in approximately the same way. The difference here is only in the fasteners, the rest of the steps are completely the same.
Good evening friends! The weather is no longer pleasant at all; I think most have already parked their iron horses. I hope everyone skated the season without serious problems. I had some free time and started preparing my motorcycle for painting and assembly. It seemed like I was doing everything slowly, but some material had accumulated, so I decided to publish the second part about Planet-4. In general, I’ll tell you about everything in order.
Friday morning! The weather is gloomy... I'm wondering if I should go clean the frame and prepare it for painting. There was more than enough dirt on the frame. And it wasn’t painted very well... I remembered how we touched it up in 2009. In general, the frame came in several colors: original gray, primer, black, white, mud)) Taking a drill with a metal attachment from a friend, I quickly removed all the large dirt. Then I washed it with a brush and gasoline to remove small particles. Then I washed it clean again with gasoline and wiped it down.
Then I sanded away all the unnecessary colors and made one - matte gray. After the frame, I also cleaned the center stand, fender, brake pedal, swingarm and driver's footpegs.
Everything was successfully painted in 2 layers. I picked out the paint, which was almost like the original one. The color is called "gas gray". After drying, it looked like it came from the factory) Well, I hung everything up in the garage and left it until tomorrow, let it dry. Here they seem white from the mega-flash))
I came home, but there was nothing to do... I saw that there was GOI paste and a piece of felt boots by the monitor. Hmm... I decided to polish all the parts that had lost their shine, that is, all the parts) I brought some of the parts and cleaned them with fine sandpaper. Then the process went through. I rubbed the surface with paste and rubbed it with a felt boot. Then he began to rub it with his felt boot so quickly that some of the parts even burned a little! Oh, how excited I was.
Then I got into the tempo and it started to work out very well!
Then I had enough strength for the signal, which was completely disassembled and even had to be polished from the inside, and a couple more washers gave it a great look. That was enough for today.
The next morning I went to see if the parts were dry. Hmmm... they're a little dry. Well, what did I want... on the street at night it’s +5, but in the garage it can be +7. I'm thinking what to do. And then the idea came to mind to heat the bathhouse and dry it there! While my parents were away on business, I lit the bathhouse and brought all the details there. When I brought them in, it was +60. After I brought everything in, I threw in some more firewood. I arrived 20 minutes later, and it was +100 degrees! Ooooh, even the digital camera immediately fogged up! But then, when everything was dry, I also went to the bathhouse myself, it was a waste of time to drown))
While everything was drying, I went to finish polishing the main parts.
Evening came. Everything dried just perfectly. Nothing stuck or smelled anywhere. I took everything out into the fence and I think we can collect it already. Hmm... There was already a car in the garage, there was no table in the fence and, in principle, it was a little cold. And then I remembered how I once assembled Jupiter-4. Nostalgia…
Well, you understand what I decided to do))) I decided to quietly drag everything into my room so that they wouldn’t say “there’s nothing to do, you’re already dragging the motorcycle home!”))) And at that moment the parents and guests were sitting in the kitchen, and the kitchen right opposite my room. In general, he dragged everything in and no one even noticed. I took my children's table from the veranda, where I used to put LEGO construction sets, now I will assemble a construction set from the IZHMash plant)
I grabbed all the tools, fasteners, spare parts and started assembling. I made some coffee, turned on the movie, set the scene, so to speak, and drove off.
Let's go! I started the assembly with the rear suspension, as usual.
The bulky parts are now on the frame and there is more space on the floor where everything was laid out.
I replaced the ignition coil, signal, and turn relay.
Attached the wing. Even the original rubber bands still remain, which rest against the GSV. I've never seen anyone like this before. Let them be)
Now the BPV is in its place.
Finally, I installed the parking brake mechanism along with the brake pedal and tags, so as not to leave it for tomorrow. Oh, and I also tightened the chain tensioners so they wouldn’t get lost. Wow, everything shines like new. I like)
So, now the question is where to put this stuff. Reluctantly, he takes it out into the fence; he still has to collect it tomorrow. And I managed to stick it into a free corner. It fit just perfectly! Then I moved another hundred to the right and there was even more space. It will remain there until a certain time.
The next morning I went to a friend to get turn signals. He had potato turn signals in good condition. I gave him my plastic ones in return. He hesitated a little, but still gave it. They were also silver, which suited the frame very well.
Then I found the wiring clamps for the frame and decided to clean them of rust and polish them too.
Now all the clamps were in place and waiting for the wiring.
I brought the wiring from the basement. But I didn’t install it right away. First, I wiped it off from dirt and any accidentally spilled paint. Now the isolation has become much lighter than it was, and much more pleasant. I also replaced all the substandard plastic plugs.
I ran the rear part of the wiring to the corners, to the BPV. Yes, and I just did everything so that nothing got intertwined or twisted anywhere.
I also found the clamps that go under the tank cushions. They hold the wires that go to the steering wheel. I decided to wear them too. If they don't pinch the wires too much when turning the steering wheel, then I'll leave it.
Even the OTK stamp was preserved on the turn signals)
Looking at this entire structure, I remembered that the clamps sometimes rub the paint and leave an unsightly mark. So I decided to put a small pad under them so that nothing would rub through later. I cut the pads to the required size and installed them. Now everything is neat and convenient.
That's all I managed over the weekend. But it turned out well. The main thing is to start, and then everything will go fine!
Then he got to work on the dashboard. Repair for painting, change terminals... The main thing is that the plastic body is intact!
Such connectors only inspire fear in me.
Well, everything is painted and assembled! Lyapotischa.
Now part of the cladding is ripe. Painted and dried in the same way as the frame)
It took me a long time to select the paint... I compared it with all sorts of paints, but it didn’t really suit me. They offered to order it, but it was very expensive. And yet I found the color that was closest to my original one - breeze. And then there are new linings for the glove compartments! Good looking. I almost forgot! Now I’ll tell you a great story about how I found these pads. Unbelievable but true.
So, how did I find the pads? It happened in the summer in the village. We just dug up the potatoes, dried them and carried them underground. In the underground, I accidentally noticed a small shelf and all sorts of rubbish was stored there. Curiosity took over and I was drawn to see what was there. I look - there are all sorts of boxes. It seemed like nothing special, I rummaged through everything and at the end of the shelf I saw some familiar silhouette. It was a plastic shelf from the glove compartment. Wow, I thought! He pulled it out, took it to the garage, and there oooh...
Even the stamp still remains from Izhevsk. Well, I think there is something there)))
The plastic thing contained foot brake mechanisms, cans of paint for a motorcycle and a fuse, and also rusty fasteners on the bottom. An interesting book lay nearby. I also saw the worm shaft. I started to take it apart...
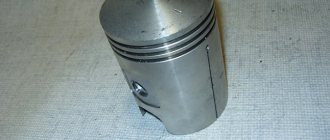
Oops, piston! But it looks worn out. I think, well, the old spare parts were put here. And I took a closer look at the worm shafts from Jupiter - brand new! wow, cool, cool!
Having removed the shafts, something wrapped in paper lay next to them. 2 packages contained piston rings from Planeta. One had a lot of rings and some of them were already worn. Another package contains 3 brand new rings. And the piston was P4, nominal size. As I understand it, this was the first piston from my Planet 4, which my grandfather and father bought and drove to this village. Probably after the first capital they threw it in a box)
Next to the piston in the box there were still new gear shift forks from Jupiter. Well, then you won’t be able to get away with dropsy))
And one last thing. At the bottom, I noticed a reamer and a device for pressing out the VGS bushing. But looking at the package, I thought - it can’t be...
Aaaaaaaaaah, hold me!!! New emblems from Planet 4. And there are 6 of them. I knew that my grandfather was thrifty, but so)) Baaalin, since 2010 I have been looking for them everywhere, and here they are, they have been nearby for so many years)) Wow, how I jumped for joy then!
I found such a lucky package in the village! How happy I was to find this!
Let's move on. The glove box has already been screwed in with the brake frog and rod installed, and of course the drawer. I also immediately installed the passenger footrests.
Oh well, now it’s a completely different matter! I sat glued to this beauty for about 5 minutes.
Following this, I installed traverses, otherwise the tidy is lying idle. As usual, everything is freshly painted.
On the same day I wanted to sort out and install the feathers, but heh... Pulling them out of the traverses, I saw that they were very noticeably bent! And both are two. And I think that the motorcycle was moving to the sides! That's the problem...
After that, the second glove compartment fell into place.
Wow, I look and am happy, what a thing! When my father saw that the Planet was standing in the room, he said “oh... um, awesome, now there’s no space in the garage, so I came here. There’s nothing you can do... You could sell it and that’s it.” Then, after assembling the cladding, he came in again and said: “I’ll probably drive it in the summer!” It’s expensive to refuel a car all the time, maybe I’ll drive this, I’ll remember my youth”))
That's all I've managed to do since disassembly. The motorcycle is about 30 percent ready. The main thing is that all the main parts were painted and a little bit assembled. Although not quickly, but how. Everything is beautiful and clear. I decided to do Planet 4 in full, so that I wouldn’t be ashamed of it. And how much he suffered from me, now it’s my turn to bring him to his senses.
Now it's up to the engine. I'm thinking about removing the cylinder and there I'll figure out what's causing the knocking. Also look for the fork stays and casings, otherwise everything there is bent and bent. And all sorts of little things will take a lot of time. No matter guessing how it will go, I’ll do it anyway. There is time before the season, there is no hurry. See you again friends, thank you for your attention.
Assembling the crankcase halves
We degrease the connector of the halves, knock out the guide bushings a little so that they extend 5-6 mm above the plane. Depending on your desire, we assemble the checkpoint. Personally, I assemble the gearbox only after assembling the engine, it’s more convenient for me.
We apply any automotive sealant to the connector, install the second half of the crankcase, tap it with a mallet, install the gearbox cover and tighten the crankcase with bolts.
We do not pull the bolts anyhow, but strictly according to Feng Shui: we pull about a third of the force, first the middle crosswise, then the periphery, and gradually increasing the force over several circles, we tighten the bolts as much as is sufficient.
3.5. Electrical equipment of motorcycles IZH 7.107-01
| Rechargeable battery | 6MTS-9, 12V, 9A.h |
| Single-phase alternating current generator with excitation from permanent magnets | 7.107-3701010, 14 V, 90 W |
| Rectifier-voltage regulator or voltage regulator | BPV 21-15, electronic or RNM 1 |
| Capacitor | K50-35-63V-2200 uF-V |
| Ignition switch | 7.107-3704010-10 |
| Ignition coil | 7.109-3705010 |
| Ignition sensor | 7.110-3838200 |
| Ignition switch | 7.110-3734010-20, electronic |
| Spark plug | type A 23 |
| Spark plug tip | 7.107-3707160 |
| Turn signal lamp | 34.3726 or 7.109-3726 |
| Turn signal switch | IZH RP4, electronic |
| Alarm switch | 7.107-3709010 |
| Combination switch | 7.107-3710010-10 |
| headlight | FG 137 B1 or FG 137B2 |
| Back lamp | 171.3716 |
| Sound signal | S 205 B |
| Rear Wheel Brake Light Switch | VK 854-B |
| Speedometer | SP 158 |
| Front wheel brake light switch | IZH BK103 |
| Fuse | 7.109-3722010 |
| Dashboard | 7.107-3805010-10 |