How to remove the gearbox of a Ural motorcycle
REMOVAL AND INSTALLATION OF THE TRANSMISSION OF MOTORCYCLES “URAL”, “DNEPR”
To remove the gearbox from the motorcycle without removing the engine, you must:
— place the motorcycle on a stand;
— remove the rear wheel;
— Unscrew the nuts securing the main gear to the rear suspension arm;
— remove the main gear;
— remove the elastic coupling disc with the rubber coupling from the fingers of the gearbox disc;
— dismantle the suction pipes to the carburetors, the air filter and the battery;
— disconnect the flexible speedometer drive shaft by first unscrewing the nipple mounting bolt;
— Unscrew the clutch cable adjusting fitting from the upper head of the clutch release lever;
— unscrew the nuts of the box mounting studs and unscrew the box mounting bolt located at the bottom right;
— move the gearbox back and remove it from the frame to the front.
Install the gearbox on the engine in reverse order. Before installation, you need to check the alignment of the teeth of the hubs of the driven clutch discs and, if necessary, adjust them so that the teeth match. This can be conveniently done using a special mandrel or input shaft. The teeth at the end of the input shaft of the gearbox are adjusted (by turning the shaft) according to the position of the teeth of the hub of the driven clutch discs.
To put the gearbox in place, you need to push the clutch release rod forward, insert it into the square hole of the clutch pressure plate, then, moving the box forward, insert the input shaft into the splined holes in the hubs of the driven clutch discs.
CARE OF MOTORCYCLE GEARBOX “URAL”, “DNEPR”
Caring for the gearbox involves timely topping up and changing the oil. You need to use the recommended type of oil and change it after 4-5 thousand kilometers. The oil level should reach the lower threads of the oil filler hole.
During operation, there may be a need to adjust the gear shift mechanism. To ensure normal operation of the foot switch mechanism, the adjusting screws 10 (Fig. 4.9) must be installed so that at the extreme positions of the foot switch pedal, the locking holes of the 2nd and 3rd gears of the sector reach the lock ball.
The fixed position of the sector is felt when moving the manual shift lever 5. The need to adjust the switching mechanism appears when the sector locking holes do not reach or cross the lock ball.
Correct adjustment is checked using the manual shift lever. When switching with your foot from 2nd to 3rd gear (Fig. 4.28, b) (the rear arm of the shift pedal is lowered down all the way), if the locking hole of the 3rd gear of the sector does not reach the lock ball (Fig. 4.28, c) , the manual shift lever must be moved forward until the hole coincides with the ball. In this case, you need to unscrew the lower adjusting screw. If the locking hole passes beyond the locking ball (Fig. 4.28, d), the manual shift lever must be returned back until the hole coincides with the ball. In this case, you need to tighten the lower adjusting screw. The position of the engaged 3rd gear is shown in Fig. 4.28, d. When switching from 3rd to 2nd gear (the front arm of the shift pedal is lowered down all the way) (Fig. 4.28, g), if the locking hole of the 2nd gear of the sector does not reach the lock ball (Fig. 4.28, d), the manual switch lever can be turned back until the hole coincides with the ball. In this case, you need to unscrew the upper adjustment screw. If the locking hole passes behind the lock ball (Fig. 4.28, i), the manual shift lever can be turned forward until the hole coincides with the ball. In this case, you need to tighten the upper adjustment screw. The position of the engaged second gear is shown in Fig. 4.28, k.
The clutch release mechanism is adjusted when necessary. Using the adjusting screw (see Fig. 4.21), adjust the cable tension so that in the free state the clutch release lever (left lever on the steering wheel) has a free play of 5-8 mm.
Replacing the oil seal in the Urals
All work begins with loosening the front axle bolts located where the shock absorber is. Next, you will need to hang the vehicle, and then follow these steps:
The main difficulty of the procedure is that the feathers may not be pulled out from the places where they are attached. This can be solved by turning the nut in the opposite direction, as well as by lightly hitting it with a wooden object. If it doesn’t help the first time, you should do it again - the disassembly procedure will be much easier. After replacing the oil seal, boot and other elements that have become unusable, you can reassemble the motorcycle - all operations are carried out in the reverse order.
It is worth considering that when replacing oil seals/boots, you cannot use abrasive tools to clean adjacent elements, otherwise you will have to change not only the oil seals in the foreseeable future - the parts are treated with a special coating that protects against premature wear. Before installing the oil seal in its place, it will be necessary to process this element inside and outside, eliminating premature obsolescence.
Source
Dismantling the gearbox of a Ural motorcycle.
From time to time, owners of Ural motorcycles have to perform this simple operation of disassembling and assembling the gearbox. We will not describe the repair of failed components in this article; we will limit ourselves to disassembling the main components using the example of an old Ural gearbox without reverse gear.
First you need to drain the oil and remove the gearbox from the motorcycle. Depending on the specific motorcycle, the steps may vary slightly. But the main thing is to put the motorcycle on the center stand, remove the rear wheel, remove the rear axle gearbox along with the cardan drive. Remove the air filter and rubber pipes. Disconnect the speedometer cable. Disconnect the clutch cable. Unscrew the four nuts on the studs securing the box to the engine, and then depending on your luck. For example, on my motorcycle, you have to remove the mufflers, intake pipes, unscrew the top engine mount, pull out the rear engine mounting pin, tilt the engine forward, and only after that can the box be pulled out of the frame.
Well, all the necessary manipulations have been done, let's start disassembling.
Disassembling the gearbox.
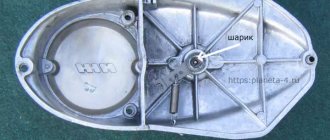
Remove the kickstarter lever. To do this, unscrew the nut on the wedge and carefully knock out the wedge.
We remove the clutch release lever, having first removed the rod, the fungus and the bearing from the housing.
We unscrew the seven bolts with a 10mm wrench securing the cover to the crankcase.
Turn the box upside down. We hold the housing slightly with our hand and lightly tap the input shaft with a hammer. The body remains in the hands, and the lid with all the insides goes down.
We take out the trigger disk.
We remove the fork axle from the housing and remove the shift forks.
Unscrew and unscrew the nut 22 holding the elastic coupling fork on the secondary shaft. We take out the fork, having first pulled out the speedometer gear.
Source
Features of the design of gearboxes of modern "URALS"
The “Wolf” gearbox is devoid of the curse of the Uralists - oil leaks. The shaft that controls the gears was equipped with bearings, and the reliability of the oil seal increased. The cover and crankcase are processed with increased precision; now they are sealed only with sealant. The cover of the front kickstarter support was eliminated - the one that “added” oil to the clutch. The breather has been found in a position in which it provides crankcase ventilation and does not force lubricant out. Instead of the gear shift shaft output plug there is a new, more reliable cover. The gearbox has also partially changed in terms of kinematics.
New gearbox elements that prevent oil leaks:
Method to reset the kickstarter springs: turn the shaft with an open-end wrench (a), at the same time press it with a knob (b) in the axial direction.
Factory spare parts must be tested at the stand and are marked with the quality control department stamp (highlighted in red)
To remove the part from the shafts, use a press (a) or a puller (b)
When connecting the “halves” of the gearbox, apply a strip of sealant-gasket from a tube to the contour of the mating planes. Don't overdo it! An excess of “gasket” can “draw” oil into the gearbox shaft channels and clog them. If you removed the driveline flange, place the washer of the castle nut on the sealant.
Modified reverse unit:
When charging the kickstarter shaft spring, first install the gearbox with the crankcase facing down. Then press the shaft into the box, use an open-end wrench to turn it one turn counterclockwise and release the shaft. Put on the kick pedal without large axial forces, otherwise the spring will reset. Fill the gearbox with SF-SG grade oil with a viscosity of 15W40.
| GEARBOXES OF IRBITSK MOTORCYCLE PLANT* | |||||||
| Gearbox ratios** | |||||||
| NN | designation | 1 | 2 | 3 | 4 | ZH | marking on the crankcase |
| Gearbox without starter for motorcycles with sidecars | |||||||
| 1 | IMZ-8.103-04001-03 | 3,6 | 2,28 | 1,71 | 1,30 | 4,2 | 6 |
| 2 | IMZ-8.103-04001-04 | 3,6 | 2,28 | 1,71 | 1,30 | 4,2 | 6 |
| 3 | IMZ-8.103-04001-05 | 3,6 | 2,28 | 1,56 | 1,19 | 4,2 | 7 |
| Gearbox without starter for single motorcycles | |||||||
| 4 | IMZ-8.123-04001-02 | 3,6 | 2,28 | 1,71 | 1,30 | — | 06 |
| 5 | IMZ-8.123-04001-05 | 3,6 | 2,28 | 1,56 | 1,19 | 4,2 | 07 |
| Gearbox with starter for motorcycles with sidecars | |||||||
| 6 | IMZ-8.104-04001 | 3,6 | 1,71 | 1,30 | 4,2 | 6 | |
| 7 | IMZ-8.104-04001-10 | 3,6 | 2,62 | 1,61 | 1,3 | 4,2 | 10 |
| 8 | IMZ-8.104-04001-20 | 3,6 | 2,28 | 1,56 | 1,19 | 4,2 | 7 |
| Gearbox with starter for single motorcycles | |||||||
| 9 | IMZ-8.124-04001 | 3,6 | 1,71 | 1,30 | 4,2 | 6 | 01 |
| 10 | IMZ-8.124-04001-10 | 3,6 | 2,28 | 1,56 | 1,19 | -(4,2) | 07 |
*As of September 2002
** Number of gear teeth at different gear ratios (secondary shaft/input shaft); 36/10=3.6; 35/11=3.18; 34/13=2.62; 29/17=1.71; 29/18=1.61; 28/18=1.56; 26/20=1.3; 25/21=1.19; 23/23=1
*** Motorcycles “Solo” and “Wolf” are equipped with a gearbox both with and without reverse gear.
Alexey Goloviznin, head of assembly production at the Irbit Motor Plant
Cool, cool. But still the best option is M62. The most grammatical box without any kind of surprises. Even after 10 years of work, my grandfather has 15% wear and tear.
to: sid6 what if it’s not chrome plated, does it mean it’s unfinished? Should I paint it over later? Let's say I don't like chrome.
I don’t know how this one, but from the standard factory one to 8 103 10, it broke down until I replaced it with the old model, it works great!
A very smart box. And MT804 is just as good!
hmm interesting, but in the production of ana will it be necessary or not mosh and the first batch will be a great success and then it will go as usual I again took the gearbox from me through all the seals ticking in the winter I will transfer it to the starter there and see what kind of gearbox it is I will install the Volkovo gearbox
There is no better Dnieper box.
in points 6 and 9, the fourth gear is the gear ratio is not 4.2 but 1.2, otherwise it turns out that the motorcycle will go slower than in first gear.
Yeah, now you can assemble the box)
The Ural box is simple, disassemble and assemble without problems. Now I’ll install Austrian shafts, it will be absolutely beautiful
please tell me why in the Volkov gearbox my shift pedal travel is too long? The lever on the right turns on with less travel. Switching is very inconvenient.
Source
Messages [1 to 20 of 40]
1↑ Topic from olegich 10-12-2012 22:57:12
Topic: please help me how to properly remove the box from the Urals without removing it from the motorcycle
Explain to a beginner how to remove the gearbox from the Urals without removing the engine from the motorcycle
Edited by olegich (10-12-2012 22:57:48)
2↑ Reply from mexanik62 11-12-2012 10:32:54
Re: please help me how to properly remove the box from the Urals without removing it from the motorcycle
Place it on the center stand Remove the rear wheel Remove the final drive Remove the fork Remove the elastic coupling Remove the clutch lever and whatever else you can remove from the clutch Remove the box just don’t forget about the clutch rod
3↑ Reply from olegich 11-12-2012 14:17:31
Re: please help me how to properly remove the box from the Urals without removing it from the motorcycle
Place it on the center stand Remove the rear wheel Remove the final drive Remove the fork Remove the elastic coupling Remove the clutch lever and whatever else you can remove from the clutch Remove the box just don’t forget about the clutch rod
how to remove main gear
Added: 11-12-2012 10:17:31
and you can remove the box without removing the main gear
4↑ Reply from mexanik62 11-12-2012 15:02:59
Re: please help me how to properly remove the box from the Urals without removing it from the motorcycle
Unscrew 2 or 4 nuts (depending on who) securing it to the fork leg
you can remove the box without removing the main gear
It is necessary to remove the engine mounts and move it forward (remove the silencers naturally)
5↑ Reply from [Leshy] 11-12-2012 15:58:14
Re: please help me how to properly remove the box from the Urals without removing it from the motorcycle
Unscrew 2 or 4 nuts (depending on who) securing it to the fork leg
you can remove the box without removing the main gear
It is necessary to remove the engine mounts and move it forward (remove the silencers naturally)
Why unscrew the divglo? I’m on the Dnieper 10, in my opinion, I removed the box without unscrewing the engine, you just unscrew the box, and then you’ll figure it out) and also, to pull it out, the platform on the battery is bent a little, and there will be a small problem with the clutch) but not It’s difficult, I took it off in about 30 minutes) you’ll figure it out
6↑ Reply from VlAiSLAV 11-12-2012 19:20:29
Re: please help me how to properly remove the box from the Urals without removing it from the motorcycle
Unscrew 2 or 4 nuts (depending on who) securing it to the fork leg
you can remove the box without removing the main gear
It is necessary to remove the engine mounts and move it forward (remove the silencers naturally)
Why unscrew the divglo? I’m on the Dnieper 10, in my opinion, I removed the box without unscrewing the engine, you just unscrew the box, and then you’ll figure it out) and also, to pull it out, the platform on the battery is bent a little, and there will be a small problem with the clutch) but not It’s difficult, I took it off in about 30 minutes) you’ll figure it out
on the Dnieper it is on the Dnieper. here the Ural won’t roll with it, there’s a little less space there, so you have to push the engine forward a little
7↑ Reply from Shaman 11-12-2012 19:22:50
Re: please help me how to properly remove the box from the Urals without removing it from the motorcycle
in the Urals it can also be removed without unscrewing the engine
8↑ Reply from partizan 11-12-2012 19:50:37
Re: please help me how to properly remove the box from the Urals without removing it from the motorcycle
Olegych, the main gear means the gearbox (the one that turns the rear wheel). in the Ural, everything can be removed just as easily: you take off the wheel (rear); unscrew the brake rod from the lever on the gearbox; unscrew that same gearbox (main gear); disconnect the speedometer cable from the box; take off the clutch cable; unscrew three nuts and one bolt (fastening box to the block); you move the box back, while kicking it slightly to the bottom - it jumps out! The most you can resort to is a large screwdriver or a mounting tool so you don't have to pull it with your hands. GOOD LUCK!
9↑ Reply from olegich 11-12-2012 22:28:06
Re: please help me how to properly remove the box from the Urals without removing it from the motorcycle
I'll do it in the spring, but right now I'm doing the general
Added: 11-12-2012 18:28:06
And after I take it all off and then put it back, nothing will need to be adjusted?
10↑ Reply from mexanik62 11-12-2012 22:30:12
Re: please help me how to properly remove the box from the Urals without removing it from the motorcycle
Clutch and brake
How to grind valves with a drill?
pedestrian Thu, 19/07/2007 - 06:25
Viking, people, why are you using a screwdriver, your valves are crooked, and you are grinding them on the seat along the way.
Most of the heads that you have to work with are worn out, there is a large chamfer of the valve seat, there is play in the guides, valves with burnouts, or the working chamfer of the disc is worn out. 1 I interrupt the guide, there is a blog where you can buy factory blanks for your uncle turner. 2 I countersink (sharosh) the valve seats, 45, 15, 75 degrees, fortunately I have friends in a car service center, although I should buy myself a set of cutters so as not to beg
It is important that the working chamfer of the seat (45) is not wide, about 1 mm. 3 I'll give it away if the valves are used
for grinding the working chamfer, it happens that new lapans also have to be grinded because they are crooked. 4 After the above procedures, I rub it in with my hands, carefully for no more than 10 minutes with diamond paste, I don’t recommend rubbing for a long time at all, you will shorten the life of your head (moto head). All work takes 1 day, costs $5 and the head is like new. I also advise you to polish the channels, the outer and inner surfaces of the valve plate, which will add performance to your engine, and it’s much more pleasant to assemble such units.
Ps It is more convenient to polish the channels with a screwdriver.
Repair, disassembly, assembly and video of gearboxes of heavy Ural motorcycles
In 2022, the Ural company offers motorists only two models for purchase - Ural Gear Up 2022 2WD and Ural City. This is a rather expensive equipment that has found the bulk of buyers in the USA and Canada. In the CIS, few fans of two-wheeled “iron” horses buy new motorcycles from IMZ. The main reason is high cost. The price tag starts at 798 thousand rubles. It is justified by the manufacturer’s widespread use of imported components and the small number of units produced. Plus, many consider Ural motorcycles to be morally and structurally obsolete. However, the manufacturer is constantly improving its developments, improving the characteristics of the engine, gearbox and other important components. In this article we will talk in detail about the Ural gearbox.
Motorcycle gearbox design
Over the long history of its existence, the Ural gearbox has undergone several global upgrades. Today it is a modern transmission with reverse gear. Ural is equipped with a 2-shaft four-speed gearbox model 6204. Due to the introduction of the second shaft, the dimensions of the unit have been significantly reduced, and productivity has also increased significantly. In this gearbox, the gears are constantly meshed, and due to the fact that it uses fewer gears when transmitting torque, it is characterized by increased efficiency. There are three initial speed gears located on the input shaft, forming a single whole with the shaft. The gears are rigidly fixed on the secondary shaft and its main purpose is to select the desired speed.
The design includes the following parts:
The gearbox with reverse gear is very convenient to operate and repair. She received manual and foot methods of switching gears. Unlike many modern motorcycle gearboxes, the gearbox in the Urals is detachable from the engine, which greatly facilitates motorcycle repairs. The crankcase of the unit is made of aluminum alloy; on the latest models of motorcycles, the crankcase additionally received a removable rear cover, which simplifies the disassembly and assembly of the gearbox. Such a transmission can also be installed on previous Ural models, but this will require installation of the latest modification of the air filter.
Why adjustment is needed
- With a small gap, especially if the pusher fits closely, low compression is observed. Even on a hot engine there is a gap. In this case, the engine operates unstably at any temperature; on a hot engine, characteristic knocking noises will be heard, and popping noises may occur in the carburetor;
- If there is a large gap on the valves, they do not open completely. At the same time, the combustion chamber is poorly ventilated and is also not sufficiently filled with the fuel-air mixture. This leads to unstable operation of the motor.
If there are strong deviations in the clearances, the engine operates very unstable, to the point of being unable to start. Adjustments are made to avoid these problems.
Dismantling and assembling the gearbox of a Ural motorcycle
To disassemble the gearbox, proceed as follows:
Complete disassembly of the clutch mechanism, gear selection mechanism and kickstarter is allowed only when repairing them - otherwise there is no need to disassemble them.
The Ural motorcycle gearbox is assembled with reverse gear in reverse order. After assembly, the gear shift mechanism must be adjusted, otherwise problems may arise when choosing them.
The gearbox of a Ural motorcycle with reverse speed begins to be adjusted by placing the motorcycle on the stand. Then the 2nd speed is turned on and the pedal is pressed to the 3rd gear. If the ball coincides with the well, adjustment of the lower adjustment screw is not required. After moving from 3rd speed, you need to return to the second and check the alignment of the ball, tighten the upper screw if it does not match. This completes the gear selection adjustment.
The Ural motorcycle allows you to repair the gearbox with minimal effort, thanks to the simplicity of its design, which distinguishes this model from other two-wheeled vehicles.
Gear shift mechanism and neutral sensor. Adjustment
In cases of periodic self-switching of one or more gears while the motorcycle is moving, the adjustment of the screws of the shift mechanism should not be disturbed. Self-shutdown of the gear indicates wear and the need to replace the corresponding gear on the secondary shaft
The gear shift mechanism is adjusted at the factory. The adjustment technology requires certain skills and is a difficult task for an inexperienced mechanic. It is necessary to re-adjust the shift mechanism only after overhauling or replacing gearbox parts
The gear shift mechanism can be adjusted both with the power unit assembled and installed on the motorcycle, and with the gearbox removed. The photographs show the gearbox removed from the motorcycle for clarity. 1. Use a 13 mm wrench to unscrew the nut and remove the reverse gear lever from the axle. Before removal, it is recommended to mark the position of the lever on the shaft for subsequent assembly.
2. Using a slotted screwdriver, unscrew the four screws of the gearshift shaft cover and remove the cover.
3. Using a slotted screwdriver, loosen the tightening of the locknuts of the adjusting screws of the gear shift mechanism and the reverse gear mechanism.
4. To do this, use a 13 mm wrench to unscrew the lock nut, holding the screw from turning with a slotted screwdriver.
5. We turn out each of the screws one by one, count the old sealant from the screws and holes, degrease the threads with a solvent for nitro paints or a similar preparation, and apply silicone sealant to the threaded part of the screws.
Correct position of the latch on the sector. 9. You can check the position of the sector like this. We grab the sector shaft by the flats on the shank with a 10 mm open-end wrench.
10. We are trying to turn the shaft forward or backward. If the spring stopper does not fit into the sector groove when changing gears, the shaft will easily turn in one direction or another until the stopper gets into the sector groove (you will hear a characteristic click of the gear being engaged); adjustment is required. If the shaft rotates only after overcoming the force of the spring, it means that the gear was shifted correctly, the spring stopper entered the groove of the sector of the desired gear and the adjusting screw was set correctly. 11. The lower adjustment screw is responsible for shifting gears “up”.
How does a gearbox work?
On the secondary shaft, the gears have splined rims, with which the gear clutches alternately engage, moving along the outer splines of the secondary shaft couplings. Gear shifting occurs using splined couplings, the movement of which is ensured by the gear shift fork. The forks are not interchangeable and are driven by a sector welded to the shaft. There are two grooves in the sector where the fork spikes fit. Using the manual gear shift lever, the sector is set to one of five possible positions.
How to change gears on a Ural car
Gear shifting is carried out by a lever located in the cabin using a mechanical remote drive, the need for which is caused by the forward displacement of the cabin located above the engine. In a bracket fixed to the boss of the gearbox housing cover, a gear shift roller is mounted on two supports. A switch lever is attached to the inner end of the roller, the end of which fits into the grooves of the heads mounted on the switch rods. In the middle position, the lever is installed by an upper clamp with a pin and a spring and a lower reverse lock with two pins and a spring. The outer pin is installed in the swing arm for shifting first gear and reverse gear. The leash is pivotally mounted on a pin fixed in the boss of the gearbox cover.
The input shaft with gear is installed in the crankcase on a ball bearing. The intermediate shaft is also installed in the crankcase: in front - on a cylindrical roller bearing, and in the rear - on a ball bearing. The rear bearing housing is covered with a cast iron cover.
Engine
Engine type – four-stroke two-cylinder. Brand – M-72M. Cylinder diameter, mm – 78. Piston stroke, mm – 78. Working volume, cm³ – 746. Compression ratio – 5.5 ± 0.2. Maximum power, l. With. – 22. Maximum torque, kg m – 4.0. The block head material is aluminum alloy. Head gasket – asbestos metal 0.6 mm. The piston material is aluminum alloy.
Valve distribution phases (according to the angle of rotation of the crank), degrees: – beginning of intake to c. m.t. – 76; – end of inlet after n. m.t. – 92; – beginning of release BC m.t. – 116; – end of release after c. m.t. – 52.
Carburetor – Two K-37.
Repair and service
One of the main advantages of the gearbox on a Ural motorcycle is its high maintainability. Each owner can carry out a major overhaul of the gearbox in just a few days, provided that the necessary parts, spare parts, other consumables and tools are available.
To remove the unit from the motorcycle you need to do the following:
Typically, transmission repair involves replacing worn gears and adjusting the gear shift mechanism. Monitor the condition of the seals, since loss of lubricant will lead to unfavorable operating conditions of the unit, which will ultimately cause premature failure.
How to adjust without a valve gauge on a Ural motorcycle
Adjusting the valves of the Ural and Dnepr motorcycles.
In the gas distribution mechanism, the thermal clearance in the valve drive is regulated. In order for the valve to fit tightly on the seat, it is necessary that there is a gap between the valve and the drive parts when the camshaft cam is not acting on the pusher. If there is no such gap, the valve will rest against the actuator, will not sit on the seat and will not provide a tight seal. If, on the contrary, the gap between the valve and the drive parts is too large, this will lead to the opening of the valves being delayed. In both cases, this is a sign of unstable engine operation, intermittent operation (and if you add to this a poorly set ignition, incorrectly selected spark plugs, unadjusted carburetors, then the motorcycle will most likely refuse to start and run at all).
The clearance is adjusted on a cold engine. At the same time, it is useful to know that for lower-valve engines (motorcycles: M-72, K-750, Dnepr-12, MV-750) the clearance decreases when the engine warms up, and for overhead-valve engines (Ural and Dnepr motorcycles of modern models). Therefore, when adjusting, for lower-valve engines, a larger gap is assigned, and for overhead-valve engines, a smaller one.
Total information
Motorcycle type: with sidecar. Wheelbase, mm – 1430. Ground clearance, mm – 130. Track, mm – 1100
Dimensions, mm: – length – 2420; – width – 1650.
Height (by ignition key) – 1000
Motorcycle weight, kg: – dry – 335; – worker – 380.
Fuel consumption on the highway, l/100 km – 7. Fuel reserve on the highway, km – 310. Highest speed, km/h – 85.
Capacity (oil), l: – engine crankcase – 2.0; – gearbox housing – 0.8; – reverse gear housing – 0.150; – air purifier – 0.2.
Fuel tank capacity, l – 22.
How to check the foot switch mechanism
The need to adjust the foot shift mechanism may be necessary after the transmission has been rebuilt or if the locknuts have become loose. To do this, move the motorcycle manually and change gears from 2nd to 3rd and vice versa. It is necessary to achieve easy switching. The motorcycle is also placed on a stand, the rear wheel is hung out and the engine is started. When switching from third to second speed, you need to press on the front shoulder of the pedal. Looking to the left, the pedal should turn counterclockwise and the pawl crank clockwise and will therefore rest against the top stop. It needs to be adjusted.
How to change gears on a motorcycle correctly
When changing gears, change one speed at a time. It is not advisable to jump.
To understand how to change gears on a motorcycle, you need to carefully study the controls. There are motorcycles with manual transmission and semi-automatic.
Method one
Motorcycles with manual transmission. All actions in this case occur in the following sequence. Pick up speed. Take off the gas. Engage the clutch. Press the gear shift pedal. Release the clutch, then the shift pedal and add gas.
To start the motorcycle, place it in neutral. After this, remove the gas and squeeze the clutch, at the same time turning on first gear. Taking your foot off the gear pedal, apply gas and release the clutch. Now add gas.
To downshift, you need to remove the gas and engage the clutch. After this, sharply add gas, and when the speed begins to drop, press the gearshift pedal. Release the clutch and shift pedal and add gas. Once the motorcycle has stopped, be sure to put it in neutral.
Method two
Motorcycles with semi-automatic transmission. On these motorcycles, gear shifting is easier. Take off the gas and change gears. The clutch and gearbox are connected here.
Before starting the engine, place your bike in neutral. In order to engage first gear, you need to remove the gas and press the gear lever down. To increase the gear, you need to remove the gas and lift the gear lever up. To downshift, on the contrary, you need to apply gas and immediately remove your hand from the gas. When the speed starts to drop, change the speed and add gas. Now you know how to change gears on a motorcycle.
Read more: Engine resource reviews
Technical characteristics of modern models [edit | edit code]
Tourist, Tourist 2WD, Gear-UP, Troika Lux [edit | edit code]
| Tourist | Tourist-2WD | Gear-UP | Troika Lux | |
| Model: | IMZ-8.1037 Tourist | IMZ-8.1037 Tourist-2WD | IMZ-8.1037 Gear-UP | IMZ-8.1037 Troika Lux |
| Dimensions L×W×H, mm: | 2580×1700×1100 | 2580×1700×780 | 2580×1700×1100 | |
| Ground clearance, mm: | 125 | |||
| Dry weight, kg: | 350 | |||
| Total weight, kg: | up | |||
| Fuel tank, l: | 19 | |||
| Maximum speed, km/h: | 105 | |||
| Fuel consumption in the city, l/100 km: | 6-7 | |||
| Fuel consumption on the highway, l/100 km: | 4-5 | |||
| Engine: | 745 cm³, 42 l. p., 4-stroke, 2 cylinders, opposed OHV | |||
| Launch: | electric starter and kickstarter | |||
| Electrical system: | 12 V, generator 500 W | |||
| Ignition system: | contact | |||
| Checkpoint: | 4-speed, with reverse | |||
| Main gear: | gimbal | |||
| Gear ratios: [15] | I - 3.6; II - 2.62; III - 1.61; IV - 1.3; Rear: 4.2 | |||
| Main gear ratio: | 4,62 | |||
| Tires: | 4.00x - 19″ | |||
| Wheels: | knitted, painted, 19″ | spoked, chrome-plated, 19″ | knitted, painted, 19″ | spoked, chrome-plated, 19″ |
| Brakes: | front - hydraulic, disc; rear - drums | |||
| Suspension: | front - lever with spring-hydraulic shock absorbers; rear - pendulum with spring-hydraulic shock absorbers, adjustable for load | front - telescopic; rear - pendulum with spring-hydraulic shock absorbers, adjustable for load | ||
| Seat: | separate, double adjustable | solid | separate, double adjustable | solid |
| The package includes additional equipment: | Painted stroller wheel rack, driver's mudguards, passenger handles, parking brake | Chrome-plated rack for the stroller wheel, searchlight, driver's mudguards, stroller glass, shovel, canister, chrome-plated driver's protective bar, chrome-plated stroller protective bar | Stroller wheel rack, searchlight, shovel, canister, driver's mudguards, passenger handles, parking brake, driver's protective bar, stroller's protective bar | Chrome-plated luggage rack on the stroller wheel, chrome-plated passenger handles, velor upholstery of the stroller, leather passenger seat in the stroller, stroller glass, parking brake, driver's roll bar |
Retro, Retro-Solo, Wolf, Solo-sT [ edit | edit code]
| Retro | Retro Solo | Wolf | Solo-sT | |
| Model: | RETRO | RETRO SOLO | WOLF | Solo-sT |
| Dimensions L×W×H, mm: | 2224×1630×1020 | 2224×840×1060 | 2530×850×1300 | n/a |
| Ground clearance, mm: | 140 | 115 | 125 | |
| Dry weight, kg: | 343 | 220 | 260 | 198 |
| Total weight, kg: | 610 | 400 | 430 | n/a |
| Fuel tank, l: | 19 | |||
| Maximum speed, km/h: | 120 | 150 | ||
| Fuel consumption in the city, l/100 km: | 6-7 | 5-6 | ||
| Fuel consumption on the highway, l/100 km: | 4-5 | |||
| Engine: | 745 cm³, 42 l. p., 4-stroke, 2 cylinders, opposed OHV | |||
| Launch: | electric starter and kickstarter | |||
| Electrical system: | 12 V, generator 500 W | |||
| Ignition system: | microprocessor | |||
| Checkpoint: | 4-speed, with reverse | |||
| Main gear: | gimbal | |||
| Gear ratios: [15] | I - 3.6; II - 2.28; III - 1.56; IV - 1.19; Rear: 4.36 | |||
| Main gear ratio: | 4,62 | 3,89 | ||
| Tires: | 110/90-18″ | front 90/90-18″ rear 130/90-16″ | front 3.50-18″ rear 4.00-18″ | |
| Wheels: | spoked, chrome-plated, 18″ | spoked, chrome-plated, 18″ | spoked, chrome plated | spoked, chrome-plated, 18″ |
| Brakes: | front - hydraulic, disc; rear - drums | front - hydraulic, disc; rear - hydraulic, disc | front - hydraulic, disc; rear - hydraulic, disc | |
| Suspension: | front - telescopic; rear - pendulum with spring-hydraulic shock absorbers, adjustable for load | front - telescopic; rear - pendulum with spring-hydraulic shock absorbers, adjustable for load | ||
| Seat: | separate, double adjustable | separate, double adjustable | separate | separate |
| The package includes additional equipment: | Velor upholstery of the stroller, leather passenger seat in the stroller, stroller glass, parking brake, driver's roll bar | Driver safety bars | ||
MY MOTORCYCLE
Today I want to talk about an unusual representative of the Irbit motorcycle industry. What could be unusual about it? We are all used to the fact that Urals have always been produced with sidecars and few people dreamed of a single model, but the motorcycle plant, I think, surprised everyone by starting the production of single vehicles.
Why suddenly? In the 90s, the demand for motorcycles with sidecars fell, and the Irbitsky plant decided to save the situation by releasing a single Ural “Solo” model, and then the oppositionists’ dream came true. After all, they tried to convert wheelchair users into singles and encountered more than one problem, but here everything is ready right away, you just need to complete it “for yourself” and ride. An inexpensive, reliable and powerful motorcycle with a low, straight handlebar and a classic riding position has become very popular among fans of city riding.
So, let's start with the motorcycle itself: the motorcycle is a bit surprising and pleases with a lot of chrome. There are many of them: fenders, mufflers, arches, wheel rims. In combination with the strict black color of the remaining parts, they give the car a solid and at the same time festive look. When it appeared, it immediately attracted the attention of not only ours, but also foreign fans of this style of motorcycle.
Actually, it was prepared for production with the expectation of the foreign market. Most of the plant's products are sold abroad (USA, England, France, and, more recently, China). But domestic fans were not forgotten; they also dropped a little, and “Solo” began to appear in our stores in scanty quantities. Most of the differences from the base model IMZ-8.103-10 concern the appearance. The Solo is equipped with two small mufflers (Nikonov exhaust system), gracefully raised at the rear and protecting the passenger’s legs from hot surfaces. Another thing that immediately catches your eye is the double mono-saddle and the side decorative plastic panels (the tool, as before, is stored in a drawer on the tank). Elements of passive safety include roll bars with reliable fastening to the frame and folding footrests for the driver and passenger. The front fender - it has become a little smaller - is attached to the fork stays and is unsprung.
Increasing the compression ratio to 8.5 due to spherical head pistons raised the engine power to 29.5 kW (40 hp) and requires the use of AI-93 gasoline. In new pistons, the piston pin axis is shifted 1 mm from its axis of symmetry - this reduces engine noise and cylinder wear. In addition, the “heart” of the motorcycle has become more “environmentally friendly” due to the use of a closed crankcase ventilation system. The gearbox has “lost” reverse gear - it is not needed for single driving. The Solo uses electronic non-contact ignition, which does not require adjustment during operation and ensures reliable engine starting even with a partially discharged battery. The reduction in the weight of the motorcycle and its total load capacity (225 and 175 kg, respectively) entailed a change in the suspension characteristics: the latter became softer. Leaving the hydraulic part of the shock absorbers unchanged, the developers lowered the stiffness of the springs by using wire with a diameter of 4 mm instead of 4.5 for the front and 7.5 mm instead of 8 for the rear.
The position of the lower support washers of the rear shock absorber springs has changed - they have dropped by 20 mm. Abandoning the sidecar and switching to 18-inch wheels required reducing the rear axle final drive ratio from 4.62 to 3.89. The Solo's maximum speed increased to 135 km/h, and fuel consumption was 5-7 l/100 km. The motorcycle can be equipped with a conveniently shaped fairing and plastic mudguards. The brake system remains the same drum type.
This was Solo at the beginning of its release, in the 90s. But I don’t finish the description here. I would like to show you now the modern model of this motorcycle. Of course, no major changes happened, but still…….
So, a more modern single Ural in our time:
Externally, it remains with a rich color and a good balance of painted and chromed parts. It looks good, as befits a classic motorcycle.
The tank is a “droplet”, its appearance is impressive, the lid on it is of a new design and is airtight. Now I would like to talk about the configuration: Irbitsk residents probably decided that they had made an eternal motorcycle, it would never break. Apparently they think so at the factory, since there is no space for tools. But - this, of course, is just terrible - but the tire pump is fixed in the most visible place. Although this is a small thing that can be eliminated.
The motorcycle has two options for completing seating positions: the basic model has a single seat, which is characterized by a rubber coating, or a double seat. In addition, there is the possibility of having two single seats. The price for the basic configuration of the Ural Solo motorcycle is about 215 thousand Russian rubles, which is considered a very competitive price compared to models from competing manufacturers.
The increase in cubes did not affect the power of the motorcycle in any way. The engine power is enough for dynamic acceleration. It feels like it’s not 40 l/s, but all 60.
The gearbox works, of course, well and clearly. But some shortcomings remained, for example, the long stroke of the lever. And most importantly, the fifth speed never appeared; as compensation there is a lever for quickly engaging neutral, as well as reverse gear (they returned it). On the Ural Solo-Classic, these options are not superfluous; even at a traffic light, it’s convenient to set the lever to neutral, and reverse gear helps when parking.
The two-cylinder engine runs on AI-92 gasoline. The motorcycle tank holds nineteen liters of gasoline.
The ignition system of this motorcycle is microprocessor-based, which ensures quick and easy starting of its engine. Fuel consumption per hundred kilometers in the urban cycle ranges from five to six liters. The cruising speed of the motorcycle is one hundred and five kilometers per hour, and the maximum permissible speed is one hundred and twenty kilometers per hour.
The Ural Solo motorcycle is available in different colors and, as mentioned above, in different configurations, so that each potential buyer can choose one or another version of the model of this motorcycle, depending on taste preferences and financial capabilities. In the end, we can say that the motorcycle is really not bad, there are a lot of good improvements. But..... I haven’t seen them in Ukraine yet - they are supplying them to foreign markets and for their consumers! Why is that?
Fault Inspection
When inspecting the parts, you should check the ease of movement of the forks along the rod. Condition of fork stays and ring grooves in movable couplings. The amount of axial movement of the forks in the groove of the engagement couplings.
The following malfunctions may occur in the trigger mechanism: - wear, crushing or chipping of the pawl; — jamming of the pawl pusher; — breakage of the pawl spring; — bending the ends of the return spring of the starting pedal; — damage to the working end of the buffer pin; — cracks in the starting lever; - wear of the oil seal.
Source
What is thermal gap
The term thermal clearance refers to the distance between the rocker arm and the upper end of the valve.
This allows for the inevitable thermal expansion of engine parts to ensure optimal operation of the valve mechanism. The disadvantage of having such a gap is the low stability of the engine when starting when cold, but it works great when fully warmed up. It should be remembered that the gap must be appropriate for the engine model. On older models, the alloys are less stable, so it is recommended to set this indicator to 0.1 mm. On more modern engines, the gap can be set within 0.05 mm.
Source