Engine Features
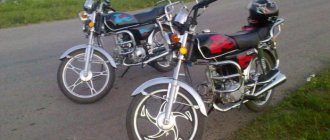
The engine of the Chinese Alpha moped has characteristic features, thanks to which fans of motorcycle technology prefer this particular model.
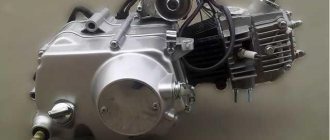
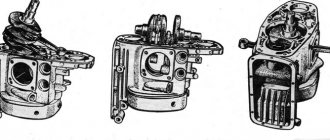
Engine for Alpha moped
Engine capacity - 72 cc. With the right approach, it can be upgraded to 110 cc. Also, if desired, you can increase the speed by 10 kilometers.
The weak point of the engine is the gearbox, which requires close attention and a delicate approach . When repairing the “heart” of a moped, you need to know how to correctly disassemble and reassemble this part of the motorcycle “organism”.
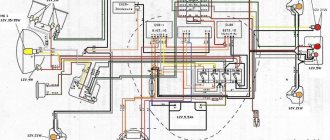
Alpha is equipped with a powerful engine, the circuit of which is complex. If you can’t figure it out on your own, it is recommended to contact an experienced specialist. The price of repairs is quite affordable.
Advantages of the online store of motorcycle parts “MotoArt”
The catalog of the MotoArt store presents high-quality batteries for Alpha 110 and other models of mopeds. A large selection of various types of devices, differing in their capacity, size, technical parameters and price, will allow you to choose the most suitable battery model. The best modifications of rechargeable batteries made in Ukrainian, Chinese and Taiwan are presented to buyers. All units are accompanied by quality certificates and are carefully checked before being sent to the client for manufacturing defects.
Causes of malfunction
The Chinese Alpha moped, whose price is affordable, does not cause owners many problems. Interruptions in a moped engine have several causes, and once you understand them, you can quickly fix the breakdown.
Disassembling the moped engine
So, if the engine starts with great difficulty, the muffler “shoots”, and smoke comes out of the chimney, it means that the moped is “capricious” due to problems with the carburetor. In order to solve this problem with the Alpha moped, you need to:
- clean the carburetor;
- thoroughly clean the moped's air filter;
- tighten the screws;
- adjust the moped carburetor.
If the Alpha slowly picks up speed, and its engine is not able to develop the declared power, then the reason is the incorrect operation of the moped valves. It can also “get sick” due to gaps and incorrect timing. In order to make the Alpha moped function normally, it is necessary to replace the used valves with new ones.
If the Alpha moped is not able to reach the required speed, despite the roar of the engine and solid revolutions, it is impossible to stop the spinning wheel, and gear shifting occurs intermittently, then the cause of the malfunction is clutch wear.
Moped clutch parts
To eliminate the breakdown, you must perform the following manipulations:
- remove the engine;
- remove the plastic cover;
- unscrew the tightening screw;
- Unscrew the adjustment mechanism and tighten the screw tightly;
- start a moped;
- turn on first gear and drive a few meters.
Another cause of moped engine malfunction may be wear on the drive sprockets. If they are very worn, they must be replaced with new ones.
You may encounter the problem of engine overheating. The situation can be corrected after adding oil. If oil leaks, you must urgently contact a professional service .
Alpha moped engine overheating
Engine disassembly
Disassembling the Alpha engine is quite simple. To do this you need:
- “arm yourself” with a key;
- Unscrew the bolts on the intake manifold (by 10);
- unscrew the cylinder covers and the bolts located there (4 pieces);
- remove the cylinder head.
After performing the necessary manipulations, you need to properly assemble the engine, installing all the parts in place.
A diagram can help you understand the nuances. Also, a lot of useful tips regarding repairing the most important “organ” of the Alpha moped are contained in the training video.
Engine disassembly
It is very easy to disassemble the Alpha engine. To do this you need:
- "Hand" with a key;
- Unscrew the bolts on the intake manifold (10);
- unscrew the cylinder covers and bolts (4 pcs.);
- remove the cylinder head.
After completing the necessary manipulations, it is necessary to correctly assemble the engine and install all the parts in place.
It may help to figure out the nuances of the scheme. The training video also contains many useful tips for repairing the most important “body” of the Alpha moped.
Gearbox disassembly
It is necessary to disassemble the gearbox in order to replace used parts. This is done after the following parts have been dismantled:
Gearbox disassembly
Repair of this part of the engine is carried out as follows:
- Using a screwdriver or blade, remove the retaining ring and the drive gear;
- Carefully unscrew the gear fixing bolt and remove the gear shift mechanism;
- remove the gear shift fork and shaft;
- remove the crankshaft and drum (including the core);
- After replacing the worn part with a new one, reassemble (in reverse order).
Dismantling and assembling a moped gearbox
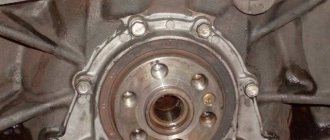
Disassembly and reassembly of the gearbox is carried out to replace worn parts. Before disassembly, it is necessary to dismantle the cylinder head, generator rotor, cylinder and clutch housing.
Using a screwdriver with a thin blade, remove the retaining spring ring from the secondary shaft and then the driven gear of the motor transmission. To remove the gear shift mechanism, unscrew the gear lock bolt on the right side of the engine and remove the lock together with the spring located under it.
We remove the gear shift shaft assembly with the auxiliary gear shift fork.
We separate the halves of the engine crankcase and dismantle the crankshaft, after which access to the gearbox parts opens. The gearbox shafts along with the gears remain in the left half of the crankcase.
Unscrew the screw securing the speed indicator sensor and remove the sensor. Using a hex wrench, unscrew the gear shift drum screw. Under the screw there is a contact element and a washer for the speed indicator sensor. We remove the drum along with the shift forks, shafts and gears of the gearbox. When separating gears, shafts and forks, it is important not to mix them up.
If defects are found, the parts must be replaced. Reassemble the box in reverse order.
How to disassemble a box on a moped
mechanical, four-speed and made in a single block with the engine. Gear shift mechanism
consists of a lever, shaft, ratchet and shift drum.
In the neutral position, the clutch cams for 1st, 2nd, 3rd and 4th gears are located with a gap relative to the gear cams. This neutral position in the shift mechanism is ensured by a detent lever. When you turn the gear shift lever, its shaft rotates, which through the ratchet mechanism transmits rotational movement to the shift drum disk, rigidly mounted on the drum. Rotating in the crankcase, the shift drum acts through curved grooves on the shift forks, which, moving along the axis, displace the couplings along the splines of the secondary shaft until they engage with the gear cams. When the force is removed from the lever, the gear shift shaft returns to its original position under the action of a spring, while the ratchet mechanism of the shaft, after interacting with the shift drum disk, remains in the same position. The gearbox is lubricated from a common oil bath. Oil is poured into the crankcase in an amount of 0.8 liters through the filler hole (the oil change procedure is described in the “Moped Maintenance” section). Oil leakage from the crankcase is prevented by oil seals (on the secondary shaft and kick starter shaft), rubber rings on control shafts and gaskets between parts of the boat. The oil level in the crankcase may drop due to its leakage through the seals, loose connections between the crankcase parts and the crankcase cover. Operating a moped with a low oil level can cause failure of engine and gearbox parts. Operating a moped with a low oil level is not allowed!
What is the gear ratio of the gearbox and final drive?
The gear ratio is nothing more than the ratio of the number of teeth on the driven gear to the number of teeth on the drive gear. In practice it looks like this. If one (driven) gear has 60 teeth, and the other (drive) has 30, then the gear ratio of this pair is 2 (60:30). Gear ratio is one of the main characteristics of gears, which ensure the transmission of torque from the engine to the drive of some other device (unit). At the same time, this mechanism allows you to increase or decrease the amount of transmitted torque. For example, by changing the number of teeth on both gears, you can increase or decrease the torque transmitted from the engine to the “consumer”. The gear ratio in the gearbox affects such characteristics as acceleration dynamics and maximum speed of the moped. In relation to gearbox stages with different gear ratios, it looks like this: the larger this number, the “shorter” and “more powerful” the gear, that is, when accelerating, the engine spins up faster to maximum speed, and the motorcycle accelerates more intensely. True, this reduces the maximum speed in this gear. Consequently, there is a need for more frequent switching. The acceleration dynamics are also influenced to the same extent by the gear ratio of the main pair. The higher it is, the more dynamic the motorcycle is, the better it pulls in all gears, but the maximum speed is lower. By reducing the gear ratio, they increase the maximum speed (if the engine has a so-called power reserve), but lose in the acceleration dynamics of the motorcycle. For example, installing a main pair of 4.1 or 4.3 instead of 3.72 makes the moped more dynamic, but less fast. Transmission gear ratios are selected depending on the power and torque characteristics of the engine, wheel size, braking system capabilities, and if the moped is tuned, the owner’s wishes are also taken into account.
Let's get started
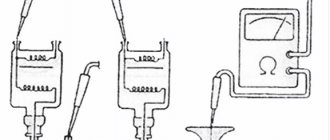
So, the battery is ready to charge. Connect the terminals of the charger to the battery. The red terminal is to the positive terminal of the battery, the black (or blue) terminal is to the negative terminal. Don't mix up the polarity!
Most modern chargers automatically set the charge current and charging time. But if it is possible to set the charging current, it is chosen by dividing the nominal capacity of the battery by ten. For example, with a capacity of 4 Ampere-hours, the charge current should be 0.4A. In this case, the charging time will be approximately 10 hours.
You should not charge a motorcycle battery with a car charger if it cannot charge with a current of less than 1A. High charging currents can damage the battery.
Battery care rules
The battery requires proper storage and care. Here are some requirements for proper operation of a scooter battery , so that it will last a long time.
First, do not allow the battery to be discharged to more than half its capacity. In general, the battery should not be allowed to be stored in a discharged state. If you feel that the scooter starter is having difficulty cranking the engine, recharge it as quickly as possible.
The battery must be kept clean, since dirt accumulating on the terminals contributes to the rapid discharge of the battery due to current leakage. Keep contacts clean and free of oxides.
In order to prevent a short circuit at the battery terminals, which can permanently damage the battery, you need to spare no expense in purchasing fusible links, preferably factory-made ones. Homemade fuses, which often fail, can only make the situation worse.
It is unacceptable to store the battery at temperatures below -5˚ Celsius, as well as overheating the battery above +50˚. The battery can be charged with currents ten times lower than indicated in the battery capacity characteristics. There is NO need to recharge the battery. When overcharged, water begins to actively evaporate, and energy accumulation stops.
Measure the voltage at the output terminals with the engine running, it should be between 13.5-14.5 Volts. If abnormal, check the scooter's voltage regulator.
If your scooter is equipped with a serviceable battery, check the electrolyte level at least once a month. If the level drops, add distilled water. Plain water causes the battery to fail faster.
You should always remember that equipping a scooter with a radio, additional headlights, and an alarm requires the scooter owner to check the battery charge more often, since all these devices require additional electricity.
Alpha moped engine repair
Before disassembling the engine of the Alpha moped, we fix the scooter with the central stand and free it from the plastic. We disconnect all engine power systems and do not forget to drain the oil.
We remove the engine along with the transmission, and on a flat surface we continue the home repair of the Alpha moped.
It will help to properly dismantle the Alpha moped engine by disassembling it according to the following scheme:
- remove the muffler and exhaust pipe;
- remove the camshaft gear cover;
- unscrew all 4 bolts from the cylinder cover;
- remove the top cover and cylinder head;
- We look at valve wear, internal contamination and the condition of other system parts.
If this is your first time doing a DIY repair on an alpha moped and you need to disassemble it, don’t forget to sketch a diagram of how everything was in place! If the valves need to be replaced, or if there are gaps in the fit, then they need to be removed:
- Place the head on a level place. To prevent the valve from being damaged during dismantling, it is better to place a layer of thick rubber or a rag under it;
- we select the socket head, place it on the valve plate and hit it hard with a hammer;
- release the crackers, remove the top plate and valve washer;
- remove the valve and guide bushing.
To complete the repair of the Alfa moped engine, after replacing the parts, we begin assembling the engine in the reverse order, putting everything in its place, observing the marks. Don't forget to add fresh oil.
Photo report: Assembly of the gearbox (box) of the “Ant” scooter
After completely disassembling the engine of the Ant scooter, many, especially beginners, have difficulty reassembling the gearbox, and this is not surprising. There is very little reference information, there are too many “ant” experts, the matter is further complicated by the fact that there are no marks on the gearbox parts that greatly simplify the work on the correct orientation of the gearbox parts relative to each other.
In fact, everything is not as complicated as it might seem at first glance...
The gearbox, after disassembling the engine and troubleshooting the parts, turned out to be in very good condition; only one gear of the first gear had to be replaced (extreme wear of the bushing and, as a consequence, increased backlash of the gear on the shaft) and all the bearings (due to severe wear). All other gearbox parts were checked for wear and so on without any problems. Complete disassembly of the “ant” engine is described in detail in the article: Photo report: Disassembling the engine of the “Ant” scooter
Before assembling the gearbox, we carefully wash all the parts from dirt, pay special attention to the engine crankcase and the condition of the threaded connections, buy a new set of oil seals and gaskets (preferably made of paronite). The general principles of engine crankcase repair are described in detail in the article: Photo report: Repairing a scooter engine crankcase
Alfa moped box repair
The gearbox of the Alpha moped sometimes fails and requires constant attention. Repairing a gearbox at home is not particularly difficult for a beginner.
How to rebuild a gearbox with your own hands?
We carefully read the instructions for the alpha moped, do-it-yourself gearbox repair.
Let's take it slowly, in order:
- We first dismantle the cylinder, then the rotor and clutch block;
- carefully remove the retaining ring (you need a screwdriver and a thin knife or blade) and the drive gear;
- To remove the speed unit, unscrew the fastener - the bolt on the back side.
- remove the gear shift fork;
- remove the crankshaft and drum.
When the repair of the Alpha moped box is completed, assemble the gearbox using the reverse algorithm.
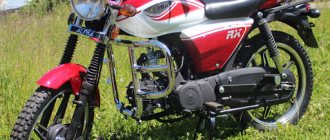
For many, Alfa moped repair begins almost immediately after purchase. Thanks to the presence of spare parts and the simplicity of the Alpha moped engine, tuning is common. This could be replacing the not very comfortable original seat, or increasing the engine capacity to 110 cc. Replacing the sprocket from 14 to 15 or even 16 will increase the speed to 10 km/h.
Increase in cylinder volume - replacement from 50 cc. at 70 cc., will add power, which is sometimes lacking. To do this, in addition to the cylinder head, you will have to change the pistons and carburetor. You can carry out such maintenance of the Alpha moped yourself. If you bought an Alpha moped, repairing the gearbox and engine yourself will be a good opportunity for you to study your equipment.
Alfa moped engine repair
Recommendations for repairing the Alpha engine.
As we all know, any motorcycle wears out and breaks over time, especially if it is not handled correctly. The most important part of the Alpha moped is its engine, which, if handled improperly or repaired or replaced with spare parts, may not work or work incorrectly. To avoid such problems, you need to know how to properly repair the engine of an Alpha moped with your own hands. This is easy to do if you have the necessary experience and knowledge.
Consequences of untimely replacement
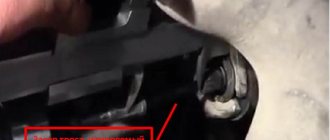
If you don't change your air filter, at best its performance will deteriorate over time. The moped will lose power and stop idling. Also, dust getting into the carburetor will clog all the channels, which will lead to unstable operation. The worst case scenario may be that dirt gets into the engine itself. Large particles will leave deep scratches on the cylinder bore and on the piston. The valve assembly may fail. Accordingly, a major overhaul of the engine will be required, so you should not neglect replacing the air filter. The consequences can be dire.
The frequency of replacement depends on the level of road pollution in the area. The cleaning system should be carefully inspected periodically.
Do-it-yourself repair of Alpha moped engines
When the moped does not start, the muffler fires and black smoke comes out of it, this means that you have a problem with the carburetor. To fix these problems, you need to clean the carburetor and air filter, also make carburetor adjustments and tighten the bolts thoroughly.
If your moped takes a long time to accelerate, and the engine does not have enough standard power, the problem is broken valves. The old valves need to be replaced with new ones and the moped will work again.
If the Alpha moped cannot accelerate to the required speed, although it has high speeds, and the engine roars like crazy and shifts gears intermittently, the problem is clutch wear. To repair the clutch you need to do the following: you must remove the engine and the plastic cover from it, then unscrew the clamping bolt and the adjustment mechanism, then tighten the clamping bolt tightly, and start the moped. After all this, you need to drive a little at first speed, about a couple of meters. Also, another cause of engine-related problems is wear of the drive sprockets , in which case you will have to replace them with new ones.
Engine overheating . This problem can be solved very simply - add oil. If suddenly oil leaks from somewhere, you should definitely contact a professional.
Dismantling engines and gearboxes of Alpha mopeds
In order to disassemble the engine you need to do the following:
Remove the screws located in the intake manifold.
Remove all cylinder covers and screws.
Remove the cylinder head.
The gearbox is disassembled to replace parts such as rotors, clutches or cylinders.
In order to disassemble the gearbox you need to do the following:
Remove the retaining ring, then the drive gear is removed.
Unscrew the locking gear screw, then remove the gear shift mechanism itself
Remove the shift fork and shaft, then the crankshaft and drum.
Put everything back to front.
And in conclusion, we would like to say that although the Alfa moped rarely breaks down, it is not worth disassembling and repairing it yourself if you lack knowledge and experience, or you are simply not completely sure that you can handle it, since if you want to save money, you can lose a lot more . Therefore, you should not refuse the services of professionals. But still, if you decide to repair the engine of the Alpha 110 moped yourself, do not forget to use the diagram or training video. And if there is no diagram, then mark the location of the parts on a piece of paper so as not to forget.