How to assemble a gearbox on a motorcycle in Minsk
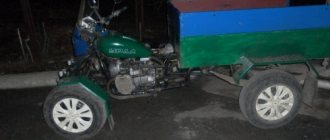
Lightweight 125 cc cars of the Minsk Motorcycle Plant (MMVZ) have long and firmly won the sympathy of motorcyclists. They do the first kilometers, mastering the ABCs of driving. Many remain faithful to this brand for many years due to its unpretentious operation and maintenance, sufficient cross-country ability, and, of course, low price.
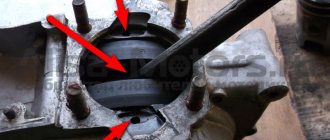
Gears do not turn on or off . The reason may be that the gear shift pawl is stuck due to heavy oil contamination or the base of the mechanism is loosened. In such cases, the oil is replaced with clean oil, having first washed the gearbox crankcase with kerosene. The base of the gear shift mechanism is securely fixed.
The gears switch on indistinctly - sometimes only after the second or third attempt, sometimes they switch off on their own, and sometimes they turn off with difficulty. The cause of the malfunction, as in the first case, may be a weakening of the base, but excessive axial movement of the shift shaft cannot be ruled out. To eliminate it, you should loosen the lock nut, tighten the adjusting screw on the gearbox cover until it stops, and then unscrew it a quarter turn and tighten the lock nut again.
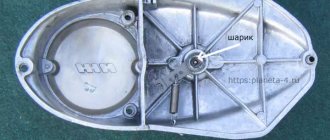
Self-switching off 3rd gear . The most likely cause is axial play of the intermediate shaft. To eliminate the backlash, remove the oil seal housing installed at the output end of the secondary shaft and place the opened intermediate shaft bearing inside the box. Install washers of the same size as the bearing into the resulting recess. Their thickness should be such that they are flush with the plane of the gearbox cover or do not reach it by 0.1-0.2 mm. The washers should not be allowed to protrude outward - then the shaft will be tightened, the bearings and gears will overheat and fail.
If the axial play of the shaft is normal, this means that the transmission may turn off due to a malfunction of the switching mechanism or damage to the working surface of the cams on the gears.
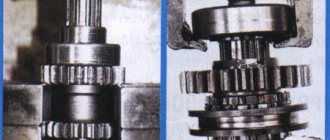
Gear cam repair : 1 - emery wheel; 2 - gear cam.
Chipped gear cams can be corrected using an emery wheel, as shown in Fig. 1. In this case, it is necessary to remove the same layer of metal from all three cams, ensuring their simultaneous contact with the cams that work in tandem with them. Note, however, that gears repaired in this way are short-lived, since a hard hardened layer of metal 0.3–0.4 mm thick is removed from the cams, and soon (after 6–10 thousand kilometers) the repair will have to be repeated or the gears replaced.
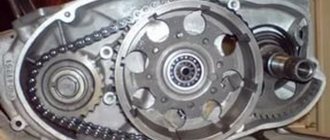
Disassembly and assembly
Removing the fork blade and disassembling it is carried out in the following order:
- remove the wheel and front fender;
— unscrew the nut securing the feather and remove the spring, if necessary, disconnect the steering wheel;
— release the coupling bolts of the lower bridge and, holding the sliding pipe with your hands, remove the feather from the bridges. If it cannot be removed, you should tighten the feather nut halfway and hit it with a wooden block;
— if necessary, disconnect the headlight and remove the cover along with the cap and rubber gasket. If it cannot be removed, you should loosen the lock nut and the coupling bolt of the upper bridge;
- Use a pipe wrench to unscrew the oil seal housing and remove it. Unscrew the oil seal housing nut and remove the boot and oil seal;
— unscrew the rod axis, drain the oil and remove the sliding pipe from the carrier;
- remove the upper bushing with the sealing ring and, turning the supporting pipe over, remove the piston with the rod and the rebound spring;
— to remove the lower piston or lower bushing, you must remove the corresponding retaining rings.
Assembly is carried out in reverse order. In this case, you should pay attention to the condition of the rubber sealing rings - rings even with slight damage should not be installed on the fork, as they will cause oil leakage. After assembly, it is recommended to loosen the tie bolts of the lower bridge and lightly tap it with a hammer, and then tighten the bolts again - this eliminates distortions that occur during assembly.
To remove the front fork assembly from the frame:
— unscrew the nuts securing the fork legs and remove them;
— loosen the coupling bolt of the upper bridge, unscrew the locknut and remove the upper bridge together with the steering wheel;
— unscrew the steering column rod nut, remove the protective cap and the upper cone and carefully remove the balls of the upper bearing;
disconnect the fork from the frame, carefully removing the rod from the column tube and trying not to lose the balls of the lower bearing.
Assembly is carried out in the reverse order, with the running tracks of the cones generously lubricated with lithol and balls (20 pieces in each bearing) placed on them.
The steering column bearings are adjusted as follows;
— loosen the coupling bolts of the lower and upper bridges;
— loosen the locknut of the steering column rod;
— the rod nut is screwed so that the front fork rotates freely relative to the frame, but there is no axial play. After adjustment, tighten the coupling bolts and locknut.
To add oil to the hydraulic shock absorber, simply unscrew the nut securing the stay, and to drain it, unscrew the fixing axis of the rod and smoothly swing the fork.
Malfunctions. The most common ones are knocking noises, oil leaks and rough running.
1. Knocks in the front fork. To determine the nature and cause of knocking, take the motorcycle by the handlebars and forcefully rock it up and down, lifting the wheel off the ground and listening to the operation of the fork. The following cases are possible:
— the front wheel fender knocks due to skewed braces or loose bolts;
— the fork knocks when moving forward. The reasons may be:
— insufficient tightening of the oil seal housing, as a result of which the upper bushing has axial play. Insufficient tightening of the housing, in addition to knocking and oil leaks, can lead to damage to the threads;
— insufficient quantity or low viscosity of oil in the hydraulic shock absorber. To check, drain the oil and measure its quantity. Let us remind you that the shock absorber should contain 150 cm-1 of AC spindle oil or its substitutes (for example, a mixture of autol with kerosene in a ratio of 80:20);
— weakening, wear or breakage of the spring. The normal spring length is 450-460 mm. If the springs have sagged, you can stretch them or install an aluminum or other rod under the nut securing the feather. Spring wear usually occurs in the middle part of its outer diameter and is clearly visible on a washed spring. It is advisable to replace worn springs, as they lose their properties and soon break. If the breakdown occurs on the way, then before replacing the spring, a steel washer or aluminum rod should be installed between its broken parts;
— wear of bushings or pistons due to long-term operation, which is usually accompanied by increased oil leakage and is eliminated by replacing parts (see Fig. 4.7). However, before making a replacement, you should carefully check the quality of assembly, the condition of the spring and oil seal, and also try to eliminate the malfunction by using a more viscous oil;
— the fork knocks during reverse stroke, which can be caused by: a broken or missing rebound spring;
— insufficient amount of oil or low viscosity, wear of bushings or pistons;
- increased spring stiffness.
In the front forks of previously produced motorcycles, rebound springs were not installed. If such a fork knocks during reverse stroke and the knock is not eliminated by reducing the spring stiffness or increasing the viscosity of the oil, then a rebound spring can be installed in it, the drawing of which is shown in Fig. 4.8. In this case, you should shorten the fork spring by 33 mm, bend and grind its end;
— the supporting pipes are knocking in the holes of the lower bridge due to insufficient tightening of the coupling bolts. The malfunction is determined by the swaying of the fork legs in a horizontal plane;
— sliding pipes knock due to severe wear of the bushings. The malfunction is determined by swaying of the pipes in the horizontal plane. As a rule, this knocking sound is accompanied by increased oil leakage;
— the steering column bearings knock, which is determined by rocking the fork in a vertical plane and is eliminated by adjusting the bearings. If, when turning the front fork, jamming occurs at any point, this indicates uneven wear on the bearing raceways. Typically, such a malfunction occurs after a significant mileage of the motorcycle and is eliminated by replacing the bearings. You can try to rotate the cones and bearing cups by 90°, but this does not always have a positive effect.
Rice. 4.7. Front fork parts.
2. Hard operation of the front fork is usually observed during the initial period of operation - during break-in. As a temporary measure, a smaller quantity of oil or oil with a lower viscosity may be added during this period. If, even after running-in, the fork works hard, you should determine and eliminate the cause of the malfunction, which may be:
— increased amount of oil in hydraulic shock absorbers, which is accompanied by increased leakage. Over time, excess oil flows out of the fork and it begins to work normally;
— increased oil viscosity, which is especially common in the cold season. If the stiffness of the fork does not decrease during operation, you can drain some of the oil or reduce its viscosity (for example, by adding kerosene);
- increased spring stiffness due to an increase in its length. Note that assembling a fork with an elongated spring (protruding more than 5-10 mm from the pipe) is difficult. The spring should be shortened and its ends should be ground;
— jamming of pipes in the bushings, which usually occurs in new forks or after they have been repaired. To check, drain the oil and remove the spring. If in this case the fork operates harshly or with jamming, the corresponding surfaces of the bushings should be treated with fine emery cloth, after which they should be thoroughly washed in kerosene.
3. Oil leak. During normal operation of the front fork, the support tube is lightly lubricated with oil, which collects in a small amount on the oil seal nut. This is a normal phenomenon, so you should only periodically wipe the front fork and add oil to the hydraulic shock absorber. However, if there is a significant leak and oil floods the wing, feathers, wheel or other parts, then the cause of the malfunction should be found and eliminated. The following reasons are possible:
— the oil seal nut or its body is not tightened;
— the pen fastening nut is not tightened, the gasket or o-ring is damaged or missing;
— the rod axis is not tightened, the sealing washer under it is damaged or missing;
— the rubber O-ring under the upper bushing is damaged or missing;
- wear or damage to the oil seal. Sometimes swelling of the oil seal occurs due to poor quality rubber - such oil seals must be replaced;
— increased amount of oil in hydraulic shock absorbers or insufficient viscosity;
- wear of guide bushings.
Rice. 4.8. Rebound spring.
4. The reason for the headlight rattling is damage or missing rubber gaskets on the lower bridge, as well as the absence of installation caps under the upper bridge.
How to set the outline for the best ignition
Initially, the outline is installed at the factory, when the finished motorcycle is in a state of assembly, and is tightly adjusted with special screws. In most cases, this avoids problems, but sometimes they become loose, disrupting the course of the ignition spark and reducing its intensity.
Setting an outline on a Minsk motorcycle is not easy. This procedure takes a lot of time and effort, and also requires utmost attention from even the most experienced drivers. Therefore, you need to start it only if you are absolutely sure that the problem lies in the outline. You can check this by measuring the intensity of the spark when adjusting the contacts. Changing it indicates a problem, but if it remains stable, no adjustment is required.
Loosen the outline screws and check how the spark changes. If it increases with increasing distance between the contacts, then the plate should be gradually rotated clockwise, and vice versa if it decreases. The steps must be repeated until you get a strong ignition spark that will remain stable when the distance between the contacts changes.
Installing a Minsk motorcycle ignition will be much easier with the assistance of experienced drivers or mechanics if you are new to this matter. However, you can easily do it yourself, paying maximum attention and effort to it, saving a lot on the price of repairing a motorcycle at a service center.