Motorcycle color. Color of the motorcycle What color to paint the Izh Jupiter 5
Hi all!
Our team is happy to welcome guests at any time of the day. Today, the section of this web resource called “Questions and Answers” helps to determine many of the subtleties of repairing or improving iron horses, as well as to learn the theory from the world of bikers. Only your heart will tell you what color is best to paint the Izh motorcycle. If you want to ignore your own tastes and go with the flow of other people’s opinions, then we will help you find the most popular color of motorcycles from Izhevsk.
If your bike has not undergone modernization with modifications to the main components of the motorcycle, you can safely leave the original color. For Jupiter and Planet 5 models, having a standard red factory color would be quite acceptable. Additionally, earlier models of these single and twin cylinder steel steeds can also be left in dull green and dull blue.
If you have carried out significant tuning of your motorcycle by replacing the tank, front fork, etc., all this can be painted in metallic color. We will also tell you what color it is better to paint the Izh motorcycle for a more elegant look.
Alternatively, you can paint the engine black. This will complement those bikes that also have a black frame. Please note that individual parts of Izhmoto products have different colors. This emphasizes the originality of the iron horse and makes it quite elegant.
The photos below will tell you what color is best to paint the Izh motorcycle. Thanks to them, you will surely choose different shades to suit your taste.
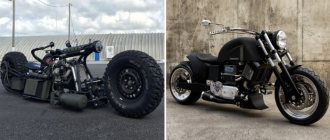
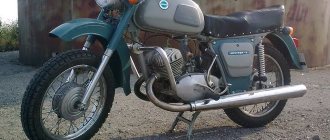
The IZH Jupiter-5 motorcycle was produced by the Izhevsk Machine-Building Plant from 1985 to 2008. In the USSR, it was a direct competitor to models from the famous Czech motorcycle manufacturer Java. Many of the cars produced are still on the roads of our country today. They are reliable and unpretentious, however, their technical characteristics and appearance no longer meet modern requirements. Tuning IZ Jupiter-5 helps correct the situation.
Air fork for Izh Planet 5
Content
To replace my previous publication, I present to you a new one with a more detailed description and photo. Continuing the repair of one of my motorcycles (hard workers) I got to the fork. In general, I’m starting to analyze it and this is how you see the state inside
In order for the oil seals to work in the proper order and remove oil, the working area of the feather on which the oil seals touch must be in the best possible ideal condition; any scratches (from dust, dirt) or cavities lead to inevitable leakage of oil (through the oil seal). A gas wrench for unscrewing the nuts on the feather (and not only) will help. Here is the state of the feathers BEFORE
I'm starting to polish! First, I started rubbing my hands with fine sandpaper, 800-grit for 20 minutes, I sweated and couldn’t stand it, I took the grinder in a circle with Velcro and set it to the lowest speed so as not to make holes, I put the pen on the wheel in my right hand, I rolled the grinder with my left hand like a rolling pin and + I drove the grinder to the right to the left. then the effect began. I grind carefully, no sparks should fly from under the wheel. And also ATTENTION! Don’t try to remove too deep shells, it will only make things worse. Here after the grinder
Then I glue felt onto the Velcro circle (cut from a felt boot with metal scissors) and rub it generously with GOI. Here it costs 35 rubles. There is no separate photo for the jar, there is this one
While polishing the nib, I rubbed the felt 3 times. To make it more convenient to rub on the fireplace, I heated it to the state of plasticine and took it out of the jar, then it hardens again and everything is GOOD!
I pointed the mirror now to slightly modify the cylinder itself, or rather, install the springs on the rebound, that is, so that the fork does not knock at the exit. Again a gas key and a 12 key
Last year I disassembled another fork and installed springs, but I don’t know what they were from, but here on the forum I found out that they come from the clutch. Well, when I measure it, it almost gets removed
I take it to the knife, slightly sharpen it in a circle, try it on several times, and now it fits freely. Now, in order to put it on the rod, you need to remove the cylinder nut (it does not go through the threads on the rod), I clamp the rod in a yew with a wrench, turn it to unscrew with my foot, hold the yew and pull the nut up. I assumed that it would be more difficult, but I didn’t bother too much and it was removed.
I put on the spring and assemble the cylinder
Now the seals! The glass was in this condition
I pick out the glass, or rather the old seals, away
I insert a new one and for an even fit I insert the ring that was standing, I set the head at 30, it is just the right size, then I remove the ring, insert the second one as well and it turns out that it fits a little on the first one and narrows even more, i.e. it turns out that the pen will squeeze tighter than the first one
And on top of the second oil seal I insert one ring, I save a strip of felt boots a little higher than the height that remained in the glass because... it will crimp during installation
Now I collect the pen and, in order not to mess up the direction of the seal, I put the glass through a plastic tube
And then I insert a strip of felt boots that I have stored, it can also be rubbed with goyi paste and you need to prepare it with a reserve length and cut it in place with a small addition to make the seam tighter
ATTENTION. If you push the felt with a screwdriver or something metal, try to do it so as not to nick or scratch the surface of the pen that was polished; it’s better to use some stronger piece of wood, such as birch. Now I fill in the oil at 175 g. I filled in 160. First, ATF for the automatic transmission after installation, during operation, I realized that I NEEDED EITHER to lengthen the rod by the length of the springs that I installed, OR fill in thicker oil, OR, as a last resort, cut the main springs to the same length because when the fork comes out, there is of course no knocking, but These springs can be reached easily and since I know that the fork is more than 25 years old and the wear on it is not small, I replaced the ATP oil with diesel oil and then everything became great, just really great. It works smoothly. I really like it. It’s been a while since I’ve ridden a good fork. A week has passed, no oil leaks, this is the most important thing. Well, this is also at your discretion, but on both Izhas I have it done like this. The fork casing is cut off right along the traverse and there are Voskhod corrugations in this case, complete insulation from dust and dirt. Well, I like the view better.
Tuning Izh Jupiter 5 - creating a modern appearance
So, let's start with the most interesting! As they say: you meet someone by their clothes. The factory appearance of the motorcycle has a rather dull appearance. If you like sports motorcycles, you will have to work hard to give new shapes to the motorcycle. The standard gas tank is ugly and also very heavy. This part of the bike immediately catches the eye, so we install a streamlined tank from a sports motorcycle. As a rule, there are plenty of these at showdowns. This detail is not only an external transformation, but will also improve the sense of control, because it allows the knees to better stay in the saddle. The bulky seat also needs to be replaced. This will have a positive effect on the weight of the motorcycle; the standard seat is very heavy.
You can make two-section new seats yourself:
- It is enough to cut out the base from a sheet of thick plastic and give it the intended shape.
- Cover with a thin layer of furniture foam rubber, then cover the seats with eco leather.
The next procedure will be to change the tail:
- First, cut out the desired tail shape from construction foam.
- Then use epoxy glue and fiberglass to cover the mold in layers.
- After the mold has dried, cut out the foam and remove the residue with a solvent.
The fiberglass tail lends itself well to priming and painting. Go for it! Well, the rear part of the frame will have to be welded to accommodate the new tail, depending on its shape and size. A good improvement would be replacing the old tires with road sports ones. Installing new mirrors will give a modern look, and most importantly improve visibility. The dashboard can be installed from a Chinese motorcycle or moped, as well as control panels on the steering wheel. It wouldn't hurt to install xenon in the headlight and replace all the bulbs, turn signals and brake lights with LED ones. Example Izh Jupiter 5 tuning photo:
Common faults
The most common problem with IZ Planet 5 is the spontaneous switching off of second gear. This problem is common on many other motorcycles, but this breakdown is often associated with careless gear shifting. When the first gear “spins” to high speeds, bypassing the “neutral” gear, the engagement with the second speed gear causes an impact, which causes wear. To prevent such a malfunction, it is not recommended to spin the first gear too much. But if the second one still dies, then some ways to eliminate the problem are possible:
The simplest method that will help in some cases. Place the motorcycle on its right side, then remove the kick starter and gear shift lever along with the shaft. Then remove the left crankcase cover, and then remove the clutch basket along with the discs. During operation, the gearbox gears wear out, which causes the meshing of the teeth to deteriorate. This leads to slipping and jerking of the transmission until the second gear fails. Sometimes, when replacing a gear, the problem is not always solved, and lies in the wear of the bearings of the input shaft, which moves to the left over time due to vibrations. To fix the problem, you need to remove the stopper of the input shaft bearing, then move this bearing with light blows of a mallet or with a hammer through the “spacer”, so as to move the shaft to the right. To fix it in this position, you should place washers of appropriate diameter under the bearing. Using the number and thickness of washers, ensure that there is no play in the input shaft, then return the bearing stopper to its place, reassemble the clutch basket and other parts in the reverse order.
- If fourth gear disappears. This is often due to failure of the secondary shaft bearings. This is due to the appearance of axial play in the secondary shaft when the bearings are displaced or fail. This malfunction can be repaired in the same way as repairing the second gear by removing the left crankcase cover.
- If the gear shift jams from upshift to downshift, the spring of the shift mechanism pawls has broken and must be replaced.
- If the gearbox switches tightly after assembly, it indicates incorrect installation of the adjusting washers.
We would like to warn you right away: you should mark and write down the previous location of the adjusting washers when dismantling the switching mechanism.
Engine tuning Izh Jupiter 5
Many Jupiter owners are not satisfied with the power of their motorcycle. In this part of the article we will look at Jupiter 5 engine tuning. In fact, the Izha engine has great potential for increasing power. First, make sure that the engine is in more or less normal condition, the cylinder fins are intact, and the bearing seats in the crankcase are not broken. First of all, tuning of this model is to eliminate the “jambs” from the poor quality of production of parts of the serial industry of past years, since at that time they tried to reduce the cost of production as much as possible. Don't forget to clean the engine before disassembling. Having disassembled the engine, we advise you to replace all the bearings with European or Japanese analogues, because after tuning the Izh motorcycle, the speed will increase and the loads will increase. If the gaps between the pistons and the cylinder do not meet the standard, you will need to bore to the nearest repair size. Then we proceed to processing the purge channels. As a rule, these are steps at the joints between the bottom of the cylinder and the surface of the crankcase.
They create resistance and unnecessary swirl of the fuel mixture, which reduces the flow rate and prevents you from getting maximum power from the engine. This can be done using cutters and a drill.
After this, you need to smooth out any remaining unevenness with sandpaper. Also use sandpaper to sand the inlet and outlet channels in the cylinders, smoothing out any unevenness from the casting. Moreover, it is enough to process the inlet channel to a smooth rough surface, and the exhaust channel to the smoothest possible state for better movement of exhaust gases and to prevent carbon deposits. The bottom and surface of the pistons must similarly be polished to a shine. To increase the compression ratio, Jupiter cylinder heads need to be trimmed by 1.5-2mm to reduce the combustion chambers. This is done on a lathe, the heads are mounted in the chuck using mandrels. It is important to ensure the same surface treatment - the volume of both combustion chambers must be strictly the same. Increasing the compression ratio will entail a transition to 95th gasoline, and the ignition is set a few degrees earlier. It is highly recommended to replace the old contact ignition with an electronic one with automatic advance. It will allow you to achieve high speeds and spark at the right time. If desired, you can assemble the new ignition yourself. The crankshaft also needs to be modified. The standard crankshaft is too heavy and is designed to be ridden with a sidecar and a loaded motorcycle. You will have to unpress it, and grind the outer diameter of the cheeks to 125 mm in diameter, then polish the connecting rods to a mirror surface. The modified crankshaft is subject to assembly and mandatory balancing. This tuning of Izh Jupiter 5 will allow it to accelerate to 160 km/h.
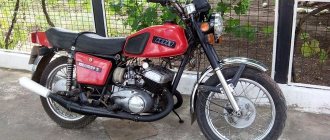
The history of the motorcycle began back in 1989, at the Izhevsk plant :) The motorcycle is the same age as me :) My dad bought it the same year I was born :) And my dad rode it too, until one day he let me take a ride behind the wheel: ) Well, here we go, you can’t pull him away by the ears now. Well, okay, I got carried away...:) So about the motorcycle. In principle, this is still an ordinary Jupiter. But not killed, like most of the Soviet motorcycles. I try to keep it in good condition. Everything on the motorcycle is original, from the factory. I haven’t gotten into the engine at all yet, although it’s already starting to rattle :) Well, in general, I treat it according to the principle “Don’t interfere with a well-functioning mechanism and it won’t let you down” :) Only an accident ruined everything (I gave it to a friend for a ride, in the end I changed the entire front and repainted everything completely) When the motorcycle came into my possession, small alterations began for now :) Namely: . 1. The strap on the seat was removed 2. A second handle was installed at the back for the passenger 3. The windmill (shield) was converted from a Java one and painted in color, a stripe was glued 4. “Crystal” (Chinese:)) turns were installed on it 5. Hubcaps were installed on wheels in the color of the motorcycle 6. The motorcycle itself was painted “pomegranate”, but it seems the color is called “Paprika”, so I don’t know if it’s correct) 7. I threw out the clumsy factory mirror (albeit a very convenient mirror) and replaced it with two teardrop-shaped ones (the same color, of course) ) 8. The seat mounts are bent upward, and the rear wing is raised slightly 9. Halogen in the headlight instead of this round factory light bulb 10. Signals are installed - Zhiguli shells 11. There was neon, but it is no longer there :) 12. White speedometer scale (Will be completely redone ) 13. Cylinders painted 14. Star 21. At the moment this is the most vigorous JUPITER in our city. Few people can catch up (from the Soviets, of course), except maybe a single Ural with whom they had a bite to 120 1 in 1. Well, then excuse me, there are not enough fillies :) Well, never mind, I’ll try to fix everything soon
. Well, that's all about the general description :) . And now some plans: . Grandiose (Probably not soon): Casting is either native or from the Japanese, along with the front fork and brakes and the rear with a hub and also a disc brake, body kit. Quite doable: Xenon in the headlight, 2 carburetors (or 1 from a Lada, I don’t know, you have to read smart books to install it) Obligation: 1. Non-contact ignition 2. Arcs from the Planet 3. Side stand 4. VAZ 2106 devices 5. LED tuning 6. Filter, like a nulevik 7. Saw the intake and exhaust channels 8. Rebuild the front fork 9. I’ll probably return the star 19 10. And perhaps forward flow with the elbows leading into one common pipe 11. It would be nice to change the tires, otherwise she’s 21 years old after all , although for rubber the period is 10 years, and then every year is considered 2 :) . All the details will be in the on-board report later :) Check it out :)
Izh P-5 engine design
The design of the engine together with the clutch and gearbox and the general view of the engine are shown in the figure. The detailed design of components and parts is shown in catalog (detailed) drawings, and the designations of parts and components and their applicability are given in the corresponding tables.
The engine cylinder consists of an aluminum jacket with cooling fins, inlet and outlet flanges for fastening the corresponding pipes, a reinforced cast-iron liner with windows, aluminum plugs that form the bypass channels, and fastening parts. The cylinder along the inner diameter of the liner has four size groups, according to which the pistons are manufactured. The new cylinder and piston are selected from the same groups. When replacing a piston, it is allowed to install it from the next group (larger diameter). An oval-barrel-shaped piston without piston rings must move in the cylinder under the pressure of its own weight, and a piston with a split skirt and piston rings must move with a force of 3-8 kg.
The aluminum alloy cylinder head has cooling fins, a spherical combustion chamber, and threaded holes for installing a spark plug and decompressor.
The piston is cast from a high-silicon, low-expansion aluminum alloy with three piston rings and grooved holes in the bosses for installing the piston pin and circlips. Pistons are used both with a split skirt and solid ones with an oval-barrel-shaped working surface.
The crankshaft is designed to convert the reciprocating motion of the piston into rotational motion and consists of cast iron flywheels with pressed-in axle shafts, a crank pin, a connecting rod with a roller bearing and spacer washers. The bearing between the connecting rod and the piston pin is a bronze bushing.
The crankcase is the base on which and in which the engine parts, clutch and gearbox are assembled. The crankcase consists of several functional parts cast from aluminum alloy. In order to ensure alignment of the holes for the crankshaft bearings and the gearbox shafts, the crankcase halves and cover are processed as an assembly. Therefore, the use of crankcase parts from different engines (during repairs) is unacceptable.
Directly functionally related to the engine in the crankcase is the crank chamber, in which the crankshaft is mounted on rolling bearings. Since the crank chamber participates in the engine operating cycle as a scavenge pump, it must be sealed. This is ensured by high-quality assembly of the crankcase halves along the connection planes and the crankshaft oil seals (cuffs).
The right oil seal protects the crank chamber from the penetration of air from the cavity of the generator, and the left one protects air and oil from the cavity of the motor transmission and gearbox. The output end of the gearbox secondary shaft is also sealed with a rubber seal. The remaining holes in the gearbox shafts are plugged with special plugs and sealant. The crankcase halves, as well as the crankcase cover, are secured against mutual displacement by control bushings.
The transmission (power train) of a motorcycle ensures the transmission of torque from the engine crankshaft to the drive wheel of the motorcycle and changes it depending on road conditions and load. The transmission consists of a motor transmission, clutch, gearbox and transmission to the rear wheel.
General view of the engine and cylinder group
1 - gasket, 2 - pipe, 3 - bolt, 4 - washer, 5 - cylinder gasket, 6 - cylinder assembly, 7 - cylinder plug, 8 - gasket, 9 - gasket, 10 - screw, 11 - exhaust pipe, 12 - stud, 13 - vibration damper, 14 - cylinder head, 15 - vibration damper, 16 - cylinder head assembly with vibration damper, 17 - washer, 18 - nut, 19 - spark plug A23-1, 20 - decompressor assembly, 21 - washer , 22 — stud, 23 — carburetor, 24 — Engine assembly with carburetor and air filter, 25 — Air filter assembly
| Part designation | the name of detail | Quantity per motorcycle, pcs. | ||||
| PZ | P4 | P5 | P5-01 | |||
| 1 | 2 | 3 | 4 | 5 | 6 | 7 |
| 1 | IZhPZ. 1-3 | Pad | 1 | 1 | — | — |
| IZhP5. 1-26 | Pad | — | — | 1 | 1 | |
| 2 | IZhP4. 1-3 | Pipe branch | 1 | 1 | — | |
| IZhP5. 1-3 | Pipe branch. | — | — | 1 | — | |
| 3 | 360015-29 | Bolt M8 x1 -6gx22 | 2 | 2 | 2 | 2 |
| 4 | 252155-29 | Washer 8 | 2 | 2 | 2 | 2 |
| 5 | IZH56. 1-204-5 | Cylinder gasket | 1 | 1 | 1 | 1 |
| 6 | IZhPZ. Sat. 1-50-1 | Cylinder assembly | 1 | 1 | — | — |
| IZhP5. Sat. 1-5-2 | Cylinder assembly | — | — | 1 | — | |
| 7 | IZH56.1-260 | Cylinder plug left | 1 | 1 | 1 | 1 |
| IZH56.1-261 | Cylinder plug right | 1 | 1 | 1 | 1 | |
| 8 | IZH56.1-265 | Pad | 2 | 2 | 2 | 2 |
| 9 | IZhP5.1-25 | Pad | — | — | 1 | 1. |
| 10 | IZHV-122 | Screw M8-6ghx22 | — | — | 2 | 2 |
| 11 | IZhP5. 1-5 | Exhaust pipe | — | — | 1 | 1 |
| 12 | IZHSPI-1 | Hairpin 2M8-6gx95 | — | — | 2 | 2 |
| 13 | IZhP5. 1-37 | Vibration damper | — | — | 3 | — |
| IZhP5.1-38 | Vibration damper | — | — | 1 | — | |
| 14 | IZhP5. 1-1-1 | Cylinder head | 1 | 1 | — | — |
| 15 | IZhP5. 1-36 | Vibration damper | — | — | 2 | — |
| 16 | IZhP5. Sat. 1-28 | Cylinder head assembly with vibration damper | — | — | 1 | — |
| 17 | IZHSB-19-1 | Washer-10 | 6 | 6 | 6 | 6 |
| 18 | IZhG-103 | Nut M10-6N | 6 | 6 | 6 | 6 |
| 19 | A23-1 | Spark plug | 1 | 1 | 1 | 1 |
| 20 | IZH49. Sat. 1-27 | Decompressor assembly | 1 | 1 | 1 | 1 |
| 21 | IZHP. 1-332 | Washer | 1 | 1 | 1 | 1 |
| 22 | IZH56. 1-206-1 | Hairpin | 6 | 6 | 6 | 6 |
| 23 | K65I-1107010 | Carburetor | 1 | 1 | 1 | 1 |
| 24 | IZhP5. Sat. 1-0 | Engine complete with carburetor | — | — | 1 | — |
| IZhPZ. Sat. 1-0-3 | Engine complete with carburetor and air filter | 1 | — | — | — | |
| IZhP4. Sat. 1-0-3 | Engine complete with carburetor and air filter | — | 1 | — | — | |
| IZhP5. Sat. 1-0-3 | Engine complete with carburetor and air filter | — | — | 1 | ||
| 25 | IZhPZ. Sat. 9-0-1 | Air filter assembly | 1 | 1 | 1 | — |
Design of the Planet 5 engine with clutch and gearbox (sectional view)
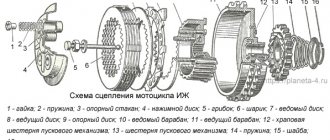
1 - spark plug, 2 - cylinder head, 3 - cylinder, 4 - piston, 5 - piston ring, 6 - piston pin, 7 - crankcase, 8 - main bearing lubrication channel, 9 - roller bearing, 10 - left oil seal, 11 — left cover, 12 — motor chain, 13 — ball bearing, 14 — crankshaft sprocket, 15 — outer clutch drum, 76 — clutch disk, 17 — inner drum, 18 — pressure plate, 19 — spring, 20 — shaped nut , 21 — pusher, 22 — ball bearing, 23 — outer drum ratchet, 24 — gear shift lever, 25 — trigger lever, 26 — trigger shaft, 27 — gear shift shaft, 28 — trigger sector, 29 — spring, 30 , 31, 32, 39, 40, 42 - gearbox gears, 33 - gear shift fork, 34 - stop, 35 - gear shift shaft, 36 - gearbox cover, 37 - installation sleeve, 38 - right cover, 41 - intermediate shaft, 43 — ball bearing, 44 — roller bearing, 45 — secondary shaft, 46 — input shaft, 47 — clutch adjusting screw, 48 — worm ball, 49 — clutch worm, 50 — secondary shaft nut cap, 51 — oil seal, 52 — sprocket , 53 — generator, 54 — right oil seal, 55 — roller bearing, 56 — gasket, 57 — crankshaft, 58 — bypass channel, 59 — exhaust window, 60 — decompressor.
Crankcase
| Part designation | the name of detail | quantity per motorcycle, pcs. | ||||
| P3 | P4 | P5 | P5-01 | |||
| 1 | 2 | 3 | 4 | 5 | 6 | 7 |
| IZhPZ. S6.1-53 | Carter with details | 1 | — | — | — | |
| IZhP4.S6.1-1-2 | Carter with details | — | 1 | 1 | — | |
| 1 | IZHSB-27 | 5-fiber washer | 1 | 1 | 1 | 1 |
| 2 | Screw M6-6gX58 | 1 | 1 | 1 | 1 | |
| 3 | IZHV-117 | Screw MB-6gX58 | 5 | 5 | 5 | 5 |
| 4 | IZhPZ. S6.1-76-G | Left crankcase cover | 1 | 1 | 1 | — |
| 5 | IZH56.1-214 | Left crankcase cover gasket | 1 | 1 | 1 | 1 |
| 6 | IZH56.1-228-1 | Filler plug | 1 | 1 | 1 | — |
| 7 | IZHSB-124 | Washer 14-fiber | 1 | 1 | 1 | — |
| 8 | IZHV-25 | Screw B1.M5-6gX12 | 9 | 9 | 9 | 9 |
| 9 | IZH56.1-218-2 | Locking bar | 1 | 1 | 1 | 1 |
| 10 | IZHSB-114 | Adjusting washer | 2 | 2* | 2* | 2* |
| IZHSB-116 | Adjusting washer | 2 | 2* | 2* | 2* | |
| 11 | IZHSB-11-1 | Adjusting washer | 7 | 7* | 7* | 7* |
| IZHSB-11, | Adjusting washer | 3 | 3* | 3* | 3* | |
| 12 | IZHSB-24 | Adjusting washer | 4 | 4* | 4* | 4* |
| IZHSB-24-1 | Adjusting washer | 2 | 2* | 2* | 2* | |
| 13 | 203 | Ball bearing | 2 | 2 | 2 | 2 |
| 14 | 204 | Ball bearing | 1 | 1 | 1 | 1 |
| 15 | IZH49.1-39 | Drain plug | 1 | 1 | 1 | 1 |
| 16 | IZH49L-181 | Pad | 1 | 1 | 1 | 1 |
| 17 | IZH56.1-208-1 | Cylinder mounting stud | 4 | 4 | 4 | 4 |
| 18 | 252156-29 | Washer 10 | 4 | 4 | 4 | 4 |
| 19 | IZhG-103 | Nut M10-6N | 4 | 4 | 4 | 4 |
| 20 | IZhP4.1-41 | Breather | 1 | 1 | 1 | 1 |
| 21 | IZhP4.1-33 | Neutral contact | 1** | 1 | 1 | 1 |
| 22 | IZhP.1-209-2 | Left crankcase half | 1 | 1 | 1 | 1 |
| 23 | IZH49.1-27 | Crankcase bushing | 2 | 2 | 2 | 2 |
| 24 | IZHP. 1-210-1 | Right crankcase half | 1 | — | — | — |
| IZhP4.1-6 | Right crankcase half | — | 1 | 1 | — | |
| 25 | IZH49.1-159 | Gaskets | 1 | 1 | 1 | 1 |
| 26 | IZhP.1-213-3 | Transmission cover | 1 | 1 | 1 | — |
| 27 | IZH49.1-23 | Installation sleeve | 3 | 3 | 3 | 3 |
| 28 | IZH49.1-35 | Stub | 3 | 3 | 3 | 3 |
| 29 | IZH49.1-30 | Stub | 1 | 1 | 1 | 1 |
| 30 | IZH49.1-31 | Retaining ring | 1 | 1 | 1 | 1 |
| 31 | IZhP5.Sb.1-3 | Right cover assembly | 1 | 1 | 1 | — |
| 32 | 220086-13 | Screw M5-68HZO | 2 | 2 | 2 | 2 |
| 33 | IZhP4.1-32 | Generator cover | 1 | 1 | 1 | — |
| 31,32,33 | IZhP3. Sat.1-55 | Cover assembly • ~ | 1 | — | — | — |
| 34 | IZH49. Sat.1-28-1 | Oil seal assembly | 1 | 1 | 1 | 1 |
| 35 | IZHP.1-327 | Installation ring | 1 | 1 | 1 | 1 |
| 36 | IZHV-113 | Screw M6-6gX 30 | 2 | 2 | 2 | 2 |
| IZH49.1-23 | Installation sleeve | 3 | 3 | 3 | 3 | |
| 37 | IZHV-8 | Screw M6-6gX 37 | 3 | 3 | 3 | 3 |
| 38 | IZHV-5 | Screw M6-6gX 45 | 2 | 2 | 2 | 3 |
| 39 | IZHV-2 | Screw M6-6gX 65 | 8 | 8 | 8 | 8 |
| 40 | IZH49.1-188 | Installation sleeve | 2 | 2 | 2 | 2 |
| 41 | 252004-29 | Washer 6 | 2 | 2 | 2 | 2 |
| 42 | IZHP. 1-334 | Stub | 1 | 1 | 1 | 1 |
| 43 | IZHV-1 | Screw M6-6gX50 | 2 | 2 | 2 | 2 |
| 44 | IZHSHT-3 | Cylindrical pin | 1 | 1 | 1 | 1 |
* Largest quantity ** With modification of the crankcase (drilling and threading M12)
Transmission
The gearbox is designed to change the gear ratios of the motorcycle's power train (transmission) depending on the load, road and other driving conditions, as well as to disconnect the engine from the motorcycle's power train.
The gearbox consists of a gearbox and a gear shift mechanism.
| Part designation | the name of detail | Quantity per motorcycle, pcs. | ||||
| P3 | P4 | P5. | P5-01 | |||
| 1 | 2 | 3 | 4 | 5 | 6 | 7 |
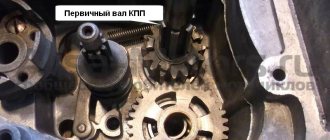
| 1 | IZhPS. 1-40-2 | Primary shaft | — | — | 1 | 1 |
| IZhPS. 1-40-1 | Primary shaft | 1 | 1 | — | — | |
| 2 | IZhPS. 1-42-2 | 2nd gear | — | — | 1 | 1 |
| IZhPS. 1-42-1 | 2nd gear | 1 | 1 | — | — | |
| 3 | IZH49.1-41 | Thrust washer | 1 | 1 | 1 | 1 |
| 4 | IZh49.1-42 | Installation ring | 1 | 1 | 1 | 1 |
| 5 | IZhPS. 1-41-1 | 2nd and 4th gear gear | 1 | 1 | 1 | 1 |
| 6 | IZhPZ. Sat. 1-86-1 | Primary shaft assembly | — | — | 1 | 1 |
| IZhPZ. Sat. 1-80 | Primary shaft assembly | 1 | 1 | — | — | |
| 7 | IZHSB-34or | Washer | 1 | 1 | 1 | 1 |
| IZHSB-34-1 | Washer | 1 | 1 | 1 | 1 | |
| 8 | IZhP2. Sat. 1-92-1 | Secondary shaft with bearing | 1 | 1 | 1 | 1 |
| 9 | IZH56.1-282 | Secondary shaft sprocket | 1* | 1* | 1* | 1* |
| IZH49.1-128 | Secondary shaft sprocket | 1 | 1 | 1 | 1 | |
| 10 | IZH49.1-129 | Lock washer | 1 | 1 | 1 | 1 |
| 11 | IZH49.1-130 | Secondary shaft nut | 1 | 1 | 1 | 1 |
| 12 | IZhP2.1-416 | Cap • nuts of the secondary shaft | 1 | 1 | 1 | 1 |
| 13 | IZhP2:1-420 | Ring | 1 | 1 | 1 | 1 |
| 14 | IZhP4.1-56 | Intermediate shaft | 1 | 1 | 1 | 1 |
| 15 | IZhPS. 1-45-1 | 3rd gear | 1 | 1 | 1 | 1 |
| 16 | IZH49.1-48 | Installation ring | 2 | 2 | 2 | 2 |
| 17 | IZhPS. 1-44-1 | 1st and 3rd gear gear | 1 | 1 | — | — |
| IZhPS. 1-44-2 | 1st and 3rd gear gear | |||||
Refinement of the intake system
The intake system also applies to tuning the Izh Jupiter 5 engine. The main disadvantage of the intake system is the absence of a reed valve and the presence of only one carburetor on a standard engine. One carburetor does not allow you to develop high speeds and, accordingly, power. An excellent solution would be to install two identical carburetors together with two “house” reed valves.
To do this, you will need to make new inlet pipes for each cylinder separately with housings for reed valves. They ensure that the fuel mixture moves only inward, which has a positive effect on filling the cylinders and increasing power. Carburetors can be supplied from foreign 2-stroke equipment of similar volume, but if the budget is limited, then domestic K68 from the Ural motorcycle will do. In this case, it will be necessary to select jets for the engine size of the Izh Jupiter 5.
At the end of the article, I would like to note that tuning this model does not end with the methods outlined above. Tuning Izh Jupiter is a complex chain where one design change will entail another. Take care of strengthening the chassis, balance the motorcycle rims, strengthen the pendulum. The standard frame on this motorcycle is flimsy and requires reinforcement with stiffening ribs. It would be good if disc brakes were installed and the front fork was thicker. Tuning Izh Jupiter 5 is an exciting activity, and if you take this process seriously, the result can exceed expectations!
In 2005 I got a stock Jupiter-5. I went for six months. And off we go... At first it was repainted, then the engine began to seem weak... As a result, at the time of sale it had the following alterations:
Engine:
-Sova liners, displacement 475 cc. cm; -BSZ (VAZ 2108 switch, VAG Hall sensor, OKA two-terminal coil); -Five-channel purge, enlarged purge windows; -Lightweight and polished connecting rods; -Lightweight piston pins; -Lightened and polished crankshafts; -Enlarged and polished intake manifold channels; -Enlarged carburetor diffuser (38 mm, I think, I don’t remember exactly); -Low resistance filter; Exterior: -Installation of VAZ 2103-06 instruments (speedometer, tachometer, voltmeter, temperature sensor); -The seat is covered with leatherette; -White turn signals; -Installing LEDs wherever possible; -Xenon (funny, but I managed to install it); -Reduced travel and increased suspension stiffness; -Clip-on steering wheel...
Features of electrical equipment
The wiring diagram of IZH Planet 4 is almost completely copied from the Jupiter model that was the first to appear on the factory assembly line.
- The Planet family has one working cylinder, and accordingly the ignition system is designed to ensure its operation;
- The IZ Jupiter family, unlike the Planet, has 2 working cylinders; accordingly, the wiring diagram has additional repeating elements.
For reference: the possibility of operating a motorcycle with a trailed sidecar is also taken into account. The wiring diagram on IZH Planet 4 has a connector for connecting the right turn signal repeater and side lights.
Headlight
IZH Planet 4 is equipped with more advanced lighting devices:
- Headlight type "European beam" FG137V with glass with an asymmetrical pattern;
- Low beam mode with lamp A12-45 + 40 W;
- Modern direction indicators type 16.3726 (lamp power - 25 W).
Photo of IZH Planet 4 model 1986
Thanks to the modernization of the lighting system, as well as the configuration of the motorcycle:
- battery 6MTS-9;
- high power alternating current generator 100 W,
The illumination of the road in the flow of traffic has significantly improved, and traffic on public roads has become safer. At the same time, the price of the motorcycle did not change significantly, which brought its sales to a new level of popularity.
Contactless ignition system
The motorcycle used a new contactless ignition system, the operating principle of which was based on the following operating algorithm:
- The generator rotor generates pulses when rotating;
- The storage capacitor is charged through diodes (in the diagram below indicated as VI, V5), as well as through a limiting resistor (R1);
- Passing through the diode (V6), the electrical signal from the sensor winding (3) enters the thyristor (V4);
- After it opens, the charged capacitor (C1) transfers the accumulated charge to the ignition coil (primary winding - 4);
- Under its influence, a high voltage pulse is induced in the secondary winding;
- Through the high-voltage wire, the central electrode of the spark plug receives a charge;
- A spark between the electrodes ignites the air-fuel mixture in the motorcycle engine cylinder.
The factory instructions contain the original diagram of the contactless ignition system.
The electrical wiring of the IZH Planet 4 motorcycle, due to the peculiarity of the contactless ignition system, has differences in the layout of the main components:
- The electronic unit of the stabilizer and ignition system is placed in a single housing;
- It is equipped with two plug connectors;
- In order to increase reliability, the block is filled with polyurethane foam (non-separable version);
- Its operating parameters are designed to provide a light signal circuit voltage in the range of 11.5 – 14.5 V.
In addition, the use of a 12-volt circuit led to the division of the ignition system into three electrical circuits that differ in voltage levels:
- A high-voltage circuit consisting of an ignition coil, a spark plug, a spark plug tip and a high-voltage wire;
- Storage capacitor charging circuit, consisting of a charging winding, connecting wires with plug connectors, BCS and the primary winding of the ignition coil;
- The sensor circuit, consisting of its winding, connecting wires and plug connectors.
Gearbox Izh Planet 5
The Izh Planet 5 gearbox is four-speed, three-shaft with constant mesh spur gears and foot-operated gear shifting. Switching is carried out using a copy shaft, which is located inside the box; the shift fork pins fit into its grooves. The copy shaft rotates from the shift selector, which in turn is connected to the foot lever. The secondary shaft is hollow and fits onto the end of the primary shaft. The main gear sprocket is located on the secondary shaft. The gearbox is located in the same crankcase with the motorcycle engine, together forming a single power unit. The gearbox is lubricated by oil poured into the engine crankcase. The IZH Planet 5 gearbox can be disassembled without removing the engine, however, for complete disassembly and greater convenience, you can remove the engine from the motorcycle frame. Today we will look at disassembling the Izh Planet 5 gearbox step by step.
Drain the oil from the motorcycle crankcase by placing it on a stand. Then, after unscrewing the bolts, remove the right engine cover as well as the gear shift levers and kickstarter. Having disconnected the chain casing from the box, we separate the chain links. We take out the clutch rod, and then use a large screwdriver or chisel to bend the sprocket retaining washer. Now you need to unscrew the sprocket nut; to do this, wedge the sprocket between its teeth and the engine crankcase with a suitable metal object, preventing its rotation. The thread on the nut is left-handed, so you need to unscrew it clockwise using a 36mm wrench. Use a screwdriver to unscrew the seven screws of the box cover, remembering the length of the screws (it is not the same) and do not lose the aluminum sealing washers under the heads of the two lower screws.
Using a universal puller, remove the secondary shaft sprocket. Through the gap formed between the cover and the crankcase, we hold the gear sector of the starting device. If this is not done, the sector moves behind the cover and it, warping when the puller is tightened, may crack. Do not “help” the puller by wedging the gap with a screwdriver or similar tool. This will damage the cover gasket and, most importantly, cause dents to form at the junction of the cover and the crankcase, which will lead to oil leakage.
Remove the gear selector from the axle.
Remove the shift shaft along with the ratchet mechanism.
Lifting the follower shaft, remove the pin of the shift fork for 2nd and 4th gears from its groove. Remove the fork from the rod, and from the primary gear the 2nd and 4th gears and the washer.
Remove the intermediate shaft.
Use a screwdriver to pry the lock lever away from the tracing shaft. Remove it by removing the shims and noting their location.
Remove the 1st and 3rd gear shift forks from the rods and gears of the 1st and 3rd gears. The plugs are not interchangeable, so remember their placement.
Remove the first gear. Pay attention to its position in the crankcase.
Using two screwdrivers, slightly open and remove the split retaining ring of the gear from the groove of the input shaft. Remove the retaining ring, thrust washer and gear from the primary.
Unscrew the sprocket nut and remove it.
Remove the secondary one from the cover, while remembering that the bearing here is a cageless one, be careful not to lose the rollers!
If the ball bearing of the intermediate shaft is severely worn or damaged, remove it from the cover. The bearing is not a tight fit and usually comes out of its seat easily.
Separate the cover gasket.
Inspect and wash all parts in kerosene. If severe wear occurs, replace. Thoroughly clean the bottom of the Izh Planet 5 gearbox housing. Attach the roller bearings of the secondary shaft, generously lubricating the shaft with thick grease. Reassemble the gearbox in reverse order. If the gasket is torn, replace it. Be sure to align the marks on the track shaft on the gear side and the gear shift sector. First, assemble the box without covering the gasket with sealant to make sure the box works correctly. Speeds should switch clearly and correctly, and parts should rotate without clicks or jams. After making sure that the operation is correct, remove the cover again, degrease it with acetone or gasoline where it contacts the crankcase, and lubricate the gasket on both sides with a thin layer of sealant. Do not use sealant alone for sealing without a gasket! The axial clearances may be disrupted and the box will not work correctly. Tighten all bolts in a crisscross pattern. Fill your Izh Planet 5 motorcycle with oil and check for leaks.
You need to redo it wisely
You can find a lot of materials on this topic on the Internet. But they should be treated with great caution. Some recommendations openly contradict common sense; the result of other alterations may be unpredictable. Let's try to help with advice to those who decided to do the tuning of Jupiter 5 with their own hands.
There are several directions for making changes to the design of the popular model:
- Correction of the appearance of the motorcycle.
- Modification or alteration of the suspension.
- Engine tuning.
Let's consider each of them separately.
Correction of motorcycle appearance
Changing your appearance can happen in different ways. Among the most common:
- Fairing installation.
- Replacing the fuel tank.
- Seat modification.
- Motorcycle painting.
Fairing installation. This is the first thing that many lovers of modifying the appearance of motorcycles undertake. Although it is possible to cope with such a task, it should be recognized that the development of such components is a complex task that requires specific skills. The enterprises employ entire groups of specialists engaged in the design of fairings.
Previously, plaza development methods were used for this, but today automatic design systems are used. Finished parts are blown in wind tunnels so that their behavior in air flow can be assessed.
A person who does not have specific skills, despite all his talents, will most likely receive a result of dubious quality. The surface of the fairing will be uneven, which is clearly visible in the 5 photos posted online illustrating Jupiter tuning. The aerodynamics of the motorcycle may not improve, but worsen. Take all this into account before you decide to start making and installing a fairing.
Replacing the fuel tank is a completely justified decision. But you shouldn’t try to make a complex part yourself. This is not an easy task even for enterprises with special technological equipment. It’s smarter and easier to choose a ready-made fuel tank from some other motorcycle model.
Seat modification. You can try to make a change to the standard structure by upholstering it with a new material like leather or a good substitute, and installing a new filler. But the original seat has a significant mass. To reduce the weight of the motorcycle, it makes sense, as in the case of the fuel tank, to select a part from other equipment.
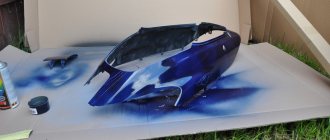
Painting IZ Jupiter-5 is a good thing. Here you can let your imagination run wild. But the best results can be achieved if you know the laws of color combinations or consult with a professional designer. Otherwise, instead of a stylish combination of contrasting colors, you can end up with an eye-catching color scheme.
If you are interested in long-lasting paintwork, first apply a layer of high-quality primer and refuse to use nitro paint, preferring alkyd or polyurethane enamels.
I'm learning to paint using a new technology.
It was for this reason, first of all, that I took up the hardware, leaving all the mechanics for later.
Before that, I painted it metallic with a “Karpaty” spray can and a “Riga-11” spray gun. I'll write about them someday.
The planet should be red, but the soul asked for something exclusive, unusual.
I carefully erased two shades of red and finally got to my native one and went to select the most similar paint. The motorcycle has clearly been painted more than once. At least the drips gave it away. Yes, and shine. More precisely, its absence.
They offered acrylic paint for 550 rubles. per liter, but I refused. The shade was a little different.
— during tinting they mixed the desired color from three colors of base enamel (200 grams = 600 rubles)
— I bought red Xeralik (a pigment that shines a little more interesting than metallic, but only when hit by light)
- and, of course, varnish. I chose Bruleks.
— I bought black acrylic for the carburetor covers and arcs.
— I took a black primer (in theory, I needed a light one, but I used it for painting a dark car)
Then I bought additional accompanying materials: paint filters, dust-absorbing wipes, grinding wheels and other things.
I bought a new carrot. The old one was full of holes because of the headrest and it was impossible to restore it.
The quality of the new part left much to be desired. It looks like it was specially sprinkled with sand before painting.
I’m already silent about how hard it was to put it in its place.....
Stage 1. Stripping to metal.
Who knows how the new paint will react to the old one and what the motorcycle was painted with? I played it safe and stripped everything down to the ground. The tank took two days.
I removed some of the dents on the side covers, smoothed out the “carrot” and a couple of dents on the tank, which only appeared when priming.
First, a universal putty, then a softer finishing putty.
Everything is clear here. Before painting, I sanded the ground with 600 grit sandpaper.
While I was thinning the paint, a white dove came into my garage. He just wandered literally a meter away from me. I counted. that this is a sign of success.
She went to bed well. I first covered the garage with film and made a kind of “chamber”.
I filtered the paint before filling it into the spray gun, degreased the parts with anti-silicone, and collected the dust with a special napkin.
In a good way, it should be diluted in a colorless base, but I read that it can be added to the first layer of varnish. I did exactly that. The main thing here is to “water” evenly so that the metal particles are in the same quantity everywhere. The trouble is that the effect is not visible until you cover it with a thick, final layer of varnish. Working blindly.
Everything is simple here. Two good layers per spill. As an experiment, I took a new varnish. They praised him. It turned out to be natural shagreen, which I’m not ashamed of. No experience, cheap equipment.
There are no unpainted marks, no drips.
I foolishly went through the glove compartments with a hose without noticing it, and thereby doomed them to repainting.
The carrots turned out well.
When everything was dry, I took the parts home. It dries faster there.
happened when I installed the tank. There was a scratch on it...
Refinement and modification of suspension
The original suspension of the IZH Jupiter-5 motorcycle is reliable and has good maintainability. It is not difficult to restore it, but better results can be obtained by making some changes to the design.
Installation of adjustable gas shock absorbers. Today on sale it is not difficult to find gas shock absorbers with suitable parameters that can be used in the design of the rear suspension for tuning IZ Jupiter-5. Ideally, you can improve ride comfort and improve the stability of the car on the highway.
Engine tuning
The two-cylinder two-stroke engine with a working volume of 347.6 cubic meters was installed on the motorcycle. see most often has air cooling. The number of models released in recent years of production that used liquid cooling is negligible. The power that the engine develops is 24 hp. With. – can be increased by making some simple modifications:
- Increase the compression ratio by removing about 1.5 mm from the adjacent plane of the block head. But this will require switching to fuel with an octane rating of AI-95 and making changes to the design of the crank mechanism. First of all, replacing the crankshaft bearings. You will also have to select spark plugs with a different heat rating.
- Replacing crankshaft bearings. There is an opinion that only high-quality imported bearings can cope with increased loads. In fact, domestic developers have installed bearings with a large margin of safety. If you manage to purchase high-quality Russian analogues, they will do the job perfectly. Trying to change the size of the crankshaft journals is simply harmful. The thickness of their hardening layer is small and when more than 1 mm is removed from the surface of the journal, the service life of the part will sharply decrease.
- Replacement or modification of pistons. The stock parts aren't that bad. Don't rush to look for a replacement for them. To increase power, it will be enough to lighten the pistons by removing casting flash and excess material from them. Parts should be carefully adjusted according to weight. It is desirable that the difference does not exceed hundredths of a gram. Such simple engine tuning will be more effective than installing a zero-resistance air filter or a direct-flow muffler. Although it is, of course, possible to install forward flow on IZ Jupiter-5.
- Installing another carburetor. If possible, it's worth shelling out for a good Mikuni carburetor. Don't go for a large diffuser size. The standard diameter of 32 mm will be quite sufficient. But it’s definitely worth removing the protrusions on the intake and exhaust manifolds and polishing the internal channels of these parts. This will not only provide an increase in power, but will also help reduce fuel consumption below five liters.
- Replacement of the ignition system. Installing BSZ on IZ Jupiter-5 only makes sense if you intend to use imported components. Most likely, the quality of domestic components will reduce all the advantages of the contactless ignition system to zero and the rework will not give the desired result.
Do not forget that increased power will improve the acceleration dynamics of the motorcycle, but will not provide a significant increase in speed. To increase speed, you will have to change the transmission gear ratios, selecting different sprockets for the gearbox and rear wheel.
MY MOTORCYCLE
The article concerns the front suspension of motorcycles IZH 7.107-015 (Planet -5-015) of newer modifications (before production closed), although the front suspension is not much different from previous models!
The front fork, as usual, consists of guide devices, elastic elements and vibration dampers. The guide devices ensure the specified movement of the wheels relative to the frame and transmit movement resistance forces and braking forces to it. Elastic elements perceive and soften impacts transmitted through the wheels to the sprung parts. Damping devices reduce the time of forced oscillations and turn! these oscillations are damped. Motorcycle front suspensions are usually made in the form of telescopic and lever forks. Telescopic forks are the most widespread - they are found on all IZh models. The licensed plug we are considering (manufactured in Japan) also belongs to this type.
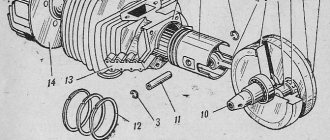
It is based on two struts 17 (left) and 18 (right) of shock absorbers (Fig. 1), fixedly fixed in the upper 8 and lower 15 bridges, which are pivotally connected to the head part of the frame 12 using the steering column axis 16 and two ball bearings 11 This device allows you to rotate the fork (and with it the front wheel) relative to the frame, changing the direction of movement.
Shock absorber struts are stationary elements of guide devices. Each rack is secured in the upper and lower bridges with bolts 3 and nuts 4. In the areas between the bridges, the racks are covered with casings 1 and 2. The headlight is fixed to the brackets of the casings. The working part of a fixed pipe is called a cylinder. The outer, movable part of the fork leg slides along it, having a reservoir 22, a piston 21 with a ring 18 and a rebound spring 19. Inside the fixed pipe there are a large 8 and a small 12 spring. The tightness of the connection between the movable and stationary parts of the feather is ensured by a sealing unit, which consists of two cuffs 15, a retaining ring 17 and a protective cover 13, secured to the movable pipe with a clamp 14 and on the stationary pipe with a clamp 10. The role of the elastic element in each rack is performed by the already mentioned large and small springs with different stiffnesses: this provides the necessary nonlinearity of the suspension characteristics. In addition, compressed air is used as an elastic element in the suspension under consideration: it is pumped into each airfoil through spools 2. This is the first time this solution has been used on our motorcycles - and therefore we pay special attention to this! In order for the feathers to work equally, you need to strive to ensure that the pressure in the left and right feathers is as equal as possible. At least the difference should not exceed 0.1 kg/cm. If only one driver uses the motorcycle and his build is not very different from the average, the pressure in the feathers should be maintained at approximately 0.2 kg/cm3; if he travels with a passenger - 0.4 kg/cm3/cube; and when driving with a stroller - 0.6 kg/cm/cm. These are, of course, only approximate values. Each driver will very soon set the optimal ones for himself, based on specific conditions. The new struts are much stiffer than the old ones, since the outer diameter of the 20 cylinders has been increased to 38 mm. In addition, the suspension has an unprecedentedly long travel of up to 200 mm. And all this together allows us to say that the new front fork has significantly increased the comfort and safety of riding a motorcycle. A few words about the vibration damper. Extinguishing occurs due to the resistance forces that arise when the oil is throttled through a special valve device rolled in the lower part of the working cylinder 20, as well as due to the slow flow of the same liquid through the annular gaps between the piston 21 and the inner walls of the cylinder 20 and through the holes in the piston . Some tips regarding the operation and repair of a new fork . Practice has shown that the fork works quite stably, there are no major complaints about it. However, you need to ensure that the threaded connections are securely tightened, prevent fluid leakage, and systematically check the pressure in the pneumatic pumping system. Pay attention to the safety of protective covers. If you discover any malfunction, try to fix it as soon as possible, without delay: otherwise, a minor malfunction will certainly turn into a major one. Since motorcyclists do not have to rely on service, here are some tips on suspension maintenance.
- It is recommended to replace the hydraulic fluid for the first time after 2500 km - that is, immediately after the end of the break-in. This should not be neglected, since oil is not just a working fluid, but also a lubricant for the pen parts. If it is contaminated - and during the break-in period this process is especially active - the oil will contribute to increased wear of rubbing parts.
- The next oil change should be made after 6-7 thousand kilometers, using 300 cm3/cube of MGP-10 fluid (OST 38.1.54-74) or any other currently suitable fluid for each feather. Unfortunately, replacement can only be done when the stand is removed - this is not entirely convenient for the consumer. However, if you consider that the annual mileage of a motorcycle rarely exceeds 10 thousand km, then this operation, performed at the beginning and end of the season, will not seem so burdensome.
To remove and disassemble the rack, the following sequence of actions is recommended.
Place the motorcycle on a stand and remove the front wheel. Disconnect the front disc brake bracket, if equipped, from the moving pipe (applies to newer models). Remove the front fender together with the stamped bridge by unscrewing the bolts securing it to the bosses of the left and right movable pipes. Remove caps 3 from each stand (Fig. 2). By pressing spool valves 2, remove air from the upper cavity of the shock absorbers. Unscrew the nuts of the 4 working cylinders halfway. Loosen the coupling bolts in the lower and upper bridges, then knock the struts out of the bridges using a wooden spacer with light hammer blows on nuts 4 and remove them from the motorcycle.
To change the oil, all you have to do is unscrew nut 4 completely, remove large spring 8, bushing 11 and small spring 12 from the pipe. Be careful when you finally unscrew nut 4: springs press on it from below and it can “shoot”. Turn the rack over and drain the oil. Rinse the cylinder with clean unleaded gasoline and blow dry with compressed air. Assemble the racks and install them on the motorcycle in the reverse order. If it becomes necessary to replace seal 15, the rack should be completely disassembled. After draining the oil, remove the protective cover 13, unscrew the screw 25 and remove the cylinder 20 along with the piston 21 from the reservoir 22. By removing the retaining ring 17, you will be able to remove the cuffs 15 and replace them with new ones. To prevent oil leakage in the lower part of the rack before tightening screw 25, it is recommended to lubricate its threads with a thin layer of sealant.
I touched on only one unit of Izh motorcycles, but I don’t finish there - I will continue to publish information on configuration and repair. I hope this will help you in repair and maintenance.....
Painting, cheap and cheerful.
Hi all! Because The painting of my “Cross Collective Farm” project left much to be desired, but I didn’t really want to spend time and money on full-scale painting with a spray gun, the decision was made to paint with the most budget-friendly spray cans, and the question was also how to restore the used signs to a usable condition! And so, for this I needed:
1. 3 cans of the cheapest kudo paint (about 140-200 rubles per can, prices are different for everyone)
2. One used primer (there were leftovers lying around)
3. Varnish purchased in time immemorial and naturally expired.
4. Remains of sandpaper.
Initially, you need to wash everything from dirt with soapy water and dry it, then treat everything with sandpaper to create adhesion for the paint. the paint will not stick to a glossy surface, for initial processing I used 500 sandpaper, for finishing 800, after processing the surface is degreased and primer is applied to the prepared surface (I applied it in two layers), after which the primer is washed off with 1000 sandpaper “X”-shaped movements, our surface is ready, you can paint! Painting should be done in a warm room because... I painted in the winter at a temperature in the box of about +20, warmed up the metal a little with a PKN 1000 lamp, then applied layers, applied three layers in total, then let the paint dry for two days (a little advice, don’t try to paint the entire area at once, the first layer of paint is dry lightly sprayed) and while the paint was drying it was time to start making signs! Because I had an old varnish for painting and a lot of fine sandpaper, I decided to restore the original plates rather than buy new Chinese ones.. what do you need for this? Everything is very simple, we take two types of sandpaper in cases where there are large scratches 800 and 1000, if the plates are simply faded, you can use a finer grain, we process the surface we need with sandpaper until it is completely matte, removing deep marks with coarse sandpaper and fine sandpaper level, then degrease the surface, it is advisable to do this with a neutral liquid for plastic, such as alcohol, because acetone, etc. will dissolve your signs, then we coat our prepared surface with varnish, literally from the first seconds of application the result is visible! And now our budget painting is ready) It looks very worthy for a spray can and will also be suitable for rides in the woods
Of course, I don’t encourage anyone to do this kind of painting because... the layer applied with a balloon is less strong than the layer applied with a spray gun
According to the signs, it is also advisable to use pure varnish without solvent because... Naturally, spray varnish contains a solvent, and on different types of plastic it behaves differently, on some types it is very aggressive, and no one has canceled the polishing of transparent plastics)
Thanks everyone for reading
Izhevsk Fork: myths and reality
Izhevskaya fork…
Many say that this miracle has been dead since birth, and there are even myths and legends about those who saw IZH with a fully working plug)))
I didn’t take pictures of the process of restoring and tuning the fork, honestly I didn’t have time for that. I’ll describe the process in detail, and I’m only attaching photos of the final result (some changes are clearly visible in them). I thought I’d get it done faster. Yeah, right now... The reanimation of the fork ate up all three of my weekends...
I had three forks available. Different years, different condition. Looking ahead, I’ll say that even with three forks there weren’t enough spare parts...
Day 1. I started by gutting the forks. Two were with straight stays, and two were with bent support pipes. The disassembly was fun) One of the forks was obviously filled with salidol instead of oil (well, the consistency is accurate), the others clearly suffered from a lack of oil. After disassembling all the forks, I realized that none of them were assembled correctly. On one there were no lower guide bushings at all, on the other the shock absorber cups were bent (don’t ask, I’m tormented by guesses)…
I chose more or less living supporting pipes (for restoration), sliding pipes, springs, shock absorbers, and washed all this first in gasoline, then in solvent. It was necessary to make new lower guide bushings and cups (which are textolite in stock). I selected blanks for them according to size, drew up drawings and took them to the turner. The bushings were sharpened from ShKh13 (for those not familiar with metal, bearing steel), and the cups were made from special blue polyurethane (a relative of polyurethane, not very distant).
Day 2. Support pipes. Bringing fear and horror to all Izhevods) What is the main reason for the “snotty” seals? That's right, lifted carriers. So I spent the whole day restoring them. First, on a grinder (a polishing machine, I usually polish knives on it) they began to remove all the scratches. I started with a sanding belt grit of 240. Then 600-800-1500-2000-3000. And at the finish, a felt circle on the grinder and GOI paste #4.
Why do oil seals leak on almost new forks? Yes, because the quality of pipe polishing from the factory leaves much to be desired. When compared, the factory quality of polishing hardly reaches the level of cleanliness.” Felt was shoved over the seals, and even soaked in oil?!? Felt itself is also a dust collector, but together with oil we get very rough sandpaper right above the seals. Why do we need it? Apart from IZh, I have never seen such a seal assembly on any other fork (maybe there is, but that’s not the point).
I gutted the new oil seal assemblies, threw out the felt, and pressed a third oil seal in its place, only upside down. All three oil seals have shortened springs. Now we have three oil seals on each feather)))
Well, further assembly is basically according to the manual. By the way, yes, I finally sandblasted and sanded the traverses and clip-ons for testing. Needs tweaking, but overall not bad. Motul Fork oil expert 10w was poured into the fork, as before into the shock absorber. Would you say this is too much for Izh? And for me it’s just right)
What do we do next? Either the tail, saddle and wings, or engine overhaul, I haven’t decided yet in what order we will work)
Good luck to all)
Tags
- Front suspension
- Izh fork
- improvements to the Izhevsk fork
Not tuning, but restoration
However, modernization is not the only way for owners of the popular model. After all, the age of many motorcycles has already exceeded two decades, which means that they can already be classified as rare. Restoring IZ Jupiter-5, restoring it and bringing it to its original state is also quite justified.
A legendary motorcycle that looks like it just rolled off the assembly line yesterday will attract no less attention than the tuned version. It’s just that how to properly restore equipment by performing qualified repairs often turns out to be much more difficult than remodeling it to your taste.
Source
| I have only recently begun to learn the art of painting and am always glad when there is a reason to practice. |