Purpose of the clutch IZ Planet and IZ Jupiter
Clutch - the name speaks volumes about the job it does.
In our case, the crankshaft engages the gearbox of the IZH Planet and IZH Jupiter engines. The connection should occur smoothly without jerking, this is necessary to start moving and smoothly change gears. In case of heavy loads, it protects engine parts from damage. The clutch is located in the left half of the crankcase, under the left engine cover.
To get to the clutch, you need to drain the oil and remove the cover with the gasket, first remove the levers and unscrew the mounting bolts.
The basket is constantly in working condition, the discs are tightly compressed by springs.
The motor transmission consists of two sprockets. The small drive is located on the crankshaft. A large star driven on a drum. The connection is made by a motor chain.
The engine gear ratio is 2.17 for all single-cylinder IZh models. For IZ Jupiter, the gear ratio is 2.57.
When assembling the motor transmission, the planar arrangement of the stars is controlled. No more than 0.4 millimeters are allowed.
Switching off occurs using a special device. The shutdown mechanism is installed in the right engine cover. This mechanism is used to make adjustments.
How many clutch discs on Izh Jupiter 5
Motorcycle IZH-Planet. Operation, maintenance and repair. >> Motor transmission, clutch, trigger mechanism. Clutch - disc replacement
LLC "World of Autobooks"
Clutch - disc replacement
Before replacing the clutch discs, motor chain or drive sprocket, it is necessary to remove the left muffler from the left driver's footrest (with a two-pipe exhaust system), drain the oil from the power unit crankcase, or (for repairs on the road) place the motorcycle on its right side. If the fuel tank is full, the fuel must be drained or the tank removed.
The work is shown on a removed power unit.
Removing the clutch discs
1. Using a 12 mm wrench, loosen the pinch bolt of the gear shift lever.
2. Remove the lever.
3. Remove the washer.
4. Remove the O-ring.
4. Use a 14 mm wrench to loosen the pinch bolt of the kick starter lever.
5. Remove the lever.
6. Using a slotted screwdriver, unscrew the eight screws securing the left crankcase cover. If necessary, you can use an impact screwdriver.
Please note that the screws vary in length and some have aluminum sealing washers underneath.
7. Remove the cover along with the paronite gasket. Be careful not to tear the gasket.
8. Using a large slotted screwdriver, unscrew the five nuts of the clutch pressure springs.
9. Remove the five springs along with the caps from the inner clutch drum.
10. Remove the pressure plate.
11. We take out the driven and driving disks.
12. We lay out the disks in the order of removal, so that (in case of assembly without replacement) install them in their original places.
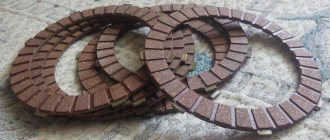
13. Inspect the clutch discs. The driven (steel) discs must not be deformed as a result of overheating, and the driving (plastic) discs must be free of cracks, burns and visible wear of the contact surfaces. The outer protrusions of the discs must not be damaged. If defective disks are found, we replace the entire set.
Installing clutch discs
We install the clutch discs in the reverse order.
Uniform compression of the springs is ensured by equal protrusion of the ends of the nuts above the ends of the studs. It should be equal to 4.0-4.5 mm (for new disks) and is measured with a caliper depth gauge.
The pressure plate should move without distortion or jamming. Otherwise, it is necessary to eliminate the distortions by additional adjustment with nuts.
Before installing the crankcase cover, it is recommended to degrease its seating surface and the crankcase seating surface, and apply a thin layer of sealant to them or to the oil-free gasket (on both sides).
The holes in the cover for the screws should also be degreased, and sealant should also be applied to the back of the screw heads.
Attention!
After installing all the removed parts, you should adjust the clutch drive (see below), and, in addition, repeat this adjustment after several hundred kilometers of the motorcycle, when the clutch discs have become accustomed to each other.
Clutch adjustment IZH Planet
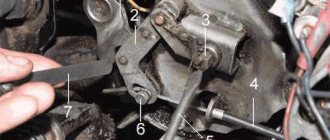
To adjust the clutch control mechanism of motorcycles IZH Planet 5, IZH Planet 4, IZH-56, IZH-49, use adjusting screw 1 and locknut 2. By loosening the locknut by turning the screw clockwise, reduce the free play of the control lever. When turning the screw counterclockwise, the free play increases. After completing the adjustment, tighten the locknut. The normal free play value is determined by the free movement of the end of the clutch lever by 5..10 mm.
The normal amount of free play is determined by the free movement of the end of the clutch lever by 5..10 mm.
How many clutch discs on Izh Jupiter 5
Motorcycle IZH-Planet. Operation, maintenance and repair. >> Motor transmission, clutch, trigger mechanism. Clutch - disc replacement
LLC "World of Autobooks"
Clutch - disc replacement
Before replacing the clutch discs, motor chain or drive sprocket, it is necessary to remove the left muffler from the left driver's footrest (with a two-pipe exhaust system), drain the oil from the power unit crankcase, or (for repairs on the road) place the motorcycle on its right side. If the fuel tank is full, the fuel must be drained or the tank removed.
The work is shown on a removed power unit.
Removing the clutch discs
1. Using a 12 mm wrench, loosen the pinch bolt of the gear shift lever.
2. Remove the lever.
3. Remove the washer.
4. Remove the O-ring.
4. Use a 14 mm wrench to loosen the pinch bolt of the kick starter lever.
5. Remove the lever.
6. Using a slotted screwdriver, unscrew the eight screws securing the left crankcase cover. If necessary, you can use an impact screwdriver.
Please note that the screws vary in length and some have aluminum sealing washers underneath.
7. Remove the cover along with the paronite gasket. Be careful not to tear the gasket.
8. Using a large slotted screwdriver, unscrew the five nuts of the clutch pressure springs.
9. Remove the five springs along with the caps from the inner clutch drum.
10. Remove the pressure plate.
11. We take out the driven and driving disks.
12. We lay out the disks in the order of removal, so that (in case of assembly without replacement) install them in their original places.
13. Inspect the clutch discs. The driven (steel) discs must not be deformed as a result of overheating, and the driving (plastic) discs must be free of cracks, burns and visible wear of the contact surfaces. The outer protrusions of the discs must not be damaged. If defective disks are found, we replace the entire set.
Installing clutch discs
We install the clutch discs in the reverse order.
Uniform compression of the springs is ensured by equal protrusion of the ends of the nuts above the ends of the studs. It should be equal to 4.0-4.5 mm (for new disks) and is measured with a caliper depth gauge.
The pressure plate should move without distortion or jamming. Otherwise, it is necessary to eliminate the distortions by additional adjustment with nuts.
Before installing the crankcase cover, it is recommended to degrease its seating surface and the crankcase seating surface, and apply a thin layer of sealant to them or to the oil-free gasket (on both sides).
The holes in the cover for the screws should also be degreased, and sealant should also be applied to the back of the screw heads.
Clutch adjustment IZ Jupiter
On motorcycles IZH Yu and IZH Yu K, adjustment of the clutch release mechanism begins with the release mechanism, for which the adjusting screw is screwed in all the way and released 1/4 -1/2 turn, after which the lock nut is tightened.
The correct installation is checked by pressing the shift pedal in one direction or another. Moving the front end of the shift pedal 5-5.5 mm from the neutral position should not lead to movement of the pressure plate. After this, the manual release is adjusted using the adjusting screw located in the left post of the clutch lever on the steering wheel (the free play is 5-10 mm).
Adjusting the clutch springs
Adjusting the springs is not difficult, the main thing is to get it right. We start by placing the motorcycle on the center stand. Then remove the lid, draining the oil in advance. We squeeze the lever on the steering wheel to the limit and make sure to fix it. Next we turn on the speed, preferably the first one. We take the wheel and begin to rotate. We try to determine by touch how much effort we are applying. We look at the coupling as it rotates and determine which springs are loosely tightened. We mark them with chalk, then tighten them. We begin to rotate the wheel again and if you feel that the wheel has become easier to spin, then everything has been done correctly. The process must be repeated to achieve a better result. After this, we check the result obtained while moving. If, as the load increases, the clutch begins to slip. All springs must be tightened using nuts. In this case, all nuts must be turned the same number of turns.
Clutch faults
Possible malfunctions that may appear during operation of IZ motorcycles.
The clutch of IZH Jupiter IZH Planet is slipping reasons
The malfunction is noticeable during sudden acceleration. We increase the speed, but the motorcycle does not accelerate. The same thing happens when driving on a steep hill as the load increases. The motorcycle cannot overcome the obstacle and stops, although the crankshaft speed does not drop. The discs get very hot and wear out quickly. It is impossible to operate the equipment in this condition; the cause must be found and eliminated.
This malfunction indicates that the disks are poorly pressed against each other.
There may be several reasons:
- The adjustment was not carried out correctly
- The springs have lost their former elasticity
- The discs have worn out and become thinner.
- Wear of drive parts
A serious problem could be a jammed control cable. The reason is damage to the shell and the resulting rust underneath. Gentle cleaning and lubrication, better replacement.
Check and wash the adjustment mechanism itself located in the right engine cover. Small particles of road sand that get into the mechanism with water can slow down the operation. After squeezing the lever, the parts do not return to their original position.
Drives clutch IZ Planet IZ Jupiter reasons
The clutch is driving - this is when the lever is squeezed all the way, and when the speed is turned on, the motorcycle immediately starts moving and cannot be stopped. You press the brake, the engine stalls. This indicates that the clutch is not completely disengaged.
The main reason is the springs that compress the discs. The discs are not evenly weakened and in some places are in strong contact with each other. The springs need to be adjusted correctly.
There is too much free play in the control lever on the steering wheel. If adjustment is not possible, replace worn control parts.
You need to check the pusher, which is located inside the input shaft of the gearbox. Perhaps the rod has become shorter.
Be sure to check the presence of the ball. Often during disassembly it rolls out and gets lost.
The ball is located inside the input shaft of a two-cylinder engine between the pusher and the thrust rod.
For a single-cylinder unit, the ball is located in the right cover between the screw with a control nut and the thrust rod in the input shaft of the box.
CLUTCH OF MOTORCYCLE “IZH”
If we consider the motorcycle transmission in order, then the first article should appear on the motor transmission - the first link of the transmission. But for various reasons we were forced to change our plan. And let's start this cycle with the second link - the clutch .
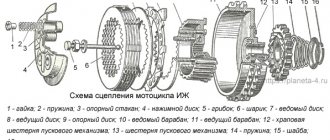
The clutch (Fig. 1) ensures the transmission of torque from the large gear of the motor transmission to the input shaft of the gearbox, short-term separation and smooth connection between them. IZh motorcycles use a friction multi-plate clutch operating in an oil bath. Let's consider the operation of the clutch using the example of the IZH Planet power unit.
The large driven gear of the motor transmission is made integral with the drive drum 8 of the clutch (Fig. 2). The driving plastic disks 6 fit with their protrusions into the grooves of the large drum 8. Between the driving disks, driven steel 5 are installed, which are connected in the same way to the small, driven clutch drum 7, mounted on the splines of the input shaft of the gearbox.
The package of disks in working condition is compressed by five cylindrical springs 2, which rest on cups 3, fixed in the outer pressure steel disk 4. The force of the springs can be changed using shaped nuts 1: during operation, this has to be done when replacing the package in order to move it evenly in the grooves drums The normal position of the clutch is constantly closed, the discs are pressed tightly and with great force against each other. To disengage the clutch, you need to separate the discs and move them away from each other.
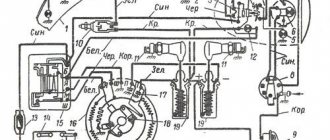
This is accomplished by a shutdown mechanism mounted on the right engine crankcase cover and a drive. The clutch release lever is located on the left side of the steering wheel. A cable 14 is fixed in it. When you press the lever, the force is transmitted through the cable to the worm 13; the latter turns, moves along the three-start thread and presses on the ball 11, the thrust rod 10 and the pusher 9 and moves the pressure disk 4, overcoming the force of the springs.
At the same time, the clutch discs are released from the force compressing them and are separated, the clutch is disengaged. As soon as you release the lever on the steering wheel, the release mechanism returns to its original position under the action of springs 2 and 12. Normal operation of the clutch mechanism is ensured only if there is sufficient clearance in the drive (free play on the release lever), and the springs are preloaded so that the disks move without distortion and over a sufficient distance.
Approximately, the spring force can be considered normal if the nuts protrude above the caps by approximately 4.5-5 mm. The clearance in the clutch release mechanism is, first of all, ensured by the adjusting screw 17. First, this screw must be screwed in until it reaches a noticeable stop (without, however, allowing the discs to move), and then loosened 1/2-3/4 of a turn and secured with a nut 16. Then use the adjusting screw on the steering wheel to set the free play of the clutch cable: it should be 5 mm at the end of the lever.
The clutch release mechanism of the IZH Jupiter engine (Fig. 3) differs significantly from that previously described in that it is interlocked with the gear shift mechanism. This allows you to disengage the clutch using both the lever on the steering wheel and the pedal, and gear shifting occurs more smoothly and quickly. The shutdown mechanism is also mounted on the right engine crankcase cover.
As in the previous case, it is connected to the lever on the steering wheel by a cable drive, the operation of which requires no explanation. As for semi-automatic clutch release, we need to talk about it in more detail. The gear shift pedal is mounted on the left end of the shift shaft; At the right end of this shaft 14 there is a cam 15 of the automatic clutch release.* The cam has a complex shape; in constant contact with its working surface there is a roller mounted on the end of a double-armed lever 19.
In the normal position of the shift lever, the roller is located in the cavity of the cam 15. When the lever moves down or up (this or that gear is engaged), the cam 15 with its protrusion runs onto the roller, through it presses on the shoulder of the lever 19; the second arm acts on the pusher 13, the ball 12 and the thrust rod 11 and moves the pressure plate 6. The springs 2 are compressed and release the disks, the clutch is disengaged. The working surface of the cam 15 is designed so that the clutch disengages earlier; what switches on this or that gear; It turns on only after the transmission is detected. You have to pay for convenience - in this case, with more complex adjustments.
If in the IZh Planeta clutch release mechanism it was necessary to adjust only the free play of the lever on the steering wheel, then on the Jupiter it is also necessary to adjust the free play of the shift pedal. Moreover, the sequence of adjustments is also important. Start, as in the first case, with the clutch springs. They should protrude above the cups by approximately 3.5-4 mm and ensure uniform, distortion-free movement of the discs when the clutch is disengaged. After this, screw 4 must be screwed into the pressure plate until it stops and unscrew it 1/4-1/2 turn. This may not work right away; for insurance purposes, it is better to perform this operation several times to be absolutely sure of the result. Then lock screw 4 with nut 5.