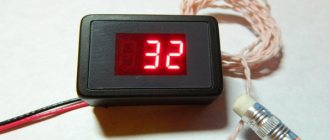
Temperature sensor Buran (electronic motorcycle thermometer −70/+250)
Description: A universal electrical device for taking data from 2-4 stroke engines - snowmobiles, motorcycles, scooters, boat motors, etc... Operating voltage 12 Volts (from 7.5 to 20 volts).
Temperature sensor - contact (cylinder-candle) - measured temperature range from −70 to +250 C; Does not have a body. The dimensions are small, it easily fits into any place. It works correctly ± 1C. To install the sensor under the spark plug, an additional adapter is required.
Delivery within Russia by post with cash on delivery is possible.
Before shipping, the sensors are checked for correct readings.
Recommendations for installing temperature sensors
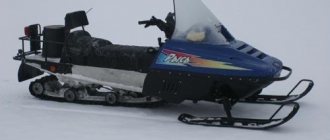
When mounting the device body into the snowmobile's instrument panel, keep in mind: the installation location should always be in front of your eyes, without obstructing your view, with little exposure to air turbulence (when moving, the snowmobile raises snow dust, which settles differently in different parts of the snowmobile). The laying of wires is carried out using frequent fixing laying or the wires should be placed in additional protection such as a cambric. The insulation of the wires is weak and can fray due to vibration, which will lead to a short circuit. When extending the sensor wires (if necessary), take into account that the temperature sensor is polar and make the connection in accordance with the polarity. The joints should be soldered and insulated. Do not install wires on twists. It is possible to do without soldering by using electric wires to connect them. automotive type connectors. In the future, such a connection is more convenient for repair work, as it allows the components of the device to be easily removable. Note! The sensor wires are heat-resistant - they can withstand the operating temperature of the engine, but not the exhaust manifold. They can be extended using any wire, without exceeding the resistance of each wire of 5 Ohms. Regardless of the sensor installation method, it is useful to isolate the protruding parts of the sensor shell (brass sleeve) from the incoming air flow. For example, by using a piece of cambric that will reduce heat loss, the same method can be used when installing the sensor under the spark plug. Power supply - connect temperature sensors in accordance with the device installation manual. The power connection via the ignition switch is most often used. How? On the ignition switches, there is a terminal on which there is no voltage at the moments when the key is turned off, the key is turned to the electric operating position. starter, but is present when the ignition is on or the engine is running. Thus, the ignition switch functions as a switch. The power supply circuit is quite simple: power is supplied through separate wires from the battery terminals - the ignition switch - the circuit that you soldered - the device. If there is no ignition switch, it is possible to use a separate toggle switch. If there is no battery, it is permissible to connect to the step-down terminals of a standard voltage stabilizer. Please clearly remember that the device is not designed to be connected to an alternating current network, or directly to the engine magneto, bypassing the standard voltage stabilizer. Also, it should not be connected to the old type of rectifier devices of Russian technology such as VU.
The average operating temperature of a serviceable two-cylinder engine, under light and medium operating conditions, is 140 - 150 degrees Celsius. With any of the considered methods of installing sensors, the temperature difference between the left and right cylinders should not exceed 20C. A fully operational, new engine has a temperature difference between the left and right cylinders of 5 - 10 degrees. Up to 20 C is considered acceptable. In this case, the temperature spread between the cylinders may vary depending on the speed of movement.
Installing sensors under the spark plug has undoubted advantages, which include: if the engine is under warranty, such installation will not lead to its loss (requires clarification from the dealer); installation method is less time-consuming; certain accuracy of readings - the sensor is located in close proximity to the epicenter of combustion, it is not affected by heat dissipation in various parts of the engine - with such an installation, when taking readings, it is possible to rely on the generally accepted pattern of 180 - 200 degrees (in accordance with the operating instructions for a particular technical means). The disadvantages of this installation include the high probability of damaging the sensor when installing spark plugs.
Note: The device can be powered from both alternating and direct voltage 12V.
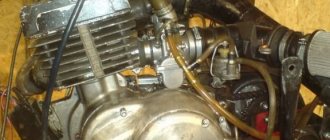
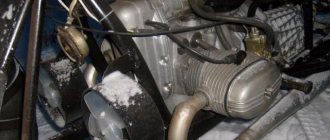
Carburetor snowmobile engine: why do the spark plugs flood on the power unit?
You can often find carburetor engines on snowmobiles. They have a similar problem less often, but motorcycle owners still have to deal with it. There are no complex electronics in such motors, but spark plugs are poured into them for a number of reasons. In particular, this may be active gas operation during starting, prolonged use of the “choke”, or weak compression.
This problem often also arises as a result of slow driving over rough terrain. In this case, fuel residues that do not burn during “overflow” stick to the electrodes of the spark plugs, preventing the engine from starting.
*Factory setting of critical engine temperature: 195ºC.
Critical temperature setting step, ºС.
5
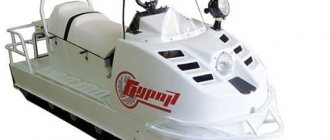
CATALOG OF PARTS AND ASSEMBLY UNITS SNOWMOBILE “BURAN”
Engine base for snowmobiles "Buran" SB-640A, "Buran" SB-640M, "Buran" SB-640MD
Engine crankcase without electric starter and starting for snowmobiles "Buran" SB-640A, "Buran" SB-640M, "Buran" SB-640MD
Engine crankcase with electric starter and starting for snowmobiles "Buran" SB-640A, "Buran" SB-640M, "Buran" SB-640MD
Crankshaft with piston group and flywheel for snowmobiles "Buran" SB-640A, "Buran" SB-640M, "Buran" SB-640MD
Cylinder group for snowmobiles “Buran” SB-640A, “Buran” SB-640M, “Buran” SB-640MD
Cooling system for snowmobiles "Buran" SB-640A, "Buran" SB-640M, "Buran" SB-640MD
Exhaust system for snowmobiles "Buran" SB-640A, "Buran" SB-640M, "Buran" SB-640MD
Power supply system for snowmobiles "Buran" SB-640A, "Buran" SB-640M, "Buran" SB-640MD
Air purifier for snowmobiles "Buran" SB-640A, "Buran" SB-640M, "Buran" SB-640MD
Manual starter for snowmobiles "Buran" SB-640A, "Buran" SB-640M, "Buran" SB-640MD
Transmission for snowmobiles "Buran" SB-640A, "Buran" SB-640M, "Buran" SB-640MD
Reverse box for snowmobiles "Buran" SB-640A, "Buran" SB-640M, "Buran" SB-640MD
Reverse box control drive for snowmobiles "Buran" SB-640A, "Buran" SB-640M, "Buran" SB-640MD
Brake for snowmobiles "Buran" SB-640A, "Buran" SB-640M, "Buran" SB-640MD
Chassis snowmobiles "Buran" SB-640A, "Buran" SB-640M, "Buran" SB-640MD
Steering control for snowmobiles "Buran" SB-640A, "Buran" SB-640M, "Buran" SB-640MD
Ski for snowmobiles “Buran” SB-640A, “Buran” SB-640M, “Buran” SB-640MD
Snowmobile body " Buran " SB -640 A , " Buran " SB -640 M
Snowmobile body " Buran " SB -640 MD
Seat for snowmobiles "Buran" SB-640A, "Buran" SB-640M, "Buran" SB-640MD
Hood (design option 1) for snowmobiles "Buran" SB-640A
Hood (design option 2) for snowmobiles “Buran” SB-640M, “Buran” SB-640MD
Electrical equipment for snowmobiles " Buran " SB -640 A with electric start
Electrical equipment for snowmobiles " Buran " SB -640 A without electric start
Electrical equipment for snowmobiles " Buran " SB -640 M , " Buran " SB -640 MD
Characteristics of carburetors model K65zh
| Diffuser | 28 mm |
| Camera | 30 mm |
| Spray | 2.65mm |
| Main jet power, cubic meters cm/min | 190 |
| Starting power | 55 |
| Idle hole | 0.7 mm |
| Adapter | 1.2 mm |
| Throttle | Flat |
To the average person, these characteristics will not tell much, except that they will be useful when searching for spare parts. However, to search, it is best to tell the seller the specific carburetor model - K65zh.
Adjusting the fuel level
This is done by adjusting the floats in the float chamber. Unscrew the bottom of the float chamber and remove the float. First of all, you need to check the tightness of the float. They immerse it in water and see if there are any bubbles. Then they look at approximately what level the float is. Normally, this is 13 mm from the bottom of the float, approximately in the middle. The size is measured with a caliper. If this figure is different, bend the float tongue in one direction or another.
Idle system
The idle system is responsible for ensuring that the engine does not stall when the clutch is disengaged and the gas is released. At the same time, it is necessary to adjust it so that fuel consumption in the cold is minimal. Adjustment is carried out using two screws - the quantity and quality of the mixture.
A good sign is that the engine starts confidently from a cold state and does not stall; when the engine warms up, the speed increases slightly, and when the gas is given, it quickly jumps to the maximum value. At the same time, as everywhere else, there is a golden mean. You have to choose - either accelerate quickly from a stop, or consume less fuel.