Many people want to become motorcyclists, but not all beginners have enough money to purchase a ready-made sports motorcycle. There is only one way out in this situation - to prepare a standard car yourself. The Minsk engine is considered one of the simplest in design and can easily be slightly boosted. It should be taken into account that in this case the engine resource decreases in proportion to the increase in power.
Design and technical characteristics of a Minsk motorcycle engine
In this article we will look at all the stages by which tuning a Minsk motorcycle can occur - the most affordable and popular motorcycle in the USSR.
We will reveal the secrets of tuning the Minsk 125 engine, increasing its power, maximum speed, as well as improving its appearance. Minsk 125 is one of the most popular famous Belarusian motorcycles, which have been produced since 1951. They have proven to be unpretentious, cheap to maintain, and are also famous for their reliable gearbox. This motorcycle is widely used in training and passing exams for category A, as well as in the “ Minsk cross 125 ” version for teaching the basics of motocross in many sections of the country. Minsk's foreign competitor is the Yamaha YBR 125 road motorcycle, which is perfect for beginner motorcyclists.
Tuning Minsk can be divided into two main parts:
Design and technical characteristics of a Minsk motorcycle engine
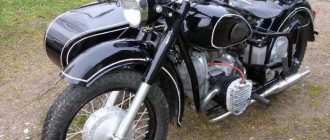
Minsk is a Belarusian Soviet-era motorcycle, distinguished by its strict classic design. However, with the economic downturn at the Belarusian plant, engineers had to cut the budget and use cheaper materials, which led to the deterioration of the design and its adjustment to general standards. The rather simple design of the Minsk motorcycle engine and the possibility of its modification allowed the Belarusian machine to participate in sports motorcycle competitions and circuit racing. In 1961, a 23 hp A feature of this motor was the ability to boost, which added about 9 kW to the performance.
In general, the Minsk motorcycle engine, the technical characteristics of which allow it to carry heavy loads, has a simple design and convenient maintenance. However, for all its popularity, like any Soviet motorcycle, repairing the Minsk motorcycle engine took up most of its owner’s time.
Replacing the piston and boring the cylinder
If such a situation occurs, then replacing the piston alone does not solve this problem.
It needs to be solved comprehensively, i.e. replacing a piston plus boring a motorcycle cylinder. Those. cylinders must be bored every time their wear has been detected. It is also worth considering that not all cylinders are subject to wear, even after quite a long period of operation in very difficult conditions. There are also cases where a vehicle lives out its life without ever boring the cylinders.
Parameters for determining cylinder wear:
- if at the top dead center of the cylinder its dimensions have changed by 0.05 mm from the original ones;
- if in the place where the piston skirt and the cylinder wall come into contact, the size has changed by 0.03 mm.
Thus, the two indicated parameters may well answer the question of whether or not it is worth boring the cylinder. If there is at least one of the changes listed above, then the answer is obvious - boring is necessary.
There are also worse situations when a so-called “stepped” defect appears in the upper part of the cylinder. The resulting step reduces the wear time of the cylinder, piston rings, and ring seats on the piston, resulting in very noticeable shocks during driving. However, this defect becomes noticeable without any measurements. When it changes, the nature of the engine's operation changes - it begins to vibrate strongly.
This is a direct indication for immediate repair, since the ellipsoidality accompanying this defect leads to the fact that the piston rings adhere worse to the cylinder walls. This, in turn, can lead to breakthrough of gases from the cylinder into the crankcase, disruption of compression in the engine, which also increases oil and fuel consumption.
As we see, in addition to the fact that untimely elimination of defects leads to the expenditure of money, they can also cause irreparable damage to the heart of the vehicle.
In this case, boring the cylinders will help restore the necessary parameters of this part of the engine. However, by boring we mean not only the restoration of the geometric parameters of the motorcycle cylinders, but the restoration of the normal position of the mating parts relative to each other. In other words, if you only correct the geometry of the cylinder, it will not be enough to restore normal alignment and the normal location of all the main surfaces.
The consequence of this is the appearance of excess friction, which affects other structural components of the piston group. In other words, all moving parts that participate in the operation of the engine and are part of the piston group will be subject to additional bending, compression, etc. loads. This, in turn, can cause further breakage of the cylinders as the engine operates.
Thus, if the question arises about boring the cylinder, then, of course, it is better to do it in a workshop - more expensive, but less problematic.
However, nowadays there are still masters who want to carry out this process on their own. Perhaps some people don't have enough money, while others just like to spend time in the garage, tinkering with their motorcycle. In any case, it is possible to bore a motorcycle cylinder yourself. It is worth noting right away that the boring method is also suitable for an automobile cylinder block. The only caveat is that turning to a turner is inevitable, since it is the turner who can make the appropriate mandrel that is suitable for this process.
The mandrel should have dimensions depending on the size of the cylinder being bored. For example, if the diameter of the cylinder is 76 mm, then the diameter of the mandrel should be 74 mm, and its length should exceed the length of the cylinder by approximately 150 mm, although a little more is possible. After the mandrel is ready, you need to make a hole in it into which the knob will be inserted, and use a hacksaw to cut a groove along the groove, the depth of which should be approximately 10 mm.
External tuning
Drivers often wonder how to paint a motorcycle. In general, this is also tuning. It is better not to change the color radically, just apply different designs. This way you can be guaranteed to avoid problems with traffic police officers. Be sure to install a windshield and protective arches.
This not only improves safety, but also significantly increases travel comfort. Alloy wheels are often installed. They have a more beautiful appearance, increasing the attractiveness of the motorcycle. Another type of tuning that is often found is making the lights brighter. In fact, it's not worth doing this.
It will not be possible to significantly increase the illumination of the road, but the load on the generator will increase. Therefore, think about whether you are ready to regularly repair the generator for the sake of a little brighter light.
Previous entry Technical characteristics of the Minsk motorcycle
Next entry Izh Jupiter 3 - technical specifications, review
External motorcycle tuning Minsk
It all depends on your desires and financial capabilities. The most obvious option is to replace the wheel rims. A simple technical operation will immediately transform your motorcycle.
New tuned wheel for a Minsk motorcycle
To improve the appearance, you can install steel leg protection. This will not only make the appearance of the Minsk motorcycle more sporty, but will also increase your safety when operating it. In addition to this, you can repaint the motorcycle, replace the seat, replace the fuel tank, change the shock absorbers, make a sports body kit, or attach luggage bags to it. It all depends on your ideas and available funds.
Tuned motorcycle Minsk 125
Ultimately, if you have a great desire and with a relatively small investment, you can completely transform a Minsk motorcycle with your own hands, turn it into a cross-country, sports, or fashionable road motorcycle. Many people want sports motorcycle tuning, but cross-tuning is better suited to this model. Photos of Minsk tuning for cross
Cross tuning Minsk 125
Photo of an old Kawasaki, but for some reason it was soldered into the name “Minsk”!? I wouldn't be surprised by such phrases! But in the photo it’s really the same “macaque” (as people say). This is the work of Andrey FETISCHEV from the city of Kamen-na-Obn, Altai Territory. Anyone who is interested in this project (done around 2003) and reads it will understand why the mot is similar to “Kava”. I am publishing further information from the words of the author of the motorcycle and presenting it to your attention:
“In the off-road conditions of the outback where I live, only one type of motorcycle fits perfectly - enduro. There are no domestic devices of this class on sale and are not expected to be. There is no need to think about buying Japanese - it’s too expensive. You can buy an Izha, “lift up the front wing, weld on the rear shock absorbers and be proud: “I have an enduro.” But there are plenty of these, so to speak, “all-terrain vehicles.” If you're going to do it, do it this way. I found a frame and front wheel from a Minsk, a front fork and a rear wheel from a Voskhod. I assembled it and assessed it: no, it’s just a “skeleton” for now. The triangular pipe connection under the saddle was redone in such a way as to create enough space for a monoshock absorber. I lowered the middle of the frame down and raised the rear part so that, being above the center of the frame, you could easily reach the ground with your feet, but at the same time the rear wheel would have room to move. I welded the lower part of the frame so that the frame became half-duplex, and another reinforcing pipe was brought from the middle of the frame to the bottom of the steering column. After all the alterations, the frame is unrecognizable. I immediately discarded the idea of installing domestic motorcycle shock absorbers: they were of no use. A true enduro should have a monoshock installed. I took the rear shock absorber from a VAZ-2121 as a basis - it fit perfectly in length. Yes, and it works - it cannot be compared with the products of the motorcycle industry. The spring I used was from Honda. Made a system for adjusting the stiffness. I made the rear swingarm myself - the part is 10 cm longer than the standard one.
When the frame and suspension were ready, I started working on the wheels. The 16-inch rear one from Voskhod with its huge drum spoiled the whole appearance of the motorcycle. I decided to take a desperate step: make a new hub for the disc brake. Having received a blank from the turner, turned according to my drawing, I manually marked and drilled holes for the “Minsk” knitting needles. Despite. that the hub is steel, the wheel flew by 1 kg. Inspired by success, he did the same with the front wheel hub, but instead of steel he used aluminum. Of course, the wheel was completed in the summer. The time came when I had to think about design - and I had never done this in my life. Use ready-made “Minsk” parts? Or glue it yourself? I took a risk and started gluing it. “Sculpted” the hood parts from fiberglass with epoxy resin. And I didn’t regret it. What appearance options are there? In our town, we didn’t see anything except domestic technology; the only source of information was magazines and catalogues. I liked one Kawasaki in the picture. I sat down at the computer, made a drawing of a motorcycle in Autocad, and set about turning the virtual model into a real motorcycle. I made wings, fairings, and struggled with the gas tank. Not only is it hollow, but it also has a neck, plus fastening elements for air intakes, fasteners to the frame... The result exceeded expectations: the entire lining of the motorcycle weighed 4.5 kg (!) against the standard 15. The safety margin is quite sufficient (already checked in an accident). But - that's what an amateur means! — the “Voskhod” front fork, prepared at the beginning of the work, did not fit in. Thanks to the Izhevsk plant for launching the production of licensed hydropneumatic front forks - as if especially for my design. Along with the fork, I bought a brake “machine” and a caliper from Izha. Only the standard brake disc did not fit - I had to grind it out. But with the rear brake, not everything was so smooth. In the end, Novosibirsk karting drivers came to the rescue - they gave me a master brake cylinder from a kart, and he made the caliper and brake disc himself.
Read also: Bla Bla Car find your ride today
The rear part of the frame and the swingarm have been redesigned to accommodate the installation of a monoshock absorber. The number of teeth on the driven sprocket has been increased to 54. The Minsk engine is simple and durable, but it doesn’t have enough power. Again I used the advice of karting drivers. I bored out the intake and exhaust windows, eliminated casting errors in the purge channels at the junction between the cylinder and the crankcase - the ledge in some places reached two millimeters! I trimmed the cylinder head for 92 gasoline. I installed a piston with one steel ring on a needle bearing. Carburetor — Jikov 2928. The muffler was based on a resonator from a CZ motocross car, only the elbow was turned in the right direction. At the exit I installed a direct-flow muffler of my own design... After modifications, the engine is unrecognizable! Sharp pick-up from the bottom, acceleration without failure, explosive dynamics! The increase in power did not add maximum speed due to the fact that the final drive ratio was increased. But an enduro is not a sportbike, and 90 km/h is quite enough for it. I wanted to increase traction and achieved my goal - the motorcycle can start from 3rd gear, and it doesn’t mind any climb. As for the electrical equipment, no matter how funny it may seem, the most time-consuming job was reworking the tachometer from a Toyota Carina. It is not so easy to get a device designed to work with a 4-cylinder 4-stroke engine and assembled from unfamiliar radio components to correctly display the rotation speed of a 1-cylinder 2-stroke engine. Installing a 90-watt generator from motorcycles from the Kovrov plant with the accompanying set of electrical equipment was much easier.
I can't be dissatisfied with the results. The suspension turned out to be energy-intensive - for it, as if there were no bumps and potholes. The motorcycle is maneuverable, light and stable. In a word - enduro. My father and I brought it to a motorcycle festival in Novosibirsk and placed it in the most visible place. We sit and wait for the onlookers to start gathering. We can’t understand anything - well, at least someone would be curious! Only towards the evening did the guys come up and ask: “Why did you adopt a Kawasaki engine from Minsk?” What, you didn’t have enough money for your “native”?... Then we understood everything. After they explained what was what, people poured in to us, many praised us. It's fun to watch jaws drop."
This is how the Kawasaki from Minsk turned out. With this post I want to prove to those who say that Soviet scrap metal is no longer good for anything - fuck you. If you want, you can fly into space. The main thing is to move towards the goal.
M-106 engine diagram
1 - cylinder head; 2 - cylinder; 3 - piston; 4 — piston pin; 5 — piston pin retaining ring; 6 — connecting rod; 7 — crankshaft oil seal; 8 — crankshaft bearing; 9 — bearing retaining ring; 10 — spacer sleeve; 11 — left half of the crankcase; 12 — motor transmission chain; 13 — segment key; 14 — washer; 15 - nut; 16 — driving gear; 17 — oil dipstick; 18 — gear shift pedal; 19 — clutch; 20 — ratchet gear of the trigger mechanism; 21 — input shaft bearing; 22 — left crankcase cover; 23 — thrust washer of the trigger mechanism; 24 — kickstarter oil seal; 25 — trigger shaft; 26 — kickstarter lever; 27 - screw; 28 — trigger sector spring; 29 — centering pin of the left cover; 30 — fork axis; 31 — shift fork for 1st and 3rd gears; 32 — gear shift disc; 33 — pedal return spring; 34 — adjusting screw; 35 - lock nut; 36 — right crankcase cover; 37 — shift fork for 2nd and 4th gears; 38 — plug screw; 39 — right cover plug; 40 — drive gear of the main gear; 41 — clutch adjusting screw; 42 — spacer sleeve; 43 — gearbox seal; 44 — secondary shaft bearing; 45 — gearbox oil seal housing gasket; 46 — hole for lubrication of the right crankshaft bearing; 47 - generator; 48 — outer seal of the bearing of the right crankshaft journal; 49 — gasket of the oil seal housing; 50 - right half of the crankcase; 51 — cylinder gasket; 52 — nut M7x1 of the cylinder stud; 53 - spark plug.
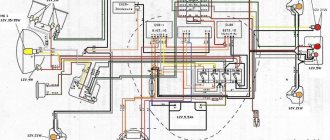
Ignition system
The standard Minsk ignition system does not always successfully cope with its tasks. Therefore, it makes sense to carry out the revision carefully and carefully. Just like with Izh Planet 5 tuning, here they primarily work with the ignition timing.
The model has a good generator, as well as contactless ignition with an electronic switch. But, there is no possibility to change the advance angle depending on the operating mode of the moped engine. Therefore, it is recommended to install a device that forms the angle depending on the need at a given time.
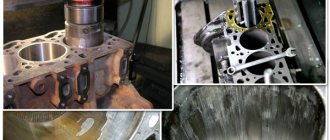
OUR ADVANTAGES
| MODERN EQUIPMENT | |
| All work is performed on specialized German equipment Huller Hille , which does not allow errors | |
| FAVORABLE PRICES | |
| We offer affordable prices for all car and service station owners, which is why our services are in demand. | |
| HUGE EXPERIENCE | |
| During the work of our company, the craftsmen have repaired more than a thousand cylinder blocks. | |
Engine repair
Assembling a Minsk motorcycle engine is the reverse process to disassembly. Therefore, for a clearer idea of the mechanisms, start working with partial disassembly of the motor. Here's a simple procedure:
If the ball is deformed, it is better to replace it with a new one.
In this easy way, you can partially disassemble the motor . If there are knocks or jolts while riding, it is worth doing a complete disassembly according to the motorcycle operation and maintenance book. In many cases, even simple cleaning of individual elements helps. For example, cleaning your carburetor will provide better fuel delivery without contaminating the mixture. Replacing the air filter will provide a significant flow of air into the engine, which will improve the purity of the fuel-air mixture.
Engine modification
Participation in motorsports requires a reasonable advantage over competitors. Therefore, many will think about how to increase the engine power of a Minsk motorcycle. To do this, you can perform several manipulations:
This boost can add more than 7 kW of power to the motor. Overall, the motorcycle is pleasant to move around the city and reliable when doing work. The lightness and controllability of Minsk have long established themselves among motorcyclists. Even now, at a gathering of bikers you can see several modified models of Minsk.
Weaknesses and shortcomings of the Minsk 125 motorcycle engine
The MMVZ two-stroke engine with a volume of 125 cm³ has been produced by the Minsk Motorcycle Plant for many years. From 1951 to the present, two-stroke 125 cc engines have been and continue to be produced in various models and modifications. The first motorcycle engine was 4.25 liters. s., at this time, the engine power is 12 hp. With. Structurally, no global changes were made to the internal combustion engine. The cooling remains the same air with two-channel return blowing. Despite the experience of world manufacturers of motorcycle engines using an ejector, the Minsk plant, unfortunately, did not replace the carburetor with an ejector, but it’s a pity, the engine would have had even more advantages.
Repair of the CYLINDER BLOCK
TYPE OF WORK | COST (RUB) | |
| L/a, m/a | Cargo. vehicle | |
| BORING 1st cylinder in-line BC | 20 | 20 |
| HONING 1st CYLINDER / V-shape | 10/20 | 20 |
| BORING and HONING 1st cyl. | 30 | 45 |
| BORING, LINING and HONING 1st cyl. | 40 | 60 |
| V-shaped, opposed block BORING and HONING 1st cyl. | 45 | 60 |
| V-shaped, opposed block LINING, BORING and HONING 1st cyl. >>> | 80 | 100 |
| MOTORCYCLE boring and honing 1st cyl. | 40 | — |
| MOTORCYCLE lining, boring and honing 1st cyl. | 60 | — |
| TESTING FOR V-blocks | 80 | 140 |
| BLOCK GRINDING row up to 630 mm | 40 | 55 |
| BLOCK GRINDING row over 630 mm | 70 | 105 |
| GRINDING BLOCK opposed in two planes | 70 | 100 |
| GRINDING BLOCK V-shaped in two planes>>> | 130 | 190 |
| PRESSING OIL INJECTOR for 1 piece. | 10 | 10 |
| CUTTING THE SLEEVES to size 1 pc. | 10 | 10 |
| DEFECTIVE CYLINDERS (dimensions) for the entire block | 0 | 10 |
Motorcycle tuning Minsk
Minsk was perhaps the most widespread and accessible of the motorcycles of the Soviet Union. Produced at the Minsk plant, it enjoyed deserved popularity among motorsports enthusiasts and ordinary citizens for its low price, ease of operation and good maintainability. This unpretentious motorcycle could serve as both the first vehicle for a novice motorcyclist and a workhorse for many residents of cities and rural areas.
The ancestor of the Minsk motorcycle was the motorcycle of the German DKW center, the equipment for the production of which was exported from Germany as reparations in 1945. The production of the first models was established in Moscow, but then by 1951 production facilities were transferred to Minsk. The first motorcycle rolled off the assembly line of the Minsk Motorcycle and Bicycle Plant back in 1951. For more than 60 years of production of motorcycles of this brand, more than 6.5 million Minsk motorcycles have been sold worldwide.
Tuned motorcycle Minsk 125
But this mass-produced motorcycle, like any other equipment, of course, has its certain drawbacks. The main ones include:
But this amazing motorcycle provides its enthusiastic owners with ample opportunities to implement tuning ideas. And, although in the basic version, even with the most powerful engine, the Minsk motorcycle could hardly accelerate to 100 km/h, as a result of competently and responsibly carried out tuning from this beloved, but still not very technically advanced product of the Minsk plant, it is possible to make a truly nimble, responsive and fast motorcycle, not much inferior to its expensive foreign counterparts.
see also
Comments 20
I don’t really know about the expense, but I have a piston from a Susa in UP, there’s even a video of how it was done...
Can I have a video link?
So he made it for me, Moishe Dunaevsky, took it to him in Ivanovo and did not spare the black man
I’m glad to help, there’s a lot of interesting stuff, but to get started with my work I had to put it all aside a little
+ for the owl engine. From 3Ma it’s completely unrealistic. I came across a colossal difference with both engines, although in many ways they are similar. Try to get the maximum out of the Minsk engine, and if you want to get rid of it, take the owl or 3M01. Well, of course, you can install 3Movsky, but the first thing you will encounter is the release. I signed up)
There are probably no spare parts for the owl one, but it’s more realistic to find it for Minsk and Voskhod.
Well, the owl one is more modern, in theory there are more of them left in good condition. Another thing is that Minsk and Voskhod were released for much longer and were more widespread.
the fact is that Minsk is still produced now and therefore there are spare parts
can’t be installed, I heard they did from the planet
what did they put? piston with cylinder from the planet to the Minsk engine?
I agree about the engine from the owl... physically you can install a cylinder from the owl, but not from the sunrise, because the rise of the ribs is low, it continues at the expense of the crankcase and the channels do not go along the cylinder, but more along the crankcase (to understand what we are talking about, just compare everything three cylinders) There are two ways the engine from the owl is 200cc. it already has a reed valve and a tuned exhaust, 5-channel purge, it’s a pity the box is a weak point. And speed up the Minsk engine. I washed down the channels, installed LC, made the carb more interesting, made a tuned exhaust. I read that karting drivers filmed about 40 kb, but the resource was for one race and 2 training sessions)) one must proceed from the possibility and the desired result so that the end justifies the means)))
The cylinder and piston are already sawed down to the point where I can’t, but I want more, and on this motor, I have to look for another motor and make it later, but this one is like new. You think the wall thickness of the liner won’t be enough if you just bore the original cylinder from Minsk. And about the channels, I just thought that they wouldn’t converge.
install a motor from the dog))) if you install a larger cylinder separately, then the CV and gearbox will quickly die... is it worth it?)
the dog is too much dope, the simple planet will make you crazy, I don’t like too powerful equipment, it’s a goat and you don’t have time to stop after starting.
Is it true that it will fit, the diameter of the “sunrise” simply will not fit into the Minsk crankcase, even if it is bored and the piston stroke does not fit, even if everything would fit, the crankshaft will not withstand the increased load, install a single-pipe “owl” engine.
the knee will withstand it, but regarding the stroke, this is not the point, the most important thing is that the height from the finger to the bottom is the same. Regarding the cylinder bores, we should compare this moment, or at the very least, you can think about trying to see if this cylinder is bored for the sunrise piston
Minsk was perhaps the most widespread and accessible of the motorcycles of the Soviet Union. Produced at the Minsk plant, it enjoyed deserved popularity among motorsports enthusiasts and ordinary citizens for its low price, ease of operation and good maintainability. This unpretentious motorcycle could serve as both the first vehicle for a novice motorcyclist and a workhorse for many residents of cities and rural areas.
The ancestor of the Minsk motorcycle was the motorcycle of the German DKW center, the equipment for the production of which was exported from Germany as reparations in 1945. The production of the first models was established in Moscow, but then by 1951 production facilities were transferred to Minsk. The first motorcycle rolled off the assembly line of the Minsk Motorcycle and Bicycle Plant back in 1951. For more than 60 years of production of motorcycles of this brand, more than 6.5 million Minsk motorcycles have been sold worldwide.
Read also: Peugeot 308 alternator belt tensioner
Tuned motorcycle Minsk 125
But this mass-produced motorcycle, like any other equipment, of course, has its certain drawbacks. The main ones include:
- The rather weak engine is the most powerful available in the basic version, only 13 hp.
- A poorly designed clutch that can slip even after the motorcycle has been driven for a long time.
- On early models, the arrangement of the crankshaft bearings was poorly thought out.
- Weak braking system.
But this amazing motorcycle provides its enthusiastic owners with ample opportunities to implement tuning ideas. And, although in the basic version, even with the most powerful engine, the Minsk motorcycle could hardly accelerate to 100 km/h, as a result of competently and responsibly carried out tuning from this beloved, but still not very technically advanced product of the Minsk plant, it is possible to make a truly nimble, responsive and fast motorcycle, not much inferior to its expensive foreign counterparts.
Motorcycle styling Minsk 125
Improving the quality of the air-fuel mixture
The formation of the air-fuel mixture in this vehicle occurs in the carburetor. To reduce losses, at this stage the jets and diffuser surface are polished. This kind of tuning of the Minsk motorcycle can be done with your own hands using thick, rigid thread and Goi paste. The amount of fuel mixture entering the cylinder depends on the diameter of the diffuser.
When setting up a carburetor, the parameters specified in the instructions should serve only as a starting point, but not as reference values. Any carburetor is customizable. An important detail is the tightness of the contacting planes: the carburetor and the adapter. The tightness of the connection significantly affects the life of the engine.
Causes of cylinder failure
The pistons, falling and rising inside the cylinder, are in constant friction with the walls of the cylinder, thereby leading to its wear. It is worth noting that a motorcycle cylinder can wear out completely unevenly, and therefore the cylinder becomes deformed, losing its original shape. Unfortunately, this defect is not immediately noticeable to the naked eye. However, the fact that the shape of the cylinder has undergone changes can be determined using special measuring tools.
It should be remembered that the piston moves inside the cylinder along the correct trajectory only theoretically; in practice it happens a little differently. The angle of deviation from the trajectory affects the wear rate of parts. Thus, the larger the angle, the faster the motor cylinders wear out.
The movement of pistons in cylinders along an incorrect trajectory is caused by several factors, one of which is the nature of the design (lack of axiality or perpendicularity in the position of the parts that are mating).
In addition, very large dimensional tolerances also contribute to rapid wear of pistons and cylinders, due to which the piston moves not only parallel to the cylinder axis, but also with a certain deviation from the horizontal.
It is also worth considering the temperature regime at which all this occurs, as well as the products produced. All this has a destructive effect on the cylinder walls and piston surface. Thus, as a result we can have not a round cylinder, but an elliptical one.
Let's start tuning a Minsk motorcycle with our own hands
To increase power we will tune the engine, clutch, ignition system, cooling and exhaust.
Engine tuning in Minsk - adding a few horses
The most powerful engine in the base, as mentioned above, is a maximum of 13 horses. Of course, this is completely insufficient for modern dynamic riding, motocross, and stunt riding (depending on what the motorcycle tuning is for). Modifying the Minsk engine is not very difficult. To increase power, you will have to work on the cylinder and piston of the motorcycle engine. We reduce the combustion chamber by grinding. This increases the compression ratio and engine power. The engine is now suitable for using high-octane gasoline and this will have a positive effect on increasing power.
Motorcycle engine Minsk
So let's get started:
Tuning Minsk for sports Such tuning of the engine of this motorcycle will allow you to add several horsepower to the power , which will immediately noticeably affect the dynamics and acceleration speed. The increased power as a result of engine modification will require replacing the standard crankshaft bearings with more durable ones. For this, it is best to use imported bearings produced by the Japanese company NTM.
Photos of tuning the Minsk 125 motorcycle
Reworking the ignition system
The standard ignition system with a very powerful and reliable generator, a contactless ignition system and an electronic switch require modification in terms of additional installation of a device to change the degree of ignition angle advance depending on the engine speed. With the help of such tuning, the Minsk motorcycle engine will run more smoothly and quietly, and its service life will increase significantly.
Motorcycle tuning Minsk
Exhaust tuning for a Minsk motorcycle
How to make a Minsk motorcycle quieter? To improve the power performance of this engine, it is very important to install a resonator in the exhaust system. A resonator is an oscillatory system where vibration energy is accumulated due to resonance with the driving force. A properly selected resonator allows you to ensure that some of the lost working mixture is returned to the cylinder by the time the exhaust window is closed. It is very difficult to find such a device for free sale, because... it was produced in limited quantities and only for cross-country versions of the Minsk motorcycle. But you can make it yourself using drawings available on the Internet.
Tuning the exhaust system on a motorcycle Minsk Tuning a motorcycle Minsk
Cooling system tuning
Increased power as a result of engine tuning will require a more efficient cooling system. It is necessary to purchase and install a more serious radiator.
Clutch modification in Minsk
Now, after engine tuning, the standard clutch will not be able to cope with the increased power in all operating modes of the motorcycle engine. It needs to be improved by replacing springs and discs. It is necessary to cut off a few millimeters of steel from the standard clutch discs and insert three more selected discs into the free space. As a result of this replacement, the clutch will become slightly stiffer in first gear, but overall the motorcycle will gain more dynamics and drive.
Now we can replace the rear wheel sprocket with a similar one, but with fewer teeth, which will add dynamics to the acceleration of the motorcycle. We replace the standard brakes with good disc brakes - do not forget about driving safety. All these measures, if carried out correctly and responsibly, will allow you to increase the power of a 125 cc motorcycle engine from the standard 13 to 20-23 horsepower, which of course will make your iron horse much faster and more interesting. A technically savvy owner can do the tuning of a Minsk motorcycle engine on his own, or you can contact a motorcycle center, where all the necessary work will be carried out not only quickly and efficiently, but also where you can quickly purchase all the parts and elements necessary for tuning a motorcycle.
OUR SERVICES FOR BORING AND CYLINDER BLOCKS
CHECKING THE BLOCK FOR LEAKS - Squeezing antifreeze out of the cooling system - this means there is a crack in the BC or cylinder head. Therefore, it is necessary to check first the cylinder head, and then the block itself. Read more…
BORING THE BLOCK - The need to bore the block is determined by the wear in the cylinders: deep scuffing, ellipse, taper. The result is loss of compression. Read more…
CYLINDER BLOCK LINING - Some engines require repairs by replacing or installing liners. The cylinder block liner is produced by cooling the liner in liquid nitrogen and heating the engine body itself. We always hone the cylinder before pressing the liners . This is necessary for better heat transfer of the liner and block, and is a prerequisite for proper cylinder liner placement. Read more…
HONING OF BLOCK CYLINDERS - leaves certain “scratches” on the cylinder walls with a characteristic angle of inclination of the pattern. Thanks to this complex operation, an oil film is formed on the cylinder walls, which reduces the wear of the piston rings significantly. We STRICTLY adhere to the technology and recommendations developed by the world famous company KOLBENSCHMIDT. Honing is carried out in 3 stages: first roughing, then finishing, and then flat-top. Read more…
GRINDING THE CYLINDER BLOCK - As a result of engine operation and overheating, the plane adjacent to the BC head may be deformed. This can cause gases to enter the oil jacket or cooling, as well as antifreeze into the oil and vice versa. Read more…
THE AVERAGE REPAIR TIME FOR A CYLINDER BLOCK IS: boring - 1-2 days, liner - 2-3 days, V-block liner - 3-5 days.
The fact is that for accurate measurements, the block (preferably with a piston) must take room temperature from +16C to +22C - only this takes about 4-8 hours. PRECISION IS THE KEY TO CORRECT OPERATION OF THE CYLINDER BLOCK AND PISTONS!
Exhaust system
This element must be modified if the engine has been tuned. The problem arises due to the fact that the standard muffler is not designed for increased exhaust gas pressure.
As a result, in certain operating modes, the motorcycle engine begins to choke. Optimal mufflers were installed on a motocross motorcycle, but it is now almost impossible to purchase such a part. Such versions have not been produced for more than 20 years, and therefore spare parts for them have not been produced either.
You can make a high-quality muffler yourself. To understand how to make it yourself, let's look at how it works. Using a muffler of a certain shape allows you to create reverse draft. It allows the remaining combustible mixture to be sucked into the engine. A resonator is used for this.
You can make this detail yourself. On the Internet you can find a large number of formulas by which calculations are made. It is important to remember the basic rule - the size of the resonator directly depends on the power of the motor. This kind of motorcycle tuning in Minsk allows you to achieve maximum efficiency and engine response.
DIY motorcycle gearbox repair
Often the problem arises of repairing and restoring a broken tooth in a motorcycle gear, or repairing a gearbox when the speed barks (jumps out and engages and jumps out again) or simply knocks out the speed on the motorcycle. Motorcycles IZH, Voskhod, Minsk, Java, etc. suffer from knocking out and barking speed. Gearbox repair IZH, Voskhod, Minsk, Java, etc. You can do it yourself at home very simply, and restore the old gears of the motorcycle gearbox so that the speed does not bark or knock out.
CYLINDER HEAD
TYPE OF WORK | COST (white rub.) | |
| Passenger car (m/bus) | Truck | |
GRINDING OF CYLINDER cylinder head , COLLECTOR, etc.
| GRINDING 1-2 cyl. | 15 | 20 |
| GRINDING aluminum | 30 | 40 |
| GRINDING cast iron >>> | 30 | 40 |
| GRINDING cast iron trucks up to 630 mm | — | 50 |
| GRINDING cast iron trucks from 630 mm | — | 150 |
| COLLECTOR GRINDING >>> | 30 | 60 |
| GRINDING THE ADJUSTING WASHER | 5,50 | 5,50 |
| PISTON GRINDING | 20 | 25 |
| COMPRESSOR GRINDING | 40 | 40 |
| GRINDING THE STEERING RACK SHAFT for 1 side / 2 sides | 35/55 | — |
WORKS RELATED TO PROCESSING OF VALVES AND VALVE SEATS
| DEFECTIVENESS OF VALVES, BUSHINGS per 1 valve | 1 | 1 |
| REMOVAL or INSTALLATION OF CAMSHAFT 1 PCS | 7 | 15 |
| RESTORATION OF THE WORKING CHAMBER OF THE VALVE SEAT with cleaning of carbon deposits | 3,60 | 5,40 |
| GRINDING IN VALVE with cleaning of carbon deposits | 3,60 | 5,40 |
| REPLACING THE VALVE GUIDE | 1,80 | 2,70 |
| REPLACING THE OIL CAP | 1 | 1,50 |
| VALVE DECAY | 1 | 1,50 |
| DRYING OF THE VALVE | 1 | 1,50 |
| ADJUSTING VALVE CLEARANCES with washers 8-12 | 56 | 56 |
| ADJUSTING VALVE CLEARANCES with washers 16-32 | 92 | 92 |
| REPLACING THE VALVE SEAT | 20 | 25 |
| ADJUSTING VALVE CLEARANCES by machining 8-12 | 75 | 75 |
| ADJUSTING VALVE CLEARANCES by machining 16-32 | 150 | 150 |
| CRACK REPAIR 1 cyl.>>> | 110 | 110 |
| MANUFACTURING THE VALVE BUSHING | 20 | 30 |
When grinding valves, troubleshooting, drying out/drying out is not included in the price
RESTORATION OF cylinder head and cylinder head
Eliminating barking and speeding on a motorcycle
Speed knocking and barking on a motorcycle occurs due to the fact that the gear tooth wears out and the gears begin to repel each other, many blame the gear forks for this, but they have nothing to do with it, the job of the fork is to engage the gear in another gear and then the gears must grab each other , and not push away from each other. This problem can be solved very simply; use a cutting stone or grinder to sharpen the worn teeth at an angle as shown in the photo, and the gearbox of your motorcycle will start working like new.
“Pressed standard” or force “Minsk”
More than once on our website questions have been asked about the “fine-tuning” or, as they say now, “tuning” of Minsk-made engines. “How do I make this engine work?” “How to improve its performance and how to increase power?” You will find answers to these and other questions in this article.
This article was published in MOTO magazine in 1994, but to this day the information in this article is valuable for most owners of Minsk engines, for which many thanks to the author! I also want to thank the user of our site Urfin for finding this article and sending it to me. Unfortunately, the article was in the form of a heavily packed graphic file, so the text had to be rewritten manually, and the drawings turned out to be of poor quality, for which I apologize, I did everything I could...
“A pressed standard” For many motorcyclists, “Minsk” has become a “school desk”. A considerable number of these motorcycles, still in relatively good condition, are simply abandoned in garages and sheds. However, they can still serve, for example, as an ideal object for acquiring skills and testing various technical solutions. Today, Vladimir Turaev, a karting driver and motocross racer from Pavlograd, shares his experience in fine-tuning the Minsk engine. Its option is interesting, first of all, for its accessibility. Of course, you shouldn’t expect too much from the engine - at best it will produce 15 hp. But at the same time, it becomes more economical, and perhaps even more durable (due to the thoroughness of the work). Another advantage of the proposed path is the possibility of “partial” modification of the engine, in proportion to one’s strengths and capabilities. Naturally, the results will also be partial. Please note that work on the cylinder must either be completed completely or not begin at all; similar situations with the cylinder head and with the crankshaft-crankcase pair. In addition, you should not tinker with the crankshaft if the cylinder is not finished first. The last thing to remember is that the success of a job is proportional to the thoroughness of its execution. Carelessness can easily ruin all your hard work. Do not ignore the warnings, treat the matter carefully!
To paraphrase Gogol, we can say: “And what Russian (read: Belarusian, Ukrainian, etc.) doesn’t like a powerful engine!” I bring to your attention my version of the “pressed standard”. This is a Minsk engine with minimal modifications to original parts. Making a “cool” motor on your knees is, to put it mildly, difficult, so be prepared to use machines, devices, and, most importantly, ingenuity and plumbing skills. Because tuning engines is a matter bordering on art. First, let's determine its condition. If it’s new and broken in, great! If it’s old, that’s okay too - tighten the belt, buy a crankshaft, a piston with rings, bearings and seals (seals).
Cylinder The liner of the Minsk engine is poured into the jacket and it is impossible to turn it or press it out, therefore, to ensure that the windows in the liner coincide with the channels in the cylinder jacket, one must remove the metal. Remember that the thickness of the walls of the cylinder jacket and crankcase neck must remain at least 3 mm. Processing canals is a rather labor-intensive process, and a drill with a set of cutters, abrasive cutters and various scrapers (flat, triangular) can make it easier. The ultimate goal of refining the purge channels is to achieve their symmetry and high surface cleanliness. It is not necessary to polish the channels, but their surface should be smooth both in appearance and to the touch. Remember, do not change the height of the upper bypass windows - this may degrade engine performance if the other windows are not changed accordingly. In addition to the upper windows, the vertical blowing angle in the bypass channels should also remain unchanged. My technique for measuring angles is as follows. From a soft wire with a diameter of 2-3 mm I make a “stick” with a tip bent almost at a right angle, 10-12 mm long, and by inserting this tip into the purge channel, I ensure that the “stick” fits both to the “ceiling” of the channel and to the mirror of the cylinder . I determine the horizontal angles of the blowing again with a “stick”, but this time I apply it to the side walls of the channel, and the curved tip indicates the place where the channel exits the back wall of the sleeve. (In reality, you will need a set of clubs of different lengths - ed.) Value "A"
For many motorcyclists, “Minsk” has become a “school desk”. A considerable number of these motorcycles, still in relatively good condition, are simply abandoned in garages and sheds. However, they can also serve, for example, as an ideal object for acquiring skills and testing various technical solutions. Today, Vladimir Turaev, a karting driver and motocross racer from Pavlograd, shares his experience in fine-tuning the Minsk engine. Its option is interesting, first of all, for its accessibility. Of course, you shouldn’t expect too much from the engine - at best it will produce 15 hp. But at the same time, it will become more economical, and perhaps even more durable (due to the thoroughness of the work). Another advantage of the proposed path is the possibility of “partial” modification of the engine, in proportion to one’s strengths and capabilities. Naturally, the results will also be partial. Please note that work on the cylinder must either be completed completely or not begin at all; similar situations with the cylinder head and the crankshaft-crankcase pair. In addition, you should not tinker with the crankshaft if the cylinder is not finished first. The last thing to remember is that the success of a job is proportional to the thoroughness of its execution. Carelessness can easily ruin all your hard work. Do not ignore the warnings, treat the matter carefully! To paraphrase Gogol, we can say: “And what Russian (read: Belarusian, Ukrainian, Kazakh, etc.) doesn’t like a powerful engine!” I bring to your attention my version of the “pressed standard”. This is a Minsk engine with minimal modifications to original parts.Making a “cool” motor on your knees is, to put it mildly, difficult, so be prepared to use machines, devices, and, most importantly, ingenuity and plumbing skills. Because tuning engines is a matter bordering on art. First, let's determine its condition. If it’s new and broken in, great! If it’s old, that’s okay too - tighten the belt, buy a crankshaft, a piston with rings, bearings and cuffs. Cylinder The liner of the Minsk engine is poured into the jacket and it is impossible to turn it or press it out, so the windows in the liner must be aligned with the channels in the cylinder jacket by removing the metal. Remember that the thickness of the walls of the cylinder jacket and crankcase neck must remain at least 3 mm. Processing the channels is a rather labor-intensive process, and a drill with a set of cutter cutters, abrasive cutters and various scrapers (flat, triangular) (Fig. 1) will make it easier (Fig. 1). The ultimate goal of refining the blowing channels is to achieve their symmetry and high surface frequency. It is not necessary to polish the channels, but their surface should be smooth both in appearance and to the touch. Remember, do not change the height of the upper passage windows - this may degrade engine performance if the other windows are not changed accordingly. In addition to the upper windows, the blowing angle in the passage channels should be left unchanged and vertical (Fig. 3). My technique for measuring angles is as follows. From a soft wire with a diameter of 2...3 mm we make a “stick” with a tip bent almost at a right angle, 10...12 mm long, and by inserting this tip into the purge channel, I ensure that the “stick” fits both to the “ceiling” of the channel and to the mirror of the cylinder (Fig. 4). The horizontal angles of the blowing are determined again with a “stick”, but this time it is applied to the side walls of the channel, and the curved tip indicates the place where the channel exits the rear wall of the sleeve. (In reality, you will need a set of clubs of different lengths - ed.) The value “A” (Fig. 5) of the displacement of the apex of the angle from the longitudinal axis of the sleeve ranges from 0 to 10 mm and should be the same for both channels. Value “B” (Fig. 5) - the distance from the edge of the outlet window to the leading edge of the bypass window is also one of the values for controlling the symmetry of the channels. The leading edge of the bypass window must be sharp (see Fig. 5, callout 1) so that the purging jet “comes off” from the channel wall without turbulence. The lower edge of the upper purge window should be filed along a radius approximately equal to the thickness of the liner so that the purge jet is tangent to the surface of the piston at the point of separation from the window (Fig. 3). The upper edge of the lower bypass window should also be filed along the radius (Fig. 3). Due to the fact that the holes in the cylinder jacket are much larger than the diameter of the studs, displacement and, therefore, mismatch of the bypass channels along the mating plane of the cylinder is possible. To ensure unambiguous assembly, a stud with a centering collar is made (Fig. 6). The stud material is 20 steel. Check that the cylinder skirt fits freely into the crankcase assembled without a gasket. If not, use a scraper to remove excess metal in the crankcase neck. The sleeve should fit in without tension. Now you can adjust the cylinder jacket to the centering pin. The bypass channels at the jacket-crankcase connector are adjusted using a template that follows the contour of the jacket bypass channels. Under no circumstances should the sleeve skirt block the bypass channels. If there is a jumper, remove it and adjust the windows in the sleeve according to the windows in the crankcase. Unlike bypass windows, the outlet window can be “sawed” a little, but only to level the surface. It is important that there is a smooth, step-free transition from a round diffuser to a rectangular, rounded exhaust window. The exhaust channel must not only be well aligned, but also be polished, which will reduce gas braking at the outlet to a minimum. By filing the upper and lower edges of the window, you can give it an oval shape (Fig. 7). Chamfers (Fig.
 both on the exhaust and on the upper bypass windows are softened by the transition of the piston rings through their transverse edges. The piston rings should also be chamfered (Fig. 9), preferably on a diamond wheel, as it provides low roughness. The rings should be coated with matte chrome with a thickness of 50...80 microns (µm). The gap in the ring lock should remain the same - file it down to 0.2...0.3 mm. The surface of the cylinder liner is processed by grinding, honing or lapping. Surface roughness Ra 0.32, deviation from cylindricity up to 0.01 mm. The gap between the piston skirt and the cylinder mirror of 0.04...0.05 mm is measured quite accurately using a set of feeler gauges. Piston The windows in the piston skirt must match the windows in the liner skirt. All edges on the piston skirt have a radius of 0.5 mm. At bottom dead center, the piston should not cover the lower edge of the upper bypass port. Otherwise, either the flats are removed (Fig. 10), or the piston head is machined along a radius of 70 mm to the required amount. The piston bottom after grooving should be no thinner than 5 mm. Since the connecting rod is centered along the cylinder, process the ends of the bosses on a milling machine (Fig. 11). Dimension “A” for both bosses should not differ by more than 0.1 mm. Washers pos. 4 are made of steel 40X, heated to a hardness of 45...50 according to NRSa and ground from the ends. The piston pin is lightened by grooves on the cone (see Fig. 11). The length of the inner cylindrical part should be 2...3 mm greater than the length of the rollers of the upper needle bearing. The wall thickness at the ends of the pin is 1...1.5 mm. When reworking your finger, protect its working surface from damage.
 Download explanatory photos
Explanations for photographs: Fig. 1 To work, you will need a “Gnome” drill with a set of cutters and abrasive stones. Rice. 2 In the upper purge window, the protrusion of the cylinder jacket is clearly visible, which needs to be removed. Rice. 3 Purge channel: 1-opening edge of the upper passage window; 2-tangent to the piston; 3-piston; 4-upper edge of the lower access window. The arrows indicate the direction of the purge jet. Rice. 4 Determination of the vertical blowing angle using a stick. Rice. 5 Working diagram for finishing the purge: 1-purge channel; 2-cylinder jacket; 3-cylinder liner. Rice. 6 Additional centering of the cylinder with a pin: 1-cylinder liner; 2-cylinder jacket; 3-pin; 4-centering collar; 5-crankcase. Rice. 7 Outlet window. The thin line indicates the shape of the old window. The size of 60 mm is indicated from the upper end of the cylinder. Rice. 8 Chamfers to make the rings easier to work with. Rice. 9 Modification of the piston ring. Rice. 10 Coordination of the shape of the piston crown with purging. Remove the part of the piston highlighted with a bold line. Rice. 11 Piston and connecting rod assembly: 1-circlip; 2-piston; 3-finger; 4-washer; 5-separator; 6-connecting rod; 7-roller.
Source: MOTO 8/94 magazine
Restoring a broken tooth in a motorcycle gear
Of course, it is better to buy a new gear when a tooth is broken, but if the motorcycle is old or imported, it is not easy to find a new gear, but there is a way to restore a broken gear tooth at home. The first time I encountered such a problem with a gear tooth breaking was in my old cross-country motorcycle ChZ-250; two teeth in the first speed gear broke at once. The first time I tried to find such a gear, but I couldn’t find it, and it became very disappointing that because of two broken teeth, my ChZ-250 was at least thrown away or sold for metal. I thought for a long time and decided to try to restore the broken teeth by welding, everything worked out and the ChZ-250 has been running for several years and so far there are no problems with broken teeth. Now I will explain the whole process of restoring broken gear teeth at home without special machines, you will only need welding and a sharpener with a cutting stone or a grinder.
Let's start, in the photo you can see a broken gear tooth on a Minsk motorcycle
Photo. Next, I weld and use electrode No. 3 to replace the broken tooth. I weld in 4-5 passes and after each pass I beat off the welding slag with an electrode, so you should get a metal bulge in place of the broken tooth. After welding, I immediately cool it in water so that there is a slight hardening. But since I’m not a professional welder, it doesn’t look very good, but that’s not important, the main thing is to weld more metal.
Photo. Next, I grind the area on a cutting stone and try to give the appearance of a gear tooth, checking with another gear how the gear fits. You can see the completed work on restoring the gear tooth.
Photo. An important point, since I don’t have a tooth cutting machine and I do everything by eye, of course I can’t grind a perfect gear tooth. Therefore, I grind the tooth slightly thicker than the standard one, and since this tooth is made of softer metal, it rolls as it should while working in the gearbox. The main thing is that after the motorcycle box has been assembled, the gear should, albeit tightly, scroll in the place of the restored tooth, but not jam. A gear with a welded tooth will roll in very quickly.
The gear fork lights up and knocks the speed out of the motorcycle. Video.
Appearance tuning Minsk
Every Minsk 125 owner has at least once thought about the appearance of his motorcycle.
Perhaps we should start by repainting the frame and other parts of the motorcycle. The first thing to do is remove the handlebars, seat, tank, engine, wheels, fork and other parts to leave a bare frame. Sandblast the parts to be repainted or remove the old paint layer using special attachments for an angle grinder/drill. An attachment on a drill for an emery wheel with Velcro is also very effective for this. Be sure to get rid of pockets of corrosion. The next stage is puttying. This is necessary to get rid of deep scratches and level the surface. Parts with a leveled surface are degreased to prepare for priming. Apply primer in 2 layers. The dried soil should be sanded with 400 grit sandpaper. Then we paint it in the color we like in 2-3 layers, followed by a layer of varnish in 3 layers. The metallic color on your Minsk 125 motorcycle will look very impressive. Source