How interesting it is to collect your own collection of paper cars and for this you only need a color printer, desire and time)
In the article you will find not only layouts and diagrams of machines for printing, but also learn interesting facts about the cars provided and you will be able to see the history of creation .
Making a paper car is quite simple, for this we need:
Tools and materials:
- Printer (preferably color)
- Scissors
- White paper
- Glue
Video instruction:
Paper cars from the times of the USSR:
VAZ 1111 diagram
To save an image of the car, right-click on it and click “Save image as...”.
Interesting facts: Oka was designed as a car for the disabled. At the beginning, they planned to make the car based on a motorized stroller. Produced from 1987 to 2008.
Zhiguli 2101 car template for printing
Facts: The Kopeyka was recognized as the best domestic car of the 20th century according to the results of a 2000 survey conducted by the Za Rulem magazine. From 1970 to 1988, 4.85 million cars were produced.
Car VAZ 2102 (template)
Do you know? Based on the VAZ 2102, from 1980 to 1981, 47 electric vehicles were created, which were called VAZ 2801.
Diagram of the Zhiguli 2103 car
Facts: The car was developed jointly with the Italian company Fiat. The basis of this model was the Fiat 124. The first 518 VAZ-2103 cars were manufactured in 1972, but they did not go into retail sale; they were bought by VAZ employees, as well as employees of other factories that were involved in production. Produced from 1972 to 1984.
Lada 2104 car diagram
Interesting facts: For the first time, the VAZ-2104 introduced an innovation that went into mass production and was available to citizens of the USSR - heated rear window and rear wiper. Previously, this was used only for cars that were exported.
| Start of release: | 1984 |
| Ending: | 2012 |
Car model VAZ 2105
From the history. For the first time in the USSR, the “five” used a timing belt instead of a conventional chain. Although the “five” was produced a year longer than the “six”, there were twice as many “sixes” produced.
| Start of release: | 1979 |
| Ending: | 2010 |
2nd option, racing car
Zhiguli 2106 car diagram made from paper
Interesting fact: Rightfully one of the most popular cars of the USSR. Over all, 4.3 million cars were produced. A luxury version called LADA 1300 SL was produced for export; this modification was equipped with an oil pressure sensor. A right-hand drive version was also produced, number 21062.
| Start of release: | 1976 |
| Ending: | 2006 |
Lada 2107 template for printing
Facts: VAZ 2107 is an improved modification of the VAZ 2105. This car was exported under the names Lada 1500, Lada Riva, Lada Nova, Lada Signet.
VAZ 2108 template
Did you know? Some parts and components of the eight were developed jointly with Porsche.
| Start of release: | 1984 |
| Ending: | 2010 |
2nd Varant, racing model
VAZ 2109 diagram
Interesting: A version for the European market was assembled at the Finnish Valmet Automotive plant from 1996 to 1998. The model name was Lada Samara Baltic. It featured a more modern front fascia and also offered an airbag as an option.
| Start of release: | 1984 |
| Ending: | 2010 |
VAZ 2110 car scan
Interesting: the first test copy of the “ten” appeared back in 1985, but mass production began only in 1995. The model was produced until 2007 and it was possible to install electric windows and power steering.
VAZ 2111 diagram
Did you know? This model was produced not only in Tolyati, but also in Cherkassy.
Car VAZ 2112
VAZ 2114 car diagram
Did you know? VAZ 2114 was assembled not only in Tolyati, but also in Zaporozhye.
| Start of release: | 2001 |
| Ending: | 2013 |
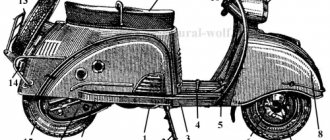
How to make a motorcycle
To figure out how to make a motorcycle out of paper, you should familiarize yourself in detail with the diagram of the technique, carefully cut out all the necessary elements from paper, and assemble the craft step by step.
Required materials and tools
Before you start making a motorcycle out of paper with your own hands, you should prepare all the materials for work:
- colored and white paper;
- a simple pencil for tracing;
- scissors or stationery knife;
- tape, glue, stapler.
To make an applique on the base, you need cardboard, frames (for decoration), braid or rope (for hanging), or a stand (for installation). You may need wire, toothpicks and other small elements to better secure the parts of the entire structure.
Step-by-step assembly of a three-dimensional craft from modules
An original craft made using the technique of a modular origami motorcycle, upon completion of the work, will become a real decoration of the collection.
The step-by-step assembly, according to the diagram, is as follows:
- Wheels are assembled from white or gray paper modules - 8 pieces are fastened together. first row, then the next row in the same quantity. You need four such blanks for 2 wheels.
- A bus is created from the black modules - 1 and 2 modules are alternated, thus 54 elements are closed in a circle. They do two things.
- White blanks (step 1) are inserted into the tires - two in each. If necessary, use glue.
- The front fender is assembled from 16 rows of modules according to the color of the selected motorcycle, alternating 3 and 4 pieces. in a row. In the 17th row - 2 pcs., in the 18th row - 1 pc. The workpiece is given a curved shape.
- Create a front fork according to the selected color (according to the VTs) - 23 pcs. insert one into the other, you need 2 such blanks.
- Windshield - assembled (according to the VTs) from five rows, in each of which there are respectively 6/5/6/5/4 modules.
- Frame parts 2 pcs. They are assembled from 40 modules each - inserting into each other, and bending into a wave.
- The gas tank is made of 7 rows - 4/5/6/5/6/5/4 pcs. Accordingly, they are glued for strength.
- A straight part for the base is created from 33 rows, alternating - the first row is 3 pieces, the second is 4 pieces.
- Motorcycle parts are assembled from modules. To do this, holes are made at the base of the forks (2 pieces) with an awl. A toothpick or match (cut to 0.7-08 mm), sharpened at the edges, is inserted into the holes on the glue. Next, put a wheel on the forks with toothpicks and secure them with glue.
- An element is assembled from three rows of modules, 5/6/7 pieces each, and connected to the wing and the upper part of the forks.
- Glue the tank.
- Holes are made on the curved frames at the bases and the rear wheel is also attached (with a toothpick).
- Blank for the base of 33 pcs. Fixed to the gas tank exactly horizontally, towards the rear wheel.
- An element is assembled from six rows of modules - 6/7/6/5/4/3 pcs. Then another 12 rows of alternation are added to it - 3/2 pcs. In the last row 1 piece. This blank is fixed with glue to the bottom of the structure.
- Create additional contrasting elements (2 pcs.) in six rows, alternating 1 pc. and 2 pcs. Glue them under the gas tank, creating a more similar three-dimensional appearance.
- Of the three red modules, the rear brake lights are imitated, and at the front of the frame, two additional modules of the primary color are added on each side - these are the steering wheel.
The original, beautiful and spectacular motorcycle model is ready. If desired, you can add designs imitation pedals, rear-view mirrors, headlights, reflectors, trunk, and even a round helmet.
Video master class
Video preview, layout drawing and step-by-step assembly simplifies and speeds up the work on paper crafts.
Origami with a simple diagram
Even a child can assemble a simple origami motorcycle, under the guidance of an adult. The craft can be assembled from colored paper, and individual parts can be painted with felt-tip pens or paints.
The finished durable model will look impressive. Let's look at how to make a motorcycle model correctly step by step:
- a square of colored paper is folded diagonally on both sides, followed by straightening;
- bend the square in the middle, do the same twice;
- now fold diagonally and bend to the left along a straight fold;
- then the next corner is the same, then straighten the pocket;
- in the resulting reduced square blank, bend the edge of the side towards the middle - on one side and on the other;
- the workpiece is turned over from the bottom up, and the side corners are folded again towards the middle, then the bottom corner towards the middle;
- straighten the folds, straighten the workpiece and bend the outer sides towards the middle;
- fold carefully, also repeat on the other side;
- the workpiece is pulled to the sides by the corners, stretching;
- the free triangles in the middle are bent down, the workpiece is unbent, and the corners of the side triangles are bent inward;
- the workpiece is placed on the table with sharp corners in the middle up;
- each of the corners is bent at an angle, sharp tips, folded downwards, then horizontally;
- the blunt right edge is carefully straightened, giving a rounded wheel shape (along the folds);
- Take out the folded element at the left edge, straighten it, and make a small fold on the base;
- give a rounded shape to the left edge (wheel);
- small folds and folds are made inside the base;
- straighten the curved sharp corners in the middle - this is the steering wheel.
The craft is ready. It can be additionally colored with a felt-tip pen, highlighting small elements.
Reamers for cutting and gluing
One of the very common and especially favorite options for children is making crafts with your own hands from a ready-made motorcycle template. This option is interesting both in the creative process itself and in the subsequent possibilities. You can play with crafts, creating many different models, or collect a collection, which is very common among adult amateur craftsmen.
The developments are carefully cut and assembled, glued in the required order and sequence, according to the numbering. The result is a very durable and believable model of a motorcycle of reduced dimensions.
Development of a Japanese (racing) motorcycle
Applications for children
Even a small child can make a bright, beautiful craft with his own hands from colored paper. It is necessary to think over the composition in advance, whether the motorcycle will be on the road, or on a green lawn, near a tree, or some other object will be next to it. Next, the paper motorcycle applique is made in stages:
- They draw, then cut out all the details and components of the future picture from paper.
- On the base (made of cardboard) all the elements of the application are placed in the right places.
- Carefully fix the motorcycle and other panel parts using glue.
- Small elements are completed with paints, felt-tip pens, or, if desired, cut out of colored paper or foil.
The finished work can be mounted on a pedestal, placed in frames, or hung on a rope, braid, or thin chain.
Foreign cars. Machine diagrams.
Chevrolet Camaro made of paper
Paper diagram of a Subaru BZR racing car
Mazda 2 car template
Mazda 3 car scan
Mazda 6 car template
Mazda Cosmo Sport car drawing
Mazda B-Fighter printable template
Mitsubishi Lancer Evolution car diagram
Mitsubishi Lancer Evolution X paper car drawing
Mitsubishi Outlander car diagram
Paper diagram of Mitsubishi Pajero Dakar
Mitsubishi Triton car
Paper model of Audi A3
Bobcat XL machine diagram
Citroën Ami 6 printable diagram
Citroen drawing
Daihatsu Terios car
Paper printout of FIAT 147
Paper diagram of FIAT 600
Ford Kuga car template
Paper Mercedes Benz printout
Mercedes-Benz e-class cars
Mercedes-Benz Lorinser
Mercedes-Benz W124 diagram
Mercedes-Benz W210 made of paper
Cutting templates
The use of ready-made templates significantly saves time; you do not need to make a drawing yourself or calculate dimensions, which, when designed independently, cannot always guarantee the joining of parts of the entire structure. All you have to do is choose the option you like, print it out, and start the creative process - the craft is always successful on the first try.
Thus, a self-made motorcycle from cardboard or colored paper is an original, spectacular craft. Guided by diagrams, videos and step-by-step assemblies, the motorcycle structure will be easy to assemble. And the finished model of equipment will delight the eye for a long time, adding to the collection of crafts.
Trucks
UAZ-3303 truck made of paper
Truck UAZ-452
KAMAZ truck made of paper
Truck GAZ-69 (diagram)
Hello. Everyone deals with motor toxicosis differently. Someone is rebuilding their motorcycle, someone is setting up a garage... I, having neither one nor the other, decided to make a model of a two-wheeled vehicle, not from beads, but from a common material for modeling - paper. A couple of years ago I finished modeling, because I’m not good at this whole thing (and in general, after looking at my models, they sent me to kindergarten), but now the need arose to give a gift. And the best gift is a gift made with your own hands. Remembering how I once made paper cars, I decided to make a motorcycle. But not simple, but more or less working. For practice, I glued together a model of a Heinkel 162 airplane, this is one of the first jet fighters. And then he got to work. There will be no gluing and cutting process, only an assembly process. It all started with the engine, which according to the plan was supposed to turn the crankshaft, move the pistons back and forth, and open/close sixteen valves. In the process of moving, the model was destroyed, there were problems with the life of the crankshaft (since it is only a couple of millimeters thick), the issue of the timing drive arose, but nevertheless, I assembled it. After which, having redrawn it on paper, I finished drawing the rest of the motorcycle. Here is this drawing: It was from this that everything was cut out (well, I also looked at the picture of the Suzuki GSX1400). So, let's start assembling our own paper motorcycle. Here are all the parts we need to assemble a classic motorcycle: We begin assembly from the rear wheel: The pendulum, wheel and brake caliper are in their places. Here is the frame: We connect: Mono-shock absorber (it works, but we should have made two mono-shock absorbers - the weight of the motorcycle turned out to be greater than I thought, and therefore it breaks through): Well, and attach it to the frame: Next is the engine: Crankshaft with connecting rods: Pistons: Pistons move: Timing belt. The valves and camshaft are visible. Let's attach the timing belt to the CPG: This is the spark plug Oo: All four spark plugs take their places in the spark plug holes: And this is our exhaust manifold. Part-time - direct flow. We attach it to the engine: Like this: These are four carburetors with zero-resistance filters: They take their place in the intake manifold.
Let's put the engine aside. Let's take care of the front suspension. Front wheel: The stays have taken their position: So the calipers have joined: Parts for assembling the fork: Assembled fork: Assembling the front suspension: And now let's start assembling the three parts of the motorcycle, without which it has nothing to do on the road: the frame with the pendulum, the engine, and the front pendants. We’ll also install the headlight: We’ll install the gas tank: The seat: Installed... Yes, it opens: But there should be electronics under the seat. For this we have a battery: Well, let’s not forget about the wiring: Let’s install the tail: There is a brake light =) The assembly is almost finished. All that remains is to install the clip-ons: A gas tank flap to prevent gasoline from spilling: A radiator to prevent the engine from overheating: High-voltage wires to give a spark to the engine: Well, let’s install the instrument panel. As a result, we got a classic motorcycle with an atypical high tail. The wheels are spinning, the engine is running, the front suspension is working, the rear suspension is working too, the hatch opens, the seat opens. The steering wheel naturally turns. There was a prototype of working brakes, but it got lost during a move. Unfortunately, there is no timing drive: the valves and cylinders move separately. And you don’t have to be particularly attentive to notice that there is no chain or stars. RESULT: Of course, everything is also taken apart and put back together again many, many, many times. The plans are to make a streetfighter: A streetfighter with a V2: A cruiser, and perhaps a cruiser with a V18: And where there is a V18, it’s not far from creating a hot rod. Of course, they will use existing parts, they will all be interchangeable.
Thank you all for your attention! I'll post a video of the entire construction soon. PS Well, this is a terrible job: uploading photos from a modem to a website... Of course, I’m a lousy modeler.
Buses (printable diagrams)
DIY Motorcycle
Children's crafts Motorcycle
To make a motorcycle, you will need:
cardboard, paper, 4 caps from drinking water bottles, tape, stapler, foam rubber, 2 cocktail straws, Kinder surprise egg, food foil, PVA glue, toothpicks.
Draw a motorcycle frame on cardboard. We mark the locations of the wheels. Cut out the motorcycle frame.
We make the motorcycle frame from thick packaging cardboard from three identical parts for strength. Cut holes for the wheel axle.
We put the motorcycle frame parts together and fasten them with a stapler. We mark on the frame the place where the gas tank is attached (a Kinder Surprise egg) and cut out the excess cardboard.
Wrap the Kinder Surprise egg in foil. Attach the gas tank using tape. We roll a cylinder out of paper (an axle for wheels) and glue it together.
We insert the wheel axle into the hole on the motorcycle frame and fasten the wheels. We do the same for the second wheel. If necessary, secure the wheels with tape.
We pierce the motorcycle frame with an awl, insert a toothpick and put plugs on both sides of the frame - this is the motorcycle engine. We cut the toothpick.
We fold two cocktail tubes, cut them, fasten them together with tape and put them on the motorcycle frame - this is the steering wheel. We make 2 cylinders from paper with a diameter of a pencil and a length of about 7 cm.
We wrap the cylinders in foil - these are motorcycle exhaust pipes.
We attach the exhaust pipes to the motorcycle frame using tape. The motorcycle seat can be made of foam rubber and secured with toothpicks. The motorcycle is ready.
moyamamma.ru