How to make an ATV with your own hands is a difficult and responsible task, but feasible for a master who has mastered welding and turning. The effort and time spent are paid off not only by large savings, but also by the result obtained - an exclusive, original model of a quadric that no one else has.
Features of assembling a homemade vehicle highly depend on the chosen base - the engine and other elements that are used by the craftsman.
6 best options for a base (“donor”) for those who have set the goal of how to make an ATV.
- Motorcycle "Ural".
- Motorcycle "Izh".
- Motor scooter "Ant".
- Another motor scooter (scooter).
- Car "Niva".
- Oka car.
Most often, some structural elements are taken from a motorcycle, others from a car.
In addition to the parts (components) for the quadric, its creator will need:
- assembly “shop” - a fairly spacious garage equipped with good heating and lighting will be useful in this capacity;
- a set of equipment and tools;
- blueprints.
You may also be interested in an article from our specialist, which talks about how to make a mobile home with your own hands.
Preparation for work, tools and equipment
First of all, you need to carefully consider when, where and for what purposes the future ATV will be used - hunting and fishing, motorcycling in nature, transporting goods, etc. It is on this basis that you need to make a choice of a “donor” vehicle, deciding how powerful the engine is needed, what kind of suspension is suitable, what kind of trunk, etc.
You can take ready-made drawings from the Internet, create them from scratch yourself, or combine both options and ready to remake them at your own discretion.
List of required tools:
- welding machine;
- Bulgarian;
- drill;
- a set of keys;
- various small tools - calipers, hammer, knife, screwdrivers, pliers, etc.
To make your own frame, you will also need equipment for bending pipes. If you don’t have one, you can rent it or outsource the necessary work to another craftsman. Only with remarkable skill can you bend the pipes manually by heating the bend with a gas cutter or torch.
Quad components:
- engine;
- frame;
- rear and front suspension;
- steering;
- brake system;
- cooling system;
- muffler;
- electrical equipment - battery, headlights;
- body, body kit
It is strongly recommended to purchase a brake system either completely new or from a vehicle with the shortest mileage. Using old brakes is too dangerous.
It is quite possible to make a muffler yourself. Everything else is to purchase used parts on the shadow market.
Features of frame development
The dimensions of the ATV frame depend on the power of the installed engine and the number of people it will carry. The optimal length is in the range of 1600-2100 mm, and the width is 1000-1300 mm. The long frame will have to be reinforced with additional rigid elements so that it does not break while riding. A frame that is too wide will experience lateral loads, but the ATV will be more stable when cornering.
An increase in the number of stiffeners will lead to an increase in weight, which will negatively affect the dynamic characteristics of the ATV and will require the installation of a powerful engine.
For pleasure walks on asphalt, you can neglect the excessive rigidity of the structure, giving preference to a low-power engine. Lightweight touring ATVs for adults have small dimensions and a lightweight design, but there are more fasteners on the frame to expand functionality - installing luggage racks.
Parts selection
ATV frame
Depending on the “donor” and the design of the quad, you either have to make the frame yourself, or you can reconstruct a finished, used one.
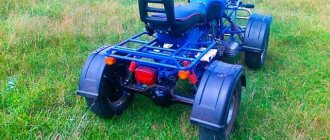
The most important thing is that the engine is securely bolted to the bottom along the frame, which can be located either front or rear. The transmission and drive should also be firmly attached to the frame to avoid play.
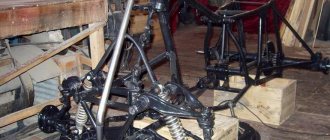
Homemade frame
The material used is ordinary water and gas pipes with a wall thickness of no more than 3 mm:
- for spars - 25 mm;
- for crossbars and struts - 20 mm.
The pipes are connected using spot welding, followed by solid welding. Ears for attaching shock absorbers and levers are welded to the frame immediately. Brackets - during installation of units and components.
Reconstruction of an existing frame
To reconstruct a finished frame, you should remove everything, leaving the frame, dismantle the back part and build up the front. Then weld elements for fastening a complete set of components and assemblies of the ATV. When reconstructing a motorcycle frame, the seatposts should be moved back by 40 - 45 cm.
The front and rear luggage racks are cut out of a metal sheet and welded to the frame. Finally, the finished frame is painted; there is no need to varnish it.
Additionally, we recommend reading our expert’s article on how to choose a roof rack for your car.
We also recommend reading our specialist’s article, from which you will learn how to select and install a box on the roof of a car.
Engine
The engine is suitable for a car, motorcycle or scooter. Some “Lefties” even construct an ATV from a walk-behind tractor with their own hands, since newer models are equipped with four-stroke engines, the power of which in heavy devices reaches 15 “horses” - versus 11 hp. "Ant."
The engine of a scooter has the advantage of low fuel consumption; in addition, the scooter-based quad is the lightest, which makes it easy to pull it out when stuck in mud and sand. But a quad to transport cargo and/or drive off-road requires a more powerful engine.
The engine power of the Izh-1, Izh-2 and Izh Jupiter is 24 hp, the old Ural is 32 or 36 hp, the two-cylinder engine of the old Oka is 35 hp. , a three-cylinder car of a later release - 53.
To travel in hot weather, the ATV needs a cooled engine. Cooling was not installed on older motorcycles, so you will have to pick it up (for example, from a VAZ 2108 will do) and install it.
Suspension
The suspension can be used both rear and front. The easiest way is to take the front one from a motorcycle.
2 rear suspension options:
- The rear axle of the car, shortened to fit the dimensions of a quad. The advantage is the presence of a differential. Disadvantage - the design will be heavier.
- Cardan-gear design - with a gearbox mounted on the rear axle.
Please note: the quad all-terrain vehicle requires an independent suspension with high ground clearance.
The suspension arms are bolted to the frame through rubber-metal hinges - silent blocks.
The front suspension strut must be tilted, otherwise the ATV may roll over.
The shock absorbers are suitable from Izha, but if the budget allows you to purchase gas-oil shock absorbers with pumping, the driver will be able to adjust the suspension according to road conditions.
Steering and chassis
The steering system of an ATV can be based on a car - with a steering wheel, or with a motorcycle steering wheel. Some craftsmen combine both types: motorcycle handlebars, levers and shafts at the top, car tie rods at the bottom. It is advisable to take the fuel tank along with the motorcycle handlebars.
A homemade steering shaft is made from a 20 mm pipe with walls up to 3 mm. A travel limiter must be installed at the bottom.
When making a quad on a car base, it is better to replace a gear pair with a chain drive. This will greatly simplify and reduce the cost of maintenance.
We recommend a manual gearbox, since it improves maneuverability; moreover, when driving an ATV, you still have to shift the rear, low or high gear manually.
The input shafts from the gearbox must be directed directly to the rear and front axles.
The wheels are most often taken from small-sized VAZs (“Oka” or “Niva”) and are shod with tires that correspond to the operating conditions (weather, terrain, etc.). The brake system is selected depending on the wheels. The steering knuckles are also from Niva or Oka.
Four-wheel drive
All-wheel drive ATVs are characterized by particularly good cross-country ability - of course, if they have a fairly reliable engine and studded tires (read about the law on winter tires).
If you choose a four-wheel drive vehicle, vehicle steering, differentials, and a manual transmission are required.
The existing frame will not fit in this case; a new one should be welded to suit the engine size.
The suspensions, like the steering system, must be taken from the car. On the front it is necessary to provide space for installing the gearbox.
Installing an all-wheel drive model requires not only special skills of the craftsman, but also additional labor costs. The alternative is to buy a ready-made all-wheel drive unit - it costs money.
Frame
Making the body is far from the simplest stage of the story called “how to assemble an ATV with your own hands.” Suitable materials are fiberglass and fiberglass; it is easier to make a body kit from the second.
First, you need to draw, cut and construct a “blank” of the body from pieces of durable foam plastic, glued or fastened with polyurethane foam. Then apply several layers of fiberglass on it, coating each with epoxy resin and inserting metal fasteners between them to attach the body to the frame. In conclusion, dry the body thoroughly, then prime, sand and paint.
Alternative designs
As an alternative, take a ready-made old motorcycle frame of the Ural or IZH type. It is preferable to use the load-bearing elements of a heavy Dnepr motorcycle, since they are designed for heavy loads. For extreme driving conditions over rough terrain, it is better to use car frame parts from a small car, for example, Oka. And if you take the frame from the Ant scooter, the assembly result will not be long in coming.
The advantage of remaking factory frames from a motorcycle or small car will be the presence of its number, which is needed when registering the vehicle with the traffic police. Otherwise, the homemade ATV cannot be used on the roads, and its transportation will require a car trailer.
Stages of assembling an ATV
To create a homemade ATV with your own hands, you need to go through 9 stages of work step by step:
- Acquisition and preparation of everything necessary;
- Welding (alteration) of the frame;
- Installation of suspensions, brakes, chassis, shock absorbers, wheels;
- Installation of engine, gearbox, drive assembly;
- Installation of the fuel system;
- Installation of electrical equipment - turn signals, headlights, dashboard, battery;
- Case manufacturing;
- Priming, sanding and painting the body, (if desired) sophisticated custom tuning;
- Installation of the body and seat.
After the final stage, the finished miracle of home-made equipment will need to be thoroughly tested, gradually making road (and off-road) conditions more difficult.
Steering
The most difficult part of making an ATV frame will be welding and assembling the steering. The steering column must be firmly attached to the frame, being its integral part. It is best to use a ready-made motorcycle steering wheel, onto which levers with silent blocks are hung. Since the steering is subject to constant shock loads when hitting bumps and holes, additional stiffening ribs will not be superfluous.
The advantage of installing prefabricated parts is that you use the exact factory parts, while making them yourself can lead to sizing errors. Minor deviations from symmetry will lead to uncontrollability of the ATV at high speeds or during aggressive driving. To weld the front part of the frame, profiled pipes are used, their bending strength is higher.
Frame and suspension
The frame for a homemade device is usually made independently from scratch. You can use blanks from an old motorcycle as material for the frame. The pipes from which they are made are lightweight and have the necessary strength and flexibility. As a last resort, you can choose the material yourself. The main parameter here will be weight. Excessively thick tubes or profile will make the ATV very heavy and difficult to ride quickly and maneuverably.
For suspension, you can use shock absorbers with springs from the same motorcycles. The suspension itself is shaped like the letter “A” and is movably mounted on the frame. Shock absorbers and springs should be selected in such a way that they can withstand the weight of the future car and ensure a smooth ride with good control over bumps and holes.
Steering and wheels
The steering can be partially used for a motorcycle, with the addition of two-wheel drive. The drive is carried out by adding levers and ball joints to the design, which can be borrowed from a car. The main task of the steering is accurate and comfortable steering.
Wheels for an all-terrain vehicle are best used from a car, as they are wider and will improve the vehicle’s maneuverability. The diameter of the wheels must be calculated in such a way that the homemade ATV can develop sufficient speed and also have a harmonious appearance.
Body and electronics
To install attachments, a gasoline tank and controls, you can use a motorcycle frame, which is structurally connected to the ATV frame. Particular attention should be paid to the stability of the all-terrain vehicle, its appearance and the comfort of the driver’s seat.
Don’t forget about installing all the necessary lighting and external alarm devices on your homemade ATV. The headlights, taillights and turn signals can easily be used from the same bike that everything else came from.
Look at this homemade ATV in action!
An ATV is a four-wheeled hybrid of a motorcycle and a tractor, a vehicle that is equally successfully used in both agriculture and recreation. Just a few years ago, Russian people considered the ATV a foreign curiosity. And today he is able to independently design and manufacture it. In addition, today a much more common occurrence in Russia are home-made ATVs, rather than factory ones. Next, we will try to figure out why it happens this way and not otherwise.
How to make an ATV from a Dnepr motorcycle
Today, Soviet-era motorcycles are not very popular and are increasingly being scrapped. This depends on the fact that it is difficult to get spare parts for repairs, and old equipment tends to break down often and constant repairs are not something any motorcycle enthusiast can withstand.
As a result, such rare units either rust in the yard or are used for spare parts. But some craftsmen have adapted to converting old motorcycles into ATVs. One of the most suitable for these purposes was the Dnepr.
- Assembly steps
- The entire conversion process consists of four stages: • frame improvement; • installation of engine and gearbox; • suspension modernization;
- • installation of body kits, painting.
- Necessary materials
To convert the Dnepr motorcycle into an all-terrain vehicle, you need to acquire some spare parts, without which it is impossible to create an ATV: • steering; • two bridges; • brake system;- • suspension.
The main tools include a grinder and a welding machine. Without them there is no point in starting construction.
Control
Before you start creating an ATV, you should decide on its control. For this purpose, a car or motorcycle can be used. In order not to complicate the design of the all-terrain vehicle, it is recommended to use the existing steering system from the Dnepr. Otherwise, you will have to buy the necessary spare parts.
Not a single project of future technology can be completed without a drawing, on which it is necessary to mark the location of all the main elements of the ATV. This will simplify assembly and make it possible to present the final result. In the end, you may end up with a powerful unit capable of driving on any road.
ATV frame
The first step is to slightly change the existing frame, which will serve as the basis of the ATV. To do this, you need to move the vertical tubes of the struts under the saddle back by 40 mm. Next you need to cut off the rear fork and weld the rear axle to the swingarm. Then you need to assemble the struts from the pipes and install them near the suspension bushings.
The front bumper and trunk can be made from a pipe with thin walls with a diameter of 30 mm. You just need to set the welding machine to minimum so as not to burn through the metal.
Suspension
Initially, you need to pay attention to the back. To modernize it, you can use several options. You can install a universal joint and gearbox from a motorcycle, which will greatly simplify the assembly process, but installing a car axle requires the presence of a differential.
For this reason, many prefer the second option and use bridges from passenger cars. Oka is an excellent donor for these purposes. Its bridge does not have very large weights, which in turn will have a good effect on the driving performance of the ATV. But even that will have to be shortened a little. This will take a lot of time and effort, but the presence of a differential will more than pay for this work on the track.
All-terrain vehicles with such axles perform much better on the road. To bring it to the required size, you need to remove the support cups and spring mounts. After this, you should take out the end flange, cut the bridge and insert it back. We connect the resulting contraction by welding. Axle shafts from Oka can be converted into a driveshaft.
The front suspension gives more design options. It makes no sense to install suspension arms from a car, since the weight of the ATV is not large enough. In this case, you can try to build the front suspension with your own hands.
This makes it possible to choose the required size and slightly reduce the weight of the all-terrain vehicle. In most cases, it is made from a metal pipe with a cross-section of 25 mm. Ball bearings from Zhiguli are used as supports.
DIY ATV
An ATV from a store is not a pleasure accessible to everyone. Therefore, many craftsmen make quadrics with their own hands. And in this article we will talk about the most interesting of them.
In making an ATV, everything that can be found in the garage and nearby can be useful. Each vehicle made by hand is unique and individual, so it is difficult to talk about drawings and diagrams.
Few people describe in detail the process of building their brainchild, which makes it extremely difficult to find specific information. But there are also exceptions.
How to make an ATV with your own hands
in 2012, the talented designer S. Pletnev shared the drawings and nuances of building his brainchild.
What was used in the design of the vehicle:
- Front and rear wheels from Niva Chevrolet 15 inches
- Engine a-m Oka
- Oka gearbox
- Inter-wheel gearboxes from the rear axles of the VAZ “classic”
- CV joint from a VAZ-2108 car, 12 pcs.
- Fuel tank 20l canister
- Passenger support from the headrest of the Oka
- Clutches from Oka
- Steering wheel from a Ural motorcycle"
- Instrument panel from Oka car
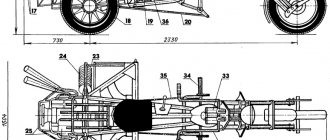
Main technical characteristics of the ATV:
| Weight | 430kg |
| Length | 2300 mm |
| Width | 1250 mm |
| Handlebar/saddle height | 1250 / 900 mm |
| Ground clearance, | 300 mm |
| Wheelbase | 1430 mm |
| Track | 1045 mm |
| Maximum speed | 65 km/h |
ATV drawings:
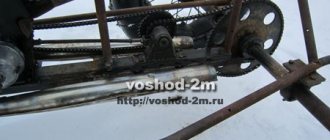
The transmission is made from AvtoVAZ units with some modifications. For example, to reduce speed and increase torque, a chain drive was used instead of the main pair.
Inter-wheel gearboxes are borrowed from the classics, the axle shafts are removed and replaced with CV joints from the front-wheel drive VAZ. Constant velocity joints are also used in other transmission units.
The suspension is independent on triangular wishbones. Shock absorbers from Oka.
Homemade muffler of 2 sections, insulated with asbestos.
The body kit is made of fiberglass. The creation of such plastic took 10 kg of epoxy resin, 1 kg of plasticizer and the same amount of hardener. 15 meters of fiberglass and 5 meters of glass mat.
The ATV body kit is made of fiberglass. I glued it for the first time, and therefore first studied the recommendations for performing the relevant work. But as it turned out, this process is painstaking, although the result is worth it.
- The bumpers and guardrails are welded from 20mm round pipes.
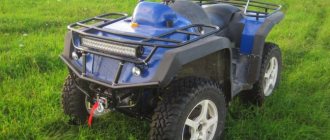
- Photo of the finished ATV:
- Material based on the article: https://modelist-konstruktor.com/razrabotki/853
ATV from a motorcycle
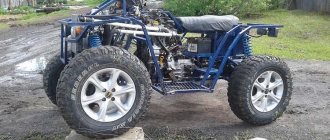
- This quad is made on the basis of the Ural motorcycle.
- All the details are in the video.
ATV with IZh Jupiter engine. Transfer case from Ant motorcycle.
ATV Cobra MIX
- Generator, forced cooling, lowering gear, electric starter from tens, engine from a Ural motorcycle.
- Video of a homemade ATV in action:
Homemade buggy "Raptor"
Homemade ATV with an Oka engine
Source: https://anarchymotors.ru/article/kvadrotsikl-svoimi-rukami.html
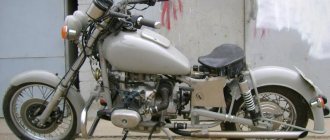
ATVs designed on the basis of the Ural motorcycle
At the moment, several decades ago, the popular domestic Urals in Russia have been replaced by much more nimble and economical foreign models. In this regard, many people have their recent best “friend” standing idle and rotting in their garages. But not a single Russian person is able to allow good things to go to waste. Therefore, “Urals” are increasingly used to create a type of transport that is relatively new for Russian people. This motorcycle is unanimously recognized by folk craftsmen as the optimal basis for creating an ATV. Homemade ATVs made from it are an order of magnitude more economical and have greater draft power than their factory-made counterparts.
The creation of an ATV based on the Ural consists of two stages: designing the rear part and the front. The use of the Ural gearbox when creating the rear part of the ATV will ensure the design not only strength, lightness, but also simplicity. In the end, the finished product will not be equipped with a differential, which, in essence, can be sacrificed in the name of reducing the time spent on its creation. As for the design of the front part of the future vehicle, it will take much more effort and time than the previous stage. Most of the work is finishing up the front arms of the ATV. This is due to the fact that they should be less rigid than a car, but more powerful than a motorcycle.
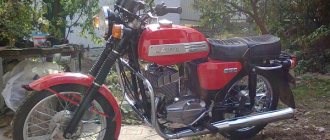
ATVs designed on the basis of the Ant scooter
For 36 years, the Soviets organized the production of Ant motor scooters. In total, over the years, 8 models have been produced, differing in gas tank volume and engine power. Today, the Ant scooter is an ideal base for creating an ATV with your own hands. In order to convert the “Ant” into an ATV, you should perform some fairly simple steps: slightly redesign the frame, work on reinstalling the seatposts, and so on. Installing the steering wheel and brakes of the future ATV will require special attention, continuous effort and time. When constructing homemade ATVs, it is strictly not recommended to use a brake system that has previously been used. It would be much safer to buy a new one. At the same time, the steering system can be used from an old Ant scooter or an Oka car. The final stage of creating an ATV from an Ant scooter is installing turn signals, headlights and stops.
ATVs designed on the basis of Oka
For 20 years (from 1988 to 2008) in the vast expanses of our vast homeland, one of the most common cars was the domestic Oka (VAZ-1111, SeAZ-11116). Today, “Oka” is one of the most popular options for vehicles, on the basis of which home-made ATVs are created. In the manufacture of ATVs, the engine, gearbox, wheels and other auxiliary parts of the vehicle are usually used. Direct installation and construction of the ATV based on the Oka car is carried out in accordance with the drawings created by experienced designers. The defining moment when creating an ATV is to formulate the purpose of its use. Based on this, the future owner of the ATV opts for one of the two existing Oka engine options (35 hp and 53 hp).