How to fix the speedometer on a scooter
The purpose and principle of operation of a scooter speedometer
The standard scooter speedometer is designed to display:
- the speed at which the vehicle is moving;
- the amount of gasoline in his gas tank.
However, such devices often show inflated speed indicators, that is, instead of the real 60 - 70 km/h, the scale will show 80 - 90 km/h. Perhaps, in this way, the creators of scooters wanted to make their technical characteristics more attractive to buyers. And, perhaps, this will protect dashing riders from speeds that are excessively high for mopeds. After all, everyone knows that the higher the speed, the worse the stability and controllability of the scooter on the road.
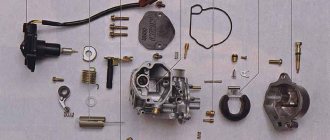
A standard scooter speedometer consists of:
The operating principle of the speed measurement system is to transmit torque from the front wheel to the speedometer magnet. To do this, a speedometer cable drive machine is installed on the front wheel, inside which gears are located. They then rotate the cable, the end of which rotates the magnet inside the cylinder to create a strong magnetic field.
Under its influence, the cylinder begins to rotate, while compressing the spring (moreover, the higher the speed of the scooter, the stronger it will be compressed). The spring, in turn, acts on the speedometer needle, which deviates to a specific indicator on the scale. This number is the speed at which the scooter is moving at a given time. If the wheel stops rotating, then the influence of the system parts on the spring stops. It unwinds, trying to take its original position, and the arrow returns to zero.
Why do you need to replace your scooter speedometer?
The first and most important reason for disassembling the speed control system and replacing the speedometer is its breakdown. If other components and parts of the system are in working order, and the arrow on the scale does not deviate, it means that the speedometer is not working for some reason (damaged or broken). In this case, it is necessary to remove it and replace it with a new one.
Another common reason for replacing a speed gauge is if it reads incorrectly. Therefore, lovers of accurate data often replace the standard scooter device with an electronic bicycle speedometer. This device allows you to:
- obtain the most accurate scooter speed data;
- determine the exact time;
- record the daily mileage of the vehicle;
- receive data on the total mileage of the scooter.
And the last reason for removing the speedometer is its tuning. Many owners, in order to refresh and update the main part of the dashboard, install additional lighting on the speedometer or replace the picture with the scale with a new and more colorful one.
Removing, disassembling, replacing and installing a speed measuring device
Dismantling the scooter speed measuring device begins with the classic installation of the scooter on the central support - the footrest. This is followed by:
- unscrew and remove the front plastic, beak and body kit around the device;
- disconnect the cable;
- unscrew the speedometer mounting bolts;
- Disconnect all wires, lights and fasteners from the back of the meter.
The speedometer must be disassembled depending on the tuning performed. If you only plan to install the backlight, you just need to remove the glass and take out the device. If your plans include replacing the picture, then you need to:
- remove glass;
- pull out the device itself;
- remove the arrows without unscrewing the cover or touching the washer. To do this, carefully take the arrow under the root with scissors and pull it out (you can warm it up a little with a hairdryer). When dismantling the arrow of the gasoline sensor, you must act very carefully so as not to bend its rod;
- unscrew the plate.
Assembling the gearbox
Wash the inner and outer surfaces of the gearbox thoroughly with a toothbrush and gasoline (until white). We replace worn parts with new ones.
Before installing the bearings, first lubricate the places where the bearings are placed with lithol, and then heat them with a burner to about 100 ° C (if you touch them with a wet finger or splash water, it should hiss). Then the bearings will calmly, without much effort, using a mandrel and tapping with a hammer, fall into place.
We assemble the shafts and all gears in the reverse order.
If the gasket on the gearbox remains intact, then we do not change it, but only lubricate it with lithol.
Carefully place all washers in their proper places. The gears must not touch the walls of the gearbox.
We fasten the cover with five bolts. Checking the rotation of the shafts. They should spin freely. Then pour transmission oil into the gearbox.
Wipe with a rag and make sure that oil does not leak anywhere around the perimeter of the gasket.
Factory speed limiting methods
A scooter can be turned off at the factory using several methods:
- The first of these is the installation of a special limiter located in the variator.
- The second method is to use a special electronic limiter embedded in the switch.
- The carburetor may also have a special limit washer that reduces the speed.
- A catalyst in the muffler is another way to limit acceleration.
Carburetor and muffler are less popular in the speed limiting arena in 4 stroke scooters. Therefore, it will be problematic to meet them, compared to two-stroke engines. On the other hand, you can also find models on the market that allow you to install a limiter on several nodes at once.
Yamaha engines with a horizontal design require special mention. They are “strangled” both in terms of release and with the help of electronic filling. The CPG windows can overlap almost half. But even with such blockages, squeezing 70 kilometers per hour is not difficult. But how to remove the speed limiter on a scooter?
What is the price
In Ukraine, a Honda today af61 moped costs from 9,378 to 15,630 hryvnia. 2 year warranty. Delivery is free.
In Russia, this model can be bought from 18,000 to 65,000 rubles. Warranty and return by agreement with the client. There is no delivery - you will have to pick up the transport yourself. Payment can be made in cash or to a Sberbank card.
Spare parts for Honda Today scooters
| Detail | price, rub. |
| Corrugations | 275 |
| Switch | 1 355 |
| Piston group | 2 400 |
| Muffler cover | 470 |
| CPG | 9 000 |
| Batteries | 700 |
| Plastic | 2 510 |
| Fork springs | 400 |
| Luggage case | 270 |
| Head cover gasket | 1 160 |
| Gasket set | 360 |
| Vacuum gas filter | 2 500 |
| Beak | 720 |
| Engine | 10 000 |
How to check the fuel level in an Alpha carburetor
Before you begin adjusting the carburetor on an Alpha moped, you need to check the fuel level in the float chamber. To do this, we need a transparent hose, which must be attached to the drain fitting. It is better to secure the hose in a vertical position.
Next, open the fuel supply valve to the carburetor and use the drain screw, which is located near the drain fitting, to let fuel into the hose.
Gasoline will fill the space and indicate the fuel level in the carburetor float chamber. The correct level should be at the joint level of the float chamber cover.
The photo shows the correct fuel level in the float chamber of the carburetor of the Alpha RX 11 moped
If the fuel level is lower, the fuel mixture is lean. If the level in the float chamber is higher, then the mixture is rich, increased fuel consumption results and the carburetor overflows.
Electronic speedometer for scooter
Most scooters have a fairly simple instrument panel: speedometer, odometer, tachometer and fuel gauge. The tachometer readings on a scooter with an automatic CVT are questionable because there is no gearbox. However, the tachometer is useful in adjusting idle speed.
The moped speed meter is usually inaccurate. For example, the speedometer of a Chinese scooter with a 157QMJ engine underestimates the speed by 15%: with 65 km/h shown on the panel, the real speed is closer to 55 km/h. The odometer incorrectly shows 4%: 100 km on the device when the true mileage is 96 km.
There is a way to add precision to a moped's dashboard. For less than $30, you can install an accurate digital speedometer, odometer, tachometer, clock, average speed, top speed, and more. all you need to do is buy an electronic speedometer for your scooter .
Home page
Features of a scooter purchase and sale agreement Any means of transport during the alienation procedure must be documented. The main document in this case will be the purchase and sale agreement. When the question is...
Garage repair of Alpha #4 moped/Repairing the speedometer on the Alpha 110 moped. Features of moped control when turning
Statistics show that car drivers are much more disciplined in terms of following traffic rules than moped owners. This attitude towards...
Pit Stop26 speedometer drive repair Recommendations for checking a scooter for theft
After the rules for vehicle registration were changed, those who sell such property stopped removing scooters from state registration. Acquirer...
Electric scooter and rights to it
First, let’s define what an electric scooter is. This is a two-wheeled vehicle (less often three wheels) that has an electric engine...
How to get insurance for a scooter
Tightening laws regarding the movement of scooters with mandatory licensing has sharply reduced the number of accidents on the roads involving such vehicles...
2x h16 Need for a license for a scooter
Events take place in time. Legislation is constantly changing. This situation is also observed in the field of driving vehicles. Recent tightening of rules leads...
Problems with the fuel mixture
If a new scooter does not pull well, the rider needs to check the fuel composition. A mixture that is too rich or too lean will worsen the dynamics, causing acceleration to become sluggish. Therefore, you need to make sure that the ratio of oxygen and gasoline is selected correctly:
- If the mixture is lean, the spark plug electrode becomes white and begins to overheat and melt.
- If the composition is rich, soot will appear on the candle.
Problems with preparing a combustible mixture can arise due to a clogged air filter or a breakdown of the starting enrichment.
Preparing to disassemble the gearbox
- Remove the exhaust pipe and rear wheel. On a Honda Dio 34, 35, it is better to do this by placing the scooter on its side on a rag so as not to scratch the plastic.
- Remove the air filter and air duct.
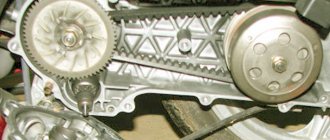
- Remove the variator casing.
- Unscrew the clutch drum nut. To do this, you need to fix the drum with some kind of device. Or the nut can be easily unscrewed with a pneumatic gun.
Then we press on the variator belt with the mounting tool and push it deeper between the cheeks of the variator to remove the clutch.
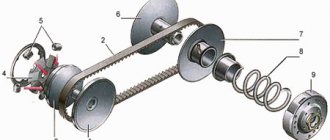
Torque limiter
For beginners, switching down is quite difficult and not entirely clear. The likelihood that the rear wheel will suddenly lock is high. Therefore, motorcycle manufacturers have been installing a so-called torque limiter in the clutches of most motorcycles for about 10 years. The torque limiter should not be confused with the slipper clutch used on racing motorcycles. The main difference is that the limiter is activated when the clutch is not fully depressed, namely at the moment when you release the clutch. So if you accelerate in second gear, squeeze the clutch, lower the engine speed and now release the clutch, then the torque limiter will work a fraction of a second before the lever drops. The limiter is designed to combat the “jumping” of the rear wheel if you make a mistake with the speed at which you shift down or up. Remember - the limiter does not work with the clutch fully released and is not a panacea against locking the rear wheel.
Limiters in the variator
This can be either a restrictive ring between the cheeks of the variator, or a plate screwed to the variator on the side where the weights are installed (depending on the engine model). Both of these plugs have the same purpose, namely, to prevent the variator cheeks from shrinking completely. Thus, the belt does not reach its maximum radius. Those. travel speed is limited. Reaching, for example, 45-50 km/h, the scooter does not accelerate further, while the crankshaft speed increases. On the other hand, to prevent the engine from breaking down due to too high speeds, a limiter is installed in the switch. The idea is that when a certain number of engine revolutions is reached, the ignition of the fuel stops. We'll talk about this later, but for now let's talk about the variator.
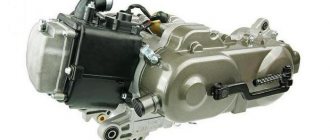
Operation, maintenance and repair
The operating instructions for the Today scooter can be downloaded from the link:
manual
Replacing consumables
During operation, metal dust settles in the engine oil, which affects the structure and properties of the oil. That is why it must be replaced regularly. The first change is carried out immediately after purchase. The second is recommended after 1000 km, and after break-in - 3-4 thousand km.
Oils typically used range from SAE 5W-20 to 10W-40. A worn engine will accept SAE 20W-50 grade oil.
Before replacing, warm up your moped. This will thin the oil and mix it with any dirt that may have accumulated in it. To warm up a moped in summer, 5 minutes is enough, in winter – 10 minutes.
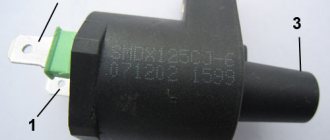
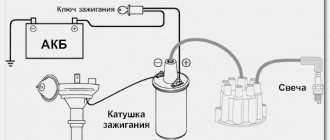
Ignition installation
The Honda af61 uses a CR7HSA spark plug with a resistor. To install the ignition, follow the instructions:
- Disconnect the spark plug cable;
- Connect two strobe wires to the battery and the third to the spark plug cap;
- Find the ignition timing timing marks (usually one mark on the generator flywheel, the second on the scooter body);
- Crank the engine and fix the strobe flash and markers. If the response time of the device coincides with the marks on the power unit, then the ignition is set correctly.
The device of a classic moped
A “classic” moped is equipped with a conventional bicycle pedal drive (where the second word in “moped” comes from, “pedal”) with a chain drive to the rear wheel, as well as a freewheel and a brake in the rear wheel hub.
Braking on a moped is carried out by rotating the pedals in the opposite direction. In addition, the rear wheel is also equipped with a driven chain sprocket from the engine (it has a rigid connection with the absence of a freewheel). This sprocket is located on the same shaft as the motor. But, despite this, the shafts of the sprocket and motor can be separated by the clutch, to activate which there is a lever located on the handle on the left side of the steering wheel.
There is no gearbox on a moped, but sometimes there is a gearbox. The right handlebar is movable. By rotating it, the carburetor throttle valve is controlled. It is also called the “gas handle”.
The moped engine starts according to a certain scheme: squeeze the clutch, start moving, like on a bicycle, when the required speed is reached, smoothly release the clutch, which will set the engine shaft in motion. After that, you can go by motor. Since there is no gearbox, when climbing a mountain on a moped, you should help the engine with pedals. The moped engine does not need to be turned off, provided that the stops are not long-term. To do this, simply depress the clutch.
It is worth saying that this scheme of operation of modern mopeds repeats the scheme of the very first motorcycles. As you can see, mopeds are quite simple in design and are controlled only with the gas handle. In this regard, they are often called “gas mopeds”, “gas mopeds”, “gazulki”. However, "moped" is more of an informal name for the vehicle. In official documents it is referred to as a motor bike. This is due to the need to distinguish such mopeds from other variants. From time to time you can come across the name “mofa”, which is a name for a moped that has a structurally limited speed of 25 km/h. Mofa is a vehicle for Europe and its appearance is associated with the introduction of rights to drive mopeds in European countries.
We disassemble the gearbox
- Unscrew the five bolts securing the cover.
Please note and remember that two long bolts are located where the gearbox cover guide bushings are located.
This will be needed during reassembly.
- Place a flat, large container under the gearbox to drain the oil. We put a 12mm spanner on the shaft and screw the nut back by hand until the end of the thread. Then, carefully, tapping the spanner with the flat side of a hammer, disconnect the gearbox cover. And the oil will pour into the substituted container.
The cover cannot be pulled out using a knife or screwdriver, inserting them between the cover and the gearbox housing. Damage the gasket and break the seal. You will have to put the lid on the sealant.
We look at the condition of the bearings. They must be intact and rotate freely, without jamming, without axial and radial play. The shafts should not be loose. If there are defects, then change the bearings along with the seals without hesitation. It's better to use native Japanese ones.
On the output shaft (on which the wheel fits), the bearing is difficult to pull out. You need a special puller or you will have to remove the engine to press out the bearing.
But it can be made simpler. Unhook the rear brake cable. Take a blowtorch or a tourist gas can with a burner and heat the gearbox from the outside.
The housing will expand, and the output shaft bearing along with the oil seal will easily come out using a hammer and an extension from a set of sockets.
The input shaft with bearing will also easily come out of the heated gearbox cover.
Before heating, be sure to disconnect the breather (rubber tube).