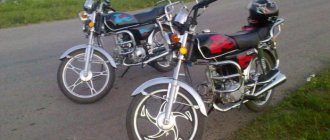
Front fork
I was thinking about changing the oil in the front fork on an Alfa, I looked on the Internet and found how much to pour (in the Alfa 120 ml, in the Delta 160 ml (in each leg)), but I couldn’t find any exact criteria about what kind of oil to pour there.
Questions: Have you changed the oil in the fork? Which one did you fill and how many ml? At what mileage did you decide to change the oil?
Added after 5 minutes
I’m also thinking about replacing the front drum brake with a disc brake, but since there is no mount for a caliper on the fork legs, I’m thinking of installing a complete fork or just the legs from Parton King 50. But I don’t know the size of the fork from King and whether it will fit into the Alpha yokes
There, as far as I know, the oil is not changed but topped up as needed. They suggested oil to me and 20. spindle in common parlance.
Added after 2 minutes
I’m also thinking about replacing the front drum brake with a disc brake, but since there is no fastening for a caliper on the fork legs, I’m thinking of installing a complete fork or just the legs from Parton King 50. But I don’t know the size of the King fork and whether it will fit into the Alpha crossbars [/ quote]
Take and measure the diameters of the pipes with a rod of both. And compare. But there is no reason to install a disk drive on 50 cubic meters. And then decide for yourself.
I changed it and barely opened the feathers. Clamped in a vice in a barbaric manner, removed the decor on the fork and clamped it in it. So I opened it. I temporarily filled it with 10w40, at least better than the original oil. I poured it to the edge in clamped fork. (This might be correct, but it’s temporary)
They also pour a transmission (a wide variety), there is a special one. oils for this, for example Motul fork oil expert of different hardness 7.5W 10W 15W. (Light, medium, hard)
Hydraulic oil MGP-10 TU U 00152365.111-99
Hydraulic oil MGP-10 is a composition of low-viscosity, low-solidifying petroleum oil, depressant, dispersant, anti-wear, antioxidant and anti-foam additives.
Intended for use as a working fluid in hydraulic shock absorbers of automobiles
Ensures shock absorbers operate over a wide temperature range.
Good anti-wear characteristics. Physico-chemical indicators: No. Name of indicator Indicator value 1. Color, CNT units, no more than 5 2. Kinematic viscosity, mm2/s at minus 20°C, no more than 1000 at plus 20°C, not less than 35, 0 at plus 50°С, not lower than 10 3. Pour point, °С, not higher than minus 40 4. Flash point, determined in an open crucible, °С, not lower than 145 5. Acid number, mg KOH/g oil, not more than 0.15 6. Corrosion effect on metal withstands 7. Mass fraction of water, %, no more than none 8. Mass fraction of mechanical impurities, %, no more than none 9. Change in rubber volume after aging, %, ranging from minus 6 to plus 6 10. Tribological characteristics on a four-wheel drive: welding load (Рз), N, not less than 2820 critical load (Рк), N, not less than 710 scuffing index (Iz), N, not less than 324 Added after 6 minutes
Oil change intervals
Most manufacturers recommend changing the oil in the front suspension of a motorcycle every 12-15 thousand kilometers to ensure that the two-wheeled vehicle maintains good handling. However, experienced owners prefer to replace them simultaneously with scheduled repairs, which include installing new oil seals. This allows you to obtain optimal fork stiffness parameters without having to deal with time-consuming, labor-intensive adjustments.
It is recommended to change the oil after the motorcycle has been idle for the winter, since low temperatures may cause it to partially or completely lose its properties. If the motorcycle participates in sports competitions and the demands on its handling are very high, the frequency of replacing technical fluid should be reduced to 5 thousand kilometers. Experienced drivers recommend changing the fluid when the fork wear becomes noticeable. This is expressed in deep “dive” when braking, as well as in destabilization of the motorcycle at high speed. In such a situation, it is recommended to buy oil of higher viscosity in order to stiffen the suspension and also improve the handling of the two-wheeled vehicle.
Oil selection
Choosing fork oil is very difficult, despite the recommendations of motorcycle manufacturers. The problem is that motorcycle manufacturers often specify ideal viscosity parameters at operating oil temperatures that are many times higher than the temperature at which the fluid is poured into the fork. Therefore, it is necessary to pay attention not only to the standard designation of viscosity, but also to the coefficient of its change with increasing temperature. Such information is often indicated on the canister of liquid, and if it is missing, you will need to pay attention to the manufacturer’s website or to specialized materials published by technical experts.
Since the characteristics of oils from different manufacturers with the same SAE designation can vary significantly, it is better to choose one brand and remain faithful to it in the future. The first change is always made with oil with the same viscosity as specified in the vehicle’s operating instructions. With a significant reduction in fork stiffness, you will need to gradually increase the viscosity - by 2.5W or 5W with each subsequent replacement, depending on your personal preference. Most touring motorcycles recommend 10W oil, while sport and high-performance city bikes recommend 2.5-5W oil.
It is prohibited to use regular motor oil in the fork as it will help achieve the desired damping characteristics. On a canister with a special material you can find the inscription Fork Oil or Suspension Oil. You should beware of fakes, because with low-quality oil in the fork, the motorcycle can become uncontrollable, which will lead to a serious accident.
When choosing fork stiffness, you need to be guided by the type of roads on which the motorcycle will be used. By adding a thicker oil, you will get better damping characteristics and your vehicle will be more stable at high speeds. However, with an increase in rigidity, comfort will significantly decrease - on any major unevenness the driver will feel a “breakdown”, which can even throw the motorcycle off course. On the contrary, insufficiently viscous fork oil will cause significant vibrations, twitching, or even steering pull when cornering.
If the bike will only be used on quality intercity trails and race tracks, there is nothing wrong with significantly increasing the fork stiffness. However, for driving on country roads and city streets with poor quality coverage, such settings are no longer suitable. A special case is replacing technical fluid in a motocross motorcycle. For it you will have to buy a special technical fluid marked “Off-Road” on the canister. Using regular oil for road motorcycles can significantly reduce the energy capacity of the suspension or even lead to its failure.
Selecting technical fluid for the front suspension
The abundance of lubricants on the market makes it difficult to decide which oil to pour into a specific motorcycle model. Another difficulty lies in the fact that you cannot always trust the recommendations of motorcycle manufacturers.
An error may arise from the difference in oil performance in cold and operating conditions. When choosing, you should take into account both standard kinetic viscosity indicators and the coefficient of their change at elevated temperatures.
Advice! If the coefficient of change in viscosity is not indicated on the container, then you should go to the manufacturer’s website and find out what it is, otherwise there is a high probability of an erroneous purchase.
Experienced mechanics recommend not changing a lubricant from one manufacturer to another with similar specified characteristics, since tests are carried out on different equipment and the same parameters on paper can differ greatly in reality.
Important! During the first change, the oil should have the same viscosity as what was filled at the manufacturer’s factory and specified in the operating instructions. If the stiffness of the fork is lost over time, then gradually switch to lubricants with a higher viscosity.
The viscosity of the oil being poured also depends on the type of motorcycle, so for sports bikes it should not exceed 5W, and for mountain bikes oils with a viscosity of about 10W are poured.
Replacement procedure
Before changing the oil, be sure to look where the lower plug on the fork is located - the principle of performing the entire procedure depends on this. The following options are available:
- Down at the end;
- On the side at the bottom;
- The bottom plug is missing.
If the drain hole is located at the end of the fork, lift the motorcycle onto a support, remove the front wheel and install the rods strictly vertically. The lateral location of the plug allows you to repair the hydraulic system without removing the wheel, although you will have to lift the motorcycle in this case as well. If there is no bottom plug, you will need to remove the fork.
Having decided which oil to pour into the fork, first unscrew the upper plug, and then the lower one, after placing a vessel with a volume of at least 0.5 liters under each shock absorber. If you have to work on a motorcycle without a bottom plug, the removed fork will have to be turned over so that the oil comes out of it through a single hole. After draining the technical fluid, the fork must be washed - a special fluid or regular low-viscosity motor oil is suitable for this. Having done all this, blow the inside of the part with compressed air from a compressor or a special can.
A very important question is how much fluid to add to achieve ideal damping characteristics? The most common recommendations on the Internet suggest using 500 ml of liquid for each shock absorber. However, this is a very rough assumption that can make the motorcycle completely uncontrollable. To optimize the controllability of two-wheeled vehicles, it is worth focusing on such a parameter as the oil level from the top edge of the pipe. You can find it in the vehicle’s operating instructions or in specialized technical literature.
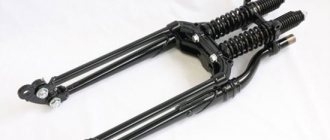
Disassembling the Honda Dio AF fork shock absorber
Understanding is not difficult. First, the fork shock absorbers need to be removed; to do this, you need to unscrew 2 bolts from the yoke, on each stay, and pull the shock absorber out of the yoke.
The shock absorber is made up of a glass (10), two bushings: the top (through (5)) and the bottom (blind (8)) made of fluoroplastic (coprolon), a rubber bumper (9), a retaining ring (4), anther (3) , a plug (1), 2 springs (6), a spring stopper welded onto the feather (7) and the feather itself (2). To disassemble the removed shock absorber, you need to pull out the boot and retaining ring, and if there are no problems with the first, then you may need to rummage around with the other. There are 2 lugs at the ends of the locking ring; you need to insert two awls into them, squeeze and then remove the ring.
After this, the feather should quietly crawl out of the glass, but it happens that the upper sleeve sticks to the glass and does not allow the feather to be pulled out. All methods are good here - WD-40 and a little warming up. You may have to crush it and pull it out in pieces.
Responsible process
The controllability of the motorcycle, and, consequently, the safety of the driver and others depends on the correct selection of oil for the fork. It is best to follow the recommendations of the motorcycle manufacturer, but increase the viscosity of the technical fluid when components wear in order to achieve good damping characteristics. It is also worth paying attention to the oil change procedure - the ability to adjust the suspension and obtain optimal rigidity depends on its correct implementation. We must not forget about flushing the fork after draining the old oil - drops of technical fluid remaining inside and chips obtained from friction between the components can significantly affect the characteristics of the shock absorbers. If you are not sure that you can perform an oil change and suspension adjustment yourself, contact professional mechanics, since your interventions can only cause harm.
Gearbox oil
The instructions say what kind of oil should be poured into the engine, but there is not a word about the gearbox. Although we are all accustomed to the fact that transmission oil is poured into the box, usually thicker than in the engine.
Owners of Alpha mopeds (and the like) need to know that the gearbox, engine and clutch are located in the same (common) crankcase and are lubricated with the same oil . This way you don’t have to think about what kind of oil needs to be poured and where. It is one!
Oil for four-stroke engines
This phrase means that you cannot fill a moped engine with two-stroke oil. The thing is that two-stroke engines have a completely different principle of engine lubrication: they mix oil with gasoline in certain proportions (either in a gas tank or using a special oil pump), and then, together with gasoline, first enter the engine crankcase, lubricating the bearings crankshaft and connecting rod, as well as the cylinder mirror. The mixture then enters the combustion chamber, where the oil burns along with gasoline and is discharged from the engine through the exhaust pipe. Thus, two-stroke oil is not designed for long-term use , it is “disposable”.
In most four-stroke engines (and the Alpha's engine is four-stroke), oil is poured into the engine crankcase and lubricates the rubbing parts either by splashing (due to the rotating parts of the engine) or under pressure (which is created by the oil pump). Oil also helps cool the engine. Therefore, the oil in a four-stroke engine must withstand long service life at high temperatures.
Some owners ask: “Do I need to add oil to gasoline?” Remember: for Alpha mopeds (Delta, Sabur, Vento, etc.) there is no need to add oil to gasoline!
engine's type
When buying oil for a motorcycle, you need to pay attention to its classification, as well as the content of special additives.
To choose which oil to put into your scooter, first consider the engine type: products for two-stroke engines are not suitable for four-stroke engines, and vice versa. The fundamental difference in operation: oil for two-stroke engines is mixed with gasoline in a ratio of 1:25 or 1:50, depending on the manufacturer’s recommendation. Lubricant replacement in four-stroke engines occurs by draining the old product from the oil tank, washing and filling with a new one.
The choice between mineral, semi-synthetic or synthetic oil for mopeds and scooters is not difficult. For economy class mopeds and scooters, mineral or semi-synthetic is perfect. Mineral varieties are the cheapest, so they are more often purchased by poor scooter owners. But when using them, you should remember that they are chemically unstable, so the timing of their replacement must be strictly observed. Semi-synthetics are preferable to mineral ones, but are noticeably more expensive. Synthetic oil is intended for high-speed boosted scooters, whose engines place increased demands on oil quality. It preserves engine life better, has better viscosity, lower volatility, and a wider range of operating temperatures. For inexpensive mopeds, synthetics are just an unnecessary luxury.
Special attention should be paid: mixing mineral, semi-synthetic and synthetic oils is strictly prohibited!
Return to contents
API classification
API is a quality classification system for automobile oils. The oil designation in this system consists of Latin letters.
The first part can be either S (Service) - oil for gasoline engines, C (Commercial) - oil for diesel engines, EC (Energy Conserving) - energy-saving oils.
The next letter is the designation of the oil generation. The designation is in alphabetical order, i.e. The farther the letter is from the beginning of the Latin alphabet, the higher the generation of oil (better performance qualities).
API categories SA, SB, SC, SD, SE, SF, SG are currently recognized as invalid, category SH is considered conditionally valid. Thus, oil of the SE and SF cannot be found on sale now. What kind of oil should you buy then? The answer is to buy any one that is further down the alphabet (SJ, SL, SM, SN), it will in any case be no worse than the recommended one.
Quality Standards
Motor oils have various specifications indicating their quality: API, JACO and others.
The oil standard is indicated on the canister. After the letters API there is a letter designation of oil quality: from SA to SM. The S scale indicates that the oil belongs to gasoline engines; the quality scale is indicated by letters from A (low quality) to M (high quality). A total of 11 quality classes are provided: A, B, C, D, E, F, G, H, J, L and M. Products with specifications from SA to SE are currently almost never produced and are only suitable for older equipment manufactured in 80s or 90s. Modern mopeds and scooters consume oil of at least SF quality, but it is better if it is SH, SJ or SL.
SAE classification
The latest edition of the classification divides motor oils into 11 classes: 6 winter (0W, 5W, 10W, 15W, 20W, 25W) and 5 summer (20, 30, 40, 50, 60) viscosity classes. The letter W (Winter) before the number means that the oil is adapted to work at low temperatures.
Most motor oils on the market today are all-season, that is, they meet viscosity requirements at both low and high temperatures and have a double designation, for example in our case: SAE 15W-40 . The first number characterizes the pumpability of the oil at low temperatures. If you subtract 35 from the first digit, you get the minimum temperature at which a safe cold start of the engine is possible. The second number is an indicator of oil viscosity at 100 degrees Celsius. If you add 5 to the second digit, you get the maximum permissible air temperature at which the oil can be used.
Synthetic, semi-synthetic or mineral water?
It is generally accepted that synthetic oils are of the highest quality and almost extend the life of the engine. On the other hand, as I wrote above, now any oil that has been certified according to the API standard is suitable for use in the Alpha moped engine.
I chose the golden mean for myself: I pour semi-synthetics from imported manufacturers into my moped, because... the price of a liter of semi-synthetic oil is now not much different from the price of mineral oil.
But only now you can rarely find semi-synthetic 15W-40 on store shelves. Mostly mineral oils are sold with this designation. Therefore, I fill the engine with 10W-40 oil as the closest to the manufacturer’s recommendations.
How often should you change the oil in your moped?
In the operating instructions, the first oil change (on a new moped) is after 500 kilometers (TO-1). The second replacement is at 1500 km (TO-2). The third replacement is at 3000 km. (TO-3). Then every 2000 km. But there is an indication that if the moped is operated under increased loads and in dusty conditions, the oil needs to be changed (maintenance) more often.
Personally, I change the oil every 1500 km.
How much oil to pour into an Alpha engine?
The owner's manual says to fill the crankcase with 0.9 liters of four-stroke engine oil. In practice, it may turn out that not all of the old oil has left the engine. I usually do this: fill in 0.8-0.85 liters of oil, control its level with a dipstick and top up if necessary.
Where to fill oil in Alpha mopeds?
When faced with servicing a moped for the first time, many owners look for a separate oil filler neck on the engine. But in fact, the engine developers acted very wisely: oil is poured into the engine through the hole with the dipstick. It is located on the right side of the engine. To avoid spilling oil on the engine, I usually use a small plastic funnel bought at a hardware store; it makes filling quick and clean.
Write in the comments what oil you chose for your moped/motorcycle.
Dimensions of coprolon (fluoroplastic) bushings for Honda Dio AF-25
| Parameter | Size (mm) |
| Inner diameter of glass | 35,4 |
| Upper bushing outer diameter | 35,3 |
| Upper bushing inner diameter | 27,5 |
| Top bushing height | 30 |
| Bottom bushing outer diameter | 34,8 |
| Bottom Bushing Inner Diameter | 27,2 |
| Bottom bushing height | 30 |
| Thickness of the bottom of the lower bushing | 5 |
| Holes in the lower bushing | 2,5 — 3,2 |
What kind of oil to pour into the engine of an Alpha moped: 16 comments
Thank you very much, I read all your articles and more and study them. In October 2022 I’m taking an alpha like 110, with a mileage of about 3 thousand km for 12 thousand rubles. At a friend's place. I am 28 years old, this will be my first motor. Previously it was 21099, I changed the clutch myself and cleaned, washed and adjusted the entire carbure. But I sold it because I didn’t drive it. Previously, I studied to be an auto mechanic, by the way, with honors... But for 10 years now I haven’t even read a single article about internal combustion engines and auto moto... I have gone very far from auto moto... I FORGOT EVERYTHING... And nostalgia has taken over. But still, having experience, albeit long-standing and theoretical, having ridden the alpha and studied it, I realized that the moped is affordable and normal for the money. And with proper care, it will please you. I decided to take it. At the same time, I’ll ask something about my future moped in your corresponding thread... I’ll wait for an answer. My name is Pasha.
Honda Dio AF fork repair
After disassembly, all that remains is to assess the degree of wear of the elements (replace if necessary), clean the shock absorber from dirt, fill it with grease and reassemble it in return order.
To repair a Honda Dio fork, you may need fresh boots, plugs and bushings, as well as other parts.
The bushings can be turned by a turner. Material: coprolon, as a more wear-resistant material.
After repair, the fork will become simply unrecognizable and is in no way inferior in softness to the Honda Tact. The result of the repair will gradually begin to be lost after 3.5 thousand. km driven on our roads.
Dirt is a terrible enemy of these (and not only) shock absorbers; pay attention to the condition of the dust plugs and boots.
Changing the oil in a scooter fork
The most common front fork is the telescopic design. The so-called “telescopes” are found on all Soviet-made boxer motorcycles and appeared back in the distant 30s of the last century. During the period of constant improvement and refinement of the design, many manufacturers went their own way, making significant changes to the seemingly simple design. Changing the oil in the front fork of a motorcycle must take into account all the design features and operating principles of each specific vehicle model.
The most widely produced motorcycles are those with a fork design that uses two tubes. One is steel, with a larger diameter. The second is chrome plated, which is called the fork leg. Moving up and down with the steering wheel, there is a hydraulic valve located inside for each side. The structure is strengthened by a powerful spring. Protection is achieved by installing anthers and seals. Changing the oil in the front fork of a motorcycle is done by pouring fluid directly into the cavity of a smaller diameter tube.
As a result of active movement, reacting to each bump or hole, the oil is the first to become unusable. This happens because all kinds of debris and small metal shavings begin to get into the liquid due to the friction of metal parts. After just a year of active riding, a change in the behavior of the fork . Following the oil, the anthers and seals also deteriorate. They begin to let in water and all kinds of pollutants. The oil absorbs them and ceases to perform its function.
Changing the oil in a motorcycle fork can be simple if the manufacturer provides holes for draining and filling oil, but it can be complicated when a total repair or restoration of some elements is necessary.
Checking work
The most adequate assessment of the work done after reassembly is a ride on the updated motorcycle. It’s not for nothing that they say that after changing the oil, a motorcyclist ends up with a completely different piece of equipment in his hands. The fork should be elastic, stable, not sag or be too stiff.
Changing the oil in the fork of Alpha and Delta mopeds
Repair of fork for moped Alpha, Delta. Change of oil. Replacing oil seals
A vehicle such as a scooter is increasingly gaining popularity. Its suspension includes such a part as the front shock absorbers of the scooter. They are simply irreplaceable on our roads. It is the shock absorbers that soften the ride over all irregularities, potholes and bumps. If they were not there, then other parts that are not designed for such a load would suffer. Thanks to its suspension, the scooter can ride not only on a flat road, but also on moderately broken ones and withstand falling into potholes. Although the scooter is intended for smooth roads and the city. I once fell into a 10 cm deep hole on a Honda Dio scooter. The same thing happened with a passenger. I think if it weren’t for the scooter’s shock absorbers, not only would it have broken, but I and my passenger would have been sent on a short flight with a hard landing.
Over time, the front shock absorbers of the scooter lose their properties and require repair or replacement. How long it will take for this to happen depends on the quality of the roads, your riding style on them and, of course, on the shock absorbers for the scooter themselves. You will feel it yourself when replacement is required, since every hole and unevenness will be more and more noticeable. There will be a characteristic knocking sound in the front fork of the scooter. If you turn a blind eye to this for a long time, the shock absorbers will completely lose their shock-absorbing properties and, over time, more expensive parts may be damaged. Therefore, as soon as you feel that every unevenness in the road is transmitted to you, that is, you feel the road with your body, then the shock-absorbing properties have become unusable.
The rear shock absorber of the scooter suffers the most. Therefore, replacing them in a scooter is often more urgent than replacing the front ones. One of the signs that the front shock absorbers of a scooter have become unusable is the following: if the scooter is rocked in place, the front fork shock absorber may jam or not return to its standard position on its own. If it sags, you will feel it because the scooter has become a little lower. If you lift the scooter's handlebars up a little, you will see that it has risen and returned to its previous position. But this is before the first load. This front shock absorber needs to be urgently replaced or repaired.
Start of renovation
Before starting repairs, place the motorcycle on a comfortable and reliable stand, so that the front wheel is free. Next you will need to remove the wheel and disconnect it from the brake mechanism. In some cases, it is also necessary to remove the wing or rudder.
You should start by “undermining” the plugs of the feathers. Not by unscrewing, but by changing the position of the cover by a quarter turn. Corks are always made with decorative processing or chrome plated. If you don’t have a reliable and clearly sized key on hand, you shouldn’t injure the plugs.
A slight slippage or licking of the edges will immediately ruin the attractive appearance. Some craftsmen use fabric or thin rubber as a gasket. This method cannot prevent the appearance of scratches, even if you try very hard.
A closed plug will not only protect the cylinders from dirt, but will also prevent injury from a fired, tense steel spring. After loosening the traverse bolts, you need to smoothly remove the fork. Before this procedure, you should have a container prepared to remove used oil from the fork. Turn the fork over and drain the oil from the feathers. Judging by the color and consistency, it becomes clear why the fork was cottony or too hard.
Sequencing
In order to understand what kind of oil to pour into the front fork of a motorcycle, read the manual or instructions for your vehicle. This information is very important because oil can have different densities. Therefore, the denser the oil, the stiffer the fork will behave. A rigid fork transmits more vibration, making movement less comfortable. However, the main advantage is the absence of strong shock and deformation of the fork if you catch a hole at high speed.
It will be necessary to very accurately fill the oil to a certain level. There are two ways to do this correctly:
- When removing the fork, measure the former level - this only works if there are no oil leaks or deformation of the glasses,
- Fill exactly the amount indicated in the manual.
A plug that is too airy or overfilled will not function properly. In the first case, the movement of the motorcycle will fail, in the second, the reaction to unevenness will be too noticeable. It is the oil level that determines the volume of the air gap, which interacts with the road. For expensive and sports motorcycles, it is important to know what kind of oil to pour into the front fork of the motorcycle. It comes with a viscosity of 2.5. 3.5 and 7.5 W. It is noteworthy that by mixing two oils of different viscosities, you can obtain a medium viscosity.
Remaining oil is removed by moving the piston up and down. If you see a significant excess of service life based on the color and contamination of the drained oil, you need to wash the internal surfaces with kerosene. Having filled in new oil to the previously determined level, you can begin reassembly.
Important! If you have already disassembled the fork, immediately check all the elements for scuffs and damage. A caring motorcyclist immediately changes all boots and seals to prevent leakage in the future, so immediately take care of the availability of spare parts. Particular attention should be paid to inspecting the bushings, which should secure the fork and not interfere with the operation of the seals. Often, a broken bushing gives freedom to oil seals and anthers, which quickly wear out. An inexperienced motorcycle owner changes boots regularly, but does not eliminate the cause of their wear.
Preparation
Disassembling a fork on a moped is relatively easy. You need to prepare several required tools. Before you start, you need to prepare the following:
- Spanners. It can be quite difficult to remove a nut, so the tool must be durable.
- Puller for shock absorber springs. You can buy the tool or make it yourself.
- Oil filling tool. It can be replaced with a syringe and catheter.
Installing a fork on a Delta moped is a difficult task. Only a trained master can perform the procedure correctly. Therefore, it is advisable to entrust this task to professionals. It is necessary to change the oil seals, plugs, and anthers, which only a specialist can select correctly.
What kind of oil to pour into the fork of an Alpha moped
How to change engine oil in a motorcycle?
This procedure, like changing the oil in a forklift motorcycle, scares not only beginners, but also experienced drivers. Even professional mechanics often spend a lot of time doing this job because they have to deal with so many details. In addition, you need to choose the right oil that will allow you to achieve the required suspension stiffness parameters. Therefore, it is necessary to approach this procedure only after careful preliminary preparation.
Oil change frequency
Most manufacturers recommend changing the oil in the front suspension of a motorcycle every 12-15 thousand kilometers to ensure good handling of two-wheelers. However, experienced owners prefer to simultaneously replace planned repairs, that is, install new cuffs. This allows you to get the optimal fork without having to go through a long, lengthy setup.
It is recommended to change the oil after idling the engine in winter, as it may partially or completely lose its properties at low temperatures. If the motorcycle is used for sports and the requirements for its disposal are very high, the frequency of replacing technical fluid should be reduced to 5 thousand kilometers. Experienced drivers recommend changing the fluid when the plug wears out. This is reflected in deep “beaks” when braking, as well as destabilization of the motorcycle at high speed. In this situation, it is recommended to buy high viscosity oil to stiffen the suspension and also improve the handling of the two-wheelers.
Oil selection
It is very difficult to choose fork oil, despite the recommendations of automakers. The problem is that motorcycle manufacturers often specify ideal viscosity parameters at operating oil temperatures that are many times higher than those at which the hydraulic fluid is poured into the plug. Therefore, it is necessary to pay attention not only to the standard designation of viscosity, but also to its coefficient of change with increasing temperature. Such information is often listed on the liquid container, and in the absence of such information, you will need to look at the manufacturer's website or special materials published by technical experts.
Since the characteristics of oils from different manufacturers with the same SAE designation can differ significantly, it is better to choose one brand and keep up with the times. The first change is always made with oil of the same viscosity as specified in the vehicle's operating instructions. If the tube stiffness decreases significantly, the viscosity will need to be gradually increased. 2.5W or 5W for each subsequent replacement, depending on your personal preference. Most touring motorcycles recommend 10 watts of oil, as well as sport and high-performance city bikes. 2.5-5 W
Moped Delta
Operating manual for Delta moped
Technical characteristics of the Delta moped
| engine's type | four-stroke, single-cylinder |
| Engine capacity | 49.0 cm³ |
| Maximum power | 3.5 hp |
| Cooling system | air |
| Engine starting method | kick starter and electric starter |
| Ignition system | CDI |
| Spark plug | NHDG1137 |
| Fuel | gasoline A-92, A-95 |
| Oil | 15W/40 |
| Maximum speed | 50 km/h |
| Fuel consumption | 1.61l/100 km |
| Fuel tank volume | 2.5 l |
| Weight | 65 kg |
| Maximum load | 80 kg |
| Transmission | mechanical |
| Brakes | Drum type |
| Tires (front/rear) | 2.25-17 |
| Dimensions (l/w/h) | 1800/700/970 mm |
| Seat height | 780 mm |
| Base | 1170 mm |
| Ground clearance | 105 mm |
| Battery | 12V/7Ah |
Moped device
The location of the moped elements and control handles is shown in Fig. 1-3
1-Passenger footrest, 2-Electric starter, 3-Running footrest, 4-Rear brake pedal, 5-Frame number, 6-Trunk
1-Seat, 2-Fuel valve, 3-Gear shift pedal, 4-Footrest, 5-Central step, 6-Side step, 7-Passenger step.
1-Headlight switch, 2-Instrument panel, 3-Light switch, 4-Front brake handle, 5-Throttle handle, 6-Ignition switch, 7-Horn button, 8-Turn signal switch, 9-Clutch handle, 10-Fuel tank cap.
Moped operating instructions
Engine starting
To start the engine when cold, turn the fuel valve to the “ON” position. Then insert the key into the ignition and turn to the “ON” position. Set the gear shift pedal to the neutral position. Close the choke on the carburetor and gently press the kick starter lever several times, and then start the engine with a sharp press.
Starting a warm engine
Performed in the same sequence as when cold, but without closing the air damper. It is recommended to start a warm engine using an electric starter.
Start of movement
Braking
By turning the throttle control away from you, reduce the engine speed. Squeeze the clutch lever and simultaneously depress the front wheel brake lever and the rear wheel foot brake pedal with equal force. After stopping the moped, shift the gearbox to neutral, then release the clutch lever.
When braking a moped, use both brakes at the same time. By gradually increasing the force on the lever and brake pedal, you can ensure the most effective braking. Braking with only the front or rear wheel may cause the moped to skid or fall, so be extremely careful. When driving on wet or slippery asphalt, operate the braking system carefully and gently to prevent falling.
Stop
To stop the moped, turn the throttle control handle away from you to reduce the engine speed. Squeeze the clutch lever and simultaneously depress the front wheel brake lever and the rear wheel foot brake pedal with equal force. Shift the gearbox to neutral, then release the clutch lever. Turn off the engine. Place the moped on the kickstand.
Do not park the moped on a slope or soft ground to avoid it falling. To avoid burns, do not touch the hot exhaust pipe.
Running in a new moped
The first 1000 km are the most important for your moped. During this period, all parts of the moped grind against each other. Avoid operating the engine at maximum speed, overheating the engine and overloading it. For mileage from 0 to 1000km, we recommend the following operating modes:
150-500 km: avoid running the engine for a long time at a constant speed and do not open the throttle valve more than 2/3 of the stroke. It is forbidden to open the throttle valve completely, i.e. The engine should not reach its maximum speed.
1000 km: Avoid running the engine for a long time at a constant speed and do not open the throttle valve more than 3/4 stroke.
1000 km or more. Avoid running the engine for long periods of time at constant speed and with the throttle valve wide open. Change your driving speed occasionally.
At the first oil change (300 - 500 km), it is necessary to clean the filter mesh of the oil intake of the oil pump. Since this procedure involves removing the right crankcase cover, it is necessary that this operation be performed by service center mechanics.
Engine lubricants
The engine life directly depends on the quality of the lubricants used. It is necessary to check the oil level every day before the trip and promptly change the oil and clean the oil filter.
The oil change is carried out when the engine is warm, after driving, so that the used oil is completely drained.
Oil change procedure:
1. Place the moped upright on the center stand so that the rear wheel does not touch the ground. 2. Unscrew the dipstick plug on the right crankcase cover. 3. Unscrew the drain plug at the bottom of the engine and wait until all the oil has drained. Screw in drain plug 4. Fill in 0.6 l. fresh motor oil for motorcycle engines 10W40 (or another, depending on climatic operating conditions) into the crankcase through the filler hole. 5. Screw in the dipstick plug. 6. Start the engine. Let it run for a few minutes at different speeds. 7. Stop the engine. After one minute, check the oil level with a dipstick. Make sure there are no oil leaks.
Idle speed control
Correctly adjusted engine idling allows for minimal fuel consumption. In this case, it is necessary to achieve stable engine operation at a rotation speed of approximately 1500 rpm.
This adjustment is made as follows:
1. Place the moped vertically on the center stand so that the rear wheel does not touch the ground, start the engine to warm up, and after warming up, open the choke. 2. Check the mixture quality adjustment screw; it must be fully tightened, then unscrewed 1 1/4 - 1 1/2 turns. 3. By unscrewing the idle speed adjustment screw, achieve the minimum stable engine speed. Unscrewing the screw reduces the engine idle speed, tightening it increases it. 4. Then adjust the mixture quality screw again, achieve the highest idle speed and screw it back 1/4 - 1/2 turn. 5. Try to sharply increase the engine speed. If there are dips during acceleration, tighten the mixture quality screw another 1/4 turn. 6. After each adjustment using the quality screw, adjust the engine idle speed using the idle speed adjustment screw.
Air filter
The air filter filter element is made of special foam impregnated with oil. When the air filter is clogged, the useful power of the engine decreases due to an increase in air input resistance, which, in turn, causes increased fuel consumption. Therefore, periodic cleaning of the air filter should be performed according to the following procedure.
1. Remove the decorative cover. 2. Remove the carburetor. 3. Remove the air filter. 4. Unscrew the outer screw of the air filter housing, disassemble the housing, then remove the filter element. 5. Remove the foam from the holder frame 6. Rinse the foam with detergent and squeeze with both hands to remove water. Then immerse the foam in engine oil, remove it, and remove excess oil from it. If the foam is too dirty or damaged, replace it with a new one. 7. Then reassemble the air filter in reverse order.
Spark plug
The spark plug is one of the most important parts needed to start the engine and affects its power. After removing the spark plug, the condition of its electrodes is checked, i.e. her contacts. If the contacts are heavily worn, the spark plug must be replaced with a new one. If the electrodes are in relatively good condition, then it is necessary to clean the spark plug with a steel brush. Inspection and adjustment of the gap must be performed in the following order.
1. Remove the spark plug cap. 2. Unscrew the spark plug with a special spark plug wrench. 3. Clean carbon deposits around the central electrode. 4. Check the condition of the electrodes and the gap between them (0.6 - 0.7 mm). The gap is adjusted by carefully bending the side electrode and is controlled by a special probe.
After adjusting the electrode gap, the spark plug is screwed into place in the cylinder head. The spark plug must be tightened moderately, not too tightly.
Throttle control handle.
Regularly inspect and check the functionality of the system before travelling.
Check the travel of the throttle control handle. The handle should rotate easily, without jamming, and return to its original position on its own.
2. Adjustment.
The free play of rotation of the throttle control knob should be within 2 - 5 mm. If necessary, make adjustments by tightening or unscrewing the special adjusting nut on the cable, under the control handle. Do not forget to fix the lock nut on the cable after adjustment.
Front fork
Since the front fork is of great importance for the ease of handling of the moped, it should be maintained in order and the necessary repair work should be carried out periodically. When servicing the front fork, it is extremely important to pay attention to the steering column bearings, mounted inside the steering column frame, on which the fork turns. If play is detected, adjustment must be made, i.e. tighten the steering column nuts. The nuts are tightened so that when lifting the moped by the handlebars, no play is felt, but the fork still turns easily.
Clutch
When accelerating a moped and while driving, you often have to use the clutch mechanism. Check its functionality regularly before your trip.
1. The free play of the clutch control knob should be within 10-20 mm. 2. Loosen the locknut and then adjust the cable tension. After completing the adjustment, tighten the locknut. 3. Start the engine by squeezing the clutch lever and engaging first gear. When you smoothly release the clutch lever, the moped should move off smoothly.
If a tear in the cable is detected, it should be replaced.
Chain transmission
The long life of a chain drive depends on good lubrication and proper adjustment. Infrequent maintenance of the chain drive and driven sprocket, as well as operation of the moped in dirty and dusty conditions, leads to premature wear of the chain drive.
1. Place the moped on the center stand. Engage neutral gear. 2. Check the chain movement by pushing it up and down with your hand. The chain travel should be within 10-20 mm. (see Fig. 20). If the chain travel exceeds the permissible value, it must be adjusted. 3. Loosen the wheel nut. 4. By rotating the adjusting nuts that tension the chain on the left and right, tension the chain evenly, avoiding distortions. 5. Secure all locknuts. Then check the chain tension again and lubricate it.
In the event that the chain tension adjustment has been exhausted and the chain is not tensioned, it is necessary to replace the chain with a new one.
Brake system
The braking system is the most important safety mechanism. Since brake linings gradually wear out, it is necessary to periodically adjust the free play of the brake lever and pedal and check the wear of the brake linings, and if necessary, replace them.
Front wheel brake:
1. The free play of the brake handle should be within 15-25 mm. It is adjusted by a toothed nut on the front hub cam. 2. After adjustment, check the braking efficiency by squeezing the front brake lever and trying to rotate the front wheel.
Rear wheel brake:
1. Place the moped on the center stand. 2. The free play of the rear wheel brake pedal should be 20-30 mm. 3.If necessary, adjustment is made using a toothed nut on the rear wheel hub. 4.After adjustment, check the braking efficiency by pressing the brake pedal and trying to rotate the rear wheel.
Replace the brake pads if the lining thickness is less than 2 mm (the thickness of a new brake lining is 3.5 mm).
Brake light switch
The brake light switch is located above the brake pedal. After adjusting the brake, it is necessary to check that the signal operates correctly and, if necessary, adjust it by moving the switch itself. Checking the operation of the brake light is carried out with the engine running.
Tires
Wheels are constantly exposed to various loads, depending on the quality of the road. Therefore, they must be inspected and adjusted regularly.
— Make sure that the tires have sufficient tread depth and are free of tears and cuts. — Check the tire pressure (150 kPa for the front wheel, 270 kPa for the rear wheel) — Make sure that the spool is not leaking air. — Rotate the wheel manually so that you can observe the radial and axial runout of the wheel rim.
— Inflate the tire if the pressure in them is not sufficient. Remember that operating a tire with low or high pressure accelerates its wear, impairs the stability of the moped in motion and makes it difficult to control the moped. — Radial or axial runout of the wheel rim should not exceed 2 mm. By tensioning the spokes, it is necessary to adjust the radial and axial runout of the rim.
Source