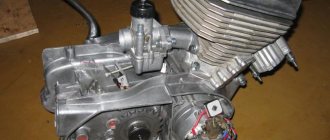
Maintenance and repair
5.18 Reinstalling the crankshaft and measuring the radial clearance of the main bearings
Reinstalling the crankshaft and measuring the radial clearance of the main bearings
Selecting new bearing shells
Inspection of main bearings and connecting rod lower end bearings
Measuring the radial clearance of the main bearings
EXECUTION ORDER
1. Clean the backs of the bearing shells and their beds in the cylinder block and in the main bearing caps. 2. Insert the bearing shells into place, making sure that the protrusion on each shell matches the notch in the cylinder block or main bearing cap. Try not to touch the working surface of the earbuds with your fingers. 3. Radial clearance can be measured by two methods. 4. The first method (which is more difficult to implement as it requires the use of an internal micrometer set or an internal/external flaring caliper) involves installing the main bearing caps into the cylinder block/crankcase with the bearings installed in them. After tightening the mounting bolts to the required force, the inner diameter of each pair of bearing shells is measured (the crankshaft does not need to be installed). After measuring the diameter of each corresponding crankshaft journal, to obtain the radial clearance, it is necessary to subtract the second from the first result. 5. The second (more accurate) method involves using a product called a plastic gauge (Plastigauge). The gauge is a thin plastic thread of absolutely circular cross-section, which is crushed between the bearing shell and the crankshaft journal. After removing the lid and liner, the width of the crushed thread can be measured using a special scale printed on the kit packaging. The gap is determined by the width of the crushed thread of the meter. The measuring set can be purchased from a Saab dealer or vehicle repair shop. When using a plastic meter, proceed as described below. 6
Once the upper main bearing shells are in place, carefully reinstall the crankshaft. Do not use any lubricants at this stage; The crankshaft bearing journals and the surfaces of the bearing shells must be absolutely clean and dry.
7
Cut several pieces of plastic thread to the required size (the length of each piece should be slightly less than the width of the main bearing), and lay each piece on the corresponding crankshaft journal coaxially with the journal. A piece of plastic thread should be laid approximately 6 mm to one side of the center line of the neck.
8. After installing the lower main bearing shells, reinstall the main bearing caps and tighten the bolts in a progressive order to the required torque. Be careful not to move the gauge thread or rotate the crankshaft during the measurement procedure.
9. Loosen the bolts and remove the main bearing caps, being extremely careful not to disturb the crushed gauge threads or rotate the crankshaft.
10. Compare the width of the crushed plastic thread on each neck with the scale printed on the kit packaging. The measured value indicates the amount of clearance in the bearing. Compare the measured gap with the values given in the Specifications at the beginning of this Chapter.
11. If the clearance is significantly different from what is expected, the bearing shells may be the wrong size (or excessively worn if old shells are installed). Before you decide that you need to install liners of a different size, make sure once again that when measuring, no dirt or oil gets on the crankshaft journal or liners. If the crushed plastic thread of the meter is wider at one end than at the other, then this indicates the presence of a taper in the crankshaft journal. 12. If the gap value is outside those established by the Specifications
limits, select the thickness of the liners to ensure the required clearance. When calculating the required clearance, remember that it is always better to err on the side established by the Specifications
lower limit, since as the liner wears out, the thickness of the gap will increase. 13. If necessary, install bearings of the required size and repeat the procedure for measuring the bearing clearance. 14. Finally, carefully scrape the crushed plastic gauge thread from the crankshaft journals and bearing shells. To do this, use your fingernail or a wooden or plastic scraper that will not damage the bearing surface.
Final installation of the crankshaft
Required Parts
In order for the ignition system to work correctly, a number of auxiliary parts are required. They are listed below:
Modulator
The most difficult stage is the production of the modulator. It is important to maintain the required shape. The more accurately the required dimensions are observed, the lower the likelihood of problems occurring after the system is implemented, that is, there will be no need to adjust it with a file. The ignition timing must match on any cylinder used.
The bolt hole must be located in the middle. Otherwise, the engine operation will not be synchronized. It is also recommended to check the integrity of the crankshaft bearings. If you find defects, you should immediately replace it.
The contact ignition is not able to work normally if the bearings are damaged. The thickness of the part should not exceed one and a half millimeters. If it is thin, it will not be possible to avoid deformation, and if it is thick, it will come into contact with the surface of the hall sensor housing.
To create the plate, it is allowed to use any material except steel. Aluminum and others should not be used as they are not magnetic. The drawing that must be followed can be found in the public domain. The presented diagram will be useful to those people who decide to modernize the vehicle ignition device. Below are methods for installing electrical ignition devices in Jupiter.
It must be turned by a professional turner. He will make a simple disk and draw on it the markings of elementary distances between the corners. Then, in accordance with it, you will cut out the necessary sectors at home. The cost of the modulator is seventy rubles.
It is not advisable to use an ordinary plate, since its width is less than twelve millimeters. This will not be enough to fully accumulate the energy resource in the coil. Of course, it can be installed, but achieving four thousand revolutions per minute will become impossible.
In addition to the above you will need:
Assembling the crankcase halves
We degrease the connector of the halves, knock out the guide bushings a little so that they extend 5-6 mm above the plane. Depending on your desire, we assemble the checkpoint. Personally, I assemble the gearbox only after assembling the engine, it’s more convenient for me.
We apply any automotive sealant to the connector, install the second half of the crankcase, tap it with a mallet, install the gearbox cover and tighten the crankcase with bolts.
We do not pull the bolts anyhow, but strictly according to Feng Shui: we pull about a third of the force, first the middle crosswise, then the periphery, and gradually increasing the force over several circles, we tighten the bolts as much as is sufficient.
Assembly of the Izh Planet 5 box
Let's look at what the Izh Planet gearbox is. We will learn not only how to assemble it, but also how to identify faults and eliminate them.
It is not uncommon to experience problems when riding an Izh Planet 5 motorcycle due to the low reliability of the gearbox. This is due to low-quality components, primitive production of the 20th century and low requirements for the precision of manufacturing the crankcase, bearings, gears and shafts. There are, of course, some advantages to the simplicity of the design of such an Izh Planet gearbox; it is low-cost production, which is rather better for the manufacturer. But the main advantage is the ability to repair it yourself. Here we will look at what the Izh Planet gearbox is, we will learn not only how to assemble it, but also how to identify faults and fix them.
To begin with, I would like to announce the list of numbers of bearings and seals used in the IZh gearbox:
- One input shaft bearing - number 204
- One secondary shaft bearing - number 192906КМ
- Two intermediate shaft bearings - number 203
- One secondary shaft oil seal - size 34.5x52
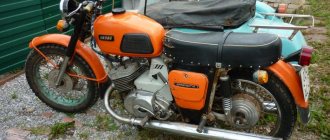
Motorcycle "Planet-5"
The Planet-5 motorcycle, production of which began in 1985 and was completed in 2008, is remarkably amenable to tuning. More often they carry out tuning of the exterior, some units or main components. To make the fifth “Planet” more playful and passable (in fact, convert the IZH “Planet-5” into a cross-country motorcycle), they remove excess from the frame in order to reduce the 180-kilogram weight of the motorcycle when it is loaded. Then, for better ride, long-stroke shock absorbers are installed on the rear wheel and the front fork is replaced. You can rearrange it from a Java motorcycle with increased speed. Naturally, the wings are also changed.
There are no major changes to the engine. To increase the service life of the crankshaft, replace the original bearings from the secondary shaft with “Java” ones. The quality and increased service life compensate for the high cost of these bearings.
For the IZH Planet-5 motorcycle, engine tuning also means increasing the cylinder volume. To do this, the top is cut off and the sleeve is bored to 76 millimeters. A piston from Planet-Sport will fit freely under this size. After these modifications, the prototype of the modernized Planet 5 will reach a speed of up to 160 kilometers instead of its 120 kilometers per hour. By the way, on the test bench the engine developed a power of 42 hp. at 5950 rpm. But with any boost of the engine, its resource is reduced. Such modifications should not be made on a motorcycle intended for everyday normal riding.
When boosting the engine, the standard rear tires, clutch and chain may not last long. We need to think about their modernization.
Weaknesses and shortcomings of the IZH-P5 engine of the IZH Planet 5 motorcycle
Why did they stop producing the IZH Planet motorcycle in Russia? Oddly enough, the Kovrov Machine-Building Plant named after Dektyarev (ZID), as well as the former Soviet, now Belarusian Minsk Motorcycle Plant, still supply their motorcycles to the market. As for the Izhevsk Machine-Building Plant, which produces IZH motorcycles (Planet, Planet-Sport, Jupiter), the last production batch of motorcycles was produced in 2008, then, due to difficulties arising from the economic crisis, the production of IZH motorcycles was curtailed. It’s a pity, because the state could have provided assistance to the plant. At that time, Izhmash had a lot of experimental design work on promising motorcycles, both with two-stroke and four-stroke engines. I have a lot of positive memories associated with the IZh “Planet-3” and “Planet-5” motorcycles.
Any motorcycle model starting from Planet-2 gave a head start to Jupiters in terms of cross-country ability, old or new, it doesn’t matter. Didn’t he even sail on it, even to the taiga or the forest, fishing or hunting?
A very reliable “workhorse” with traction like a tractor, and my father and I never transported anything on it. We bought it in 1989 and to this day my father drives it, but it looks like new and makes my heart happy with its proper operation. Planet motorcycles, even its oldest models, continue to serve their owners regularly and reliably, despite the stoppage of production, there are no problems with spare parts for repairs on the market, and there is no limit to the maintainability stock. In this article, we will look at the IZH-P5 power unit of the IZH Planet 5 motorcycle, or more precisely, its technical characteristics, weaknesses and disadvantages. The IZH-P5 power unit differs from the IZH-P4 20 hp. the previous model of the motorcycle “IZH Planety-4” increased by 2 hp. power, a higher compression ratio and an engine head, the 4th model has two exhaust pipes, the 5th has one. Gearboxes differ in the number of teeth on the gears and, accordingly, in the gear ratios. Gearboxes are interchangeable.
Correction of motorcycle appearance
Changing your appearance can happen in different ways. Among the most common:
- Fairing installation.
- Replacing the fuel tank.
- Seat modification.
- Motorcycle painting.
Fairing installation. This is the first thing that many lovers of modifying the appearance of motorcycles undertake. Although it is possible to cope with such a task, it should be recognized that the development of such components is a complex task that requires specific skills. The enterprises employ entire groups of specialists engaged in the design of fairings.
A person who does not have specific skills, despite all his talents, will most likely receive a result of dubious quality. The surface of the fairing will be uneven, which is clearly visible in the 5 photos posted online illustrating Jupiter tuning. The aerodynamics of the motorcycle may not improve, but worsen. Take all this into account before you decide to start making and installing a fairing.
Replacing the fuel tank is a completely justified decision. But you shouldn’t try to make a complex part yourself. This is not an easy task even for enterprises with special technological equipment. It’s smarter and easier to choose a ready-made fuel tank from some other motorcycle model.
Seat modification. You can try to make a change to the standard structure by upholstering it with a new material like leather or a good substitute, and installing a new filler. But the original seat has a significant mass. To reduce the weight of the motorcycle, it makes sense, as in the case of the fuel tank, to select a part from other equipment.
Painting IZ Jupiter-5 is a good thing. Here you can let your imagination run wild. But the best results can be achieved if you know the laws of color combinations or consult with a professional designer. Otherwise, instead of a stylish combination of contrasting colors, you can end up with an eye-catching color scheme.
If you are interested in long-lasting paintwork, first apply a layer of high-quality primer and refuse to use nitro paint, preferring alkyd or polyurethane enamels.
Wiring diagram IZH Planet 5
Detailed color wiring diagram for motorcycle IZH Planet 5
Explanations for the diagram
The numbers on the electrical diagram correspond to the following elements:
- Light switch, dimensions/low.
- Light switch, direction indicators and horn buttons.
- Front turn signals.
- Instrument panel lighting.
- Indicator lamp for generator operation.
- Oil pump operation indicator.
- A light indicating the operation of the neutral gear in the gearbox.
- Direction indicators.
- High beam headlight indicator.
- Front parking light bulb.
- Headlight lamp.
- Sound signal.
- Hall Sensor.
- Generator.
- Egnition lock.
- Turn signal interrupter relay.
- Neutral gear warning lamp sensor.
- Block BPV 14-10.
- Switch.
- Battery.
- Fuse.
- Relay block.
- Ignition coil.
- Foot brake light sensor.
- Rear direction indicators.
- Rear light with lamps.
Description of the symbols for the terminals on the rectifier-regulator block BPV 14-10:
- –x1 — “minus” of the generator excitation winding;
- –x2 — “minus” of the battery (“ground”);
- x2 - “positive” wire to the control lamp of the instrument panel;
- x3 - “positive” wire to the panel indicator;
- x4, x5, x7 - phases of the stator winding;
- x8 - “plus” of the battery.
Electrical equipment IZH Planet 5
Wiring for IZH Planet 5 includes:
Video: review of IZH Planet 5 wiring
Taken by user Agronom.
Generator
IZ Planet 5 generator design:
The generator converts the mechanical energy of a gasoline engine into electrical energy, which charges the battery. Alternating current is generated by 3 windings and fed to a rectifier, which converts it into direct current. An additional coil is used as an exciter.
Photo gallery: IZH Planet 5 generator and its design
Battery
To supply all components, a low-power energy storage device of 12 volts is required, since IZH Planet 5 does not have a starter. The purpose of a lead-acid battery is only to supply voltage to the ignition system and the excitation winding of the generator during startup.
Ignition system
In IZH Planet 5, the ignition coil converts low-voltage voltage into high-voltage and transmits it to the spark plug. That, in turn, is responsible for the spark that detonates the fuel. To ensure that detonation occurs only in the desired piston position, there is an ignition chopper.
From the factory, this model is equipped with a classic ignition system, which requires periodic cleaning of the breaker contacts and adjusting the gap between them.
Installing a contactless SG on a motorcycle gives:
Control devices
The following control devices are installed on the motorcycle:
Headlight and dashboard lamps
Conventional incandescent lamps are installed as lighting equipment and to illuminate the dashboard. Switching elements are responsible for supplying electricity from the battery to the lamps.
The headlight circuit includes lamps:
Switching elements
Switching elements are various types of switches that close or open an electrical circuit. They can be activated using keys on the dashboard (for example, turn signals) or by sensors.
In IZH Planet 5, the switching elements include:
Other faults
It happens that disassembling/assembling the Izh-Planet 5 box may be necessary if the fourth speed disappears. This is often due to broken bearings on the output shaft. Such a nuisance occurs due to the presence of axial play, displacement of the bearing assembly, or its failure. You can try to fix the problem in the same way as repairing the second gear. If this does not help, you will need to completely disassemble the unit.
When the speed switch jams from a high range to a low mode, the spring system of the switching mechanism has failed. It needs to be replaced. Strained operation of the unit after assembling the Izh-Planet 5 gearbox indicates incorrect installation of the adjusting washers. To avoid this, it is necessary to mark and record the previous placement of these elements during the process.
Instructions for assembling and disassembling the IZH Jupiter 5 engine
First, you need to understand the features of the motorcycle. IZH Jupiter-5 is a vehicle designed for road travel with different surfaces. You can attach a stroller and a cargo module. The appearance of Jupiter-5 is distinguished by the strict classics inherent in the Soviet era, but at the same time it has its own individuality.
The demand for this model lies in the small dimensions of the motorcycle, as well as decent power for that time. The engine of this motorcycle has two cylinders and two strokes. The cylinders are arranged in-line. The maximum developed power reaches 25 horses, which is 3 more than the single-cylinder IL Planet-5. This engine allows the motorcycle to move at a maximum speed of 120 km/h, while it has low fuel consumption.
The Izhevsk Machine-Building Plant began producing IZH Jupiter-5 in 1985, so spare parts are always available. However, the quality leaves much to be desired, which is why parts wear out quickly and the motorcycle requires fairly regular repairs. Sometimes, to find the cause of a breakdown, you have to disassemble half of what you didn’t even know about. Fortunately, in IZh everything is quite simple and the repair can be done at home. Repairing the IZ Jupiter 5 engine is not a difficult task, but if you are going to ride this motorcycle often, then you should not neglect to do the work correctly.
The main problems of Jupiter-5 include the current shock absorbers and cylinders, which alternately refuse to operate the engine. If you have encountered similar problems, then this article may help you in solving one of the annoying problems.
How to adjust a motorcycle clutch?
As always, we delve into theory.
Junker's clutch type is multi-disc in an oil bath. On the left, on the gearbox shaft, sits a basket with alternating disks, thin steel and thick getinaks. They are pressed against each other using 5 (or 6) powerful springs. Getinaks disks are connected to the basket (and, through the motor chain and 2 sprockets with the crankshaft), and steel ones are connected to the gearbox shaft (and, through the gearbox, actually to the wheel). The springs are so powerful that the entire power of the engine, without slipping (and the disks are all in oil) is transmitted to the rear wheel. Next, when you press the clutch lever, the cable pulls the lever (it sits on the right engine cover - look), which pushes the steel rod (it passes through the axis of the drive sprocket, you can take it out and turn it in your hands), and this rod rests on that part a basket with disks, which is connected to the getinax disks, and they, overcoming the resistance of the pressing springs, move away from the metal disks. That's it, the clutch is loose. The engine with its getinaks disks rotates on its own, the steel ones with the gearbox stand still. Attention! There is more than one push rod. There are 2 of them, and between them there is a ball from the bearing (eliminates rotational force). Easily lost! Be careful when disassembling, otherwise you will end up with a failed clutch.
Now about the adjustments.
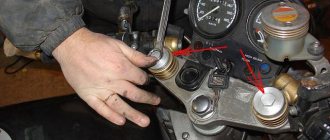
The clutch is adjusted NOT ON THE HANDLE, but by changing the force of pressing the discs against each other. The free play of the cable is simply selected on the handle. The force of pressing the disks against each other is regulated by preloading the springs, on which, for adjustment, “fungi” with a groove for a large flat-head screwdriver are put on. Access to these “fungi” appears by unscrewing the cap on the left engine cover (the hole through which you pour oil into the engine). And not to all of them at once, but only to a part – i.e. to adjust everything you will have to rotate the crankshaft with a kickstarter
IMPORTANT! All springs must have the same preload! Those. all mushrooms twist at the same number of revolutions
Or rather, half a turn - a turn is too large an adjustment step.
What to do if the clutch slips?
1. Make sure that the clutch handle has free play and that you have not unscrewed the adjuster on the handle so that the clutch is constantly depressed. 2. Open the left cover (no need to drain anything, at the same time check the oil level in the engine on the dipstick - it should be between the marks) and evenly, carefully tighten all the fungi half a turn. We start the engine, check the clutch operation, if it still slips, turn it off and repeat the procedure. At the same time, we look at the condition of the teeth on the textolite disks - if they break off on some disk, then it begins to rotate with the steel disks and the clutch operates. Good official Hyundai dealers will help you make the right decision. For an office move, movers are indispensable, I recommend Best-Loader.Ru. Wheel storage in Moscow. What to do if the clutch does not disengage?
1. See paragraph 1. higher. 2. See point 2 above, only the fungi are unscrewed half a turn. Well, the reasons for a driven clutch are natural wear of the discs, weakening of the springs, breaking of the protruding teeth on the getinaks discs, pulling out of the cable and LOSS OF THE BALL when repairing a motorcycle.
Now about what a semi-automatic clutch is.
When you change the speed, the shaft on which the gear shift paw sits turns, and with its fork protruding into the right cover, it presses on the clutch lever (the same lever to which the clutch cable fits and which presses on the steel rod), and thereby duplicates the pressure on the clutch handle by hand. And don’t blaspheme the semi-automatic in vain! A very necessary and useful thing! Firstly, your clutch cable has simply never broken on the road - it’s impossible to get going without a semi-automatic vehicle. Secondly, on the road, starting from 2nd speed, I never used the manual clutch at all - there was no need. When changing the speed, I simultaneously disengage the clutch, change the speed and smoothly engage the drive! (You make one move, oh IT makes 3!
) The only thing is that it’s inconvenient to get going with a semi-automatic vehicle if you’re not used to it, but it’s quite possible.
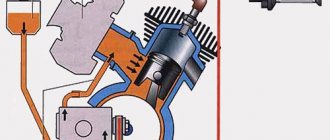
Intake, compression of a two-stroke motorcycle engine IZH
We start moving to TDC and block the purge channel on the left with the upper part of the piston. This creates a vacuum in the crankcase.
While the exhaust window of the cylinder is still open, exhaust and purging continue; after closing, compression of the combustible mixture begins.
The upward movement does not stop, and the edge of the skirt opens the crankcase inlet port. Through which the fuel mixture is sucked from the carburetor. Intake occurs.
Back to contents — ↑
Adjusting the clutch on a motorcycle
The clutch is regulated by changing the force of pressing the discs against each other, which, in turn, is regulated by preloading the springs. To do this, special “fungi” are put on the springs, which can be accessed after removing the cover on the left engine cover (oil hole). It is worth saying that in this way you can not get close to all the “fungi”, but only to some of them. All “mushrooms” can be adjusted by rotating the crankshaft using the starter
It is worth noting that absolutely all springs must be equally tensioned, i.e. each “mushroom” is twisted the same number of half turns
Thus, if the clutch is slipping, there are only two steps to follow:
- Make sure there is free movement of the handle. If it is not there, the clutch will be constantly depressed.
- Open the left cover, without draining any liquids, and tighten all the “fungi” evenly. After this, you should check the operation of the clutch. If slippage continues, it is worth repeating the procedure.
During adjustment, you should be careful and pay attention to various details, for example, the oil level in the engine, the condition of the teeth on the discs, etc. If after adjusting it there is no improvement, then you can begin the process of replacing the clutch
If after adjusting it there is no improvement, then you can begin the process of replacing the clutch.
It is worth noting that the malfunction of this element of the motorcycle should not be neglected, because if at the beginning of the day the clutch begins to slip, then after just a few hours of intensive motorcycle riding, it can completely die, thereby causing harm to the vehicle as a whole. After all, small particles of burnt clutch discs get into the oil, along with which they are sent to the precision joints of the liners, connecting rods and pistons, thereby damaging the engine
Therefore, if the time has come to replace the clutch, it should be done immediately.
With constant use of the motorcycle and long mileage, the basket itself wears out along with the clutch - wear appears on the edges of its longitudinal slots. Its appearance in these places makes it very difficult for the clutch discs to move. A shallow hole can be corrected using a regular file, however, this is a completely extreme case; still, if it appears, it is better to install a new basket.
So, there are different types of motorcycle clutch, however, the most common type is the multi-plate clutch in an oil bath. This is what is most often installed on motorcycles. Therefore, we will consider replacing the clutch using the example of a multi-disc clutch.
External tuning Izh Jupiter 5
In most cases, tuning primarily affects the appearance of the motorcycle. They are trying to make it similar to a cross-country version, “comb it” like a high-speed sports bike, or make it into an imposing chopper. It depends on the personal preferences of the tuning maker what changes to what.
The greatest effect in external transformation can be achieved by installing new fairings. There are two options: purchase a ready-made motorcycle from a different model and try to install it by changing the mounts, or order an absolutely unique one according to individual taste. The second option, as a rule, costs a little more.
In addition, when tuning the Izh Jupiter 5 motorcycle, they resort to chrome plating. Almost all metal parts that have the ability to shine fall under it. Typically this includes the exhaust pipe, engine block, fork, wheel rims and much more.
Engine tuning
Upgrading a power unit usually means increasing power. This issue can be solved in a simple way:
- cylinder boring;
- correct installation of valve timing.
The first method is outrageously simple, but not in the case of the fifth Jupiter. The fact is that the cylinder system simply will not survive serious boring due to its fragility. And considering that the “exhaust” from such a modernization practically does not improve power, it can be immediately discarded.
The second method is more practical and effective. Thanks to the skilled boring of the gas-passing cylinder windows, the motorcycle noticeably increases power.
If you want to make a real rocket out of your Izh, you can additionally install a carburetor on each cylinder and balance them correctly. This will optimize the fuel supply and increase the speed characteristics of the motorcycle. The installation of contactless ignition will also have a positive effect on the bike.
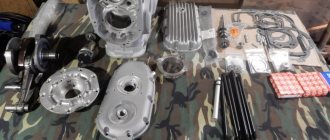
Preparing for assembly
Preparation for assembly can be divided into two main stages: measuring and, if necessary, eliminating the axial play of the tracer shaft and checking the suitability of the secondary shaft bearing for further operation.
The first stage is measuring and eliminating the axial play of the copy shaft
We put adjusting washers on the tracking shaft from the locking side. In my case, there were four adjusting washers, but you may have more or less, or maybe not... We move the locking bar to the side and install the copy shaft in its place. We put a standard thrust washer on the second end of the tracing shaft.
We place a new gasket (required) on the plane of the gearbox cover connector, on which you will later finally assemble the gearbox, and tighten the gearbox cover fastening screws with the required force.
We turn the engine over and measure the axial play of the copy shaft, the norm is 0.2-0.4 mm, but it will be better if you can ensure the axial play at a level of no more than 0.2 mm. Adjustment of axial play is accomplished by simply adding or removing shims.
I measure the play with an indicator. If you don’t have one, try measuring the backlash with a caliper; if you don’t have a caliper, so be it - measure by eye...
Second stage: checking the suitability of the secondary shaft for further use
Under normal operating conditions, the secondary shaft bearing runs for quite a long time. But no matter how much we want and try, it wears out. It would be nothing if it weren’t for safety: if your secondary shaft bearing falls apart while driving, and it will certainly fly apart if you don’t change it in time, the gearbox sticks together with the rear wheel, and it’s tight and you’re grinding the asphalt with your butt...
Carefully, take out the secondary shaft over some tray and carefully inspect the shaft bearing raceway, the races and the rollers themselves. The working surfaces of the bearing and rollers should be free of holes, edges, signs of wear or overheating
The path must have a perfectly flat working surface.
Example of a secondary shaft race and race in perfect condition.
To facilitate reassembly, apply some kind of lubricant, such as lithol, to the treadmill and carefully place the rollers on the track and, turning it a little, insert the shaft into the cage. As soon as the sprocket splines rest against the edge of the oil seal, use a thin screwdriver in a circle to straighten the edge of the oil seal and push the shaft until it stops. And immediately, so that the shaft does not fall out, put the sprocket on it and secure it with a nut.
When is it necessary to repair and adjust the gear clutch on an Izh motorcycle?
Regardless of the amount of experience the motorcyclist has, the feelings regarding gearbox malfunctions are almost the same:
- At first it seems that the clutch is slipping slightly. After two or three days, confidence appears - yes, it is slipping, because as soon as you add speed, the acceleration rate lags behind the engine speed level. The breakdown is especially obvious when moving uphill.
- The clutch “leads” or the clutch is incompletely disengaged when the control lever is depressed. In such a situation, the disks of the assembly remain pressed against each other and do not stop transmitting torque to the gearbox. You can finally verify such a breakdown after lifting the rear wheel - it continues to rotate in this situation.
If you want to know how to adjust the clutch on an Izh-Jupiter 5 motorcycle, then information about the reasons causing the listed factors would be useful:
- Use thicker oil in winter.
- Weakening of pressure springs.
- Worn clutch discs.
- Wear of clutch control mechanism elements.
In most cases, if signs of slipping or incomplete disengagement of the clutch are detected, a simple adjustment of the mechanism is required. To do this, it is enough to have a “13” key and a slotted screwdriver.
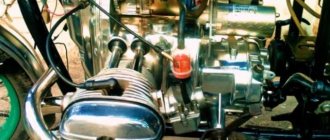
Engine tuning
The two-cylinder two-stroke engine with a working volume of 347.6 cubic meters was installed on the motorcycle. see most often has air cooling. The number of models released in recent years of production that used liquid cooling is negligible. The power that the engine develops is 24 hp. With. – can be increased by making some simple modifications:
- Increase the compression ratio by removing about 1.5 mm from the adjacent plane of the block head. But this will require switching to fuel with an octane rating of AI-95 and making changes to the design of the crank mechanism. First of all, replacing the crankshaft bearings. You will also have to select spark plugs with a different heat rating.
- Replacing crankshaft bearings. There is an opinion that only high-quality imported bearings can cope with increased loads. In fact, domestic developers have installed bearings with a large margin of safety. If you manage to purchase high-quality Russian analogues, they will do the job perfectly. Trying to change the size of the crankshaft journals is simply harmful. The thickness of their hardening layer is small and when more than 1 mm is removed from the surface of the journal, the service life of the part will sharply decrease.
- Replacement or modification of pistons. The stock parts aren't that bad. Don't rush to look for a replacement for them. To increase power, it will be enough to lighten the pistons by removing casting flash and excess material from them. Parts should be carefully adjusted according to weight. It is desirable that the difference does not exceed hundredths of a gram. Such simple engine tuning will be more effective than installing a zero-resistance air filter or a direct-flow muffler. Although it is, of course, possible to install forward flow on IZ Jupiter-5.
- Installing another carburetor. If possible, it's worth shelling out for a good Mikuni carburetor. Don't go for a large diffuser size. The standard diameter of 32 mm will be quite sufficient. But it’s definitely worth removing the protrusions on the intake and exhaust manifolds and polishing the internal channels of these parts. This will not only provide an increase in power, but will also help reduce fuel consumption below five liters.
- Replacement of the ignition system. Installing BSZ on IZ Jupiter-5 only makes sense if you intend to use imported components. Most likely, the quality of domestic components will reduce all the advantages of the contactless ignition system to zero and the rework will not give the desired result.
Do not forget that increased power will improve the acceleration dynamics of the motorcycle, but will not provide a significant increase in speed. To increase speed, you will have to change the transmission gear ratios, selecting different sprockets for the gearbox and rear wheel.
Assembly
In a carefully washed and prepared for assembly crankcase we place the input shaft, the first gear gear and the follower shaft with pre-selected shims.
We put a fork on the gear-carriage for engaging the second-fourth gear (it is smaller than the gear-carriage for engaging the third-first gear, you can’t go wrong) as shown in the picture. We put the gear on the input shaft and insert the fork pin into the upper groove of the follower shaft.
We put a fork on the gear-carriage for engaging the first-third gear, as shown in the picture, place it on the first gear gear and insert the fork pin into the lower groove of the copy shaft.
We install the fork guides in their places (with grooves towards the clutch basket). By the way, if necessary, the “Planetovskaya” gearbox can be assembled and disassembled without disassembling the clutch basket and without removing the guides. But to do this, during installation you will have to pull the tracing shaft towards you a little, insert the pins of the forks into the grooves and after that, remove the locking bar and push the tracing shaft all the way.
Install the intermediate shaft.
On older engines, the end gear is installed separately. On later ones, it is made integral with the intermediate shaft.
We fill the return spring of the gear shift shaft as shown in the picture.
We check the functionality of the gearshift shaft pawls: compress and unclench them several times
We pay special attention to their working edges: they should be sharp and not licked. And don’t forget to check the spring that compresses the pawls: it must be of the correct shape and ensure the elasticity of the pawls’ movement
We squeeze the pawls and install the gear shift shaft in its place.
We rotate the tracking shaft with the mark on the body towards the gear shift shaft and so as not to miss the mark during installation, we cover the gap between the teeth opposite the mark of the tracking shaft with lithol or paint it. It will be more noticeable this way.
We look for a mark on the sector and when putting the sector on the gear shift shaft, we combine the mark on the sector with the mark on the tracking shaft body: the tooth opposite the sector marks should strictly fit between the teeth opposite the mark of the tracking shaft.
To ensure that our marks do not get lost during installation, we tie together the sector and the copy shaft with ordinary sewing thread.
We put standard thrust washers on the input and follower shafts and insert the guide bushings of the gearbox cover into place.
We degrease the surfaces, apply sealant, lay the gasket, install the cover and tighten the mounting bolts with the maximum possible force. We adjust special washers under the bolts marked with yellow arrows.
After tightening the gearbox cover, we check the axial play of the primary and secondary shafts. Normal: 0.2-0.4mm.
If the play is greater than normal, remove the plate, seat the bearing and adjust the required number of shims under it.
Motorcycle Izh Planet 5 engine specifications
Two-wheeled motorcycle IZH Planet 5 engine, which developed only 22 hp. pp., throughout almost the entire period of its production, and from 1987 to 2008 it was considered one of the most common middle-class motorcycles among domestic buyers.
- Engine for the fifth model.
- Reasons for repair.
- Engine modernization.
This motorcycle was developed and manufactured at the Izhevsk Machine-Building Plant (Izhmash), which is located in the capital of the Republic of Udmurtia. The main advantages that ensured the popularity of Izhevsk motorcycles, and not only in Russia, should be considered:
Ease of use. Simplicity of design and maintenance. High overall reliability. Economical, repairable motors. Affordable prices.
In addition, Izhmash constantly sought to make changes and improvements in the design of its products, including the Izh Planet 5 motorcycle model and the Izh Planet 5 engine. At the plant itself, production was regularly modernized in order to improve quality. Thus, the assembly of power units, including the assembly of the IZH Planet 5 engine, was carried out at a specialized technological site.
Engine for the fifth model
The Izh Planet 5 engine contains the following main characteristics and indicators:
- execution type – two-stroke with one cylinder;
- cylinder working volume – 345 cubic meters. cm;
- piston diameter – 72 mm;
- power – 22.0 l. With. at 4800 crankshaft rpm;
- battery voltage – 12 volts;
- cooling option – air;
- ignition type – contactless;
- the ratio of the mixture of oil and gasoline (A 76) is 1/30.
Reasons for repair
Complete disassembly of the Izh Planet 5 engine during repair work is carried out if damage or breakdown of the following elements occurs:
- crankshaft;
- bearings;
- piston;
- connecting rod
Failure of these parts can occur due to engine jamming, general severe wear, which is accompanied by increased noise during operation, as well as various knocking noises in the crankcase. In addition, repair of the Izh Planet engine with its complete disassembly is carried out when the crankshaft seals are worn out. At the initial stage of production of power units, the reed valve on the Izh Planet 5 had certain technological shortcomings associated with low strength. Therefore, it quickly collapsed, its elements fell inside the cylinder, which required further disassembly and, in most cases, replacement of the Izh Planet 5 piston.
If, when operating the engine, all routine and technical maintenance procedures established by the manufacturer were observed, and appropriate technological materials and fluids were used, then it was operated for a long time, while maintaining its technical parameters.
Engine modernization
The design features of the IZH Planet 5 motorcycle are that the owner, having certain technical skills, could do tuning work with his own hands to give his motorcycle a more modern look and increase its power. Tuning the IZH Planet 5 engine was aimed at increasing its power. Such work usually began with repressing the crankshaft of the IZH Planet 5 engine, which made it possible to increase its power by 10-15%. The next step to increase power was boring the cylinder to a repair size of 76 mm and modifying the piston group. In some cases, a piston group from an IZH Sport motorcycle was installed.
For more charged versions, turbocharging was used on the engines of IZH Planet 5 motorcycles. But, no matter how well the work on modifying the IZH Planet 5 engine is carried out on your own, this still leads to a decrease in service life and an increase in the number of repairs.
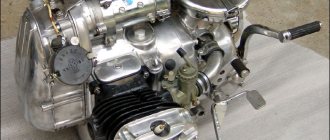
How to disassemble the IZ Jupiter 5 engine
So, disassembling the IZ Jupiter 5 engine includes the following steps:
- First you need to wash the hard-working heart of the motorcycle. You need to rinse it as thoroughly as possible, since dirt should not end up inside the engine, otherwise most of the work will most likely go down the drain.
- Take a piece of paper with a pen to write down the location of the parts and the order in which they are installed as you work. All bolts, studs and dowels have their place and order of tightening. Therefore, there is no need to scatter them in different directions, but it is better to fold them as they are disassembled.
- It is necessary to tighten the exhaust tube. Don't throw it away, tie it to something strong.
- After unscrewing the 4 nuts, remove the cylinder covers and the cylinders themselves, being careful not to damage the gaskets. If the gaskets are damaged, then the pressure inside the engine will be compromised.
- Now you need to tighten the tube on the chain cover. We knock out the stud on the front of the engine halfway. It is important not to bend it, otherwise you will have to look for a new one.
- Unscrew the nuts and remove the bolt securing the engine at the rear. It is better to lay out the parts in groups so as not to lose or mix them up.
- We unscrew the seven bolts securing the pan, remove the flywheel plate and gasket, and fix the engine. It is better to fix the engine on a workbench; if you don’t have one, then a massive table will do.
- Using a socket wrench and a long, strong pry bar, loosen the bolt holding the take-out flywheel together. Be careful not to break the thread on the cap - this will make the task much more difficult.
- Disconnect the crankcase halves. We don’t put them away, they will come in handy soon.
- Remove the take-out flywheel and veneer.
- We take out the middle and front shafts, the follower shaft, and remember the installation location of the adjusting washers. It is important to remember their exact location, otherwise parts will not fit together later.
- We unscrew the pins securing the crank chamber covers and remove the covers with rings. The pins are quite fragile, if you break them while unscrewing them, it will be difficult to get them out.
- We remove the crankshafts from the halves of the pallet.
- Pull out the bearings of the crankcase half. Don't bend the crankcase or your oil will be used up very quickly.
- Unscrew the screws and the race with the crankshaft oil seal.
- We take out the installation rings and knock out the seals.
- We knock out the bearing of the right half of the pan.
- Disassembly of the IZH Jupiter engine is completed.
Now that you have looked at all the parts from the inside and found the problem, we replace the broken part. The easiest way is to look on the Internet at a spare parts sales site. You can also find it at a regular city market (flea market). Before assembling the IZH Jupiter 5 engine, carefully inspect its surface for chips, cracks, and wear again.
After you have thrown out the broken part and stuck a new, shiny one in its place, you need to return everything to the way it was. Assembling the IZ Jupiter 5 engine is a little more difficult than disassembling it. Everything is put together in reverse order.
As you can see, there is nothing complicated about this. It's another matter if you want to add a couple of horses to your pet. Then you will have to sweat a little, because tuning the IZ Jupiter engine will require a little patience from you.
Purpose of the IZH Planet coupling
Clutch. the name of this node indicates the work it does. In our case, the crankshaft meshes with the gearbox of the IZH planet engine. The clutch should move smoothly, without jerking, which is necessary to start the motorcycle and smoothly change speed. In case of heavy loads, it protects engine parts from damage.
The clutch is located in the left half of the crankcase, under the left engine cover. To get to it, you need to drain the oil and remove the cover before removing the arms and unscrewing the mounting bolts. The clutch is always in working condition, the discs are tightly compressed by springs. The engine transmission consists of two sprockets. The small wire is located on the crankshaft. The big star led the drum. The connection is made by the motor circuit. The engine's gear ratio is 2.17 for all single-cylinder IZ models. Switching off occurs using a special device. The shutdown mechanism is installed in the right engine cover. The adjustment is made using this mechanism.
Main stage
As noted in the assembly diagram of the Izh-Planet 5 box, further disassembly operations are carried out above the insides of the roof of the unit, since the secondary shaft and sector could remain in it. If it is necessary to remove them, you need to straighten the petals of the lock washer, unscrew the nut, remove the star and washer. Holding the gear very carefully to prevent the shaft from jumping out, the cover is moved to a clean and flat surface with the gear facing up.
It is worth noting that the bearing of this part of the assembly does not have a retaining ring. Therefore, when removing the shaft with bearing, the rollers may fall out, so be careful. If the specified element has exhausted a decent service life, there is a risk that when dismantling the secondary shaft, the outer ring may jump out of the seat and remain on the rollers. Next you need to start pressing out the oil seal. To do this, the installation rings are removed from the hole in the cover, after which the outer ring of the bearing is removed.