The Ant scooter can be seen quite often on Russian roads. It has good maneuverability, is easy to drive and reliable. However, like any other wheeled vehicle, a scooter requires regular maintenance. Not all owners of this vehicle know how to properly check the charging relay. We will tell you about this today. And you can purchase spare parts for the Ant motor scooter on the website https://motoimport.net/g18190231-zapchasti-motoroller-muravej. There is everything that is useful for repairing vehicles.
Ignition installation
Installing the ignition on an Ant scooter, as on any motorcycle with a single-cylinder engine and a battery ignition system, does not require special knowledge or effort. All you need is very thin paper, a narrow rod and a set of keys. So, how to set the ignition on an Ant scooter:
- Remove the spark plug and set the piston to top dead center (hereinafter referred to as TDC).
- Insert a rod through the hole from which the spark plug was removed and press it against the piston head. Make a notch at a length of 4.5-5 mm
- Close the breaker contacts when the piston is at TDC. Place paper between them and pinch.
- Turn the crankshaft counterclockwise as slowly as possible and pull the piece of paper at the same time.
- When the paper is released when the piston is lowered to the depth of the mark made, the ignition will be set correctly.
Three advantages:
Thanks to many years of successful cooperation with manufacturing plants, we are able to provide you with the most favorable and low prices for spare parts
Our price list contains more than 6 thousand items . We offer our customers everything from specific bolts and small fasteners to complete units and large body parts
Our organization has created an optimal and stable system for delivering spare parts to any region of the country. Timely delivery is carried out both by rail and by road through transport companies.
Source
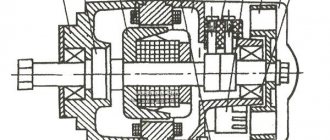
Electrical circuit of the motor scooter Ant 2M
The electrical wiring of the Ant 2 and 2M scooter (prototype – Tulitsa 2) is located at the bottom of the scooter. The cargo-passenger version is slightly different in appearance and electrical equipment. A more detailed power supply diagram of Ant 2M allows you to repair and tune the electrical equipment of the scooter.
- Direction indicators
- headlight
- Indicator light (red) for dynastarter operation in generator mode
- Indicator lamp (green) for neutral activation
- Indicator lamp (orange) for direction indicator operation
- Indicator lamp (blue) for turning on the high beam headlights and the speedometer scale illumination lamp
- Sound signal
- Light breaker relay
- Side light switch
- Ignition switch and handbrake brake switch
- Switch for high/low beam and direction indicators
- Relay regulator
- Dynastarter
- Day/night switch with emergency engine shutdown
- Breaker
- Circuit breakers
- Capacitor
- Ignition coil
- Spark plug
- Neutral warning lamp switch
- Rechargeable batteries ZMTR-10
- Foot Brake Light Switch
- Rear light with brake light
The dynostarter as a device is as far from complete perfection as our VAZ plant is from the premium segment. But if at least once a season you carry out competent maintenance of the collector unit, switching equipment, and battery, then with all its inherent shortcomings, the dyno starter can last a very, very long time, up to 30,000 km, or even more.
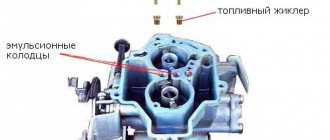
We measure compression
Compression is the pressure in the cylinder at the end of the compression stroke. The magnitude of this pressure allows you to assess the condition of the engine. A working Alpha moped engine should have a compression of at least 8-10 kg/cm² (“atmospheres”) . If it is less, then the engine is faulty: either the piston rings are worn out or the valves are leaking. Most likely the engine will need to be disassembled.
Compression is measured using a compression meter - a special pressure gauge that is inserted or screwed in (depending on the design) instead of the spark plug.
Before measuring compression, it is advisable to warm up the engine, but if it does not start, you will have to measure it cold. It is also advisable to unscrew the carburetor or open the throttle valve and turn off the fuel supply.
The engine must be rotated using an electric starter or kickstarter until the compression meter readings stop increasing.
When the compression is less than 8 atmospheres , you need to pour 10-15 ml of engine oil into the spark plug hole using a syringe. If after this the compression increases noticeably, it means the piston rings are worn out . If not, then the problem is in the valves or camshaft drive . The most common reason: the camshaft drive chain is broken or has slipped, or the valves are bent/broken.
Schematic diagram
As for the Ant's ignition system, you can upgrade it yourself. You can reduce the current passing through the contacts of the breaker using a transistor switch TK-102 (Fig. 1), which was used on the most common trucks in the past, ZIL-130, GAZ-53A, etc.
By reducing the current in this way by 6-8 times (to 0.3...0.8 A), we will make the breaker contacts almost eternal. The disadvantages of this solution include increased requirements for the cleanliness of contacts, since oil, dirt and dust caught between the contacts no longer burn out, as was the case with a conventional ignition system.
Rice. 1. Connection diagram of the transistor switch TK-102.
The use of a transistor switch makes it possible to use a higher-voltage B-114 ignition coil, which has a large secondary winding (41,500 turns). Since the voltage on the spark plug will increase from 17 to 25.30 kV, you can use a spark plug with a gap of up to 1.2 mm, which will save about 30% on gasoline.
What can you do when the battery is not charging?
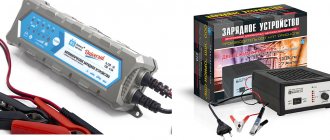
If your car battery is not charging, you can try to restore its functionality. If an acid battery has been in use for many years, then its capacity can be restored to a large extent using a charger with a training mode. Such a device periodically supplies a charge to the battery terminals, after which the battery discharges for a short time. A large number of repeated charge-discharge cycles can reduce oxide deposits on the internal plates, and even a worn-out battery will begin to charge, including from the car’s generator.
Basic faults
- Mechanical, caused by natural wear, combustion of windings, destruction of contact groups
- Structural, due to design features
- Malfunctions of the relay regulator that lead to dyno starter failure
The most unpleasant malfunctions are related to mechanics: combustion of windings, interturn short circuit, wear or destruction of the commutator. Other mechanical faults such as wear or sticking of brushes, contamination of the commutator, breakage or oxidation of wires and terminals can be eliminated quite easily.
Diagnostics
The first sign that something has burned out, shorted or broken in the dyno starter or relay regulator is when, out of the blue, right in the middle of the road, your battery charge control lamp comes on.
If this happens to you, then the first thing you need to do is inspect the wires going from the dyno starter to the relay regulator, check the fuse, remove the cover from the relay regulator and at least visually determine the integrity of its elements, remove the rotor and see what’s wrong with the brushes and collector and if nothing suspicious is found there, turn to a very competent electrician for help.
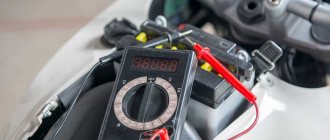
How to find out that the battery is not charging
Before deciding whether to repair the system that supplies the battery with charging current, you need to make sure that the problem actually exists. That is, you should check that there is no charging precisely because of the release of elements and parts responsible for generating and directing electrical voltage to the battery terminals.
The fact that the battery does not charge from the generator may not only be the fault of the generator. Lack of electrical contact in the wiring, malfunction of the electronic regulator and failure of the battery itself can result in the fact that the backup current source will not restore the required level of energy while the engine is running.
Connection
- To terminal “B” we connect a thick red wire coming from the battery and a red thin wire with a fuse coming from the ignition switch (terminal AM)
- To the “P” terminal we connect a thin orange wire coming from the ignition switch (CT terminal)
- To terminal “C” we connect the thick red wire coming from the dyno starter.
To terminal “W” we connect the thin black one coming from the dyno starter
To the “YaSH” terminal we connect a thick black wire with a fuse coming from the dyno starter, a thin black wire coming from the dyno starter and a blue wire going to the generator charge control lamp
Treatment
- Lapping the head
- We cut out a head gasket from thin paronite (0.6-0.8 mm) (using it we will forever eliminate the gap between the liner and the head), smear it with lithol, wait 30 minutes until the gasket becomes limp, put it on the cylinder and tighten the head
- We install a new oil seal
- With strict adherence to all the canons of Feng Shui, we screw the flange to the crankcase
- Let’s pull the “drain stick” and enjoy the flawless operation of the engine
Disassembly
We remove everything that interferes with the removal of the rotor, hold the rotor by the fan with your hand and unscrew the nut
A good owner should have a washer and a lock under the nut. The bad one won’t even have a nut...
Remove the rotor from the crankshaft. The rotor can be removed either with a factory puller or with a homemade one - it makes no difference.
First of all, we inspect the rotor commutator and brushes. The commutator must not show any wear or damage. For example, this collector is just dirty and after we wash it, the dynostarter will start working again.
And some deer broke out the lamellas of this collector. Such a rotor will be difficult to help and easier to throw away. To prevent this from happening to your rotor, select bolts for the coupling for the magnet and the fan of the appropriate length, and do not put everything you have on hand there...
This collector was pulled up by something, the lamellas were shorted together and the dynostarter died. If you find a good turner, he will be able to sharpen the scuffs and the rotor’s performance will be restored.
There are situations when the rotor is dropped or the windings are hit. You understand that damage to the power windings will not improve the reliability of your scooter’s power supply system, so handle such devices very carefully and use pullers, and do not knock them down like tractor drivers with a hammer.
On this rotor, someone smacked the windings with relish.
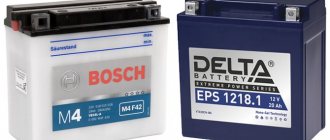
Causes of malfunction of starter car batteries
Starter batteries can fail under improper operating conditions. If a small battery is installed on a powerful car, which will need to work in high load mode to start the engine, then very soon the battery plates will be destroyed and its further operation will become impossible. Batteries with significant capacity indicators, on the contrary, will not be fully charged when installed in small cars, and the generators of such cars will constantly work at the power limit.
Incorrect operation of the battery may also involve failure to comply with basic safety standards. For example, the use of tall batteries with terminals on the top cover in vehicles with insufficient space under the hood where a chemical power source is installed may result in a short circuit between the terminals. One such event is enough for the battery to completely fail.
You should not leave a discharged battery in an unheated garage or in a car outside in cold weather. The density of the electrolyte in such batteries is extremely low, so freezing of the liquid can occur even at a relatively low sub-zero temperature. As a result of ice pressure, the plates inside the battery will be destroyed, which will also make further operation of the device impossible.
Battery testing and restoration
If the performance of the battery can be restored, then this can be done in a garage using a minimum set of tools and materials. Even a short circuit of the plates can be eliminated if there is a desire to spend a significant amount of time and effort.
Low electrolyte density
On maintained batteries, the density of the electrolyte may decrease significantly. As a result, the battery will not be able to accumulate sufficient energy even with a working generator. A decrease in density occurs due to dilution of the electrolyte with distilled water due to loss of liquid through cracks in the battery case or as a result of splashing through traffic jams when driving on a bumpy road or when the electrolyte is constantly boiling.
The density of the electrolyte can be determined using a hydrometer. This device is a small elongated tank in which there is a submerged float with a scale. The electrolyte is drawn into the device by means of a vacuum that appears when the bulb in the upper part of the measuring device is squeezed. The less dense the electrolyte, the lower the float will fall in the collected electrolyte. The exact measurement result can be determined by the point at which the electrolyte level coincides with the scale.
Low electrolyte density can be eliminated by pouring a new mixture of water and sulfuric acid into the jars.
Short circuit of plates
If the plates are short-circuited, the battery will also not charge. This malfunction is determined by the absence of boiling of the electrolyte in the damaged jar. Repairing this fault is very labor-intensive. The performance of the battery is restored by replacing the can where the plates were shorted. For this purpose, you can use a battery of the same brand as a “donor”. Despite the possibility of fully restoring the battery in this way, it is much easier to purchase and install a new battery.
Sulfation of plates
Sulfation is a natural process during the operation of a car battery. To reduce the intensity of this process, you should not leave the battery discharged for a long time. Low electrolyte levels also negatively affect the condition of the plates. Under such conditions, exposed internal elements are coated with a sulfide layer much faster than parts of the gratings in liquid.
In addition to using special chargers to train the battery, you can use periodic discharge (up to 10.5 V) followed by complete restoration of the charge. By repeating several similar cycles, you can largely get rid of the oxide layer on the lead plates.
If the battery is not charging, you should not postpone diagnostic measures. Regardless of the reason for the lack of charging current, delays in repairs may lead to the need for more complex and expensive work. Most of the testing and restoration operations are easy to carry out in a garage, but by contacting a specialized workshop you can significantly save time, because experienced technicians can easily detect the reason for the non-standard operation of the vehicle’s electrical system devices.
see also
Comments 10
If you still have a pressing question, send your email, I’ll send you a diagram for remaking the RR, very sensible, or look at the website motorscooter.ru
There is a dynastarter, and it has its own relay, with alternator-starter mode switching. It’s better, of course, to look for something native, but if you don’t have it, you can make something of your own if you have a specialist in electricity who understands. And the Lada transmissions, all these “tablets” and “chocolate bars” with old generators, work constantly. I installed the R-362 on a stationary diesel engine, as well as the R-356 on LUN generators, everything worked. Who cares -
You can’t put a relay from a Lada there, the generator design is not right.
VAZ CHOCOLATE, IF THE CURRENT IS 12 VOLTS, IF 6 VOLTS THEN THE CONTACT RELAY IS THE OLD LADY, WHICH IS ADJUSTABLE.
It’s better to look for something native, boo - they did it well before.
It won’t be a problem to find, you can hardly find analogues.
ready to sell this. write in PM
What happened to the original relay?
Is there a PP121 relay? It seems like the same thing should be on Tula... although I don’t know what’s easier to find.
Yes, in Tula it’s the same. order from the Internet or look on Avito in Russia, maybe there is something similar.
Electronic ignition on Ant
no, friends, I don’t agree, it’s already so expensive, I’ve been riding for 5 years and it works stably and cool, especially since it’s 6 volt, but it’s set to 12 volt, that’s the advantage
Today I took my engine apart and carried out an audit, so to speak. I bought a new piston! Zhen, it would be nice if you made a video on replacing the upper connecting rod bushing. I’ve watched a lot of videos but I don’t have the material base and I’m changing it for the first time. Here's a simpler way to explain the thread, so to speak for the village))))
Zhen, where was the owner going to turn this motor, it has no losses and no flywheel and forced cooling
Zhenya, hello. Help, please, with advice. I have a kit scooter. I turn the engine with the starter, but there is no spark. When I use the kickstarter, there is. The battery is normal, the starter turns quickly. I can’t figure out what the problem is. Such scooters have an ac cdi system (communicator it is powered by the generator). As I understand it, neither the battery nor, especially, the starter have anything to do with sparking with such an ignition system. I can’t understand how a starter can suppress a spark? Maybe you, my friend, are a specialist. Have you encountered such a problem?
and from experience using an ant, I will say that this is the most successful engine, economical, durable, unpretentious and high-torque, not afraid of overheating, gearbox with a good margin of safety
I removed this flywheel, the consumption dropped, the thrust increased, but the magnets regularly fail contacts
Fuck it, I have the original generator and magneto, no problems, and it starts from the starter and all the lights are there
Who understands the murovya motor, write, I can’t start one
Regarding the Soviet cycle, this is in vain. any Japanese does not live more than 10-15 years. and I have goosebumps 78g. release and working
It turns on very badly, it’s not worth doing.
Respect, it turned out well. I’ll definitely do it again. I’m interested
Does this ignition have a variable VOP? Or is it constant at all speeds?
Matveev is good at self-promotion and reinventing the wheel, it has already been invented, starting the engine with a key is a HUGE plus for Ant. I use Kik very rarely. Instead of dealing with the hassle and spending money on alterations, it is better to install an electronic ignition, which has been produced for a long time, is inexpensive, and is installed in standard places. Electronic ignition can be installed in 1 hour. The result is excellent - gasoline savings, stable engine operation, continuity, ease of starting, even without a battery. Hence the conclusion - it is better to modernize existing devices than to make changes to a factory product! I think so. Alexander.
oh damn, they just got rid of the starter in vain. I just made a butterfly modulator at the end of the cam, and to them a commutator and a hall sensor from the figure eight. and there is no need to smoke genych.
guys, get the ignition from delta 70 on the ant and the ignition will fit and put the impeller in place
Make a video like this only with Minsk.
Evgeniy, please tell me which model of moped the controller is best suited for, pros and cons, my motorcycle is MT, Dnepr, thanks in advance, I’ll put it ^
Cleaning the collector
Take a small screwdriver and clean out the dirt between the slats. The collector must be cleaned very carefully so as not to scratch the lamellas.
After cleaning, blow the collector with compressed air, wash it with clean gasoline and wipe it dry with a rag. It is best to wash the collector with a brush: wet the brush in clean gasoline and wash it until the dirt is completely removed. When the gasoline has completely evaporated, take a piece of some lint-free cloth, moisten it a little in gasoline and carefully rub the collector with the maximum possible force until it is perfectly clean.
Tula (motorcycle)
Dear user! To use the site, please enable JavaScript in your browser. Forgot your password? An ATV is a combination of a motorcycle, a car and an all-terrain vehicle. It seems that every vehicle brings its best qualities to the ATV.
So, last fall, “Motoryga,” as I call it, was safely laid up until spring, the oil and gasoline were drained, and the battery was removed. I also had a Ford Ranger pickup back then, so I did some tinkering with it in the winter.
Checking the stator windings
We unscrew the stator mounting bolts, tap it around with a wooden mallet, remove it from the engine, turn it over with the wires towards you, switch the tester to the continuity mode, connect the tester probes to the two rightmost terminals of the windings, if the tester beeps, there is no winding breakage.
We do the same with the remaining two wires: put the tester into dialing mode, connect the tester probes to the ends of the wires, if the tester beeps, there is no winding break.
Adjusting the gap between the breaker contacts
Starline car alarm diagnostics and DIY repairs
Remove the rubber plug covering the breaker from the fan cover, insert a screwdriver into the grille and turn the armature with a screwdriver until the breaker contacts are separated to the maximum possible distance from each other.
Unscrew the bolt for adjusting the contact gap of the breaker
We insert a measuring probe 0.4-0.6 mm thick between the contacts, move the breaker plate until the probe begins to move with a slightly noticeable force, tighten the bolt, turn the engine a few revolutions and check what we got: if the gap is “gone” - We re-adjust.
Contactless ignition Ant, Tula (FULL set of BSZ Muravey 2.5)
The Ant TG 200 is based on its passenger car predecessor, the Tula T-200. The wiring diagram does not have complex components and is suitable for analogues of the Ant TG 200 scooter: TG-200F, TG-200I, TGA 200, TGA 200-01.
- Direction indicators
- Scooter battery
- Speedometer
- Speedometer backlight
- Spark plug
- Ignition coil
- Capacitor
- High beam and horn buttons
- Front side lights
- Low and high beam headlight
- Turn signal switch
- Sound signal
- Turn signal relay
- Switch
- Side light switch
- Battery charging indicator
- Neutral indicator
- Neutral sensor
- Clutch
- Scooter engine starter
- Breaker
- Egnition lock
- Fuse
- Brake light switch
- Relay regulator
- Switch block
- Brake light
- Tail light
Generator from Lada for scooter "Ant"
Generator from Lada for scooter "Ant" Read more
Generator from Oka on Ant Read more
homemade generator on a scooter Ant.AVI Read more
Review of the generator from the Lada for the Ant scooter Read more
Generator from vases to ants Read more
Installation of an external generator from ZAZ on Izh Muravey Read more
Generator from fret to Ant More details
How to connect a generator from a tractor to an ant scooter Read more
Generator from tractor to scooter ant Read more
Generator (dynastarter) Ant (Tula) More details
Cargo scooter ANT with car ignition and generator More details
Car wheels on Ant Read more
Reworking the charging relay on the ant. More details
Do-it-yourself ignition from a scooter to an ant. as simplified as possible. More details
My Protection Relay for the Ant Motor Scooter. More details
Car wheels on ant | Motoraga Read more
motor scooter Ant BSZ from VAZ 2108 Read more
VAZ generator for an “ant” engine on a homemade buggy. More details
An ant with a bridge and a Zhiguli gearbox. More details
Motor scooter TULITSA. We repair and remodel. Part 5 Read more
Electrical circuit of the motor scooter Ant 2M
The electrical wiring of the Ant 2 and 2M scooter (prototype – Tulitsa 2) is located at the bottom of the scooter. The cargo-passenger version is slightly different in appearance and electrical equipment. A more detailed power supply diagram of Ant 2M allows you to repair and tune the electrical equipment of the scooter.
- Direction indicators
- headlight
- Indicator light (red) for dynastarter operation in generator mode
- Indicator lamp (green) for neutral activation
- Indicator lamp (orange) for direction indicator operation
- Indicator lamp (blue) for turning on the high beam headlights and the speedometer scale illumination lamp
- Sound signal
- Light breaker relay
- Side light switch
- Ignition switch and handbrake brake switch
- Switch for high/low beam and direction indicators
- Relay regulator
- Dynastarter
- Day/night switch with emergency engine shutdown
- Breaker
- Circuit breakers
- Capacitor
- Ignition coil
- Spark plug
- Neutral warning lamp switch
- Rechargeable batteries ZMTR-10
- Foot Brake Light Switch
- Rear light with brake light
The dynostarter as a device is as far from complete perfection as our VAZ plant is from the premium segment. But if at least once a season you carry out competent maintenance of the collector unit, switching equipment, and battery, then with all its inherent shortcomings, the dyno starter can last a very, very long time, up to 30,000 km, or even more.
Wiring diagram for Ant motorcycle
Electrical connection diagrams are usually quite complex and require special skills in order to understand the wires and the purpose of a particular element. But the Ant motorcycle is quite simple in design, so its electrical circuit is very simple.
For the most part, the Ant motorcycle is designed to transport large loads, so it was not equipped with special lighting parts. But it has the most necessary things, and the connection diagram will help you figure out the breakdown or configure the wiring. For the most part, the circuit may be needed due to a malfunction of the basic elements of movement.
Firstly, when starting a cold or already well-warmed one, problems may arise in the operation of light bulbs or other connecting devices. To solve the problem, a visual inspection may not be enough and you will need an electrical diagram.
Also, most of the “ants” that have been preserved since Soviet times have turn signals, brake lights and other light indicators. If they break down, be sure to have a wiring diagram. The final reason for using the diagram below is to check the flywheel, which receives torque when the piston moves.
Also useful for repairs:
- How to take measurements for a plastic window
- Megan 2 headlights don't shine well
- How to make a house façade inexpensively
Best answers
Andrey Chivotin:
This is most likely a design feature
Amigos:
Is the ignition set correctly? Does gasoline flow from the carb into the engine?
Alexander Terios:
the ant, or rather its engine, is a prehistoric, extremely capricious design. You need to watch everything. Is the ignition original or does it have a magneto?
Lara Kovman:
Squeeze a couple of spoons of gasoline into the cylinder through the hole for the spark plug, and start it. If it starts, then the oil seals on the crankshaft need to be changed, they siphon and do not allow gasoline to get into the cylinder. Or maybe the ignition is set incorrectly.
Ivan Ivanov:
How did you determine that the spark plug was working?
Vadim Neshcheretny:
If the above does not help, change the spark plug. in practice it was - the spark plug works on atmosphere in the cylinder no
Basic faults
- Mechanical, caused by natural wear, combustion of windings, destruction of contact groups
- Structural, due to design features
- Malfunctions of the relay regulator that lead to dyno starter failure
The most unpleasant malfunctions are related to mechanics: combustion of windings, interturn short circuit, wear or destruction of the commutator. Other mechanical faults such as wear or sticking of brushes, contamination of the commutator, breakage or oxidation of wires and terminals can be eliminated quite easily.
Why the battery does not charge from the charger
If the generator does not charge the battery, but after the battery is connected to the mains charger, the charge is not restored either, then it can be stated that the battery is faulty. The battery does not take charge from the charger for many reasons. First of all, liquid from the cans may evaporate on the products being serviced. A low electrolyte level does not allow chemical reactions between the plates to occur most efficiently, therefore, even with a properly operating generator and relay regulator, charge restoration does not occur. Adding distilled water to the required level, followed by full charging from the mains charger, allows you to restore the battery's functionality. Other reasons that have a negative impact on battery performance are:
- Low electrolyte density.
- Short circuit inside the plates.
- Sulfation of plates.
In some conditions of the battery, its performance can be restored without the involvement of qualified specialists.
Diagnostics
The first sign that something has burned out, shorted or broken in the dyno starter or relay regulator is when, out of the blue, right in the middle of the road, your battery charge control lamp comes on.
If this happens to you, then the first thing you need to do is inspect the wires going from the dyno starter to the relay regulator, check the fuse, remove the cover from the relay regulator and at least visually determine the integrity of its elements, remove the rotor and see what’s wrong with the brushes and collector and if nothing suspicious is found there, turn to a very competent electrician for help.
The main reasons why the battery does not charge
The battery may not charge in your car for many reasons. The most common breakdowns or setup deficiencies are:
- Oxidation of battery terminals.
- Insufficient tension and rupture of the generator drive.
- Poor contact of wires connected to the generator.
- The voltage regulator or diode bridge is faulty.
- The generator brushes are worn out.
Internal faults in the car battery can also cause the battery to not accept a charge even when the alternator is running. For example, with strong sulfation of the plates, the banks may practically not take the necessary charge not only from the dynamo built into the motor, but also from the mains charger.
If charging is lost, the reason for this may be the complete inoperability of the generator due to burnout of the internal winding.