Engine Features
The official manufacturer of the 139QMB scooter engine is Hongling Corporation, which equips motorcycles not only of its own brand, but also of other brands with this engine.
The corporation sells power units to other manufacturers. The motor itself is very recognizable: the design features of the 139QMB engine and its markings on the left side of the crankcase immediately make it clear what kind of heart beats the scooter.
The motor has no flaws, does not require special treatment and calmly tolerates minor negligence and negligence. The manufacturer provides a guarantee for its products that covers the first 5 thousand kilometers. This mileage is enough for the new 139QMB 4t scooter engine to fully run in and grind in all elements and components of the systems.
The total service life of the engine is about 20 thousand kilometers, with the exception of 5 thousand running-in at an average driving speed of 90 km/h. The technical characteristics of the 139QMB engine are not bad: its power is enough for a two-seater full-size scooter.
Wednesday, March 7, 2012
The choice of oil for the engine of a Chinese fifty-kopeck scooter or a Japanese 4t used air-cooled scooter.
Today we will look at which oil to choose for our 50cc air-cooled scooter. The problem for scooterists is that in the summer the engine of their scooter often overheats and it “jams”, or such an unpleasant thing happens that the cylinder-piston group of their scooter does not last long (3-5 thousand kilometers). You may ask, what is the problem with this scooter problem? Most often the problem is poor or low-quality oil. Either it’s because the scooter isn’t serviced enough or they don’t know that it needs to change the engine oil. You need to change the engine oil once a season or once every 1000-1500 kilometers. Firstly, never pour mineral oil, this will immediately ruin the engine. Yes, adding oil for 50 rubles a liter is a good financial option, but not good for your engine. Let's start with the fact that I advise using only synthetic oil. Engine crankcase 139QMB and similar Japanese 50cc engines approximately 800 ml. So a liter can of oil is enough for you to fill it once into the scooter and just add oil for this thousand kilometers. You may say, but there are so many oils, which one should you choose? And why did I say be sure to change the oil at least once a season? Each oil has its own viscosity index, this is the number at which the oil turns into liquid and loses its properties. For example, 5W-50 oil. In this case, the number 5 is the oil viscosity index calculated “for frost,” that is, at what minimum temperature the oil will turn into useless. That is, over the winter the oil has time to deteriorate, since it is not normally used, unlike a car, where the engine operates even in winter in different operating modes. So during the winter only oil with the first number 20 or more will not have time to deteriorate. The second number 50 is the maximum temperature index, after which the oil turns into liquid and the engine just “jams.” I’ll give an approximate overheating table. 40 - 100 degrees Celsius 50 - 120 degrees Celsius 60 - 140 degrees Celsius Usually, it is recommended to pour oil with a viscosity index of 40 into a scooter engine, the argument being that the engine is low-speed. Don't fall for these tricks! The thing is that the operating temperature of the engine is 90 degrees Celsius, it’s just 10 degrees short of overheating in 40 oil. But bad luck, you use a 50cc scooter almost constantly with the gas to the floor because its power is small for the traffic flow. Accordingly, in the summer, when there is a traffic jam and jerking the gas, or pressing the gas to the floor, catching the wedge does not seem to be a problem. Therefore, in a stock configuration or only when adding a 72cc piston group to a 139QMB engine, you can pour oil with an index of 50. The question immediately arises of what brand of oil to pour. Well, of the tested ones, I recommend Mannol Liqui-Moly Castrol Motul The first is famous for its price, although it has good quality, the second is an average contender, the third is expensive but the best quality. The fourth is famous for its good motorcycle oils, but... a lot of fakes. I choose Mannol. If you are a butcher, or drive a lot, or just want to play it safe, choose an oil with an index of 60. Of these oils, I choose Castrol oil. 10W60 Racing. There is such an oil manufacturer - Hado, never buy oils from this manufacturer, you will get 90% engine wedge or greatly reduce the engine life. Semi-synthetic Lukoil oils have recently appeared. I myself do not recommend semi-synthetics, but often in the regions and even the Moscow region there is simply no good engine oil or it is not certified (that is, scorched, and such oil will 100% kill your engine). Lukoil oils have proven themselves well in the oil market. So, let's summarize. When buying oil, always ask for a certificate; if there is none, it is better not to buy this oil, there is a high chance that you will get a fake. If you live in the region or Moscow region and you do not have the opportunity or finances to buy good synthetic oil in Moscow, take 5W50 Lukoil semi-synthetic engine oil. For synthetics, I recommend 5W50 Mannol (about 180 rubles per liter) and 10W60 Castrol (400 rubles per liter). Never try to keep up with freebies and under no circumstances pour transmission oil into the engine. Don't forget about certificates when purchasing! Good luck on the roads!
:
The author's incompetence is amazing. Phrase » For example, 5W-50 oil. In this case, the number 5 is the oil viscosity index calculated “for frost,” that is, at what minimum temperature the oil will turn into useless. That is, over the winter the oil has time to deteriorate, since it is not normally used, unlike a car, where the engine operates even in winter in different operating modes. So during the winter only oil with the first number 20 or more will not have time to deteriorate.” This is nonsense. The author does not know the crystallization and flash temperatures of the oil!
I use semi-synthetic oil 10W-40 ZIC, the piston engine lasted 7 seasons and 10,000 km, if you don’t even have money for oil, then walk!
Source
What oil should I use?
Available types of oils for four-stroke engines: SAE 5W-20 or 10W-40. Depends on the manufacturer. If the vehicle is often operated in high temperature conditions, it is better to choose a motor oil with a high viscosity index.
What to look for when choosing oil? First of all, on the oil indices, which should be present on the canister label. The chemical composition is also no less important. In addition to the index, the exact amount of additives from the fluid manufacturer is used.
For a four-stroke scooter engine, you can use not only oil that is intended for scooters, but also for equipment: walk-behind tractors, lawn mowers, chainsaws and others.
Chinese 4t scooter 139qmb
Sunday, June 11, 2022
Changing the oil in your 4t scooter
I'm going to tell you how to change the engine and transmission oil in a 150cc Chinese scooter with a 4 stroke engine. This procedure is the same on 50cc and 250cc 4-stroke models. Two-stroke engines mix fuel and oil while the engine is running, and therefore have no engine oil to change.
I would recommend changing the engine oil at least every 1000km, and the transmission oil at least every 5000km. Regular oil changes are the easiest and cheapest way to extend the life of your engine. Scooters use so little oil that oil shouldn't cost less than $5. That's time and money well spent.
Analogues - engine 1P39QMB
Chinese developers have created an analogue of the Japanese 139QMB engine - a motor labeled 1P39QMB, which in appearance completely replicates the original. Despite all the similarities, you can still find differences: the valve clearances on the 1P39QMB are not adjustable. The situation is similar with the carburetor: before direct operation it requires thorough cleaning and correct adjustment. Chinese copies of 139QMB engines, of course, cope with their task, but their main purpose was to reduce the final cost of motor vehicles. Budget versions of scooters are equipped with exactly the same versions of engines that are good only for short trips at low speeds.
Before starting operation, be sure to carry out a full run-in of the 1P39QMB engine. The optimal operating mode of the engine begins only after 2 thousand kilometers, but after 10 thousand kilometers all its technical characteristics drop, and it loses dynamics and power.
When to adjust valves
Experts recommend carrying out the first adjustment of the unit and diagnosing backlashes after the first 500 km of motor vehicle mileage, and 5-7 thousand km thereafter.
Service work will also be required when troubleshooting engine problems, characteristic sounds, loss of power during acceleration, or when the bike stalls and it is impossible to start it.
To carry out repair work you will need a minimum set of keys and tools:
Probes Attention!
The clearances on the scooter valves must be strictly 0.05 for the upper and 0.1 for the lower, so the feeler gauges must be exclusively of the same thickness.
Photo report: changing the oil in the engine and gearbox of a scooter
It would seem, what could be simpler? I drained the old oil and filled in new oil, but no... There are people who manage to mess up here too.
I won’t go far for examples: I had the opportunity to repair several scooters whose oil filter was simply clogged with debris. As a result, the oil could not flow through it to the rubbing parts and the engine seized. To my fair question to the owner: why didn’t he clean the filter when he changed the oil. A typical answer followed, which frankly killed me: “why clean it?” “What filter is there?” (.).
I sometimes get the impression that many scooter owners compete with each other to see who can destroy their vehicle the fastest. And then they complain on every corner that the “Chinese” are shit a priori.
So, the most common mistake made when changing engine oil is when, out of ignorance or on purpose, the oil filter is not cleaned.
Look, the owner of this scooter never cleaned the filter, and he changed the oil regularly: every 2000 km. As a result, the filter became clogged and the engine seized.
Engines 157QMJ
In addition to the very popular model - the 139QMB engines - Hongling Corporation produces other versions of power units, one of which is the 157QMJ. It is installed on expensive scooter models of famous brands. In terms of its technical parameters and indicators of functionality and reliability, this version is a complete analogue of 139QMB. In addition, the design features of the model are strongly reminiscent of other mass-produced Japanese engines.
The advantage of the 157QMJ is its increased service life - about 25 thousand kilometers. The engine boasts powerful dynamics and a high top speed. However, it also has its downside - the price is too high compared to previous versions of the engines.
History of the 139QMB engine
The largest and most popular category is four-stroke engines, the most popular and famous among which is the 139QMB model. The first model of the 139QMB engine was developed in the 90s. Ten years later, the development was used by China for mass production of engines. The final version, after numerous modifications, has become one of the best engines for motor vehicles: today Japan is actively involved in its purchase and subsequent sale under the Honda brand.
Engine D1E41QMB
The D1E41QMB motor is the only two-stroke engine model made in China. A distinctive feature of this engine from other representatives of the category of power units is the presence of a chain reverse gear in the design. The uninterrupted operation of such an engine is ensured by mixing gasoline and oil in proportions of 40 to 1. The working life of the engine is about 10 thousand kilometers, after which the need for repairs arises. The disadvantage of the engine is the forced speed limit - no more than 50 km/h.
Running in the engine
Incorrectly carried out running-in of the 139QMB engine in most cases leads to failure of the piston system. Friction occurs between the parts of the new CPG, which leads to an increase in engine temperature.
Running in the scooter motor is carried out as follows:
After carrying out such manipulations, you can run in the scooter itself. In the first 100 kilometers of the journey, you should not turn the throttle handle more than 1/3 of its full stroke. The maximum speed should not exceed 30 km/h. The speed can be increased by 15–20 km/h for the next 300 kilometers - during this time the engine should more or less reveal its potential.
After this break-in process, the oil must be changed.
Engine valves are adjusted every 500 kilometers.
Installation of 72cc (47mm) CPG on 50cc 4-stroke Chinese scooters
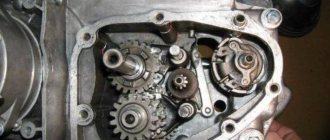
Those who rode Chinese 4-stroke “fifty dollars” felt that the capabilities of their engines left much to be desired. Horsepower can be added by installing a tuning kit that increases the displacement to 72 cubic meters. Sold in our store: CPG 72cc 139QMB https://www.motochasti.ru/product_info.php?cPath=105&products_id=1786 Remove the side parts of the plastic lining and the seat tank - this is already enough to disassemble the cylinder-piston group. For convenience, we also disconnected the engine-transmission unit from the frame. Disconnect all hoses and throttle cable from the carburetor and remove the carburetor. Remove the muffler by first unscrewing its mounting bolts - they are located near the oil filler neck and on the exhaust pipe. Remove the cooling shroud halves by unscrewing the screws that connect them. That's it, the motor is ready for disassembly. First, unscrew the bolts and remove the cylinder head cover. Before disassembling the engine further, align the marks of the crankshaft and camshaft - otherwise inconsistencies will arise during assembly. Sometimes the crankshaft position mark cannot be found. Then set the piston to TDC as follows: turn the crankshaft with one hand, and with the other control the position of the piston with a piece of copper or aluminum wire inserted into the spark plug hole. At this point both valves should be closed. If at least one of them is open, turn the crankshaft one more turn. In this position, make your marks with a marker - they will help during assembly. And another hint: almost always in this position one or more marks on the camshaft sprocket are aligned with the camshaft bed parting plane. Before removing the timing chain tensioner, unscrew the screw at its end. This will not only weaken the spring, but also disable the plunger locking mechanism. I would like to draw your attention right away: when assembling, first install the tensioner in place and only then screw the bolt into place. Once the tensioner is removed, the timing chain will be loosened and can be removed along with the camshaft sprocket. Be sure to tie it to something with wire - otherwise the insidious piece of iron will slip into the crankcase. If the cylinder has chain guides and a tensioner shoe, remember when disassembling which one is located. For some scooters, these parts are very similar, but they cannot be swapped! Unscrew the four cylinder head nuts. Remove the camshaft from the bed, and then, rocking from side to side, remove the head from the studs. Watch the chain: now is the most treacherous moment when it can be dropped into the crankcase, and to get it out, you will have to disassemble the entire engine! Before removing the cylinder, lower the piston to BDC. Otherwise, the piston, slipping out of the cylinder, may hit the edge of the crankcase and become deformed. Or the connecting rod will hit the crankcase, make a nick on its edge, and the joint under the cylinder will not be airtight. Being at BDC, the piston will simply slip out of the cylinder and “lie” on the crankcase wall. And again, watch the chain... To ensure that the cylinder leaves its place without resistance, take a mallet and lightly tap it. After this, remember in which direction the crankshaft was rotated, and, turning it in the opposite direction, return the piston to TDC. Before removing the pin retaining rings, plug the crankcase neck with a rag. If a ring falls into it, you will have to disassemble the entire engine: it is impossible to shake out the ring, and, as you understand, it is impossible to leave it inside. It is more convenient to work when the piston is at TDC. To remove a finger, as a rule, it is enough to remove one ring. Moreover, not with a screwdriver, as is often done, but with narrow pliers. The rings on some engines have very small antennae, but sometimes there are no antennae at all - then only an awl will help. The piston pin can now be pressed out. As a rule, it comes out with a little force, but try not to put pressure on the side of the connecting rod. Sometimes those who are especially diligent manage to bend this rather strong part. It is impossible to visually notice the resulting bend. You will learn about it only when the new piston gets awry and quickly wears out, and before that, since it will move in the cylinder with difficulty, the engine will never develop the power it is supposed to have. What's in our tuning kit? It includes: a piston with rings (piston and retaining rings), a cylinder and a set of gaskets. When assembling, lubricate all parts with engine oil. Do not skimp on oil: the first minutes of engine operation after assembly are the most critical, and parts should not run dry! The compression rings of a 4-stroke engine should not be pushed into the grooves at random. Due to their shape, they, like scrapers, scrape oil from the cylinder walls into the crankcase - they help the oil scraper ring. There is a designation on the top surface of the rings, usually the letter A, but it happens that something else is stamped into the marking. Make it a rule: any inscription on the ring should be directed towards the cylinder head! Here are the marks (highlighted with a red oval): on the generator rotor, crankcase... ...and camshaft sprocket. The cylinder is ready for dismantling... ...and now the piston. The arrow indicates the tensioner shoe. Feel the difference! The new guy has taken his place. Installing the cylinder is much more convenient with an assistant. Now you need to check the valve adjustment and screw on the cylinder head cover. Now you need to check the valve adjustment and screw on the cylinder head cover. Be sure to move the joints of the rings 120° apart from each other. Moreover, if the oil scraper ring is assembled, the upper and lower of its constituent rings must be moved apart relative to the place where the gap should be by 20 mm in each direction. Exactly how the gaps are located relative to, for example, the plane of rotation of the crankshaft is not important. Install the retaining ring so as not to deform it! Otherwise, it will not fix the finger and may jump out, damaging the cylinder wall. You can check whether the rings fit well in the grooves like this: take them by the tendril with narrow pliers and try to turn them. In the direction towards its gap, the ring should move with little resistance, and in the opposite direction - not move at all. The ends of the ring must be located in the same plane. Check it by placing it on the table, straighten it if necessary - straighten it with pliers. Remove the centering bushings from the old cylinder and install them into the new one. Find the cylinder gasket in the tuning kit and place it on the crankcase studs. In any case, when assembling the motor, use only new gaskets. As a last resort, thoroughly clean the joint between the mating parts and lubricate with silicone sealant. It can be painlessly used (in accordance with the instructions on the tube) in almost all components, except for the joint under the cylinder head and in the carburetor. When you place the cylinder on the piston, compress the piston rings using a simple crimp, such as one made from a beer can. It happens that without such a device the piston cannot be inserted into the cylinder at all. And don’t forget to lubricate the cylinder bore with engine oil first! It is better to work together: while one, squeezing the rings with his fingers, pushes the piston into the cylinder, the other pulls the timing chain. Now slow down the assembly. Since the engine has been disassembled, it makes sense to flush the carburetor, clean the combustion chamber and the exhaust port of the cylinder head. There are special liquids for removing carbon deposits from internal combustion engines. But sometimes mechanics use household liquids designed for cleaning ovens and gas stoves - they are much more effective. But this efficiency may be excessive. Such products, having “eaten” carbon deposits, are capable of “biting” the aluminum of engine parts. If you decide to do a “speed” cleaning, be careful! The recipe is as follows: heat the part with a hairdryer to 60°C, spray the contaminated surface with a household spray bottle and after two or three minutes, as soon as the carbon deposits soften (check the hardness with a wooden stick), immediately clean it off and rinse the part with water. Please note that polished parts will turn matt gray after this cleaning. Make sure the piston is at TDC. Install the cylinder head and the bed with the camshaft. The position of its sprocket for this motor should be as follows: one large hole at the top, two small ones on the sides, parallel to the edge of the cylinder head. There are different recommendations for tightening the head nuts. We follow the instructions of Piaggio. To complete them, you need a lot of patience, but gas breakthrough will not happen. Tighten the nuts crosswise first with a force of 6-7 Nm, then turn each 135°, and then another 90°. Wait a little and tighten again to 6-7 N.m and “walk” through the nuts two more times, tightening them by 90° each time. For those who find all this too complicated, there is advice: tighten all the nuts at once in a crosswise sequence with a force of 20 N.m. If the gaskets are of high quality and the mating surfaces are not damaged, then this is usually sufficient. Check the marks again and install the tensioner. Again, take your time! Once the head is removed, it's worth checking the valve clearances. What should they be? It is best to take information from the scooter manual. If it is not there, do not despair: the vast majority of scooter engines have the following clearances: at the exhaust valve - 0.15 mm, at the intake valve - 0.1 mm. Both should be closed when checking. An article on valve adjustment is here: https://www.motochasti.ru/article_info.php?articles_id=84 And only now screw on the valve cover and assemble everything else in the reverse order of disassembly. Change the oil and oil filter. That's it, engine tuning is complete. The result was not long in coming: already during the running-in, the engine made it clear that it now has more torque. And after running-in, the maximum speed increased by 15 km/h. Scoot easily carries two people. In short, after replacing the cylinder-piston group, the device is unrecognizable. Source: Moto Magazine
Changing engine oil
Draining used oil
We place the scooter on the center stand; if it is crooked, we straighten it. On the left side in the direction of travel of the scooter, at the very bottom of the engine, look for the drain plug, place a previously prepared container under the plug and unscrew the drain plug with a 17mm head.
While the oil is draining, go to the right side of the scooter and unscrew the dipstick and the oil filter plug, which is located at the very bottom of the engine.
We put a good 17 socket on the plug, unscrew it and remove it with all its contents from the engine.
This is the oil filter. Immediately after unscrewing it, while the point is still important - throw all this junk into clean gasoline, give it a good shake, and then blow it out and dry it.
After the oil filter plug is removed from the engine. In order to remove any remaining oil from the engine, pump the engine several times using the kickstarter.
Then we wait about five minutes - wipe the drain holes dry, for greater reliability, apply sealant to the plugs and screw them into place.
Filling the engine with new oil and checking its level
Depending on the design of the canister, pour oil into the neck either directly from the canister itself or through a funnel. The funnel must be clean!
Oil level control
The oil level is checked as follows: pour the first portion of oil into the engine, approximately 600-700 ml, wait a couple of minutes until the oil spreads evenly over the crankcase without twisting, insert the dipstick all the way into the filler neck, remove it and check the level.
The oil level must be within the control area.
- If the level is lower, add a little oil, wait a couple of minutes and take a measurement.
- If the oil level is higher than normal, drain it or, better yet, pump it out using a syringe with a tube from the neck.
The control area is indicated by red arrows. In my case, the oil level is exactly in the middle of the control section and is indicated by a blue arrow. Ideally, the oil level should be near the upper boundary of the control section. But this is ideal, but in practice, the average level is quite acceptable and does not in any way affect the reliability and durability of the engine.
Engine tuning
The first thing they try to change when tuning the 139QMB engine is the cubic capacity. For this purpose, the standard piston system is replaced with an 82cc one. At the same time, a new cylinder head with enlarged valves is installed. The piston system changes along with the camshaft, since a larger amount of fuel-air mixture is required for its correct operation. A new camshaft will help increase the volume of the incoming fuel mixture, but the carburetor will still need to be replaced.
Air filter
It is not recommended to completely remove the filter element or replace it with a zero-resistance filter - this can lead to contamination of the carburetor. Experts usually recommend removing the plug that is installed at the inlet of the air filter.
Many reviews that affected the assembly of the 139QMB engine after tuning talk about installing a zero-resistance air filter. Despite the fact that this solution is one of the most popular, it is not always appropriate and justified.
The reason lies in the fact that installing such a filter leads to rapid contamination of the carburetor. The main reason for using a zero resistance filter is the need for a richer fuel mixture after installing a larger piston. However, this can be avoided by installing a new camshaft and replacing the jets in the carburetor.
Separately, it is worth noting that a standard carburetor equipped with a 16 mm diffuser is installed together with a 62–72cc piston system, while the 82cc piston system is equipped with a carburetor with an 18 mm diffuser.
For replacement, it is advisable to purchase a set of jets, since several different options may be needed to adjust the carburetor.
Features of setting up the carburetor of a 2-stroke scooter
Some mopeds have their own characteristics. Perhaps the simplest carburetors are made in China. And a 2t scooter has a simpler carburetor than a four-stroke. Adjusting such a model should not be a serious obstacle. However, there are some peculiarities here too. It should be noted that the needle in the 2t carburetor determines the quality of the mixture only while the throttle valve is not raised all the way. Otherwise, the fuel jet has a much stronger effect. There is also a connection with the idle system, but not on all models.
Changing the oil in the gearbox
At the very bottom of the engine, on the left side in the direction of travel, we are looking for the drain and filler plug of the gearbox. The filler plug is located on the side or on top, and the drain plug is always at the bottom.
Place a container under the drain plug and unscrew both plugs.
We wait about ten minutes until the old oil drains from the gearbox.
We wipe the drain hole and plug dry, apply sealant to the plug and screw it into place.