How to set up an ATV carburetor yourself
In most cases, setting up and adjusting the carburetor on your own for beginners seems like some kind of prohibitive task, but in fact, everything is not so difficult.
So, from this article you will understand that the carburetor can be adjusted independently and without unnecessary problems, and without contacting specialized services. But it should immediately be noted that incorrectly adjusting the carburetor can lead to the following problems:
- Overclocking failures;
- Sharp shocks during operation;
- Weak engine start;
- Poor acceleration dynamics;
- Rapid overheating;
- Sudden loss of power;
- Excessive fuel consumption;
- The appearance of carbon deposits in the combustion chamber area
In order to avoid these and many other problems, you should configure:
- Idle move;
- Quality of the mixture;
Remember: carburetor adjustment must be done with a clean carburetor and a warm engine!
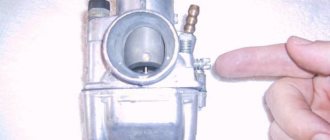
The first thing you should make sure is that there is no condensation in the carburetor. It is necessary to drain all gasoline in the float chamber. To do this, you need to unscrew the screw and drain the gasoline. Then the screw must be tightened.
Now we need to properly disassemble the locations of the screws responsible for idle speed and for adjusting the quality of the mixture. So, how should you properly regulate the mixture quality and carburetor speed in an ATV?
It's very simple, just do the following:
- Start the ATV and let the engine warm up properly so that it reaches its normal operating temperature;
- Constantly adjusting the idle speed screw, set the speed to normal, and then tighten the screws responsible for the fuel mixture all the way. The engine should stall. If the engine does not stall, then it is necessary to check the tightness of the air supply system that comes from the air filter;
- Now you need to unscrew the screw responsible for the fuel mixture. Exactly one turn. Remember that by turning the fuel mixture screw in different directions, you either enrich the mixture or lean it. Usually enrichment proceeds clockwise.
- Now you should start the engine and, carefully adjusting the idle speed screws, set the speed to a slightly higher speed.
- Now you need to start slowly unscrewing the screw responsible for the fuel mixture. It should be unscrewed carefully until the engine reaches the maximum speed point. This usually requires unscrewing the screw a maximum of two turns.
- Next, you need to re-adjust the idle speed screw, simultaneously setting the speed to normal.
- And the last thing to do is press the gas a few more times and check the stability of the idle speed.
How to adjust the quality of the mixture using a needle?
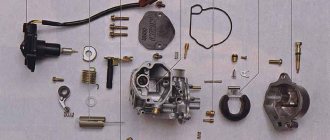
Most likely, you have already heard many times about adjusting the quality of the mixture used in the carburetor using a needle. It should be noted that manipulation with a needle is already an extreme measure. It is used if you were unable to achieve the desired result using the previous method. In order to start tuning with a needle, you need to unscrew the mount and remove the needle. What kind of needle is this? This is one of the main elements that can regulate the amount of gasoline supplied to the combustion chamber.
Additionally, there are five grooves on the game. From the very beginning, the locking ring locks the needle in a central position. This is the best option.
Remember that a very rich or very lean mixture can cause really serious problems with your ATV.
Source
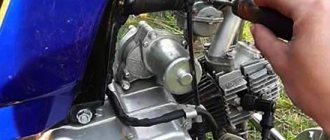
This recommendation is for adjusting the carburetor of a single-cylinder Chinese motorcycle 150/200 cc, I do this myself on my engine, everything works out for me.
1. Tighten the quality screw until it stops (this is the one near the inlet pipe)
2. Start the motorcycle, if it doesn’t start or stalls immediately, then TURN the idle speed screw until it runs stable at idle, if it still stalls, unscrew the quality screw half a turn
3. Use the idle screw (the one on the side) to set the minimum stable engine speed
4. Unscrew the quality screw slowly and the speed should increase.
5. Use the idle speed screw to reduce the speed (unscrewing counterclockwise) to the minimum stable
6. Unscrew the quality screw again and so on until it is impossible to increase the speed with this screw.
It can be even simpler
1. Tighten the quality screw until it stops (the one at the bottom near the pipe), then unscrew it 2-2.5 turns
2. Start and set the idle speed screw to approximately 1500 rpm (by ear or by tachometer)
3. We try to accelerate, if it responds normally to the throttle and when releasing the gas it does not stall or shoot, the idle speed is stable, we try to drive it, you may have to tighten the quality screw 1/4 turn here or there.
At the factory, the quality screw on carburetors is unscrewed by 2-2.5 turns, depending on the manufacturer.
After a normal trip at operating speed, we unscrew the spark plug and look at the color of the central electric wire, it should be brown, brick: if it’s black, then the quality screw needs to be unscrewed a little, if it’s white, tighten it.
Source
Do no harm!
It is no secret that many owners of Stealth 500 ATVs criticize the design of the carburetor installed on the car, believing it to be the main culprit for the incorrect operation of the fuel system and problems with the traction characteristics of the engine. There is no doubt, there are certain grounds for such statements. But when trying to do their own repairs, some motorcycle owners forget that interfering with the operation of a complex device without the appropriate knowledge and training can bring irreparable harm rather than benefit.
Carburetor adjustment(Jianshe 400)
Anatolyich
Newbie
Michel
Try draining the condensate, this is a possible reason
Before getting into the carburetor, check the ignition setting (if it is adjustable (early ignition may cause sneezes in the carburetor). A 100% sign of the quality of the combustible mixture is carbon deposits on the spark plug:
blue-white mixture poor
brown-sandy normal
black rich
How long ago was the spark plug changed? If it was a long time ago, replace it
Now adjust the carburetor:
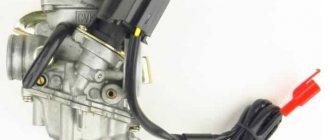
if you look at the installed carburetor from above you will see a round disk-cover
under it there is a spring, which rests on one side against the lid and on the other against the membrane with a flap and a needle
the quality of the mixture is adjusted by raising or lowering the needle
moving the bar on the needle to the sharp part: the mixture is richer
shifting in the opposite direction: poorer
If there are risks, move one
The main and important thing is “do not tear the membrane or bend the needle”
Pavlik
Active participant
Pavlik
Active participant
Anatolyich
Newbie
Michel
First, try draining the condensation from the cabure; it accumulates in the lower part of the float chamber. I have a rubber hose attached to the bottom of the carb with a shut-off screw; you close the fuel supply, loosen the screw a few turns and all the dirt along with the fuel flows out through the hose.
The membrane should ideally be removed without problems, just carefully remove it from the seat with your hands and pull everything up: pull out the membrane, the valve and the needle assembly
YahooYeahYou
All Dzhamshuts have approximately the same diseases, including this one.
My father here complained that it was difficult to start when cold when it was below zero, he advised him to change the spark plug, but he found another way out - before turning the starter, he “sucks” fuel 3-5 times with the throttle trigger and immediately starts it. I tried it myself - it helps. The only thing you need to keep an eye on is the suction, it starts right away with the throttle open, and after a minute you have to close it halfway.
There are two jamshots in the family, and both have this glitch. True, I never got around to the candle, I don’t really skate now, I don’t have time, but my father found this path and is happy with it.
Anatolyich
Newbie
Re: Carburetor adjustment
The sump in the carb is dry, there is nothing to drain there, but I’ll try to remove the membrane.
Pavlik
Active participant
Michel
Re: Carburetor adjustment
Anatolyich
Newbie
Re: Carburetor adjustment
No success, I drained the condensate and raised the needle all the way, it still starts with difficulty when cold, it takes a long time - about 20 minutes. I don’t understand what’s wrong with it.
Heavy
ATV Club team
Re: Carburetor adjustment
Try replacing the spark plug and adding another gasoline.
+ do you remember to open the choke when you start it?
Anatolyich
Newbie
Re: Carburetor adjustment
I currently have a DR8EA spark plug and 80-grade gasoline. I start it on choke, but without choke it won’t start at all.
Re: Carburetor adjustment
Bear 660 did not start - the reason was the spark plug, after replacement it became much better????
Heavy
ATV Club team
Re: Carburetor adjustment
Anatolyich
Newbie
Re: Carburetor adjustment
At first I poured 95 gasoline, then 92, then I filled it with 80. At 80 I began to work better.
Heavy
ATV Club team
Re: Carburetor adjustment
Still, fill it with 92 from another gas station and change the spark plug
Anatolyich
Newbie
Re: Carburetor adjustment
We have one gas station and 80 is the best so far. And at 95 there are only additives
Michel
Re: Carburetor adjustment
Alexan
Newbie
Re: Carburetor adjustment
This is the second time I’m trying to share a little experience in adjusting the carburetor on a Chinese car, but my answer doesn’t work. Wasted a lot of time. I log into the forum normally.
Kazuma Gator ATV. I bought it at the beginning of summer. I left without incident. There were no problems with starting, although it was always scary to drive far. There is no manual starter, only electric. If you drain the battery, it's a mess.
In the fall, with temperatures below plus five, problems began. One day, my friend and I barely left fishing. During the day the temperature dropped to zero degrees. It started with difficulty and stalled. Then for about ten minutes the same thing happened. Start, runs for about five seconds, then stalls. It's better not to touch the gas, it will stall immediately. The battery is almost dead. Then it seemed to have warmed up, and somehow they left. I disassembled the carburetor and inspected it. Even though it’s Chinese, there’s nothing to complain about. Everything is neat and high quality. There is an electric enricher, it has never shown itself, I thought the Chinese installed it for show-off, checked it on the battery, it works as expected. I collected it and put it back. The temperature outside by that time was already minus 5. The same bullshit. I drained the battery, but the quad didn't start. It seizes and stalls. It sneezes into the carburetor as soon as you add gas. I freaked out, quit, and didn’t even bother charging the battery. A week later it warmed up to plus 10 outside. I approached the quad, stroked the seat, and almost accidentally turned the key. Started up on a whim. I drove for about twenty minutes and charged the battery.
I concluded that the problem was in the carb adjustment.
I'll take a break now and try to post it on the forum. If it passes, I’ll write further. I finally achieved it, up to minus 10 it starts perfectly. But below minus 10 the problems are different.
Source
Why do you need carburetor adjustment at all?
For stable operation of the ATV, it is necessary that the engine receives the optimal amount of fuel mixture corresponding to its speed range. Otherwise, the following problems may occur:
- Difficulties with the factory, the engine constantly stalls.
- Weak power characteristics, sluggish response to the throttle trigger.
- Poor dynamics when accelerating from the bottom, accompanied by spontaneous jerks when moving.
- Dips observed mainly during overclocking.
- High fuel consumption.
- Excessive formation of carbon deposits on the walls of the combustion chamber and, as a result, overheating of the engine.
What needs to be done in this case:
- Adjust the idle speed using the mixture quality screw and the number of revolutions.
- Adjust the quality of the mixture using a needle.
- Adjust the fuel level.
Important! Make adjustments only when the carburetor is cleaned inside and out, and when the engine is warmed up to operating temperature.
Adjusting the ATV carburetor mixture quality on the go
1. Start the ATV and take it for a test ride. Wait until the engine has completely cooled down.
2. Check the condition of the spark plug. To do this, unscrew the cap and inspect the spark plug.
What to pay attention to:
- A light brown coating around the entire circumference of the insulator is a sign of optimal carburetor operation.
- Brown color on one side of the insulator means the engine has a lean mixture.
- A thick black deposit on the spark plug insulator is an indication that the carburetor is supplying too much fuel mixture while the ATV is moving.
- A completely black plug, insulator and electrode are too rich a mixture, which results in excessively high fuel consumption and a decrease in power, as well as gas pollution in the chamber.
- White insulator - lack of air and gasoline supply. Leads to overheating and increased gasoline consumption.
- A completely white spark plug is a too lean mixture.
- Brick color - a large amount of additives with a high metal content in the composition.
- The absence of carbon deposits and the simultaneous melting of the electrode means a very lean mixture at high speeds.
- A spark plug with a broken tip is a breakdown of the central electrode with a ceramic skirt.
- A spark plug with oil deposits inside the electrode is a sign of used rings and valve stem seals.
- Shiny inclusions and shavings indicate engine destruction due to driving at high speeds.
- Oxidation - problems with piston rings.
3. Unscrew the needle cap at the top of the carburetor. Pull the needle. This is the main element that regulates the supply of fuel to the combustion chamber, since the needle is connected to the gas trigger. When the trigger is pressed, the needle rises, slightly opening the hole for supplying the fuel mixture. This directly affects the increase in power and speed of the ATV.
4. Remove the cable, then press the needle to pull it out. The needle has 5 grooves and a locking ring. By default it is set to medium. The lower the locking ring is located, the higher the needle is raised, which means a lot of gasoline and little air is supplied. Accordingly, the higher the ring, the less gasoline and more air.
5. Move the retaining ring in the desired direction to optimize carburetor performance. Insert the needle into place.
6. Start the engine and pull the throttle trigger. If adjusted correctly, the engine should not stall from sudden pressure.
And remember, you should resort to adjusting the needle only as a last resort, when adjusting the quality and quantity screw does not bring any results.
The motorcycle shoots into the muffler: why does this happen and how to solve the problem?
On domestic motorcycles, a problem often arises associated with the appearance of loud sounds in the muffler. Even drivers of foreign vehicles often suffer from “machine gun bursts” that accompany a sharp increase or decrease in speed. Getting rid of this trouble can be quite difficult. However, if you understand why a motorcycle shoots its muffler, you can eliminate loud noises that disturb public peace.
What do the shots affect?
Problems with the ignition system do not bode well. In such a situation, with prolonged engine operation, not only the aesthetic impression can deteriorate. A dirty carburetor or low-quality fuel will eventually disrupt cylinder compression, which in turn will lead to engine failure.
To understand why your motorcycle is shooting at the muffler, you should check the problem areas. Here are possible ones:
- not tightness of the pipes that can suck in air, or the exhaust tract;
- faulty spark plugs;
- dirty air filters or carburetor;
- difficulty in supplying fuel;
However, the problem may also be with the racers' rev limiter. The spark plugs do not charge continuously, causing most of the mixture to go straight into the exhaust system, where it hits the hot metal and ignites, creating a loud bang.
Solution
The easiest way to get rid of pops on a carburetor motorcycle is to simply move the needle valve to a different position, changing the degree of saturation of the mixture with gasoline.
Carburetor in a motorcycle
It happens that the motorcycle shoots into the muffler and carburetor - this is often found on domestic Urals and imported choppers with a large cylinder capacity. The problem is a clogged air-fuel mixture at the inlet. To eliminate it, it is worth changing the filters and sealing gaskets, and also checking how tightly the pipes fit to the inlet fittings and whether there are any large cracks in them.
Very often, popping noises appear after replacing the muffler with a non-standard one or cutting holes in it to eliminate resistance to escaping exhaust gases. Particularly unpleasant sounds appear when installing a “direct flow”. The reason is the creation of a strong vacuum, which leads to a lean air-fuel mixture. Powerful imported motorcycles often use an exhaust gas afterburning system, which reduces their toxicity - after removing the standard muffler, its operation becomes clearly audible. To eliminate shots after changing the silencer, you must:
- Reconfigure the carburetor or reflash the control unit.
- Install filters with a different capacity.
- Disable the exhaust gas afterburning system.
On sports motorcycles whose engines run at high speeds, the problem with shots may be related to the speed limiter or crankshaft speed limiter. When a certain indicator is reached, the fuel supply may remain unchanged for some time, while the number of flares is reduced.
Accordingly, a huge amount of gasoline enters the muffler, which explodes with a jerky sound, forming a “machine gun burst.” It can be heard especially well when releasing the gas after active acceleration.
It is impossible to eliminate such a problem without reducing the life of the engine - you have to change your driving style so as not to irritate yourself and others with unpleasant loud bangs.
Source
Source
Other
Adjusting the fuel level in the float chamber of ATVs
The performance of a four-wheeler depends on the correct level of gasoline in the carburetor. An excessive amount will flood the candles, spill on the ground and lead to unnecessary expenses. If too little fuel is supplied, the engine simply will not start.
How to optimally adjust the fuel supply
- 4-stroke ATVs have carburetors with an opaque drain hose tube hanging down. Therefore, first of all, replace it with transparent one.
- Lift the free end of the hose up.
- Unscrew the drain screw next to the tube to get rid of excess fuel. Based on the amount of liquid entering the tube, determine the level of gasoline in the carburetor. The norm is the line (1-1.5 mm below is allowed) between the housing and the float chamber.
- To adjust the fuel supply level, open the float chamber and find the tab that covers the shut-off needle.
- By bending the tongue down, you will increase the intensity of fuel delivery. By bending it up, on the contrary, lower it. Perform all manipulations with caution, as the structure is quite fragile.
Source
mypitbike
01:38 14.04.2013 Carburetor design (part 1)
A moment of classics on MyPitBike.ru. Excerpt from “Motorcycle Fuel Systems” by Robinson, dedicated to the design of the carburetor. The following voluminous text will allow you to better understand the principles of the design and operation of the carburetor, which will be extremely useful in diagnosing malfunctions associated with the fuel supply system. Due to length, this post will be divided into a couple of parts.
Introduction
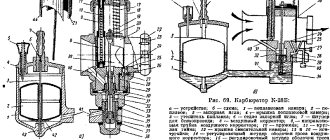
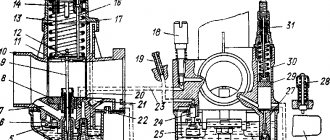
The operation of the carburetor is based on the chemical and physical properties of the gases described in the previous two chapters. To understand how a carburetor works, we will design a simple but working carburetor based on the flow of the jet in the tube. The cross-section of the carburetor air passage must be large enough to provide air supply at maximum engine power, and small enough to ensure an increase in air speed and create a sufficient vacuum between the float chamber and the fuel atomizer. Since the pressure above the fuel atomizer depends on the air speed, many older carburetors had a constriction in the area where the atomizer was installed to locally increase the air speed. This narrowing is called a diffuser or Venturi tube (named after the Italian physicist Giovanni Battista Venturi. 1746-1822). Restrictions impede the free flow of air and were therefore not used in high-performance motorcycle carburetors, although they remained as a term for this part of the carburetor.
Our simplest carburetor consists only of a diffuser and a fuel supply pipe (Fig. 1). We can add a few improvements to it. Experiments with air flow show that the duct becomes more efficient if the end of the duct has a bell that has a bend of 180 degrees. The duct should be as straight and smooth as possible, that is, free of obstructions, pockets and sharp bends that could cause turbulence in the air flow. The second end of the carburetor is attached to the engine on an elastic support, if possible without protrusions. This support is designed to protect the carburetor from heat and vibrations emanating from the engine. An increase in the temperature of a gas leads to a decrease in its density, that is, a similar volume of gas has less mass (there are fewer molecules in it), so fewer fuel molecules will burn in this volume. Vibration causes the same problems as vibration in any machinery. This can cause foam in the fuel and insufficient shut-off valve performance. The check valve is the next improvement to our carburetor. It is designed to maintain a certain fuel level.
Fuel supply
Fuel is supplied from the fuel tank using a pump or under its own weight and passes through a valve, which is a conical needle (Fig. 2). A float in the fuel reservoir supports the needle and, as the reservoir fills with fuel, the float rises and the needle closes the valve and the fuel supply stops. Typically the valve needle has a spring-loaded plunger that rests against the float tongue. This plunger protects the needle from vibration and helps more accurately maintain the fuel level in the tank. This type of valve is very susceptible to any debris that may get between the needle and seat and prevent the valve from closing. Therefore, a fuel filter is usually installed in front of the valve. The shut-off valve can have two adjustments. Firstly, the height of the float, which determines the level of fuel in the tank. It is adjusted by bending the tongue, which rests on the needle.