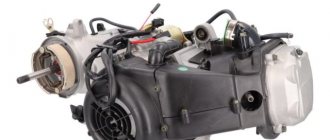
Stels Flame 200 2011 → Adjusting valve clearances and cleaning and lubricating the chain
Part 1 - VALVES
Extraneous sound when the engine is running, gas gaps, unstable engine operation, loss of power - one of the main causes of these ailments is unadjusted intake and exhaust valve clearances.
In order to adjust the valves on the Stels Flame 200, we need an 8 mm, 10 mm wrench, a flat screwdriver and a feeler gauge 0.05 mm thick, as well as an hour and a half of time spent usefully for business =). THE MOTORCYCLE MUST BE COLD!
First, you need to prepare the motorcycle - remove the seat from it and move the gas tank (you can skip this operation, I did this to better photograph the valve elements).
The seat is held on by 2 bolts that Chinese engineers hid under the rear fender; unscrewing them causes the seat to be pulled back. The tank is held on by 2 small bolts; after unscrewing them, we also carefully move the tank back; you may need to disconnect the tube from the gas tap BEFORE TURNING IT TO THE CLOSED POSITION!
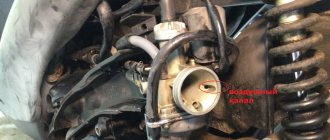
Remove the engine cover by unscrewing 3 8 mm bolts. 2 on the right and one on the left.
After unscrewing the bolts, to make the cover easier to remove, tap it with your hand - it will come off easily.
Now our motorcycle looks like this:
On the left side of the engine, unscrew the inspection window cover with a flat-head screwdriver.
There is a shaft plug under the inspection window; by removing it with a hexagon, you can smoothly rotate the shaft. But we are not looking for easy ways =) The shaft can also be rotated by the rear wheel (in 5th gear it is most convenient) or by a kick starter. Now our task is to position the piston at TDC (top dead center), in English TDP this position corresponds to the shaft mark T|, it is important to know that the piston is at the top dead center during the compression and release cycle. We need a compression cycle, it’s easy to recognize: both valves must be closed, which means the rocker arms will be at the same height (you can look at the photo below where the valves are shown).
So, with God's help, we caught the T| on the compression cycle in the viewing window:
Don’t be afraid if it doesn’t work the first time, it will work the 20th time =) we have no need to rush, the mark on the thread of the viewing window should correspond to the mark to the right of the letter “T”, a small deviation is absolutely not critical!
We proceed directly to the adjustment, the clearance of the intake and exhaust valves (the intake is located closer to the tail of the motorcycle, the exhaust to the front) according to the manual should be 0.05mm, but for the exhaust this value is small, it is also worth considering that on a hot engine the clearances increase significantly moto, so 0.05 is still normal for him.
Rocker arms are arched metal elements, at the ends of which there are holes into which a pin and nut are screwed in. We need to adjust the gap between the pin and the valve (the metal disk supported by the spring). To do this, unscrew the nut that secures the position of the stud in the rocker arm; now you can lift the rocker arms with your hands and see with your own eyes the gap that we have to set to 0.05 mm.
For this we need a probe
We insert the required feeler gauge into the gap and twist the stud by hand so that the feeler gauge comes out and in with light force, fix the position of the stud with a nut and check the gap - the feeler gauge should not go through at all by 0.10 mm!
We repeat the operation for the second valve and assemble the motorcycle.
After adjusting the valves, my engine sound became cleaner, without extraneous knocks, and now starting when cold is much easier! The valve adjustment operation is effortless and quite simple on this motorcycle - so take the time to do it yourself!
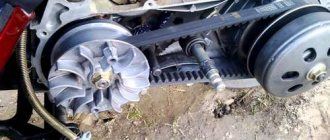
Part 2 - CHAIN
I decided to clean the chain of my Stels because after this lubrication from the can the chain is more like a magnet for dirt.
We note the initial state of the circuit:
In advance you need to purchase kerosene, chain lubricant (I bought gear oil, which was thicker in stock), a toothbrush (you can buy a new one for yourself and use the old one), latex gloves (bought at a pharmacy for 6 rubles per pair).
Carburetor for a scooter - which one to choose, how to adjust
The function of the carburetor in the scooter mechanism is to prepare a combustible mixture for the engine. Therefore, the level of engine performance quality is determined by the composition of the combustible mixture. The options for the development of this process are either operation is normal, or the engine will stall, and the mixture in the engine may detonate. When determining the standard indicator of the resulting mixture, they are guided by the standard ratio of air and gasoline equal to 15 parts of air to 1 part of gasoline. Measurement is carried out by weight. You will not be able to perform this measurement yourself. At the same time, there is no need to attribute the violation of the optimal mixture to the weather, since the quality of the mixture changes slightly depending on the air temperature.
Adjusting engine valves 165 FMM
Quick Valve Adjustment 172FMM |165|169| Correct | Avantis A7| Enduro 250| Lifehack|Read more
Adjusting valves on a 165FMM Motoland XR 250 EnduroRead more
#shorts Valve adjustment 165 FMMRead more
Repair of a 165FMM engine with a mileage of 20,000 kmMore details
Adjusting valve clearances on 172 FMM. Simple and clear. Read more
Forte FT250 GY, valve adjustment on 166 engineRead more
165 FMM Engine Assembly | Replacing the CRANKSHAFT and CPG | Motoland XR 250 (166fmm 167fmm 169fmm)More details
Motorcycle valve adjustmentRead more
ADJUSTING IRBIS TTR 250 166FMM VALVE, see to the end - SPOILER) Read more
Valve adjustment on Kayo 250 169fmm/ Timing RevisionMore details
Motoland engine assembly / 165fmm valve adjustment / how to charge the chain tensionerRead more
Valve drying, engine head 165 fmmRead more
Minsk X250 Valve adjustment 166fmm MotorMore details
Proof of the previous video “Adjusting valves on Avantis 250” Read more
Moto 250 timing belt replacement valve adjustmentMore details
#GVNMSK 35. Replacing the timing chain. Engine 165fmm/cb250 [irbis ttr250r]More details
Irbis TTR 250R Timing chain replacement and valve adjustmentMore details
#6 Assembling CPG 166FMM (164fmm 164fml 165fmm, etc.) and valve adjustmentRead more
#3.1 Head 166FMM and valve lapping (164fmm 164fml 165fmm 157 qmj 139qmb, etc.)More details
Source
How to make a motorcycle trailer with your own hands
I present to the readers of the publication my version of a side trailer for a motorcycle. The highlight of the proposed design is the suspension unit. It does not have levers, springs or shock absorbers, which significantly complicate the design and require additional time and material resources. I solved this problem differently - instead of shock absorbers, I installed a spring, which not only provides a sufficiently soft ride, dampening vibrations from road unevenness, but at the same time also acts as an axle.
In the manufacture of the trailer, available parts from motorcycles and scooters were widely used. Thus, the main load-bearing element of the structure, the frame, was “borrowed” from the side trailer of an IZH motorcycle, found in a heap of scrap metal, awaiting its turn to be melted down. Having cut off all the excess, I got a frame with dimensions of 650x800 mm (of course, one can be welded, for example, from water pipes with a diameter of 50 mm). To attach the spring to the frame side members from below, I welded a transverse beam from two corners measuring 35x35x3 mm (or from a channel of a suitable size), which, to give greater rigidity, was connected to the rear cross member of the frame with a spacer made of a pipe with a diameter of 30 mm. I welded a carrier (32 mm pipe) to the beam and the front cross member, and at the front end of it I installed a coupling device—a steering rod from a truck. On the towing motorcycle I attached a swing arm from the same car, into the hole of which the tie rod end is inserted when driving with a trailer.
To watch online, click on the video ⤵
Adjusting valves on a 165FMM Motoland XR 250 EnduroRead more
ADJUSTING IRBIS TTR 250 166FMM VALVE, see to the end - SPOILER) Read more
Irbis TTR 250R Timing chain replacement and valve adjustmentMore details
Proof of the previous video “Adjusting valves on Avantis 250” Read more
Motoland engine assembly / 165fmm valve adjustment / how to charge the chain tensionerRead more
#6 Assembling CPG 166FMM (164fmm 164fml 165fmm, etc.) and valve adjustmentRead more
Adjusting valve clearances on 172 FMM. Simple and clear. Read more
Valve adjustment on 170FMM :: irbis / kayo / lifan / falcon / racer / ekonicRead more
Minsk X250 Valve adjustment 166fmm MotorMore details
#shorts Valve adjustment 165 FMMRead more
Motorcycle valve adjustmentRead more
Repair of a 165FMM engine with a mileage of 20,000 kmMore details
165 FMM Engine Assembly | Replacing the CRANKSHAFT and CPG | Motoland XR 250 (166fmm 167fmm 169fmm)More details
Adjusting valves on a motorcycleRead more
Valve adjustment 172FMM-3A Regulmoto sport 003More details
How to set valve clearance at 150cc/250cc/How to adjust valves/Adjusting valvesRead more
Valve adjustment on Kayo 250 169fmm/ Timing RevisionMore details
Alpha moped trailer
Initially, the Alpha moped, like any other, is not intended for transporting goods. But many owners of this motorcycle tune the moped and install a trailer or stroller on the scooter, which you can buy, but it’s cheaper to do it yourself. Of course, it is easier and safer to order cargo transportation from Avtotrans in Kharkov to transport the cargo you need. The article discusses how to make a rear and side trailer for an Alpha moped with your own hands , as well as a review of the factory version of the stroller.
To watch online, click on the video ⤵
Adjusting valves on a 165FMM Motoland XR 250 EnduroRead more
ADJUSTING IRBIS TTR 250 166FMM VALVE, see to the end - SPOILER) Read more
Irbis TTR 250R Timing chain replacement and valve adjustmentMore details
Proof of the previous video “Adjusting valves on Avantis 250” Read more
Motoland engine assembly / 165fmm valve adjustment / how to charge the chain tensionerRead more
#6 Assembling CPG 166FMM (164fmm 164fml 165fmm, etc.) and valve adjustmentRead more
Adjusting valve clearances on 172 FMM. Simple and clear. Read more
Valve adjustment on 170FMM :: irbis / kayo / lifan / falcon / racer / ekonicRead more
Minsk X250 Valve adjustment 166fmm MotorMore details
#shorts Valve adjustment 165 FMMRead more
Motorcycle valve adjustmentRead more
Repair of a 165FMM engine with a mileage of 20,000 kmMore details
165 FMM Engine Assembly | Replacing the CRANKSHAFT and CPG | Motoland XR 250 (166fmm 167fmm 169fmm)More details
Adjusting valves on a motorcycleRead more
Valve adjustment 172FMM-3A Regulmoto sport 003More details
How to set valve clearance at 150cc/250cc/How to adjust valves/Adjusting valvesRead more
Valve adjustment on Kayo 250 169fmm/ Timing RevisionMore details
Sidecar trailer for Alpha moped
Let's start our publication with a photo report on how to make a sidecar on the Alfa moto . To save money, the moped trailer is made from scraps of pipes and profiles, and if desired, it can be made more neat and practical. The hub for the one-wheel trailer was taken from a VAZ car and welded with reinforced gussets. As you can see, the wheel is also Zhiguli. The side wheelchair trailer for the Alpha moped itself is simple in design and making it with your own hands will not be particularly difficult. There will be more problems with where to attach this stroller to the moped.
In this version, a reinforcing frame is welded to the Alpha frame (see photo).
This frame is attached at three points:
To prevent the steering wheel from moving, homemade rods were made from tubes. M12 nuts are welded into them for screwing in the rod studs. By turning the studs you can adjust the moped trailer.
This side trailer for the Alfa was made in a hurry and will undoubtedly be improved over time. It can carry cargo up to 500 kg. To transport small-sized cargo, it is possible to make a wooden box (as in the example of a homemade wheelchair trailer).
Delivery of materials for a homemade stroller can be carried out by Avtotrans.
Adjustment
Preparing for work
Before starting the adjustment, let the engine cool for a couple of hours or roll it into a warm room if it was left in the cold. Blow dust off the valve cover connector with a blow gun and wipe it clean with a rag. On the left side of the motorcycle, unscrew the plugs on the generator cover - there are two of them.
Remove the valve cover. The valve cover is located immediately under the gas tank and is attached to the head with three 8mm bolts.
Setting the piston to top dead center on the compression stroke
We insert a key or a 14mm socket into the hole in the generator cover and slowly turn the engine counterclockwise (to the left) until the rod actuating the intake valve opens it.
Why is this necessary?
The fact is that this engine does not have marks that show us the position of the camshaft. In turn, the camshaft rotates somewhat slower than the crankshaft and becomes in the position we need: at the end of the compression stroke, when the valves are completely closed - every second revolution of the crankshaft.
Therefore, we crank the crankshaft until the intake valve opens. The intake valve opens at the beginning of the intake stroke, followed immediately by the compression stroke, and after the intake valve opens, we turn the crankshaft to the left until the mark on the generator rotor next to the English letter “T” is exactly in the middle of the upper inspection window in the generator cover. This will be the position of the crankshaft and camshaft we need when the piston reaches its highest position during the compression stroke.
Let's repeat the algorithm again
- Turn the crankshaft counterclockwise
- We control the moment when the rod comes out and opens the inlet valve
- After opening the intake valve, we turn the shaft until the mark on the generator rotor next to the English letter “T” is strictly in the middle of the inspection window of the generator cover.
How to distinguish a 166FMM motor from a 172FMM? Marking of Chinese engines
I am often asked how to distinguish Chinese engines, for example the very common 166FMM , from the rapidly gaining popularity and more powerful 172FMM . The most obvious answer is to look at the markings on the engine. Yes, but no. The fact is that the cunning Chinese, seeing the growing popularity of the more powerful and expensive Zongshen 172FMM engine, began to apply such markings on everything that was at least somewhat similar to a motorcycle internal combustion engine. The only reliable and 100% option is to physically measure the cylinder diameter on a disassembled engine. But you shouldn’t despair, there are several indirect signs by which you can still recognize the ZS172FMM, and in this article I will talk about them.
But first, let's figure out what engines Chinese motorcycles are sold with on the Russian market, and what the markings on them mean.
Marking of Chinese motorcycle engines
Number and arrangement of cylinders
The first number indicates the number of cylinders in the engine 1 or 2. The following letter indicates the location of the cylinder:
- “P” - horizontal cylinder arrangement
- “V” - V-shaped arrangement of cylinders
- In engines with vertically positioned cylinders, the letter is missing.
The following are numbers indicating the diameter of the cylinder in mm.
Engine cooling method
After the numbers, there is a letter indicating the type of cooling:
- "F" - air cooling
- "Q" - forced air cooling
- The missing letter indicates liquid cooling
engine's type
The next letter indicates the engine type. In our case, the letter “M” is a motorcycle engine
Engine capacity
The letter after the engine type is the letter code for the displacement:
- A - <50cc
- B — 50cc
- C - 60cc
- D - 70cc
- E - 80cc
- F - 90cc
- G - 100cc
- H - 110cc
- I — 125cc
- J - 150cc
- K - 175cc
- L - 200cc
- M - 250cc
- N - 300cc
- P - 350cc
- Q - 400-450cc
Example
Let's take a look at our favorite ZS172FMM :
- ZS - short for Zongshen - manufacturer
- 1 - single-cylinder
- There is no further letter, which means with a vertical cylinder
- 72 — cylinder diameter 72 mm
- F - air cooling
- M - motorcycle
- M - working volume around 250 cm3
Labels don't mean anything
As we have already found out, the marking indicates only the engine type, but not the model. Under the same marking there can be completely different engines, similar only in parameters, but not in design, for example, upper and lower, with and without a balancing shaft. In addition, as already mentioned, the markings on Chinese engines do not always correspond to reality.
Our popular engines
CB250 169FMM (165FMM, 166FMM) ZONGSHEN
We all know the engine called CB250 from Zongshen, branded as 169FMM (230cc) and its twin brothers 165FMM (223cc) and 166FMM (225cc). These engines have their roots in Honda's MD33 and feature an overhead camshaft, two valves and air cooling. The declared power for all is around 16-17 hp. Installed, as a rule, on entry-level sports cross/enduro, such as ZUUM PX220, Motoland XR250 cross and WRX250, Kayo T2 and K1, BSE J1 and others
CG250-B 167FMM
There is another very popular and similar in characteristics, but not in design, lower engine with a balancing shaft, which is designated as 167FMM. It has a similar power of 16 hp. This engine is installed on inexpensive road models, as well as on dual-purpose enduro motorcycles, such as the Motoland XR250 Enduro and Enduro 250 LT, Racer Panther 250 and previously on the Irbis TTR250 Enduro
SONY DSC
CB250-F 172FMM ZONGSHEN
Nowadays, the engine from Zongshen, beloved by many, is the 172FMM, with a displacement of 249 cm3 and a power of 21 hp. It is nothing more than a fairly seriously modernized CB250 169FMM. In addition to the displacement, there were quite a few changes, thanks to which it was possible to achieve an increase in power of around 30%, which is quite cool considering that the volume only increased by 10%. But this engine also has a drawback - vibration, like on a vibration stand. The 172nd engine with a balancing shaft should appear soon, but in the first half of 2020 there is no such thing in Russia yet. Installed by most manufacturers on sports cross/enduro motorcycles in the average price category for China, for example ZUUM CR250CB, Motoland TT250 and XT250HS, GR7 and GR8
SONY DSC
NT300 170FMN YINXING
In our country, I have only seen such an engine on Racer motorcycles. Its working volume is 270 cubic meters and its power is about 20 hp. This is a direct competitor to the 172 engine, but has a little more torque and no vibration, thanks to the balancing shaft.
CB250 170MM-2 ZONGSHEN
Another engine called CB250, but labeled 170MM-2. Created on the same base as 172FMM. It has a volume of 249 cm3, a four-valve head, liquid cooling and a power of about 25 hp. Vibrates just like his little brother. At one time, this not the most common engine was installed on the Kayo T5 and is still installed on the Motoland XR250 Pro and WRX250 Lite WFA
CBS300 174MN-3 ZONGSHEN
And this is a modification of 170mm-2, only with a volume of 279.5cc and a power of 25 hp. It also has 4 valves and liquid cooling. In addition, one significant drawback of the engine, vibration, was eliminated by installing a balancing shaft. The engine has recently appeared on our market, but I’m sure it will find its client. In terms of power, it is not far behind the 177MM, but at the same time noticeably cheaper. Low end traction is even better. But its road origin and, accordingly, the kick starter and gearbox foot located not in the best way for enduro are its main drawback. Installed on enduro motorcycles ZUUM CR300CBs, Racer X2, BSE J7
To watch online, click on the video ⤵
Adjusting valves on a 165FMM Motoland XR 250 EnduroRead more
ADJUSTING IRBIS TTR 250 166FMM VALVE, see to the end - SPOILER) Read more
Irbis TTR 250R Timing chain replacement and valve adjustmentMore details
Proof of the previous video “Adjusting valves on Avantis 250” Read more
Motoland engine assembly / 165fmm valve adjustment / how to charge the chain tensionerRead more
#6 Assembling CPG 166FMM (164fmm 164fml 165fmm, etc.) and valve adjustmentRead more
Adjusting valve clearances on 172 FMM. Simple and clear. Read more
Valve adjustment on 170FMM :: irbis / kayo / lifan / falcon / racer / ekonicRead more
Minsk X250 Valve adjustment 166fmm MotorMore details
#shorts Valve adjustment 165 FMMRead more
Motorcycle valve adjustmentRead more
Repair of a 165FMM engine with a mileage of 20,000 kmMore details
165 FMM Engine Assembly | Replacing the CRANKSHAFT and CPG | Motoland XR 250 (166fmm 167fmm 169fmm)More details
Adjusting valves on a motorcycleRead more
Valve adjustment 172FMM-3A Regulmoto sport 003More details
How to set valve clearance at 150cc/250cc/How to adjust valves/Adjusting valvesRead more
Valve adjustment on Kayo 250 169fmm/ Timing RevisionMore details
Rear trailer for Alpha moped
This version of the moped trailer has a number of advantages compared to the previous stroller:
First, let's look at an amateur drawing of a homemade rear trailer for a moped .
We make the trailer frame from pipes and angles. The ears on the sides are where the wheels are installed.
To install the towing mechanism, you can use car towbars, but they are too expensive and bulky. The front ball joint from a Zhiguli car is used here. You can choose another suitable hinge.
We manufacture and weld the drawbar to the trailer frame.
Buy a side trailer for an Alpha moped
For those who don’t want to bother with homemade trailers, there is a factory Chinese solution for a sidecar for Alpha. Alpha with a stroller is quite rare in Ukraine and Russia. The price, compared to a do-it-yourself stroller, is steep. But if you don’t spare the money to buy such a trailer, you will get a good side stroller for a moped with a shock absorber and the ability to detach it from the scooter. By the way, delivery of such a side trailer can be ordered from the Avtotrans company.
If you do not want to additionally load your moped with cargo in a trailer or you need to transport a large amount of something, use the services of the Avtotrans company https://autotrans-ua.com/gruzoperevozki-gazel.html for cargo transportation in Kharkov. We recommend!
I hope that now you can easily make a trailer for a moped with your own hands.
Source
Solving the luggage problem
Everyone who likes to travel on an iron horse is faced with an important problem: where to place their things, because the comfort of the trip and the quality of rest depend on this. Typically, motorcycle trunks are used to place luggage. These are special small containers for transporting cargo on motor vehicles. This is not very convenient for long trips:
Therefore, for long-distance motorcycle trips, it is much more convenient to use a motorcycle trailer. You can put everything you need into it without the risk of overloading the bike and enjoy traveling wherever you like.
Motorcycle trailer
Usually a motorcycle is not afraid of any, even the most distant, distances and any roads. But if you need to transport sports motorcycles to the competition site, for example, you need to either use a truck or a trailer.
The motorcycle trailer is equipped with additional accessories to deliver your equipment in good condition to its final destination.
This usually includes the following devices:
When planning to install accessories on your trailer, be sure to do the following:
Rules for the transportation of motorcycles
Loading a motorcycle is carried out according to certain rules:
If you need to transport not one, but two pieces of equipment, then you need to install two stands. To unload a motorcycle, all actions are carried out in the same way as loading, only the opposite is true.
Transportation of ATVs
The trailer for transporting an ATV can be with or without brakes, with a wheel diameter of either 13 or 16 inches. Such trailers are called universal because they can transport both equipment and any cargo. To transport equipment, an additional device is used to properly secure it for greater reliability.
Not all roads allow ATVs. And if you decide to take a walk through impassable expanses, you still need to take the ATVs to those expanses. The best and most convenient solution is to use a light trailer.
ATV trailer
Our domestic manufacturers offer good trailer options. But if this is your first time, you need to know more than just how to transport your equipment to its destination. You also need to be able to properly load vehicles onto a trailer and unload them correctly.
Additional equipment for a universal wide trailer must be required, since without it it will not be possible to securely and stably secure the ATV. A winch and an automatic sliding wheel are required. You also need to install rails on the sides of the trailer to tie the halyard.
The station wagon trailer has a spring type of suspension. And therefore, regardless of the weight of the equipment, the trailer can drive smoothly and stably. The awning is equipped with a side door. Therefore, the equipment can be refueled directly in the trailer.
What steps need to be taken to properly load the ATV:
With skillful actions, the entire loading procedure will take no more than five minutes. When the ATV has reached its destination, unloading it is done in the same way as loading it, only in reverse order.
How to make a motorcycle trailer with your own hands
I present to the readers of the publication my version of a side trailer for a motorcycle. The highlight of the proposed design is the suspension unit. It does not have levers, springs or shock absorbers, which significantly complicate the design and require additional time and material resources. I solved this problem differently - instead of shock absorbers, I installed a spring, which not only provides a sufficiently soft ride, dampening vibrations from road unevenness, but at the same time also acts as an axle.
In the manufacture of the trailer, available parts from motorcycles and scooters were widely used. Thus, the main load-bearing element of the structure, the frame, was “borrowed” from the side trailer of an IZH motorcycle, found in a heap of scrap metal, awaiting its turn to be melted down. Having cut off all the excess, I got a frame with dimensions of 650x800 mm (of course, one can be welded, for example, from water pipes with a diameter of 50 mm). To attach the spring to the frame side members from below, I welded a transverse beam from two corners measuring 35x35x3 mm (or from a channel of a suitable size), which, to give greater rigidity, was connected to the rear cross member of the frame with a spacer made of a pipe with a diameter of 30 mm. I welded a carrier (32 mm pipe) to the beam and the front cross member, and at the front end of it I installed a coupling device—a steering rod from a truck. On the towing motorcycle I attached a swing arm from the same car, into the hole of which the tie rod end is inserted when driving with a trailer.
Making a trailer for a moped is as easy as shelling pears
A large number of people, in order to save money, practicality and reliability, create a wide variety of interesting and useful things with their own hands.
A motorcycle trailer is no exception. The majority of people who own a motorcycle want to have a separate trailer to be able to transport cargo weighing up to one hundred kilograms. The center of gravity of the trailer should be on its axle, so as not to create a load on the components of the moped or motorcycle. Owners of mopeds need to remember that traffic regulations prohibit attaching a trailer to their vehicle. But outside the city limits, people often break the rules and hitch trailers, because it is very convenient for transporting vegetables, construction materials and other luggage. At first it will be a little inconvenient to drive with a homemade trailer, but then everything will fall into place. Materials and tools for homemade work: • medium-sized cart. It should have wheels of about 8 inches and a trailing clearance of 30 cm; • welding machine; • saw; • jigsaw; • paint, • hammer. Moped trailer manufacturing process:
When all the necessary devices have been assembled, we proceed directly to making the homemade product.
Step 1. Preparing the base
The cart capacity needs to be removed. Then you need to weld a frame from a pipe and a metal corner and attach it to the cart. The pipe will be the trailer's drawbar, and the frame will be a regular square-shaped frame with recesses for the wheels. Step 2. Selecting a trailer mechanism
You need to think carefully and decide on the towing mechanism. The best, but at the same time expensive way is a car tow bar. If this part is too expensive, then many use a hinge system. It behaves quite well on uneven rural roads, does not jam the trailer and “plays” on all sorts of road irregularities.
Step 3. Selecting and installing wheels
If you have a small budget, you can use the wheels that were on the construction cart. It is only necessary to strengthen the rims and replace the standard bearings with better ones. In practice, such wheels have proven themselves quite well, however, there have often been cases where the tire burst along the tread.
If financial capabilities allow, then it is best to purchase tubeless moped wheels. It’s best to install them right away; sooner or later the cart wheels will become unusable, but these ones will last much longer.
Step 4: Create a Luggage Container
The luggage container is created from a wooden beam, the dimensions of which are 40x40. The box should have dimensions of 90x60x55 cm. The timber frame is attached to the base of the cart and covered with ordinary plywood, then painted in any color acceptable to the owner of the moped. Then you need to install the feet, shields, turn signals, and attach a protective awning on top.
Conclusion
It is not at all difficult to make a trailer for a moped/motorcycle with your own hands; it is capable of transporting a fairly large amount of cargo, up to one hundred kilograms. A loaded trailer behaves quite well on the road and does not jump on different sides. Undoubtedly, such an improvement will be beneficial for the vehicle. Source Delivery of new homemade products to the post office
Receive a selection of new homemade products by email. No spam, only useful ideas!
*By filling out the form you agree to the processing of personal data
Become the author of the site, publish your own articles, descriptions of homemade products and pay for the text. Read more here.