Many people very often think about how great it would be to at least try to create their own motorcycle with their own hands, without resorting to the services of salons, craftsmen, etc. However, often such a desire remains unfulfilled due to the motorcycle enthusiast’s uncertainty about the success of his planned project. That’s why it’s worth figuring out how to make a motorcycle without anyone’s help.
Homemade motorcycles
In the modern world there are a considerable number of creative people who are able to turn even the oldest things into something original and interesting. Many people who are not indifferent to motorcycles do not have the opportunity to buy a motorcycle for some reason. There is a way out for them - to assemble the bike with their own hands.
Not every person can assemble a motorcycle on their own. This requires a lot of time and patience. You need to use all your love for bikes as inspiration. Thanks to this, it will be possible to assemble a very good vehicle at home, which in any case will be unique.
You need to be prepared that when creating a motorcycle with your own hands, a large number of difficulties may arise. It’s not uncommon for designers to make non-standard decisions. For beginners building their own motorcycles, it is best to start by assembling the simplest models.
Steps on how to make a motorcycle yourself
There are several stages in creating a motorcycle with your own hands:
Choosing a homemade motorcycle model
Before starting work, everyone who is going to assemble any thing should have an idea in their head. It is fundamental to creating a really good thing. It is very important to imagine the design and all the technical features of your future creation.
Drawing of a future motorcycle
Any master does not necessarily need to have the skills of an artist in order to draw his future creation. It is very important to indicate on a piece of paper those features of your motorcycle that are worth paying attention to.
Important: It is necessary that everyone who makes a motorcycle with their own hands has a visual image of the future masterpiece.
Purchasing parts to create your own motorcycle
At this stage you will have to spend a little of your money. To create a motorcycle with your own hands, you need to purchase a large number of elements, including an engine, wheels, frame, and various metal pipes.
Assembly
At the final stage, it is necessary to assemble all the parts together to obtain a homemade vehicle. To do this, it is very important to have knowledge of how all the components and systems of motorcycle equipment work.
How to make a motorcycle from a walk-behind tractor engine
Auto mechanic, specializes in agricultural equipment
It is no secret that in our country there are many craftsmen who are capable of creating all kinds of technological wonders from scrap materials. Of considerable interest are the capabilities of the engine from a walk-behind tractor, which can be equipped with a motorcycle, swamp vehicle, snowmobile and all sorts of other devices. Why are such solutions attractive?
First of all, its accessibility, not to mention the ability of talented mechanics, while doing interesting work, to find practical and original application for their efforts, creating things needed in the household. As for a homemade motorcycle with a walk-behind tractor engine, this solution can be called not only practical, but also quite simple to implement.
You can make a motorcycle from a walk-behind tractor yourself
Homemade motorcycles for cross and enduro
Moderator: Neposeda
- Go to page:
#1 Post by Mycki » Thu Oct 18, 2012 4:20 pm
I decided to create the topic “Homemade motorcycles for cross-country and enduro.” The topic was created for discussions of motocross and enduro motorcycles for those people who do not have the opportunity to buy a motorcycle, but do not give up, and sharpen their scooters for this. We post photos of our motorcycles, with detailed descriptions of what was done; We discuss all kinds of tuning options and share our impressions.
#2 Post by Mycki » Thu Oct 18, 2012 4:23 pm
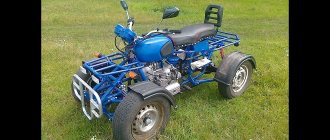
Here is my first mot, the well-known MACACA, which I created with the help of my father, and a person who is registered on this forum as dimooon, for which a huge THANK YOU to them:
— frame from chz-125516 (digested to fit the Minsk engine) and pendulum; — front fork and wheel from IZH-PS; — Minsk engine, slightly boosted; — tank from ShK “Voskhod”, cut off and digested; — self-propelled seat; — the front fender is soldered from a ChZ-Tov one, the rear fender is homemade (from a plastic sewer pipe), and the side numbers are also from the pipe; — I don’t know why the shocks came from (they were higher than the shocks from Minsk and Izh); — the rear wheel is from a road IZH-PS, with a machined rear sprocket, onto which a sprocket from the ChZ-500 (52 teeth) is welded; - standard ignition from 6v Minsk (of which there were very few
) it seems like we ask anyone who is interested in anything))) and don’t forget to throw in your MOTOs.
Chopper frame
The frame makes any DIYer “dance” - it determines the constitution and style of the bike. Let's not disrupt the sequence of building a homemade motorcycle. Do not believe those who claim that a good frame can be made without a slipway - they are lies! Only by using any semblance of a slipway in your work can you make a motorcycle frame, the wheels of which will ride strictly in the wake. Otherwise, no one can guarantee that the steering column pipe will not deviate somewhere to the side.
How to avoid geometry violations? Find the opportunity to own, or at least for temporary use, a marking table, preferably with fastenings, or, at worst, any flat, rigid slab. If you succeed, also find a large vertical dividing head. Into its chuck, clamp a steel shaft, the other end of which is processed in such a way that the steering column can be tightly fitted onto it.
Insert the shaft into the column, its other end is already clamped in the dividing head chuck. Carefully fix the head housing on the slipway plate. That's it: there is a point where the steering column should “look”. You can start plumbing work. It’s good if you have a high-speed “grinder” - an angle grinder. If you don’t have one, you’ll have to work hard with a hacksaw.
First, cut the main (upper) pipe from the smaller diameter pipes that form the support for the stock seat. Next, saw the pipes going down from the steering column. The cut location is strictly in the center of the straight section of pipes. Now separate the sawn-off upper part of the frame with the steering column from the one mounted on the slipway.
The next stage is the preparation of inserts, seam reinforcements and, if necessary, extension of the top tube in the area of \u200b\u200bthe connection with the seat tubes. Decide how much you want to change the angle of the steering column, and along the way, experimentally determine the length of the inserts in the front frame tubes. The best material for inserts is pipes with an oval cross-section from the same boxer frame. Otherwise, select suitable thick-walled pipes and try to give them an oval (cross-section) shape. And start adjusting.
Anyone who is familiar with the basics of welding is well aware that a transverse weld is not great. But we need a frame that is no different in strength from the original one. Therefore, weld inserts onto reinforcements - pins (for example, pieces of reinforcement) or sections of thick-walled pipes of suitable diameter. First, drive the reinforcements into the frame pipes secured to the slipway. Make chamfers on the mating ends of the frame pipes and inserts (on both sides) and weld them to each other in several clamps. Then hammer the reinforcements into the pipes of the cut top part of the frame.
The next step is to bend the frame pipes so that they, together with the inserts, form a straight line - from the bend in the lower part (in the area of the front engine mount) of the frame to the steering column pipe. To do this, use gas welding to heat the frame pipes below the welds on the body of the steering column (above) and below to increase the bending of the standard part of the frame. Now bend... Until you get the best shape for the front of the frame to your liking.
Naturally, all “fittings” should be done when you put the upper part of the frame on the pin clamped in the dividing head chuck. In this case (after all, the angle of inclination has changed significantly), the frame will have to be moved back along the marking table strictly along the line of the longitudinal axis of symmetry of the frame (since the dividing head is tightly fixed and only the cartridge with the shaft tilts up and down). By the way, it is at the final stage of “trying on” that you can decide how much to lengthen the upper main pipe. If necessary, top it with a piece of a similar pipe. Having finally made sure that you like everything, once again check the reliability of the fastening of the frame, the dividing head with the shaft on the slipway and proceed to the final welding of the frame joints.
When you finish cooking, the most difficult and important part will be left behind. On the slipway you were able to accurately position the steering column, mounting points for the rear wheel swingarm and engine. And this is the key to the straight-line movement of the motorcycle on the road (unless, of course, the frame was originally oblique).
At this point, you could complete the work with the frame, if you absolutely do not care about the ugly (from the point of view of the chopper builder) rear part of the standard boxer. It definitely needs to be redesigned. The options are endless! Fortunately, the work regarding the accuracy of execution is significantly simplified, since the movement of the pipes of the rear part of the motorcycle towards the line of symmetry by a few millimeters does not threaten anything, and is practically not noticeable to the eye.
It's another matter if you decide to increase the base (the distance between the wheel axles) by lengthening the frame itself, and not the rear wheel pendulum. In this case, you will also have to work with the slipway so that the new position of the pendulum's swing axis is strictly parallel to the standard one and does not shift during the transfer either to the right or to the left, not even a millimeter!
Exactly the same problems arise when the pendulum is lengthened. Here you can get by with a small plate, which ensures welding work without vertical distortions and shifts to the right and left. It seems that we have figured out the basic requirements that arise when building a chopper frame.
Main parts of a moped
First, let's look at the main parts of this technique. In other words, let's take our future scooter apart, so to speak, and find out its main elements so that making a moped is easy.
Main moped components
Engine
It is clear that without a good engine you cannot go far on a scooter. In this case, it is usually installed on the D-6 power unit. Recently, chainsaws have also become very popular, from which a homemade moped is made. In the video instructions you can see in detail how to do this. Chainsaws will be discussed in more detail below.
Exhaust system: forward flow
It is necessary to carefully consider a high-quality exhaust system so that the muffler does not have a negative impact on the power unit with which homemade mopeds are equipped, but, on the contrary, helps to quickly get rid of the remaining air-fuel mixture. A direct flow made by yourself will be what you need.
Suspension: pendulum fork
A pendulum fork that looks much better than other versions of this part of the scooter. The fact is that a large number of varieties of forks can be made, but any expert will confidently tell you that nothing is better than a pendulum one, nothing has been invented yet. As you know, this part of the scooter bears the hardest work. It is the fork that takes the brunt of the impact when going over various bumps, and generally uneven sections of the road. This is a kind of suspension on which the driving characteristics depend. Thanks to the pendulum fork, you can achieve stability of the scooter on any road.
Other parts
Finally, the bracket, shock absorbers, frame and steering column define all parts of the moped.
How to make a motorcycle
Hai! How to make a motorcycle is what interests the most fanatical motorcyclists and bikers. Why? The point is not the high cost of new factory motorcycles or even the fashion for homemade vehicles. Such a desire is caused rather by the desire to express oneself, as well as to find a bike that is as customized as possible.
The vse-o-moto.com team will help you with this. Below you will find a list of tips for assembling a two-wheeler with your own hands.
Most riders prefer riding bikes with an upright stance. Therefore, we recommend developing a classic type iron horse or a chopper. It is also advisable to take into account that it is better to move the footrests forward for the purpose of comfortable eating.
Creating a first-class bike from the Urals, Izh, Minsk. Voskhod and other serial iron horses, do not forget about the aesthetics of a huge steering wheel extended over a long distance. The most attractive type of fuel tank will be the “droplet”. An extended type of front fork will also add maximum beauty to your motorcycle with your own hands.
Before making a motorcycle, it won’t hurt to study video lessons either. You need to understand what parts of the future bike you can make yourself (primarily the frame, instrument panels, cases, plastic fairings, wheel spokes, saddle, etc.), and what you can hardly even design in drawings (engine , wheel rims and electronic components).
How to make a homemade motorcycle?
First you need to decide on the frame, but we will talk about this below. Now let's move on to engine selection. There are many engine options. Internal combustion engines are created by factories in two types: four-stroke and two-stroke. As an alternative, you can install an electric motor. In the latter case, you need to provide a lot of space for batteries in the frame of the two-wheeler. Of the internal combustion engines, 4-stroke engines are more valued in practice and are also used. You don't have to buy a new engine. By visiting transport dumps/flea markets and searching a little on the Internet on bulletin boards, you can pick up quite good options for engines and spare parts for them. It's best to polish and tune everything you find.
These days it’s not difficult to find ready-made drawings and diagrams of unique motorcycles made with your own hands from paper, from a lighter, from Lego, from the Urals, etc. Experienced customizers from TV screens will also tell you how to make a moto. To this day, the “Western” media have produced many interesting television programs on this matter. You can also order custom assembly in a professional workshop by experienced mechanics who work in almost any city in our great homeland.
Tools and consumables:
- 1. Bulgarian
- 2. Cut-off grinding wheels
- 3. Welding machine and electrodes
- 4. Drill
- 5. Drill set
- 6. Round and flat file
- 7. Rivet gun with rivets
Below is a detailed photo report on the production of a homemade mini car.
It was not by chance that I started creating my car by selecting an engine. I had a motorcycle sidecar and I wanted to install the engine so that it was hidden behind the sidecar body. I also really wanted the car to look like a real car, to have a gearbox and reverse gear. As an engine, I decided to use an engine from a Ural chainsaw ; it is compact, powerful (5 hp), has forced cooling and a centrifugal clutch, which was not superfluous for me. I took the gearbox from a heavy motorcycle M-72 or Dnepr, MT-10, etc. The box has 4 gears and one reverse.
In order to connect the engine and gearbox, I took half of the crankcase (from the gearbox side) of the engine, and made a groove in it for the protrusion on the crankcase so that it fits tightly with the engine.
Next, we take the checkpoint and cut out a template along the contour of the cardboard box. In the template we mark the holes through which the box is connected to the engine, and cut out the template.
Now we place the template on a 5 mm piece of metal and trace it, marking all the holes. Next, we cut out the metal along the marked outline and drill holes.
We screw the plate to the box.
Now we select an oil seal with an outer diameter for the hole in the crankcase, and an inner diameter for the diameter of the gearbox input shaft. We put the oil seal on the shaft and place the crankcase on it.
We transfer the crankcase holes to the plate, drill it to the diameter of the bolts and connect the plate to the crankcase with bolts.
Next you need to disassemble the chainsaw gearbox and pull out the shaft on which the clutch cup is attached. We cut the shaft along the gear.
This piece of shaft must be welded to the gearbox input shaft. In order to align everything evenly, I cut out a piece of paronite 1 mm thick and insert it into the middle of the box shaft, and into it the shaft from the gearbox.
After checking the alignment, I scald the shaft around the perimeter.
We screw the plate with the crankcase to the gearbox, and place the clutch plate on the shaft, clamping it with a nut.
Now let's start making the frame. For the frame I bought a profile pipe 50x30x2 mm. I adjusted the length of the frame to the stroller so that it would not protrude too much. To make it clearer to you what the dimensions are, I made a drawing.
From a 40x40x4 mm corner I cut out a mount for the rear axle bearings and drill holes in it for the bolts. Housing bearings of the UCP206 standard for the rear axle with a diameter of 30 mm.
From a 100 mm channel I make brackets to which the turning pins will be attached.
The rotating axle is welded from the shaft and axis at an angle of 10°, for greater controllability and stability of the machine.
Front wheels from a garden wheelbarrow with a diameter of 300 mm.
The front wheel hubs are machined from a car pump housing. I won’t say exactly which car it came from because I found these bodies at a scrap metal reception site.
The brake drum was taken from the front wheel of a Minsk motorcycle. It was ground down on the outside and a groove was made for the washer.
At first I installed a sprocket from a Chinese moped with 428 pitch and 41 teeth, but then I changed it to a homemade one because there wasn’t enough traction. The drive sprocket from the same moped with a pitch of 428 by 15 teeth is machined and welded to the gearbox fork.
The body of my car will be an old cradle from a Java motorcycle sidecar. And now is the time to install it on the frame. The cradle is assembled from two parts and connected in the middle. I divided it and put the lower part on the frame.
The homemade product reaches a maximum speed of about 60 km/h.
In conclusion, I want to say, if you have a child and have a desire, do something like this together. In my childhood, my dad made me and my brother a three-wheeled velomobile, and you can’t even imagine how much joy, positive emotions and impressions there were from such equipment. Many years have passed, but the memories remain for a lifetime. Believe me, if you do something like this, your child will never forget it either.
Video testing a homemade mini machine:
Share this idea on social media. networks
Popular articles on our website:
- Homemade children's car with an engine from...
- Homemade car Zaporozhets convertible: photo and description…
- All-terrain vehicle made from a walk-behind tractor
- Homemade GO cards
- Homemade ATV based on Izh Planet: photo, description
- DIY amphibious all-terrain vehicle
- Made a homemade scooter with a chainsaw motor
- DIY ATV based on Izh Jupiter
- Do-it-yourself gas generator from a Ural chainsaw
- DIY mini tractor
- DIY walk-behind tractor with ZiD-4.5 engine
- Homemade tarabike “Pitbull” (37 photos)
Tuning
Once you're done with the must-have part, you can also upgrade the motocross bike to suit your needs. First of all, this concerns the installation of modern carburetors with high performance - they will inevitably increase fuel consumption, but will allow for stable engine operation at high speeds. You can achieve good results by adjusting the standard carburetors of the resulting motocross motorcycle. However, if you encounter troubles such as loud pops in the exhaust pipe or black exhaust, it is better to return to the standard settings or even contact a specialist. If you are going to make a dirt bike from Voskhod, you will also need to replace the standard paper filter with a foam filter, increasing its throughput without sacrificing performance.
Most experts advise taking care of high-quality tail when creating a motocross motorcycle. In this case, it is designed not only to improve the appearance of your bike, but also to protect its components from impacts on the off-road. Therefore, it is better to purchase a special tuning kit made of high-strength plastic. In addition, to save money, the necessary tail parts can be found at disassembly.
Preparing to assemble the motorcycle
First, you need, of course, to decide what configuration the future “steel horse” will have, and also to resolve the issue of all the parts and tools necessary for the work. If you have some experience, some elements can be made independently, for example, on milling and lathe machines or by welding.
If during the assembly process the base is an old motorcycle, then you should not start work with the installation of small parts, universal joints, brake rods, etc. The best solution would be to start puttingty and painting the tanks and fenders. To avoid problems with the motor or parts of the gearbox bridge, they need to be placed in kerosene for a while. A homemade motorcycle will look much more expressive and impressive if its engine crankcases, covers, gearboxes and ignitions are well polished.
The engine of the old device needs to be completely rebuilt, and only then begin installing accessories, which, as a rule, include two main materials: leather and chrome.
The procedure for self-assembly of a motocross motorcycle
It would be best to start assembly with wheels, which can be freely purchased at any motorcycle parts store. There are two most common options for attaching these elements: purchase a rim and replace the spokes, or simply install cast sports wheels on the device.
A fork for a motocross motorcycle should be classic and have a full range of adjustments. The optimal size for it would be 43 mm.
In order to increase the reliability of the brake system, it is necessary to increase their power. Alternatively, sometimes the diameter of the brake disc is simply increased.
Particular attention should be paid to the suspension, which is mounted on a homemade motocross motorcycle. The most suitable for it will be stock shock absorbers, which can be ordered directly from the manufacturer, but it is important to indicate the possible weight of the device so that the suspension elements are equipped with the appropriate springs.
If we talk about the engine, it is definitely worth mentioning that its thrust can be increased by reducing intake losses. To ensure this, the standard paper filter in the old engine is replaced with a foam one, after which the updated motor is installed in the system of the future motocross motorcycle. In addition, the carburetor is also subject to changes, which should ensure good engine operation at maximum speed.
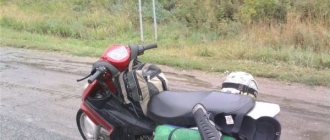
Scooter and tricycle made from a chainsaw
Chainsaws, as mentioned above, are very popular among home craftsmen. They are distinguished by their light weight and dimensions, and in terms of power they are what you need. Today on the Internet you can watch many video tutorials on how to make a tricycle, scooter or moped from a chainsaw . More often mopeds and scooters are made from the Druzhba chainsaw. An old bicycle is also taken, onto which all the parts are installed, including a forward flow muffler.
An example of a homemade tricycle scooter
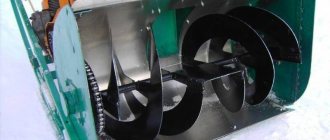
Muffler
It is the forward flow muffler that becomes almost the main feature of making a homemade scooter, because you need to know some of the secrets of its installation. The forward flow muffler was originally invented for sports cars. A forward flow muffler in itself already increases the power of a scooter engine.
Air filter
An air filter for a homemade moped or tricycle is also made by hand. First of all, the filter must be reliable. It is recommended to use an oil filter from Moskvich, a washbasin siphon, a metal pin, silicone and a self-adhesive micro-pork to make such an element.
- The filter is clamped between the neck of the siphon and the rest of it;
- The whole thing is held together with a metal pin, the length of which is selected on the spot;
- Place the plug on the metal pin;
- We collect everything and treat the cracks with silicone;
- We glue a micropork onto the flange of the siphon neck.
Homemade air filter
The result is a quite attractive-looking and very functional filter for any homemade product, including a moped or tricycle.
In conclusion, I would like to remind you that while making a homemade product, it will be useful to watch a video that gives practical understanding.
DIY motocross motorcycle
Despite the highest technical indicators of this type of motorcycle, such as a cross-country motorcycle, it is quite possible to assemble it yourself. Of course, nothing prevents you from simply buying a ready-made model, but not always factory samples are able to satisfy all the desires of a particular motorbike enthusiast, besides, such a purchase will certainly not be cheap, and a homemade motorcycle will save a significant amount of financial resources. However, here it is necessary to strictly comply with all installation requirements, otherwise the end result may be very disappointing.
DIY all-terrain vehicle
DIY all-terrain vehicle
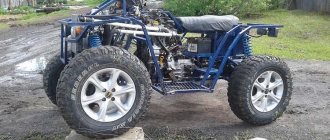
The idea to build a small all-terrain vehicle grew out of an unrealized teenage desire to have my own motorcycle. In principle, now, if you have money, you can buy even the devil’s bald one, but building it yourself is still more interesting 
I started by planning out the rough layout in SolidWorks and purchasing the parts. I purchased Chinese wheels, used in light ATVs, trailers, etc. The engine used Lifan 6.5 l/s, a clone of the Honda GX200 used in karting. I bought the engine right away with a gearbox and automatic clutch. Next, I built a slipway for welding the frame. Looking ahead, I want to say that this was the right decision, because it allowed us to build a frame with the correct geometry, which affected the ride quality and controllability of the all-terrain vehicle. Jig for welding the frame.
The construction of the all-terrain vehicle coincided with the revival of the workshop from the ashes (the previous one was lost with all the equipment under rather unpleasant circumstances), so there was very little equipment. In this regard, I decided to build the frame from a rectangular steel profile. Frame on a slipway.
The result is this design: Finished frame v1.0. Next, the wheel hubs were made: The assembly of the device began:
While working on an all-terrain vehicle, I found an office in Togliatti that makes interesting gearboxes for such equipment. They differ from standard Chinese ones in that they have a dry clutch, better gear ratios and, most importantly, the presence of a reduction gear. I threw out the standard Chinese gearbox and replaced it with a Tolyatti one. So the future all-terrain vehicle acquired an automatic transmission with a “lower gear”, like in adult SUVs. Engine with new gearbox installed in the frame. The brakes are disc brakes from a scooter.
Motorcycle sprockets, 520 chain. For centuries
Later, after the first tests, this sprocket was replaced with a larger one, with 52 teeth, to optimize the gear ratios. On the left is the new drive star. All-terrain vehicle before testing:
After the first tests, I handed over the steering wheel, added wings and elements for protecting the units:
This device goes like this:
Having driven it throughout the fall of 2014 and winter of 2015, I decided to correct the shortcomings I found. First of all, this affected the frame. The frame made of a rectangular profile turned out to be too heavy, which affected the overall weight of the all-terrain vehicle. In addition, due to its large width at the top, it was not comfortable for a person of average height to ride, because I had to spread my legs very wide. To fix this, I decided to completely redo the frame. This time it was made from a round pipe D=30mm. I already had a pipe bender, so bending the pipe neatly was no problem. Assembled on the same slipway: Frame from a round pipe on the slipway
New frame.
Let's put everything back together. Due to the heavy workload of the main work, this project moved very slowly, and it was only recently possible to completely reassemble the device. There have been no tests of the new design yet; there are no photos with the new frame yet. This is what it looked like before the modification:
PS And from the old frame we made a cart for a semi-automatic machine :-))))
Author: RedTriton, Moscow, Russia www.drive2.ru/users/redtriton/
Possible list of materials for creating a motorcycle from a bicycle
So, turning a bicycle into a homemade motorcycle, the most common option for a set of parts is the following:
- engine;
- pulleys;
- drive belt and tension roller;
- fasteners.
One way or another, making a motorcycle from a bicycle is far from a cheap pleasure, so sometimes it’s better to think about whether it would be advisable to do this or whether it’s better to buy a new moped or at least a ready-made bicycle motor.
Where to start assembling a motorcycle with your own hands?
Having ready-made motorcycle project diagrams at hand, as well as materials for their practical implementation, you can safely move on to the direct processing of pipes and metal sheets in the process of creating a frame. Each part of the chassis can be chromed or painted to give it a more aesthetic appearance. This is also done to prevent corrosion of the chassis.
You can also create wheel rims with your own hands. Still, why “reinvent the wheel” if many compatriots know from practice how to make a motorcycle from the Urals or Dnieper MT, using the frame, engine and electronics of the latter. By adding other unique nodes to them, you will clearly get an iron horse that is unlike any other.
Having installed an extended fork (preferably adapted for a front disc brake), homemade traverses (created using a steel sheet with a thickness of several tens of millimeters), the bike’s handlebars are mounted using brackets. The brackets are also used to mount the rear shock absorbers. They are considered a secure base for holding the seat back. Here you can fix various panniers and the trunk of the bike.
How to assemble a complete homemade motorcycle
It is better to choose/create a two-level saddle for a two-wheeled custom. Before creating it, you need to find a thick sheet of steel (about 2 mm). The latter will bend along the contour from the future tank to the rear panel. To make the edges of the saddle more rigid, you need to bead its sides 1 cm down. The soft part of the seat can be made of ordinary thick foam rubber. Leather is best suited for all this as upholstery. When installing the seat, it is necessary to install rubber gaskets on the frame directly under it.
Also make sure that in the future your homemade bike can be placed on a leg as easily as possible when parked. For these purposes, it is better to choose a side knife, which is mounted on the left side member of the frame and has the ability to easily recline in the presence of a spring.
The steering wheel should be attached not only to rear-view mirrors, levers, cables, but also to various electrical appliances, which can be purchased together with the body in many places. The devices that look most beautiful are those placed in chrome-plated boxes/cylinders.
You need to know how to make a motorcycle with your own hands as correctly as possible even before installing the throttle handle on the steering wheel. The latter should be made with small turned rubber rings.
Don’t forget about installing turn indicators on your homemade bike. Their absence on a motorcycle can lead to various dangers on the road. You can supplement the classic set of lighting devices (headlight, stop, turn signals) by installing small flashlights near the front headlight. Additional safety will be provided by installing safety arches on a homemade iron horse.
It is important to remember: when making a motorcycle with your own hands, make sure that in the future you will be able to register it with the road control authorities. Any major changes in the design of the bike must be registered with the traffic police/traffic police.
How to make a motorcycle with your own hands
All homemade motorcycles are unique. Not many bike lovers know how to make a motorcycle with their own hands. This requires a lot of effort. It is impossible to do without knowledge of the design of each model of motorcycle equipment and without the necessary materials.
In any case, when creating homemade motorcycles, the ideas of craftsmen who have long developed original models of motorcycles for various manufacturers are taken as a basis.
Homemade motorcycles are designs that, in all their functional qualities, do not differ from the motorcycles offered by manufacturers. For them, amateur designers use spare parts and components from various types of motorcycle equipment. Each creator of a homemade motorcycle has the opportunity to develop for himself a bike that will meet all his requirements.
Homemade motorcycles may have different technical characteristics. They can be whatever is necessary for any motorcyclist. In most cases, amateur designers create sports motorcycles and dirt bikes. Moreover, the latter can be equipped with elements of sport bikes.
How to make an all-terrain vehicle from a motorcycle?
Recently, all-terrain vehicle designs that are made from ordinary motorcycles have become widely popular. In addition to the entertainment functions that such a device carries, it is also a very reliable means of transportation.
So, homemade all-terrain vehicles made from motorcycles can be divided into several categories, the main of which are, naturally, ATVs. These transport models amazingly combine the mobility of a motorcycle and the stability inherent in cars. Due to the fact that each of the ATV wheels has its own suspension, the device is able to overcome almost any, even the steepest, road irregularities.