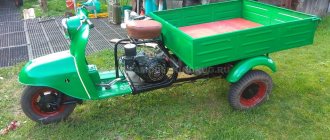
Despite the fact that Ant scooters have already been discontinued, there are still quite a lot of owners of this equipment. They are faced with the need to repair and maintain them.
Structurally, the Ant is far from the most complex vehicle. But without certain knowledge and skills, it is not recommended to take on the work with your own hands.
The dynastarter is considered one of the weak points of a scooter. However, not everyone knows what it is, how it works and how it works. And without this knowledge, it is not recommended to remove, repair or change anything in the design of the device.
Generator puller ant what thread
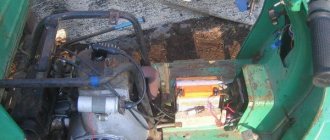
A typical situation: on the “ant” the red light is on while the engine is running, which tells us that there is no charging, that is, the generator simply does not provide current.
In such cases, I first inspect the wires going to the dynastarter and the relay-regulator, check the operation of the relay-regulator and, for complete happiness, forcefully apply current to the shunt winding; if after all that has been done, charging does not appear, then the fault is hidden in the dynastarter itself. The main malfunctions of the dynastarter are as follows: • Wear or sticking of the brushes. •Contamination of the rotor commutator. •Violation of the integrity of wires and windings, interturn short circuit, short circuit to the housing - all these malfunctions are extremely rare, unlike the first two. First, we need to remove the cooling casing; I won’t go into detail about how to remove it, since you shouldn’t have any problems when removing it. After removing the casing, we need to unscrew the breaker cam behind which there is a nut securing the rotor.
Then when you put the cam in place, don't forget to align the groove of the cam with the pin on the rotor (highlighted in red).
Now you need to unscrew the nut on the trunnion. We take a wrench, in my case it’s a 17mm socket, and holding the rotor by the fan impeller with your left hand, unscrew the nut (right-hand thread).
The dynastarter rotor can only be removed using a special puller; all your attempts to remove the rotor using hammers and chisels are doomed to failure, so I don’t recommend it...
Just in case, I'm posting the dimensions of the puller.
Dimensions of Ant scooter dynastarter puller
Scooter Dynastarter Puller Ant
Then we screw the puller all the way into the rotor and begin tightening the screw. If the rotor cannot be removed in this way, you need to lightly hit the end of the screw with a hammer while tightening it.
We successfully removed the rotor and, as you can clearly see in the photo, its collector is very dirty (a typical malfunction), which naturally led to the failure of the dynastarter.
After removing the rotor, another malfunction was simultaneously discovered: traces of oil in the generator housing, which indicates a leak in the oil seal or large radial play in the main bearing. In any case, the seal must be replaced. To do this: unscrew the bolts on the stator and remove it from the flange.
So, the flange along with the oil seal has been removed. As you can clearly see in the photo, the edges of the oil seal turned out to be very worn out; I will tell you why it was worn out further.
As it turned out, the reason for the wear of the oil seal is that when installing the flange, the oil channel (highlighted in red) through which oil flows to the edges of the oil seal was sealed with sealant.
If you look closely, you will see a sealant plug there (highlighted in red), which caused oil starvation of the oil seal. I want to give you some advice: when you install the flange back, do not apply sealant to it, use the standard gasket. I will tell you how to properly install the flange with the oil seal in place at the end of the article.
And now, we will talk about the reason that provoked the failure of the dynastarter. The reason turned out to be typical, so to speak, for generators of this type (direct current), namely: contamination of the collector. In order to restore its functionality, we need to clean the rotor commutator. How to do it? Everything is not as complicated as it might seem at first glance, for this we need a needle and sandpaper with a grit of approximately 400. We need to use a needle to clean out all the dirt and dust from the brushes between the lamellas of the commutator, then clean the commutator with sandpaper until it has a uniform shine. Then do not forget to thoroughly wash the collector from dirt with clean gasoline and dry it. If the commutator is very worn, it can be turned on a lathe (this operation can only be trusted by a good lathe). After cleaning and washing the rotor, we need to take care of the stator, it is also advisable to wash it with clean gasoline and replace the brushes with new ones, there is nothing complicated here, the main thing is that the brushes go in their sockets
Source
Repair of the dynastarter of the "ant" scooter
Eh, there were so many curses and unflattering words sent by the “happy” owners of “Ants” to the designers, who couldn’t come up with anything better, except instead of the usual and well-proven alternator, install a very imperfect, complex, and most importantly, a very unreliable and capricious “device” called a dynastarter.
So to this day, the owners of “Ants” have to pick up tools from time to time and take the rap for other people’s “shoals”. But okay, today we’re not going to talk about that...
A typical situation: on the Ant, when the engine is running, the red light is on, which tells us that there is no charging, that is, the generator simply does not provide current. In such cases, I first inspect the wires going to the dynastarter and the relay-regulator, check the operation of the relay-regulator and, for complete happiness, forcefully apply current to the shunt winding; if after all that has been done, charging does not appear, then the fault is hidden in the dynastarter itself.
The main malfunctions of the dynastarter are as follows:
- Worn or stuck brushes
- Rotor commutator contamination
- Violation of the integrity of wires and windings, interturn short circuit, short circuit to the body - all these malfunctions are extremely rare, unlike the first two
This is what we will have today.
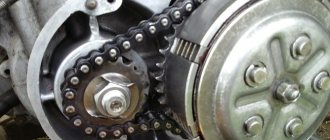
First, we need to remove the cooling casing; I won’t go into detail about how to remove it, since you shouldn’t have any problems when removing it.
After removing the casing, we need to unscrew the breaker cam behind which there is a nut securing the rotor.
Then when you put the cam in place, don't forget to align the groove of the cam with the pin on the rotor (highlighted in red).
Now you need to unscrew the nut on the trunnion. We take a wrench, in my case it’s a 17mm socket, and holding the rotor by the fan impeller with your left hand, unscrew the nut (right-hand thread).
The dynastarter rotor can only be removed using a special puller; all your attempts to remove the rotor using hammers and chisels are doomed to failure, so I don’t recommend it...
Just in case, I'm posting the dimensions of the puller.
Then we screw the puller all the way into the rotor and begin tightening the screw. If the rotor cannot be removed in this way, you need to lightly hit the end of the screw with a hammer while tightening it.
We successfully removed the rotor and, as you can clearly see in the photo, its collector is very dirty (a typical malfunction), which naturally led to the failure of the dynastarter.
After removing the rotor, another malfunction was simultaneously discovered: traces of oil in the generator housing, which indicates a leak in the oil seal or large radial play in the main bearing. In any case, the seal must be replaced. To do this, unscrew the bolts on the stator and remove it from the flange.
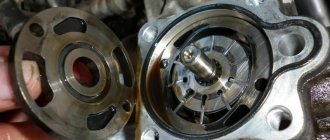
So, the flange along with the oil seal has been removed. As you can clearly see in the photo, the edges of the oil seal turned out to be very worn out; I will tell you why it was worn out further.
As it turned out, the reason for the wear of the oil seal is that when installing the flange, the oil channel (highlighted in red) through which oil flows to the edges of the oil seal was sealed with sealant.
If you look closely, you will see a sealant plug there (highlighted in red), which caused oil starvation of the oil seal. I want to give you some advice: when you install the flange back, do not apply sealant to it, use the standard gasket.
I will tell you how to properly install the flange with the oil seal in place at the end of the article.
And now, we will talk about the reason that provoked the failure of the dynastarter. The reason turned out to be typical, so to speak, for generators of this type (direct current), namely, contamination of the collector.
In order to restore its functionality, we need to clean the rotor commutator. How to do it? Everything is not as complicated as it might seem at first glance; for this we need a needle and sandpaper with a grit of approximately 400.
You need to use a needle to clean out all the dirt and dust from the brushes between the lamellas of the commutator, then clean the commutator with sandpaper to a uniform shine. Then do not forget to thoroughly wash the collector from dirt with clean gasoline and dry it. If the commutator is very worn, it can be turned on a lathe (this operation can only be trusted by a good lathe).
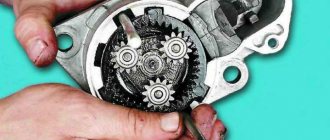
After cleaning and washing the rotor, we need to work on the stator, it is also advisable to wash it with clean gasoline and replace the brushes with new ones, there is nothing complicated here, the main thing is that the brushes move in the sockets without jamming, if the brushes sit tightly in the sockets, sharpen them with a file.
An important point: the brushes that come from the YSh terminal of the relay regulator must have insulated wires, do not confuse them!
Now let’s talk about how to put everything in place correctly. Let's start with the oil seal: install a new oil seal in the flange, to make this task easier, heat the flange with an ordinary construction hair dryer (just without fanaticism) and insert the oil seal without any problems. See the photo for the seal markings.
Next, we thoroughly wash everything, remove the remnants of old gaskets and sealant from all planes, apply engine oil to the edges of the oil seal and put the flange in place.
When you fasten the flange and stator bolts, it would be a good idea to apply thread locker to them.
After you have screwed the flange to the crankcase, we need to install the key in the groove. Otherwise, when you screw the stator, inserting the key will be problematic.
In conclusion, some advice.
- Handle the rotor and stator very carefully; do not throw them on the ground or in mud; it is best to store them separately from tools and spare parts.
- Before tightening, the bolts securing the flange must be washed in clean gasoline, and the holes for the bolts must also be washed; try to correct the threads on all nuts and bolts
- Install the stator on the flange and check again how the brushes move along the sockets, do not forget to install the wiring springs so that they fit into the grooves of the sockets
- To install the rotor correctly, you need to turn the shaft on which you will put the rotor so that the key is at the top, and also turn the groove under the key up in advance, then slowly put the rotor on the shaft, if the shaft does not go, twist it slightly from left to right and when you feel that the key has entered the groove, feel free to push it all the way
Three advantages:
Thanks to many years of successful cooperation with manufacturing plants, we are able to provide you with the most favorable and low prices for spare parts
Our price list contains more than 6 thousand items . We offer our customers everything from specific bolts and small fasteners to complete units and large body parts
Our organization has created an optimal and stable system for delivering spare parts to any region of the country. Timely delivery is carried out both by rail and by road through transport companies.
Source
Basic faults
- Mechanical, caused by natural wear, combustion of windings, destruction of contact groups
- Structural, due to design features
- Malfunctions of the relay regulator that lead to dyno starter failure
The most unpleasant malfunctions are related to mechanics: combustion of windings, interturn short circuit, wear or destruction of the commutator. Other mechanical faults such as wear or sticking of brushes, contamination of the commutator, breakage or oxidation of wires and terminals can be eliminated quite easily.
Diagnosis of dynastarter faults
Now to the question of repairing dynastarters on Ant scooters. The owner of the equipment can perform a fairly large amount of repair and restoration work with his own hands.
Usually a small set of tools is enough for this, consisting of:
- large flat screwdriver;
- small flat screwdriver;
- puller;
- tester;
- heads for 17.
It is possible that replacement and disassembly may require additional tools and accessories. Especially if any changes were made to the design of the Ant scooter that differed from the factory design.
If everything necessary for work is present, you need to carry out diagnostics.
The first sign that a burnout, short circuit or destruction has occurred in the dynastarter or relay-regulator is when the battery charge control light on the Ant's dashboard suddenly lights up.
If a motorcyclist is faced with a similar situation, it is necessary first of all:
- study the condition of the wires that go from the dynastarter to the relay regulator;
- check the condition of the fuse;
- remove the cover from the regulator and visually assess the integrity of the components;
- remove the rotor and look at the commutator and brushes.
If after this no conclusions can be drawn and everything looks normal, then the best solution in the current situation would be help from a competent electrician.
There is another sign that the dynastarter itself is working, but it already needs to be serviced. It's time to. Look at the battery indicator light when you run the engine at low or idle speed. The light bulb first winks a little, after which it burns more steadily, and after a while it burns completely and as brightly as possible. Moreover, regardless of the current operating mode of the engine and its speed.
In the first and second cases, without disassembling it will not be possible to objectively assess the condition of the dynastarter. We will have to do dismantling work.
Diagnostics
The first sign that something has burned out, shorted or broken in the dyno starter or relay regulator is when, out of the blue, right in the middle of the road, your battery charge control lamp comes on.
If this happens to you, then the first thing you need to do is inspect the wires going from the dyno starter to the relay regulator, check the fuse, remove the cover from the relay regulator and at least visually determine the integrity of its elements, remove the rotor and see what’s wrong with the brushes and collector and if nothing suspicious is found there, turn to a very competent electrician for help.
You can try to identify the fault yourself, and within the framework of this article it would be possible to describe all the stages of testing, including the author’s developments, but none of you will do this. In the best case, poke it a couple of times with the tester and you’ll give up on this matter, or even end up using a magnet instead of a dynostarter.
Design and principle of operation of the dynastarter
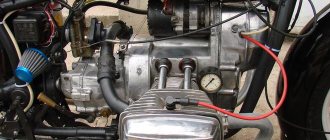
Previously, to start the engine on motorcycles, you had to press the pedal hard. This need disappeared with the advent of the dynastarter. Moreover, for the first time this unit was introduced on Tula scooters, and then they began to install it on Ant.
The advent of electric starters on motorcycles has made the starting process much easier. If earlier sharp pressing required effort, then with the advent of starters, women and older people began to actively master scooters.
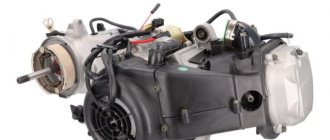
A dynastarter is a combined electric machine that has 2 excitation windings. When the engine starts, the dynastarter operates on the principle of an electric starter. He cranks the crankshaft and starts the engine. When the engine is running, the dynastarter generates electric current and operates on the principle of a generator.
The design of the device includes a rotor with an end-face commutator and a stator.
The dynastarter rotor is bell-shaped. The housing provides grooves where the winding is placed. The ends of the winding sections are routed to the end commutator. A hub is installed inside the rotor to secure the rotor to the end of the crankshaft. On the inner surface of the hub there is a groove necessary for fixing the rotor on the crankshaft of the internal combustion engine.
The relay regulator plays an important role in the operation of the unit. It includes a reverse current relay, a voltage regulator, and a starter relay.
Here it is worth familiarizing yourself with the principle of operation of the dynastarter. If you press the key and insert it into the ignition switch, then due to the current supplied to the windings of the dynastarter, the device operates like an electric motor. As soon as the Ant's engine starts, the driver does not press the key, and no current flows to the device. Having reached certain engine speeds, the reverse current relay comes into operation, and then the dynastarter turns into a generator.
In order for the dynastarter to work, a battery must be included in the design of the scooter.
Based on the principle of operation of the considered dynastarter, which was widely used for the Ant scooter, you can address issues of its maintenance and repair.
Disassembly
We remove everything that interferes with the removal of the rotor, hold the rotor by the fan with your hand and unscrew the nut
A good owner should have a washer and a lock under the nut. The bad one won’t even have a nut...
Remove the rotor from the crankshaft. The rotor can be removed either with a factory puller or with a homemade one - it makes no difference.
First of all, we inspect the rotor commutator and brushes. The commutator must not show any wear or damage. For example, this collector is just dirty and after we wash it, the dynostarter will start working again.
And some deer broke out the lamellas of this collector. Such a rotor will be difficult to help and easier to throw away. To prevent this from happening to your rotor, select bolts for the coupling for the magnet and the fan of the appropriate length, and do not put everything you have on hand there...
This collector was pulled up by something, the lamellas were shorted together and the dynostarter died. If you find a good turner, he will be able to sharpen the scuffs and the rotor’s performance will be restored.
There are situations when the rotor is dropped or the windings are hit. You understand that damage to the power windings will not improve the reliability of your scooter’s power supply system, so handle such devices very carefully and use pullers, and do not knock them down like tractor drivers with a hammer.
On this rotor, someone smacked the windings with relish.
How to disassemble a knot
The first step on the path to repairing and restoring the dynastarter’s functionality is to disassemble the unit.
First you will have to dismantle everything that prevents you from removing the rotor.
- Hold the rotor with your hand, holding the fan, and unscrew the nut.
- If there is suddenly no washer and lock under the nut, be sure to install them during reassembly.
- Now remove the rotor from the crankshaft. To remove the rotor, you can use a purchased factory puller. But some people collect them with their own hands. Which puller you choose is not a fundamental question. Both options are fine.
- Inspect the condition of the rotor commutator and brushes. The commutator should show no signs of damage or wear. It might just be dirty. But this is not so scary, because after washing the dynastarter will be able to function normally again.
- If the lamellas on the rotor are broken, then it is already difficult to talk about any kind of restoration. The easiest way is to throw it away and buy a new element. The main reason for rotor failure is the use of the first available bolts for the magneto coupling, as well as a fan of inappropriate length.
- If the collector is blocked by something, the lamellas can short-circuit with each other, which will lead to breakdown of the dynastater. In theory, you can turn the scuff marks on a lathe. And then the rotor will live on.
If the rotor falls or hits the windings, severe damage occurs. It is recommended to dismantle such elements only with a puller, and not to use barbaric approaches with a hammer.
Having disassembled the element, you can now try to restore it so that the Ant scooter can perform its duties normally again.
How to clean the collector
The procedure is performed according to the following rules and recommendations:
- Using a small flat screwdriver, carefully remove any dirt that accumulates between the slats;
- here, be extremely careful not to scratch the lamellas themselves with a screwdriver;
- Blow out the collector with compressed air;
- take a paint brush of a suitable size and clean gasoline;
- moisten the brush in gasoline and wash off the dirt on the collector;
- when the gasoline has completely evaporated naturally, arm yourself with a lint-free rag;
- lightly dampen a rag in clean gasoline and rub the manifold firmly until it is perfectly clean.
In some cases, this may be enough to restore the dynastarter. But not always. So let's move on.
Checking rotor windings
You will need a tester or multimeter in dial mode. It is necessary to check the winding circuits for possible breakdown. To do this, one probe is connected to the rotor body, and the second probe is connected in turn to all available lamellas.
If on some lamella the tester produces many numbers or squeaks, then the winding has a breakdown. There is no point in repairing the rotor in such a situation. The best solution would be replacement.
Stator windings
Here you will need to do the following:
- unscrew the stator mounting bolts;
- tap in a circle using a wooden mallet;
- remove completely from the engine;
- turn the wires towards you;
- take the tester and turn it on to dialing mode;
- connect the probes to the rightmost terminals;
- If the tester produces a sound signal, then a winding break has not been detected.
The same must be done with the two remaining wires. Here, too, the tester turns on in dialing mode. The probes are connected to the ends of the wires. It’s good if the device doesn’t beep. This indicates that no breakage occurred on the windings.
After checking the windings for breaks, you should also check the stator for breakdown of the windings. And again the tester is in dialing mode. One probe is alternately connected to the wires, and the second to the stator housing. If there is no sound signal, then there is no breakdown. If running numbers and a sound signal appear, then there is a breakdown to ground.
How to check brushes
Turn the stator over so that the brushes are facing you. Check elements for wear.
If you see that the working surface has become thinner than the main one, then the brushes have worn out. Such components should be replaced.
There should be no problems with installing new brushes on the dynastarter of the Ant scooter. You just need to carefully remove the old brushes and install new consumables in their place.
After checking for wear, be sure to take a look at how the brushes move in their sockets. It happens that the brushes get stuck. Then you need to sharpen the elements with a file. This is done until the brushes begin to move inside the socket without jamming.
The last step of the repair and restoration work is to install the components of the dynastarter from the Ant scooter into place. Do not forget to adjust the ignition, since after such an intervention this will be a mandatory and necessary procedure.
Usually, after such manipulations, the electrical component of the Ant scooter functions well again. But if something went wrong, you have problems, or the node could not be returned to normal, then be sure to seek help from specialized specialists.
Cleaning the collector
Take a small screwdriver and clean out the dirt between the slats. The collector must be cleaned very carefully so as not to scratch the lamellas.
After cleaning, blow the collector with compressed air, wash it with clean gasoline and wipe it dry with a rag. It is best to wash the collector with a brush: wet the brush in clean gasoline and wash it until the dirt is completely removed. When the gasoline has completely evaporated, take a piece of some lint-free cloth, moisten it a little in gasoline and carefully rub the collector with the maximum possible force until it is perfectly clean.
Checking the stator windings
We unscrew the stator mounting bolts, tap it around with a wooden mallet, remove it from the engine, turn it over with the wires towards you, switch the tester to the continuity mode, connect the tester probes to the two rightmost terminals of the windings, if the tester beeps, there is no winding breakage.
We do the same with the remaining two wires: put the tester into dialing mode, connect the tester probes to the ends of the wires, if the tester beeps, there is no winding break.
After checking the windings for breaks, we carry out an additional check of the stator for breakdown of the windings: we switch the tester to the continuity mode, alternately touch the wires with one probe, and touch the stator housing with the second. If the tester does not beep, the windings are not broken. If it beeps or numbers appear on the screen, the windings are broken to ground.
Checking the brushes
We turn the stator over with the brushes facing us, check the brushes for wear: the working surface of the brushes is slightly thinner than the main one, if the working surface on your brushes is worn out, replace such a brush with a new one.
After checking the brushes for wear, we check one by one how the brushes move in the sockets; if the brushes hang up, we sharpen them with a file until they move in the sockets without jamming.
After all that has been done, we install the dyno starter parts in place, adjust the ignition and enjoy the impeccable operation of the electrics of your scooter.
Source