The cabin air filter is part of the forced ventilation system of the Niva Chevrolet car. It protects the interior from insects, fluff and dust, and also traps foreign odors. Thanks to the filter, car passengers can breathe clean air.
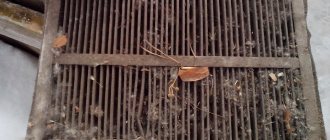
Old and new cabin filters
But, over time, the cabin filter element wears out and becomes dirty. Therefore, it needs to be changed periodically, because the health of the car driver and passengers depends on the cleanliness of the cabin filter. How often you will have to replace the cabin filter depends mainly on the road surface on which the car is driven. If the Chevrolet Niva is used in rural areas with dusty, dirt roads, then the filter will have to be changed more often than for motorists driving on city streets. Specialists of the Chevrolet Niva service network believe that the cabin filter must be changed every 5 thousand kilometers of the vehicle. The most optimal operating time for the filter is 6 months. Replacement less frequently is not recommended.
If it's time to replace the cabin filter, you don't have to take your car to a specialist auto repair shop. You can change the filter yourself, without outside help. Having a Phillips screwdriver, sealant and a new filter element on hand, any driver can handle the replacement on their own. The main thing you need to know is how to get to the filter and how to properly dismantle the cleaning system. For those who are doing this for the first time, a little hint. Open the hood of the Chevrolet Niva. If you are facing the engine compartment, then you need to look for the cabin filter on the left, under the windshield trim. If you sit in the cabin, the filter will be located to your right. There is a filter cover in the wind window trim. It is attached to the cladding with sealant and one self-tapping screw. After unscrewing the screw with a screwdriver, carefully pry up the cover and disconnect it. Dried sealant must be carefully removed not only from the filter cover, but also from the entire joint surface of the wind window trim. Pry up the old filter with a screwdriver and remove it. Carefully install the new filter element into the air intake housing so that the edge glued to the edges of the filter is located on top. Then, apply a thin layer of sealant to the edges of the lid and insert it into the opening of the cladding. Press firmly so that the grip is strong. We fix it all with a self-tapping screw and close the hood. That's all. It’s not a lot of work, but the pleasure from clean air in the cabin is palpable.
Regulations
According to the automaker's regulations, the Niva Chevrolet cabin filter should be replaced once every 15,000 km. However, if driving in very dusty areas, it is recommended to carry out work more often. That’s why many owners prefer to change it every 10,000 km, or even 7,000.
In addition, some people simply clean it from time to time, shaking out the dust and blowing it with a stream of air from the compressor (if there is one, of course). Of course, this does not allow one to refuse replacement according to the regulations, but as an additional measure it is quite acceptable.
Choosing a cabin filter for a Chevrolet Niva
(1.7 / 4×4 / 80 hp), (1.7 / 4×4 / 83 hp), (1.8 / 4×4 / 125 hp)
Problems often arise when choosing cleaning elements on your own. The reason is that the owners do not know the markings and catalog numbers, as a result of which spare parts are purchased that do not meet the requirements of the given vehicle.
To avoid emergency situations, we recommend purchasing parts exclusively from specialized stores, dealership centers, and official representative offices. As an alternative, order spare parts for subsequent installation at certified workshops. This practice is gaining momentum and spreading at a rapid pace.
Original and verified catalog items:
- Bosch, 1987432333, price from 300 rubles. Parameters: 25.2 x 15.4 x 3.50 cm;
- Champion, CCF0420, from 300 rubles;
- Knecht Filter, LA 934, from 300 rubles;
- LYNXauto, LAC1907, from 300 rubles;
- LYNXauto, LAC1907C, from 300 rubles;
- MANN-FILTER, CU26005, from 300 rubles;
- Patron, PF2266, from 300 rubles;
- Sakura, CA25055, from 300 rubles;
- CHAMPION, CCF0433, from 350 rubles;
- MANN-FILTER, CU26019, from 350 rubles;
- FILTRON, K1230, from 350 rubles;
- KNECHT, LA939, from 350 rubles;
- DENCKERMANN, M110899, from 350 rubles;
- PATRON, PF2266, from 350 rubles;
- KNECHT, LA 937, from 350 rubles;
- CHAMPION, CCF0508, from 350 rubles;
- MANN-FILTER, CU26011, from 350 rubles;
- FILTRON, K1222, from 350 rubles;
- DENCKERMANN, M110800, from 350 rubles.
There is no data regarding the compatibility of other filter modifications. All actions are under the personal responsibility of the driver. To avoid incorrect installation, always use proven consumables.
Work progress
It’s worth noting right away that the process of replacing the Chevrolet Niva cabin filter can be carried out in one of 2 ways, which differ in the dismantling algorithm:
- Removing the plastic cover;
- Removing part of the frill.
First option
The lid itself is held on by one screw and sealant. The screw must be unscrewed, the sealant must be cut off, and then the cover must be removed.
Next, you need to remove the replacement filter element itself. To do this, you can pry it off with a screwdriver.
IMPORTANT! You need to work extremely carefully and not shake the element so that the hoops and dirt accumulated in it do not fall into the air duct.
Next, a new Chevrolet Niva cabin filter is installed. It needs to be placed with the correct side - there is an arrow on it for this.
Then you need to carefully remove the old sealant from the lid, degrease the working surface and apply a new one. Then put the lid on and tighten the self-tapping screw.
Second option
It involves removing part of the frill so as not to touch the lid, which is seated on the sealant. By the way, many owners note that this is even faster.
Main parts of a moped
First, let's look at the main parts of this technique. In other words, let's take our future scooter apart, so to speak, and find out its main elements so that making a moped is easy.
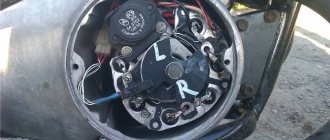
Main moped components
Engine
It is clear that without a good engine you cannot go far on a scooter. In this case, it is usually installed on the D-6 power unit. Recently, chainsaws have also become very popular, from which a homemade moped is made. In the video instructions you can see in detail how to do this. Chainsaws will be discussed in more detail below.
Exhaust system: forward flow
It is necessary to carefully consider a high-quality exhaust system so that the muffler does not have a negative impact on the power unit with which homemade mopeds are equipped, but, on the contrary, helps to quickly get rid of the remaining air-fuel mixture. A direct flow made by yourself will be what you need.
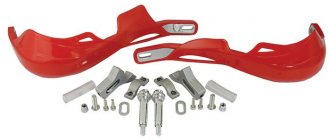
Suspension: pendulum fork
A pendulum fork that looks much better than other versions of this part of the scooter. The fact is that a large number of varieties of forks can be made, but any expert will confidently tell you that nothing is better than a pendulum one, nothing has been invented yet. As you know, this part of the scooter bears the hardest work. It is the fork that takes the brunt of the impact when going over various bumps, and generally uneven sections of the road. This is a kind of suspension on which the driving characteristics depend. Thanks to the pendulum fork, you can achieve stability of the scooter on any road.
Purpose
During operation, even with the heater and air conditioning turned off, many harmful substances enter the vehicle interior. This is not only exhaust gases from cars in front, but also soot and road dust. All this is captured by the air intake and enters the cabin. To ensure air purity, a cabin filter is located between the engine compartment and the deflectors on the Chevrolet Niva. Replacing this element strictly according to its resource is a guarantee of the health of the driver and passengers. After all, this element performs an essential function - it prevents the penetration of carbon monoxide and other harmful substances into the lungs while driving. It is also called an air conditioner filter.
DIY Izh tricycle
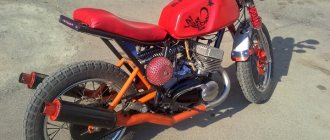
Few people know, but you can make a tricycle with your own hands from Izh in an ordinary garage with a fairly small budget. A small trike will have a comfortable fit, dynamics, good handling, and the lightness of the frame will allow you to accelerate at a fairly high speed.
The model itself can be implemented in the style of a rigid bike , with leather trim, chrome-plated steel inserts, or have a more sporty look, with streamlined shapes and lines of the body. Drawings of a tricycle from Izh can have emphasis on long trips, or on active driving on difficult rough terrain, copying models of famous brands, adjusted for size. Much depends on your budget and the time you are willing to invest in your hobby.
Some motorcyclists make a tricycle from Izh with their own hands in order to have a reliable and convenient household assistant. The reinforced frame and powerful rear axle will allow you to transport decent loads, and the reliable IZh engine is easy to maintain.
It will be easier to make an Izh tricycle with your own hands if you have experience in welding and understand the design of motorcycles or cars. The frame will have to be completely manufactured from scratch, have a pre-designed shape and structure. Usually the calculation is made in such a way as to exclude breakdowns and places with vulnerable structures, so that the trike can travel hundreds of kilometers without maintenance.
Strengthening is achieved by welding corners and additional pipes so that the fork does not vibrate. The basis of the transmission can be taken from a walk-behind tractor or combine harvesters. If you want to get a traction type Izh Planet tricycle, it is better to use sprockets in a ratio of 2:1, i.e. 50 and 25 teeth respectively.
Varieties
There are several types of air purification in the system:
- Mechanical. In this case, the air is purified through fine-fiber paper material. We will look at its device below.
- Adsorption. Such filters provide better cleaning through the use of activated carbon. It perfectly eliminates all bacteria and odors that enter the cabin. During manufacturing, the adsorption element is applied to a synthetic or textile base. Compared to a mechanical one, this element cleans the air 5-10 times better. Charcoal is used as a base.
When to change the filter
The filter is part of the forced air circulation system, which is performed by the on-board air conditioner. Of course, there are certain sanitary standards for changing the cleaner, but the degree of its contamination depends on the following factors:
- where exactly do you operate your car (dirt roads or asphalt);
- how often do you use your car?
- do you keep it clean?
We recommend: Nissan Quasqai: replacing low beam lamps
Auto mechanics at the official Chevrolet showroom advise changing this part every six months or after 10-15 thousand kilometers. Usually, according to the rules, it is recommended to replace them in early spring and then in the fall.
Remember, the air barrier has a warm, damp environment in which all kinds of fungi and hard-to-remove mold thrive.
Symptoms
How can you tell if the cabin filter on a Chevrolet Niva is dirty? Replacing this element is necessary if the air flow from the stove suddenly decreases. If the machine is equipped with air conditioning, a characteristic musty smell will be released along with the air flow. If the element is not replaced in time, the air conditioner radiator will need to be cleaned. In rare cases, reduced air flow occurs due to a broken heater motor. But first you need to check the cabin filter on a Chevrolet Niva car. Replacing this element in 80 percent of cases eliminates this malfunction. If the above symptoms occur, always check the element for contamination.
When is it necessary to change the cabin filter material?
However, all of the above problems can be avoided if you simply change the filter at the appointed time. The manual that comes with the car indicates when to replace the filter. But in this matter it is better to proceed from personal feelings when examining the cabin filter element.
Certain models have special sensors that indicate the degree of contamination of the air barrier.
When choosing a new filter, be sure to take into account that those that contain activated carbon in their composition will last much longer when compared with conventional paper ones, including if they have a bactericidal coating.
Replacement
You can perform this procedure yourself on a Chevrolet Niva car. A car service will charge about 500 rubles for this work. To replace it yourself, we will need a new filter, a minus screwdriver and sealant. Open the hood of the car and find the element housing. It is closed with a lid. Using a screwdriver, we pry up the element and clean it of the old sealant. You should also clean off any remaining residue on the body itself. On some modifications, the cover is additionally fixed with a self-tapping screw. Here you will need a Phillips screwdriver. If the sealant is very dry and the cover cannot be removed, there is no need to apply force - this will damage the element. Carefully pry the edges all the way around. As a last resort, heat it with a hairdryer. After this, remove the dirty filter element out and install a new one.
Ural Hercules - factory Ural tricycle
The Irbit Motorcycle Plant has released a three-wheeled modification in its model range for transporting cargo up to 500 kg. The model is called “Hercules” and moves well both on city roads and off-road. The sides of the tricycle are also removable and this allows it not to be limited in the size of the cargo it transports. Hercules is a truck that does not require a category “C” license.
Technical characteristics of the Hercules tricycle:
- Dimensions: 335x150x115 cm
- Ground clearance: 185 mm
- Weight: 500 kg
- Fuel tank capacity: 19 l
- Maximum speed: 70 km/h
- Engine capacity: 750 cc
- Power: 45 hp
- Engine type: opposed 4-stroke with two cylinders
- Generator: 500 W
- Electrical: 12 V
- Transmission: 4-speed, with reverse gear
- Tires: 6.45 and 13 inches
Is it possible to restore the old one?
It is worth noting that the cabin filter, be it mechanical or adsorption cleaning, cannot be restored. Blowing and washing the element with water will not help. You may be able to remove some of the dust, but there will be no effect from the work - dirty air will continue to flow into the machine. Also, any mechanical intervention damages the layer and internal structure of the filter. It is inexpensive - about 300 rubles. Therefore, there is no point in restoring it.
So, we found out where the cabin filter is located on a Chevrolet Niva car and how to replace it.
Scooter and tricycle made from a chainsaw
Chainsaws, as mentioned above, are very popular among home craftsmen. They are distinguished by their light weight and dimensions, and in terms of power they are what you need. Today on the Internet you can watch many video tutorials on how to make a tricycle, scooter or moped from a chainsaw . More often mopeds and scooters are made from the Druzhba chainsaw. An old bicycle is also taken, onto which all the parts are installed, including a forward flow muffler.
An example of a homemade tricycle scooter
Muffler
It is the forward flow muffler that becomes almost the main feature of making a homemade scooter, because you need to know some of the secrets of its installation. The forward flow muffler was originally invented for sports cars. A forward flow muffler in itself already increases the power of a scooter engine.
Air filter
An air filter for a homemade moped or tricycle is also made by hand. First of all, the filter must be reliable. It is recommended to use an oil filter from Moskvich, a washbasin siphon, a metal pin, silicone and a self-adhesive micro-pork to make such an element.
- The filter is clamped between the neck of the siphon and the rest of it;
- The whole thing is held together with a metal pin, the length of which is selected on the spot;
- Place the plug on the metal pin;
- We collect everything and treat the cracks with silicone;
- We glue a micropork onto the flange of the siphon neck.