MY MOTORCYCLE
It would seem that what else is unknown in the assembly of the cylinder-piston group? On the one hand, nothing, but there is no limit to the perfection we strive for, which means we will have to work hard here too.
Usually, when assembling a motor, mechanics do not bother with setting tolerances and gaps, as well as equalizing masses: everything works the same way, and the effect of the above procedures is not always tangible. But we have nowhere to rush, so we will approach the process beyond the requirements of the manual.
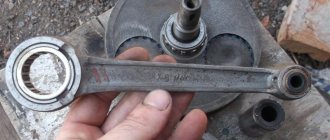
The key to smooth engine operation is equal masses of the moving parts of the crankshaft, so the connecting rods were weighed before installing the crankshaft, fixing it on a level table (photo 1). The difference in masses of absolutely identical-looking parts exceeded 10 grams, so the heavier connecting rod was “trimmed” a little with a grinding disc. At first glance, nothing complicated, but it is important to select the excess without removing the “meat” and without weakening especially loaded parts. In addition, it makes sense to “degrease” the connecting rod only up to the middle of the narrow part of the connecting rod; the part attached to the shaft has much less effect on the imbalance. Having removed about four grams, we stop: it’s risky to cut further, we’ll make up the remaining difference at the expense of other parts.
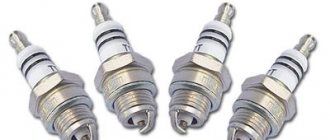
Surprisingly, the forged pistons purchased at the Plamen store turned out to be identical in both size and weight, but the piston pins differed significantly - by several grams. We will use them to select the remaining imbalance. In addition, you need to remember that not only crankcases and timing gears are divided into groups, but also holes in the connecting rods and piston pins, usually marked with one color or another (photo 2). In our case, the red marks on the connecting rods made it possible to easily find suitable “red” pins that fit into the holes of the pistons and connecting rods not too tightly, but without a hint of play (photo 3). Forget about old-fashioned habits of heating pistons in boiling water before installing pins. Properly fitted pins fit into modern forged pistons by hand, but should not fall out under their own weight. The same fit should be in the mating of the pin with the bushing of the upper head of the connecting rod.
We mark the selected sets of parts so as not to confuse them, and proceed to installing the rings. No imported brands: as practice shows, VAZ rings perform no worse, so we choose them. The main thing is to ensure the correct thermal gap. For new rings it should be 0.25-0.45 mm, and you can measure it with a regular feeler gauge after first installing the ring in the cylinder and aligning it with the piston (photo 4). In our case, the gap in the lock turned out to be 0.50 mm: this is due to the fact that during boring we made the gap between the piston and cylinder two hundred square meters larger than usual. Nothing can be done, the difference is small (0.6 mm is considered acceptable in operation). Now, using special pliers (photo 5), we put the rings on the pistons (with some skill, you can do it with your fingers), place the second compression ring with the recess down (with the inscription TOP - if there is one - towards the top ring) and move the ring locks 120 degrees relative to each other. Having previously lubricated the pistons with engine oil, we install them in the cylinders up to the pin holes - this is more convenient if there is no detachable mandrel for crimping the rings on the piston (for its installation in the cylinder).
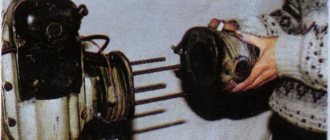
Standard cylinders have a chamfer at the base that helps compress the rings, but as a result of boring there is almost no chamfer left, so the compression rings must be compressed by hand while pushing the piston (photo 6). You can make a mandrel from a strip of metal or buy a branded one. Having prepared both cylinders for installation, we take on the gaskets. They are on sale, but Chinese craftsmen, who have never seen an Irbit engine, sometimes make mistakes with the spacing of the holes or the shape, so before installing the gasket for the cylinders, they need to be modified: in our case, several holes must be moved. Now, having previously lubricated the piston pins and inserted the lubricated pushers (photo 7), you can install the cylinders, pins and retaining rings (photo 8). Tighten the cylinder nuts crosswise with a force of 55-60 Nm (photo 9).
We turn the engine with a ratchet placed on a bolt screwed into the crankshaft and adjust the valve clearances: for the new engine, exhaust - 0.15 mm, intake - 0.10 mm. After running in, the cylinder mounts will tighten and the gap can be reduced to 0.1 mm. Next we install the block heads. The archaic square head bolts can be replaced with modern hex head bolts, but we decided to keep the authentic look, leaving their deliberate rust to contrast with the shine of the polished heads. We also tighten them with a torque wrench crosswise, with a force of 45-50 Nm.
The engine is almost ready, all that remains is to install the generator, ignition, carburetors and, most importantly, a balanced flywheel and clutch, which we will talk about in the following issues.
To be continued…
Issue: MOTO Magazine - August 2015
Author: Dmitry FEDOTOV, photo by the author
contents .. 11 12 ..Piston rings for motorcycle engines Ural, Dnepr
Heavy motorcycle engines have four rings in each cylinder. Two upper piston rings create the necessary tightness and prevent the breakthrough of gases from the combustion chamber into the engine crankcase. The two lower (oil scraper) rings are used to remove excess oil from the cylinder walls.
Piston rings are made of special cast iron. The upper compression ring is chrome plated. This increases its wear resistance and helps to increase the service life of the remaining rings and the cylinder mirror.
Oil scraper rings are made with an external cylindrical groove and slot-like slots, through which excess oil is drained from the cylinder walls into the internal cavity of the piston. For engines of all brands of Dnepr and Ural motorcycles, oil scraper rings are interchangeable.
Rice. 2.18. Steel oil scraper ring: 1 - disk; 2 — axial expander; 3 - radial expander
The compression rings of engines of all Dnepr and Ural models are the same in diameter, but have differences in height depending on the model (Table 2.4). Repair size rings have an increased outer diameter of 0.2 and 0.5 mm in accordance with the repair group.
Table 2.4 Designations and sizes of piston rings
The ring locks at the junction are straight. The gap in the locks when inserting rings into the cylinder should be within 0.15-0.60 mm.
Since 1985, on MT 10-32 engines, instead of the upper cast iron ring, a steel oil scraper ring has been installed, which consists of two disks, as well as radial and axial expanders (Fig. 2.18).
The elasticity of the radial expander is 0.25 - 0.35 N (2.5 -3.5 kgf). For normal operation of the rings, the internal diameter of the piston groove is machined within the range of 68.8 - 69.2 mm. The use of steel oil scraper rings made it possible to reduce oil consumption by approximately half.
Piston rings can be removed using a puller or brass strips (Fig. 2.19). Before checking the rings, they must be cleaned of carbon deposits and washed. If upon inspection large areas that are not worn in to the cylinder, cracks and chips, as well as loss of elasticity are found, then such rings must be replaced. The piston grooves are cleaned of carbon deposits using a device (Fig. 2.20).
For new piston rings, the gaps should be: for compression rings - 0.04 - 0.08 mm; for oil scrapers - 0.025 - 0.065 mm. If the gap exceeds the specified upper limits by 0.03 mm, the ring should be replaced.
If even when installing a new ring the gap remains increased, the piston must be replaced. The correspondence of the ring thickness to the depth of the piston groove can be checked using a ruler (Fig. 2.21).
Before installing new rings, they must be adjusted in height in accordance with the size of the piston groove using a file or emery cloth (Fig. 2.22).
contents .. 11 12 ..
Letters on stumps
Tell me what the letter “A” on the bottom of the Ural pistons means
Either a size rejection group or a weight group
piston size. A is the smallest, B is larger, C is even larger. The cylinder with the same letter is selected for the piston.
I don’t know about the Ural ones, but on the VAZ ones complete with group A - the pistons are identical in group C - there is a slight discrepancy in size
Priprihkin, look here. So, the letters are the so-called group index (the spread of piston sizes in one size group). There is a normal piston size with a tolerance of 78 -0.060; -0.090. This means that all pistons that fall within the dimensions from 77.91mm to 77.94mm meet the requirements. But if you take one piston with a size of 77.91 mm and another 77.94 mm, nothing good will come of it, so they were divided into groups: A - 77.91-77.92 mm B - 77.92-77.93 mm C - 77.93-77.94 mm Correct if anything is wrong.
Part two: Construction. Speculation. Errors
One of the first mistakes and conjectures was the theory of a broken oil seal on the HF.
The disassembly of the engine began with the clutch, which, despite 30 years of oblivion in the garage, was still covered in oil. Subsequent disassembly showed that oil was spread over all clutch discs. At that moment, it was logically assumed that the KV oil seal had broken, and here’s why.
Having removed the front timing cover, we saw a breather installed on the camshaft gear not through a slot behind a pin on the gear, but through a groove on the body of the breather (pretty beaten by the pin).
What should the piston ring clearance be? Detailed analysis
A topic that interests many car enthusiasts is how to set the gap between the piston rings, and this is especially of interest to those who are going to carry out repair work themselves. Everyone knows that any car owner (experienced or not) tries to learn more about the damage that can occur during the operation of the car, as well as the precautions to take. Techniques and techniques
What should be the gap on the piston rings?
We will look at various features, specifics of the topic, and also get acquainted with the basic techniques and techniques for repairing this part.
Firstly
, the very first step will be the fact that is associated with inspecting the pistons. It is necessary to check and carefully inspect the piston for cracks or minor mechanical damage on the surface. If you notice even a small defect, you should immediately replace the piston with a new one. To avoid an unpleasant situation or a larger breakdown.
Secondly
, if your engine is disassembled, you should also pay attention to the pistons. Such preventive measures include cleaning the piston head from existing carbon deposits, cleaning and processing the grooves that are located under the piston rings.
Third
, after the piston has been cleaned, be sure to inspect the gaps between the grooves and rings. In solving this problem, a table that will indicate the nominal piston ring clearances is more suitable than ever.
This:
- The parameters of the upper compression ring should be 1-0.04-0.075 mm;
- The compression ring, which is located at the bottom, should be 2-0.03-0.065 mm in size;
- Oil scraper ring with a gap of 3-0.02-0.055 mm.
Remember that each gap has its own parameters and distance, the most important thing is not to confuse them. The permissible gap should be 0.15 mm. If it is difficult to accurately determine the distance between the piston clearances by eye, you can use a special device - a micrometer.
Gap measuring device
How to properly use a micrometer to determine the size of the piston ring gap? It is necessary to measure the diameter of the piston in several places around its circumference. Then measure the width of the grooves using special feeler gauges.
After measurements, the average value of the gaps should be calculated. If the indicators differ from each other, then the piston should be replaced, if the indicators are the same, then everything is in order.
Fourth
, measuring gaps in piston ring locks. This measurement can be performed either using a special frame or with a simple cylindrical object. Indicators and parameters of the gap should be measured using a special probe. The parameters of the gap suitable for use have the following proportions - 0.25-0.45 mm
In this case, an error of 1.0 mm may be allowed, which may arise as a result of wear of the part. If the gap size is higher than normal, the piston must be replaced. If the measured gap is less than the specified parameters (0.25 mm), then all that is needed is to simply sharpen the ends to the desired size.
Fifthly
, measuring the gap between pistons and cylinders. This measurement is based on establishing a correspondence between the already measured diameters of the piston and cylinder. Here the standard values are from 0.025 to 0.045 mm, with possible wear of 0.15 mm.
If the gap between the cylinders and the piston is greater than the norm - 0.15 mm, the cylinder should be bored to the required size. If, on the contrary, it is not more than the main standard, then you should select a piston from a class where the distance is close to the nominal one.
We looked at the question: What should the piston ring clearance be? Remember, correct knowledge of the indicators and parameters of the gaps between the piston rings, as well as the features of measuring all parts of the piston, is the key to reliable and safe operation of your car.
And a few more words about the Liter Urals.
It's time to say a few words about IMZ liter engines.
If you, watching videos and photos, reading articles or listening to stories about liter IMZ engines, secretly or in reality, dream of owning a Ural “Liter and Five-Speed” - read it and think: - do you need it?
Write this down, and don't forget That the best of times ain't happened yet The gilded age has long been done And so many lost when the west was won
Part one. Introductory.
When, in September 2011, by an incredible coincidence, I nevertheless became the owner of my first (and, by the way, not the only) Ural Liter, a feeling of euphoria overwhelmed me to the very core. It would seem: this is the dream of every opposition member. The very fact of owning this miracle, produced in the amount of 20 copies (a similar engine with a number exceeding 00020, it seems, has not yet been found) exalted all aspirations and dreams, and hopes, and fantasies... to a qualitatively new level. Can you imagine the level of my heart rate at that moment? Mine turned out to be number 00013 (“if the cook is not lying to us,” I was lucky enough not only to touch, but also to possess, another Ural Liter with a similar number. Moreover, if you believe the same “cook,” then the K-1000 with number 00001, also did not escape my hands) I’ll make a reservation right away, all the engines from the M-73 “cycle” missed me.
This is how I saw a liter engine for the first time on Auto.ru
The story of the removal of the engine is described in detail here
Almost immediately the engine went to capital stock at VasePZ and I almost didn’t know the details of its repair, the features of its design, nuances and other things. The engine immediately showed wear and scuffing on the CPG, a broken crankshaft oil seal, and all the gaskets there for so many years had come to an end a long time ago.