Alfa Moped Connection Diagram
Ignition coil T1 with spark plug FV1 is located outside the switch and is shown conditionally.
One of the contacts, of course, is common.
Ignition coil 2. Dashboard alpha modification
It is worth noting that the high-voltage wire is connected to the cap without soldering.
To protect against dust, dirt and accidental short circuits, the coil is covered with a rubber cover.
The relay regulator on Chinese scooters is installed in the front part under a plastic fairing. There are other voltage regulator relays, where the colors are even more changed, but more about that later.
They are supplied with power from the battery.
Location of the main elements of the Alpha moped
Where is the starter on a scooter?
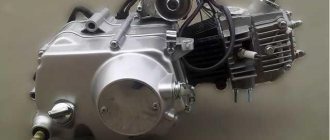
Finding a starter on a scooter engine is very simple: remove the front plastic hood of the engine and the seat tank, inspect the engine and find a small cylindrical part on it (approximately the same as in the photo) located perpendicular to the longitudinal axis of the engine to which a thick power wire fits - this will be the starter.
On most scooter models, the starter is mounted at the top of the engine, just behind the cylinder. In rare cases, the starter is installed at the front or bottom of the engine.
What is a voltage regulator relay for Viper, Delta, Alfa mopeds: 10 comments
Need a spare. And here you can get confused.
The starting of the starter is controlled by the starting relay. Among them is the famous Delta moped.
Or “raise the white flag and call SOS” - call a “tow truck” on your mobile phone. It comes from a relay regulator or battery if the engine is turned off through the ignition switch and the horn button
You can even play around a little and adjust these steps to the graph of the break in the ignition timing change curve.
When the engine is idling and at low speeds, the amplitude of the pulses coming from the induction sensor is less than the stabilization voltage of the zener diode VD4, therefore only later pulses of negative polarity pass to the input of the triac VS1, for which the zener diode is connected like a regular diode in the forward direction.
Green is the common wire. And if you look at the number of wires of such a relay-regulator, we see four of them. ALPHA TIDY! HOW TO CONNECT THE DEVICE ON ALPHA! INSTALLATION OF MOPEDS
Ignition circuit elements.
Egnition lock. Shuvav, city
It is shown simplified, but sufficient to understand the principle of its operation as part of the system.
The audio signal supply voltage is constant. The idea arose to use both impulses in the operation of the system, and so that at low engine speeds the ignition would be later, and at higher speeds it would become earlier.
Ignition coil 2. Although the ignition switch has 3 positions, the electrical circuit uses only 2.
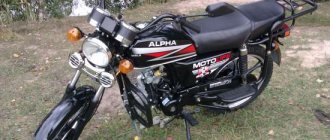
The moped gained great popularity in Russia and the CIS countries primarily because of its ridiculous price. Ignition circuit elements.
Alfa 72cc moped wiring diagram with tachometer
The difference between them is the number of wires wound and the colors. The ignition switch is nothing more than a regular multi-position switch. The image will open in a new window. The ignition system of the Alpha moped is very simple and reliable.
Thanks for the idea! If you pick apart the compound with which the printed circuit board is filled, you will find that the main relay is an electronic circuit consisting of a BTR thyristor, a diode bridge on 1N diodes, a powerful 1N diode, as well as several wiring elements: electrolytic capacitors, low-power SMD transistors, resistors and a zener diode .
Electrics and electrical equipment of a scooter
Fuel gauge and indicator. The speed at which switching from later to earlier ignition occurs depends on the stabilization voltage of the zener diode, so it can be adjusted within a wide range, changing the stabilization voltage from 3.3 to
The difference between them is the number of wires wound and the colors. It is not electrically connected to the generator and there are 2 wires coming from it: white-green and red-black.
In order not to confuse it with another wiring element, we are looking for a spare part with ribs, since the relay-regulator requires cooling and they will definitely be on the metal case.
This is what the relay regulator looks like. This is the main task of this voltage regulator relay. Need to try.
After the turn relay, the turn signal switch is installed. I can’t say about the polarity of the pulses. It is shown simplified, but sufficient to understand the principle of its operation as part of the system.
Also connected to the regulator is a yellow wire coming from the generator. There are 5 wires connected to the CDI module.
According to the diagram, this is the right position. When selecting, it is necessary, as already mentioned above, to use zener diodes with a direct current-voltage characteristic, like a conventional diode. Serves to control the front and rear turn signal lamps. The difference between them is the number of wires wound and the colors.
The starter is used to start the engine. This relay is very similar to the Minsk or Voskhod motorcycle switch. Electrical wiring Alpha, Delta
Source
How to make a relay regulator with your own hands?
To make a relay regulator with your own hands, you need a diagram and a little knowledge. The model of a homemade regulator is based on the principle of disassembling the generator and outputting a separate end of the wire from ground.
As a diagram, you can take the relay-regulator connection diagram (Figure 3), and on its basis assemble a single-phase generator.
To collect the stabilizer you need:
- disassemble the generator and remove the stator from the engine;
- then you need to unsolder the ground from the generator, solder a separate additional wire for the winding to it and bring it out. This wire will be one end of the winding. The second end is the generator wire;
- After removing the wires, you need to reassemble the generator in reverse order.
With this device, the generator has 2 wires (there should be 3 in total). You can connect the stabilizer according to this scheme:
Do-it-yourself relay-regulator manufacturing diagram
At the end of the process, you need to connect the yellow wire from the old regulator to the “+” terminal in order to obtain a constant voltage on the sides of the network. Check the resulting voltage regulator on the scooter. At this point, the process of creating a homemade device can be considered complete.
The relay regulator is a very useful thing and necessary for the normal operation of the moped. However, it requires attention and constant monitoring of its work. Therefore, if the device fails or its performance is unsatisfactory, it is better to replace it with a new one, the cost of which today ranges from 300 to 500 rubles.
The relay clicks, but the ATV does not start
How to properly connect the fuel pump on a scooter after repair or replacement, we will consider further. read more "
A common problem is that a scooter or moped starts with a kickstarter, but refuses to start with an electric starter. Let's consider all possible causes and methods for eliminating them. read more "
Of the trio of Japanese manufacturers, Suzuki scooter carburetors are perhaps the most capricious. Let's look in detail at how to properly connect carburetors to the engines of the following scooters read more "
Causes of heat seizure: read more »
For the average scooter user, the easiest way to test the voltage regulator is with the scooter engine running and can be done within one minute. Let's look at how to do this correctly using a regular multimeter. read more "
The scooter clutch assembly is equipped with bearings, ball, needle, and their combinations, which are the most common. Let's take a closer look at how to replace clutch bearings on a scooter. read more "
If, when you press the brake lever of the hydraulic brake system of the scooter, the brake caliper cylinder does not receive the necessary force to adequately press the brake pads to the disc and stop the scooter at lightning speed while moving, it is obvious that air has entered the system read more »
Safety while driving is ensured, among other things, by informative and precise steering. Only correct adjustment of the steering column can ensure smooth turning of the steering wheel without jamming or vibration. read more "
This material will be useful to all owners of a wonderful scooter - Honda Lead 90 with an HF-05 engine. The material contains all the data, technical characteristics, nominal and limiting parameters for the engine read more "
Replacing the drum brake pads of a scooter is necessary if the linings on the pads are worn out, the pads themselves are defective, and also in some cases when the operation of the scooter with the current pads is unsatisfactory due to the poor quality of the pads. So, let's look at the process of replacing the brake pads of a scooter drum brake. read more "
In the design of a scooter you can find a large number of oil seals of various sizes, designs and densities, but they all have the same task - to maintain the tightness of the connections read more "
Let's look at a simple example of how to use available tools to check the performance of the clutch within a few minutes and, if necessary, replace it. read more "
This material is intended for beginners. Here you will learn how to inspect the variator and rollers of the Honda Lead AF-20 scooter at home, using ordinary improvised tools that every scooterist has. read more "
The scooter does not start from the starter - reasons and methods for solving the problem
A common problem is that a scooter or moped starts with a kickstarter, but refuses to start with an electric starter. Let's consider all possible causes and methods for eliminating them.
There may be several reasons why a scooter or moped does not start from the starter, both individually and in combination. Let's look at each of them:
The scooter will not start from the starter if the electric starter itself is faulty. Everything is simple here. If the battery is serviceable and charged, the entire electrical circuit works, but when you press the starter button, only a click of the relay is heard, most likely the electric starter is faulty, or the contacts have come loose (oxidized).
It is very easy to check if the starter is working properly. Apply voltage to it directly from the battery, bypassing the starter relay. If the starter turns, then it is normal.
The scooter will not start from the starter if the starter relay is not working. A faulty starter relay cannot start the starter, here everything is also simple and clear. If you do not hear the relay click when you press the starter button, it may be faulty. The relay needs to be replaced.
A failed electric starter button cannot close the circuit and supply power to the relay and starter, respectively. The button needs to be replaced. Sometimes wd-40 helps.
As you know, modern scooters cannot be started from an electric starter without pressing the handle of one of the brakes. Each brake lever is equipped with a closing contact that turns on the brake light during braking. It is also responsible for closing the circuit to the electric starter.
Make sure that when you press the brake handle, the brake light is activated.
The starter contacts, as well as the starter relay chip, could have oxidized or come off. Inspect the contacts carefully and the quality of their connections. Make sure there is no oxide on the contacts.
If, when you try to start the scooter with an electric starter, the electric starter itself rotates and does not engage with the crankshaft, most likely the bendix has failed.
The scooter will not start from the starter if the battery is dead. A dead battery cannot crank the crankshaft with the proper force. Sometimes, when the battery is dead, the bendix does not transmit force to the crankshaft and we simply hear the starter twisting, as happens with a faulty bendix. Make sure the battery is charged.
Over time, the battery capacity decreases, especially when used year-round. Such a battery, even if fully charged, instantly loses capacity under load. Even a fully charged battery, when trying to start it with the starter, can reduce the voltage to 6-8 volts. Starting the scooter with an electric starter in this situation will not work. The battery needs to be replaced.
The fuse located near the battery could simply have blown.
If the turn signals, brake light and horn work, then everything is in order. If not, change the fuse.
Check the crankshaft seals. If at least one of them shows signs of leaks, starting the scooter from the starter, especially when cold, will be problematic. Leaky seals need to be replaced.
The most common reason for owners of scooters and mopeds to visit a workshop is that the scooter will not start from the starter, although all the electrics and battery are in order.
There is one rule, it’s better to remember - if the scooter starts normally with a kick starter, but doesn’t want to start with an electric starter, although the starter cranks the crankshaft perfectly and with sufficient force, the fault will almost always be low compression.
What does it mean? Most likely, your piston is already running out and you will need to change the piston with rings at best.
At the same time, question number two always arises - why does the scooter start from kickstarter? The answer is that when we rotate the kickstarter with our foot, especially when it is sharp, we turn the crankshaft faster.
A simple and understandable example can be given - remember the old pump with which you wanted to inflate the inner tube of your bicycle or scooter. Often these pumps do not have a sealed cuff that does not fit tightly enough to the walls. If you tried to slowly pump the chamber, all the air simply passed through the leaks in the cuff. And if you pumped quickly and with good effort, everything worked out. It’s the same here.
You can also read other articles on the topic:
But what if the battery is charged, and the starter is on the button (as you say whack-whack), even if you bridge the contacts, the same sound zhik-zhik, I checked the battery with a multimeter and the charging of the battery while the engine is running, everything works, the Alpha Sabur 107cc moped is like written on the cylinder.
How to Check the Starter Relay on an Alpha Moped
ELECTRONICS OF ALPHA AND DELTA MOPEDS Due to the fact that more and more owners of devices with engines of the 139FMB type and lights at recess are faced with six-coil generators (replacing the motor or preferably a more powerful generator), there is a need to write this article. First, let's figure out what the differences are. The picture shows a diagram
The electrical equipment of the mopeds under consideration consists of a source and consumers of electronic energy, auxiliary devices and an electronic network. Electrical equipment ensures timely ignition of the working mixture in the engine cylinder, operation of lighting devices and
The most popular scooter in Russia and Ukraine is the Viper Active. And here everything is very simple, a decent appearance, an established network of product suppliers, a reasonable price and a truly bassy and beautiful exhaust sound, which is sometimes misleading, and creates the memory that the Viper Active is installed on
about all the electronics on a moped. In this video we will tell you in general terms how the wiring in the bike works. Enjoy watching. Wiring on Chinese mopeds Alpha, Delta and its repair
Drawings and photos of electrical circuits of mopeds. I sketched out a few things for anyone who needs to figure it out! There are also 2 types of voltage regulator: 4-pin and 5-pin. The diagrams show only 4-pin. Generators for them are different. You can find a generator for a 5k regulator by the fact that it does not have windings
1 Ignition module (CDI) 2 Ignition coil 3 Spark plug 4 Alternator 5 Voltage regulator 6 Battery 7 Fuse 8 Starter 9 Start button 10 Start relay 11 Tachometer 12 Ignition switch 13 Brake light 14 Transmission neutral indicator 15 Instrument panel backlight 16 Headlight
Starter relay for Chinese motorcycles and scooters - alternative replacement
The purpose of the video is to save the nerves and money of the owners of Chinese motorcycle equipment to check
your relay
maybe from the link.
How to check the starter relay on a scooter
Main tasks of the relay
. Problems with the electric starter itself are not considered.
The “Delta”, “Alpha”, “Leader” and “Mustang” mopeds use a 12 V battery with a capacity of 2.5, 3.0 or 5.0 A/h (Table 6.1). Inside the case, the battery is filled with a chemical reagent and electrolyte. Battery maintenance involves periodically checking the level and density of the electrolyte.
The source of electricity for mopeds is a generator (magneto), the rotor of which is mounted on the left axle of the engine crankshaft. Flywheel type generator, alternating current, with excitation from permanent magnets. To diagnose a generator, special equipment is required. Disassembly
One of the main elements of the moped's electrical system is the voltage regulator-rectifier. The appearance of the voltage regulator-rectifier is shown in Fig. Rice. 6.6. The voltage regulator-rectifier performs two functions: it ensures the voltage in the moped network within the range of 12.0-14.5
The Delta, Leader and Mustang mopeds use a contactless CDI ignition system. The CDI ignition system eliminates the weak link of the traditional ignition system
, i.e. wear out quickly and require frequent adjustment of breaker contacts. The abbreviation "CDI" comes from the first letters
Spark plugs (Fig. 6.11) recommended by the manufacturer for A7TC or A7RTC SX four-stroke engines. Analogues of these spark plugs are NGK C7HSA or NGK CR7HSA, Champion Z9Y. The technical characteristics of the spark plug are given in table. 6.9. The gap between the spark plug electrodes should be 0.6-0.7 mm. Regulatory replacement
The electromagnetic sensor of the ignition system (Fig. 6.12) is located on the stator mounting plate in the left engine cover. Checking the electromagnetic sensor of the ignition system You can test the electromagnetic sensor of the ignition system without removing it from the engine; for this you need to: measure
The starting system includes the starter, starter relay and starter drive. The appearance of the starter is shown in Fig. 6.13. The starter is a mixed-excitation DC electric motor and is designed to start the engine. On mopeds “Alpha”, “Delta”, “Leader”, “Mustang”, etc. can be installed
The starter is removed in the following order: placing the moped on a flat surface, disconnect the “-” terminal from the battery; disconnect the terminal wire from the starter (Fig. 6.17); Unclench the spring ring lock with pliers and remove the starter sprocket along with the chain from the splines (Fig.
If the starter does not turn when you press the start button, you can check
, connecting directly to the power source (Fig. 6.20). With this connection, the starter should rotate. If the starter does not rotate, you need to disassemble the starter housing and check the starter parts: brush length
Moped maintenance
Like any vehicle, Alpha mopeds require routine maintenance, the essence of which boils down to:
- Replacement of parts and assemblies whose service life has expired;
- Setting up and restoring the factory parameters of the main components and assemblies;
- Visual inspection of the moped to identify damage.
Chinese engines quite confidently “maintain” 20,000 km on our domestic fuels and lubricants without breakdowns or overhaul of the piston group. The main thing is to change the oil in a timely manner, especially during the break-in period.
If you do not operate the moped in harsh conditions (winter, cross-country racing, etc.), then all oil seals and rubber seals will also last a long time.
Tip: Change your air filter often. This will save the carburetor and make it easier to start the engine in all operating modes.
Rules for operating a moped
The service life of a moped depends on maintenance. Care comes down to following the rules recommended by the manufacturer.
The main ones include:
If the electric starter on a scooter does not work, then there is always a kick starter that will help out. But using a manual starter is not always convenient. Therefore, in this article we will find out why the starter on a scooter does not work. The electric starter is powered by a battery and passes through a special relay. Therefore, the first reason why the starter on a scooter does not work is the battery . It may have malfunctioned or simply run out of power. If you hear a spinning sound when starting the scooter through the electric starter, then the problem is with the battery. In this case, check the contact at the terminals . If it's not the contacts, it's the battery. If it is simply discharged, then it is enough to start the scooter with a manual starter and drive several tens of kilometers. This is enough to slightly charge the battery. If it still does not charge, then most likely it is faulty and needs to be replaced.
But if you hear the starter relay click when you press the starter button, then the problem will be more complicated. In this case, you can find out what the problem is by using the diagram:
Using this diagram, you can easily determine why the starter does not work on a scooter . This can be done quite quickly, since it does not require much effort and there are only a few things to check.
If you have any questions , leave them in the comments and you will receive an answer as soon as possible.
Now you know why the starter does not work on a scooter.
Main breakdowns and methods for solving them
On scooters, the electric starter often fails. Of course, Kickstarter can help out, but it’s not very convenient to use. The engine may not start due to a faulty battery: the contacts have come loose, the charge has run out, the device is worn out. If there is no spinning sound when the starter turns on, then the problem is in the battery. If you can’t charge it, it means it’s out of order, worn out and you’ll have to install a new one.
If pressing “Start” does not produce a click in the electric starter relay, the problem is more serious. The unit may be faulty and needs to be replaced. The problem can arise when various components wear out. Most often they need to be replaced.
You can fix some scooter problems yourself
Electric starter does not work
If the scooter does not start from the foot, then its operation is impaired. If the electrical circuit is working properly, but the relay clicks when you press “Start,” then the problem is a bad contact or a broken starter.
To evaluate its performance, you need to apply voltage to it without activating the relay. If the electric starter does not turn, then it needs to be replaced.
Starter relay failure
The relay maintains the voltage at the required level for further distribution to headlights, dashboard indicators and other elements. Its durability depends on the battery. If the voltage in the generator increases or decreases, the relay is faulty. Because of this, the starter does not start. In this case, the relay needs to be replaced.
Problems with the button
When the Start button is pressed, the starter rotates and drives the engine gears. If the scooter does not start with the electric starter button, there is a malfunction. The wiring in the engine starting system could have come loose. If the scooter starts from the foot, but not from the “Start” button, then the fuse is faulty: the voltage in the generator drops, so the button does not work.
To check the functionality of the fuse, you need to measure the voltage at the battery terminals and in the fuse. If losses are detected, a new fuse must be installed. After replacing the part, the moped will start from the “Start” button.
If the scooter breaks down, the electric starter may not work.
Broken brake contact (toad)
The brake system needs regular inspections, as driving safety depends on it. A breakdown of any other scooter system is easy to identify, since engine operation is disrupted. Brake failure can only be detected by diagnosing the vehicle. During the inspection, you need to check the integrity of all parts and the amount of brake fluid.
How to check the starter button of a scooter?
A common cause of starter failure is the starter button. You yourself know what the quality of Chinese goods is, and if the starter of your scooter one day fails, it makes sense to check the button and, depending on the test results, move on, for example, to the starter relay, the starter itself, or go to the store for a new button.
To check we need:
In order to check the button, you must first remove it from the plastic steering wheel trim. The button sits in the casing on two side latches. Press the latches one by one with a screwdriver and remove the button.
The button is connected to the scooter's on-board network via a three-pin connector. There are only two contact wires in the connector: yellow and green, brown is not used. The yellow wire is positive and the green wire is negative. In scooters, the wiring is made according to a two-wire circuit, so there are two contact wires.
We disconnect the plug from the button, switch the tester to audio dialing mode, connect the tester probes to the side contacts of the button (the middle contact is not involved), press the button key and look at the tester:
Design and principle of operation of a scooter generator
To the average person who is not experienced in electrical matters, a scooter generator may seem like a very complicated device. This is partly true: electric current is an invisible thing to the eye, and if we can see or touch mechanical faults, then we can only guess about faults in the electrics of a scooter or identify them using special measuring devices.
However, “it’s not the Gods who burn the pots” and if a person has a desire for something, then this article will be a good help, but for those who don’t want anything, there’s no point in continuing.
The scooter generator is a flywheel type generator with permanent magnet excitation. This type of generator is used on the vast majority of scooters, as well as mopeds and small motorcycles.
Designation of the main elements of the generator
The scooter generator consists of a rotor (in collective farm language - “anchor”) and a stator. The rotor is mounted directly on the crankshaft and while the engine is running, the rotor rotates around the stator coils
The stator is attached directly to the engine crankcase. And while the engine is running it remains motionless. The stator is a metal base made of several plates of special transformer iron. On the base of the stator there are special projections (coils) on top of which a copper wire is wound in a strictly defined order - forming the generator windings.
Depending on the generator model, there may be two or three windings. The generator shown below has three windings: supply, control and high-voltage
Permanent magnets are installed on the inner surface of the rotor. Magnets have different polarities. The magnets in the drain are covered with a lid; if you remove it, you can see them
Each magnet forms a static (constant) magnetic field around itself. In turn, the field of each magnet will be different: blue is negative (“north”), red is positive (“south”)
If we insert the stator into the rotor in the same way as is done on the engine, then we will see that the stator coils will be in the magnetic field of the magnets located next to them
After we start the engine, the rotor magnets will begin to rotate around the stator coils. During the rotation of the rotor, magnets of different polarities will approach the coils, which always stand still, and the field in which the coils are located will change at a very high speed. Due to the rapid change of magnetic fields, magnetic induction will occur in the generator coils and the generator will begin to generate electric current.
Scooter starter malfunctions: identifying and fixing the problem
The presence of a starter in a scooter, unlike a car, is not mandatory. However, it makes life much easier for the driver, adding a little comfort while working. Everyone knows that the starter works thanks to the battery, and it consists of:
The principle of its operation is no different from any other starter, although some breakdowns may differ from the usual ones.
Why doesn't the starter work?
Initially, you need to exclude battery discharge from the list of possible breakdowns. If this were the case and the battery suddenly became low, you would hear a peculiar sound when you press the “start” button. This sound indicates that the starter is not engaged with the bendix and is running without load, idle. If you still hear this sound when starting up, do certain things:
In most cases, these points will help you solve the problem with your scooter.
However, there may be other breakdowns, which in themselves are considered more serious when compared to a dead battery. We are talking about audible clicks when the starter operates. This is a deeper problem and it is necessary to look for its causes.
Causes and solutions
Step 1: With the ignition on, try honking the horn. If everything worked out and you could hear a loud and ringing sound, everything is fine, you can start the engine. If the sound was very quiet or could not be heard at all, there were problems with the battery or power supply (recharge the battery, clean the terminals).
Step 2. When you press the engine start button, you hear the sound of the relay turning on. If yes, then try bridging the power terminals of the relay. If there is no sound, disconnect the relay from the power supply, and then use the wires to connect the battery and starter.
Step 3. Once you have connected the starter, it works fine. If yes, then you just need to replace the relay. If not, check the contacts of the start button, the wires from the starter, and replace all worn parts.
Step 4. If, after you bridge the power terminals of the relay, the starter begins to operate normally, replace the relay. If not, then you are faced with a more serious task: you need to disassemble the starter and check the condition of its parts (brushes, windings and springs).
By analyzing your scooter breakdown using these simple steps, you can easily identify and fix the breakdown. Of course, you don’t have to worry too much about this and just bring your scooter to a service station. But at the same time, you will spend your money and will not be able to gain that invaluable experience that you will gain when diagnosing and repairing yourself.
Starter malfunction and cause
The starter hums, but does not turn the engine.
Indicates that the electrical circuit is being closed and power is being supplied to the motor brushes. The electric motor is in working condition. The holding coil of the solenoid relay does not operate and the bendix does not move. Bendix gear does not engage with flywheel gear. The electric motor runs in idle mode. The cause may be either mechanical or electrical in nature.
Mechanical part. The force from the relay retracting element is transmitted to the bendix through a plastic lever shaped like a grip. If there is high resistance to the movement of the bendix along the rotor shaft, this plastic part breaks. The Bendix does not move to the working position, and the starter rotates without transmitting torque to the flywheel.
An indirect cause of failure of the plastic grip may be wear of the teeth on the rotor shaft of the electric motor or wear of the teeth on the mating part of the bendix. For repairs, you will need to disassemble the starting unit and replace either the lever itself or the lever and bendix.
Another mechanical reason for the starter idling is the destruction of the teeth on the engine flywheel. The malfunction refers to a motor failure and is not directly related to the operation of the drive. The likelihood of such a malfunction may be indicated by the activation of all working elements of the starter, the spin-up of the electric motor and the transfer of the bendix to the working position, which is detected by a characteristic click when turning the ignition key.
To confirm the likelihood of such a breakdown, you should move the car with 3rd or 4th gear engaged without turning on the ignition by 0.5 m. This will lead to a shift in the position of the faulty part of the flywheel. Repeat the start in normal mode by turning the ignition key. If the engine starts, then it is necessary to check the condition of the flywheel at a service station.
In technically complex starters with planetary gearboxes, the gearbox teeth may break. This requires replacing the entire unit. The planetary gearbox is not available as a spare part.
Electrical part. If the starter hums but does not turn the engine, the fault may be localized in the solenoid relay. The solenoid relay, mounted on the starter housing and having terminals for electrical connection, has two windings:
Basic Concepts
In order to understand wiring, you need to understand a little about the types of current. A constant is one that does not change its direction and magnitude. Variable is one where the voltage and current change their value after some time, or the current flows in the opposite direction. Often direct current, as can be seen in the wiring diagram of the Alpha moped, is needed for light bulbs: headlights, turn signals, foot. There are models where the motorcycle is completely converted to direct current, but these are old models and they are quite rare.
Valuable advice
It is no secret that the insulation of the wires is made of cheap plastic and it is better to replace the insulation with rubber before it crumbles after a few rains. The two networks in Chinese motorcycles do not intersect, therefore, when disassembling the power supply of the on-board network of the electric starter, headlights, turn signals and stop, you should remember several points:
They all go into a big black rope. The colors are fixed and it’s easier to remember what they belong to than to have to decide for a long time where they come from and where they go. There are two main coils: under the steering wheel and next to the battery, under the shield. If next to the battery you can still determine what is coming from where, then under the steering wheel the wiring of the Alpha moped begins to resemble Narnia: everything is lost there and the colors change. Wiring from this point spreads throughout the motorcycle, providing power.
Wiring work
The large black wire connects: 2 yellow, green and red, where direct current flows. Red goes into the ignition switch, from which by turning the key you can close the system and make it work. On the reverse side, the harness goes to the console, where it is connected to the switches. If voltage has been lost, then you should look at the operation of this harness - does the voltage go out from the ignition switch into this black harness.
The second line serves to power the battery (black-red), pulse from the magnetic sensor (blue-white) and has ground (green). There is a lot of voltage going to the battery, and therefore you can only touch the wires with the engine off. If the question arises about how to connect the wiring on an Alpha moped if there are problems with this line, then you should pay attention to the armored wire - the large black wire that goes to the spark plug from the ignition coil. And a rather dangerous symptom allows you to suspect a break in the black-yellow wire: if the moped does not stall, but will work until the gas runs out. This wire turns yellow in the middle and goes to the ignition coil.
Operating principle of ST221 starter
When you turn the key in the ignition switch, the contacts close and electric current is supplied through the windings of the electromagnetic traction relay. The magnetic force generated on the relay windings moves the armature until it comes into contact with the core. After this, the retractor winding is turned off, and only the holding winding works. This is because holding the armature inside the relay is much easier, since it is already retracted, while the holding winding produces much less magnetic flux.
When the relay contacts close, electric current is supplied to the armature and stator windings, which forces the stator to rotate, and with it the hub and the outer ring of the overrunning clutch rotate. The rollers are located in the narrow part of the grooves by means of springs, that is, they wedge the outer and inner rings of the overrunning clutch, thereby ensuring the transmission of torque from the armature to the working gear. Starting the engine is accompanied by an increase in the speed of the flywheel, and, accordingly, the working gear. In this case, the inner ring of the coupling helps to remove the rollers from the wedge state, that is, the inner and outer rings move independently of each other.
After the ignition key is removed, the current stops flowing to the relay windings. The relay armature is retracted back with the help of a spring and at the same time removes the bendix from the engaged state. Braking of the relay armature occurs due to friction forces between the shaft and the cover.
Basic malfunctions and methods for their elimination
The main ones include:
The starter does not turn on:
When the starter is turned on, the crankshaft rotates slowly:
You can hear the starter rotating, but the crankshaft does not spin:
When the starter is turned on, a gear grinding sound is heard:
After starting the engine, the BAZ 2101 starter does not turn off:
Starter noise while driving
Poor fastening of the starter or contacts - tighten the bolts.
Electrics and electrical equipment of a scooter
Dedicated to all owners of Chinese scooters...
To begin with, I would like to present a wiring diagram for a Chinese scooter.
Since all Chinese scooters are very similar, like Siamese twins, their electrical circuits are practically no different.
The diagram was found on the Internet and is, in my opinion, one of the most successful, since it shows the color of the connecting conductors. This greatly simplifies the diagram and makes it more comfortable to read.
It is worth noting that in the electrical circuit of a scooter, just like in any electronic circuit, there is a common wire. On a scooter, the common wire is the minus (-). In the diagram, the common wire is shown in green. If you look more closely, you will notice that it is connected to all the electrical equipment of the scooter: headlight (16), turn relay (24), instrument panel backlight lamp (15), indicator lamps (20, 36, 22, 17), tachometer (18 ), fuel level sensor (14), horn (31), tail light/brake light (13), start relay (10) and other devices.
First, let's go over the main elements of the Chinese scooter circuit.
Egnition lock.
Ignition switch (12) or “Main switch”. The ignition switch is nothing more than a regular multi-position switch. Even though the ignition switch has 3 positions, the electrical circuit uses only 2.
When the key is in the first position, the red and black wires are connected. In this case, the voltage from the battery enters the electric circuit of the scooter, the scooter is ready to start. The fuel level indicator, tachometer, sound signal, turn relay, and ignition circuit are also ready for operation. They are supplied with power from the battery.
In the other two positions, the black and white wire from the CDI ignition module (1) is shorted to the housing (common wire). In this case, engine operation is blocked. In some scooter models, to block the engine, there is an engine stop button (27), which, like the ignition switch, connects the white-black and green (common, body) wire.
Generator.
The generator (4) produces alternating electric current to power all current consumers and charge the battery (6).
There are 5 wires coming from the generator. One of them is connected to a common wire (frame). The alternating voltage is removed from the white wire and supplied to the relay regulator for subsequent straightening and stabilization. The yellow wire removes voltage, which is used to power the low/high beam lamp, which is installed in the front fairing of the scooter.
Signs that a check is needed
If the battery on your scooter often runs out, and it is still quite new, this means that there is a problem with the operation of the relay regulator. As practice shows, it burns out quite often. If the device is faulty, the battery stops charging completely and loses its capacity. This means you won’t be able to start the scooter with a button; you’ll have to start it with a kickstarter.
Another characteristic sign of incorrect operation of the device may be the frequent burnout of incandescent light bulbs. They themselves are durable and have a good durability, but are quite sensitive to voltage changes. This happens because the optimal voltage in the scooter network is considered to be 12-13 V. Increasing this value even by 2 V reduces the service life of electronics and components by 2 times.
The greater the deviation from the norm, the greater the likelihood that something will burn out in the scooter. Therefore, when starting the scooter from the starter due to a power surge and a faulty relay, the bulbs usually burn out.
Signs of a malfunctioning regulator are identical for all models of Chinese scooters. They are especially typical for charging relays for scooters of Chinese models with an engine capacity of 50 cc. Therefore, before making a decision to replace something in electronics, testing systems and devices should begin with the relay regulator.
For all models of Chinese scooters, the symptoms of a malfunction of the regulator are identical.
How to check, replace
Checking is carried out using a multimeter. This device is used in electromechanics and is sold in hardware stores. There are models without a sound signal - they do not differ in appearance, and therefore you have to ask the sellers. Without a sound signal or “ringing” it is inconvenient to constantly look at the panel, but it is possible to carry out the check. Sequentially, starting from the battery to the ignition circuit and generator, all the wiring of the Alpha moped is checked. The multimeter has two probes: red and black. Red ones need to touch the plus, and black ones need to touch the mass or ground.
Thus, the wiring of the Alpha moped is a complex and vulnerable place for this vehicle. However, this is exactly what will help toughen the motorcycle owner in the face of eternal breakdowns and make him a real ace in the electricity of his motorcycle.
How to Check the Starter Relay on a Chinese Scooter
How to check the starter relay on a scooter
Posted September 1, 2016
The main obstacles of the relay . Problems with the electric starter itself are not considered
Why is the pipe shit?
I disassembled my relay , unwinded the entire winding, re-wound it, cleaned the contacts, and now for the 5th year everything has been fine with the relay, my brain doesn’t work at all, there’s just no point in buying a new one, because there’s no guarantee of how long it will last enough again
I have a Skymoto Spider 50 scooter and this is the relay clicks and the starter doesn’t turn, but if you connect the direct wire from the battery, the starter turns and the relay has already been changed. What could be the reason.
Tell me, my starter turns but doesn’t turn, I can take a video and post it, what should I do? battery is charged
the relay clicks and the spark disappears?
I like and subscribe
Where is the starter relay on a Suzuki Adreas 110
storm 50, when the ignition is turned on, the starter does not work, the emergency lights do not work, turns in general as if there is no battery, it starts with the kick starter and everything works, what could be the matter. the fuse is intact
the scooter does not charge the battery how to find out the reason
On Glushak Shit Pipe!))) Well, you need to buy a multimeter.
I have such a problem, the scooter racer is generally Chinese, it won’t start from the starter , I took it apart and got to the relay in general there is a spark, but there is no “ whack, whack ”, the battery is charged, what could be the problem?
Thank you Krasava helped.
I have the following question: when you press the starter button, the relay just clicks once and the starter doesn’t turn, this happened rarely before, but now I just can’t start it from the starter ; I measured the voltage on the battery at 13.1 volts, but with the starter it starts normally.
If the scooter starts with the kickstarter, but does not start with the button
If the scooter starts without problems from the “leg”, but does not want to start from the electric start button, then you should pay attention to the central fuse (it is located in the compartment with the battery). If the voltage in the scooter’s electrical network is too low due to a faulty fuse, it will no longer start using the “Start” button.
To check the serviceability of the central fuse, you should measure the voltage at the battery terminals and compare with the voltage after the fuse.
The problem when the starter button on a scooter does not work may not only be in the fuse. It is likely that the integrity of the connecting conductors in the engine starting circuit is broken.
VIDEO INSTRUCTIONS » alt=»»> It will be difficult for a beginner to deal with such a malfunction, so for a complete diagnosis of the electrical circuit it is better to contact an auto electrician.