Original and color wiring diagram for IZH Planet 3
4 years after the appearance of the second Planet (1966), the factory workers made a number of changes to its design, designed to improve the technical parameters and appearance of the motorcycle. This is how IZ Planet 3 was born, which became a real symbol of freedom for many of our compatriots.
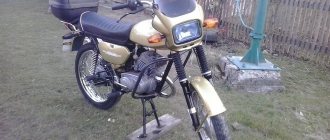
Despite its advanced age, IZH Planet 3 still serves its owners well
Differences from the second Planet
For many modern citizens, the information that domestic motorcycle manufacturers worked tirelessly to improve their models in an era of total shortages may come as a surprise.
Note! The fact takes place, moreover, it is supported by official documents, in particular 1970N04P16-17 - this is the outgoing number of the factory newsletter, which described the changes made.
In the photo - official materials of the Izhmash Design Bureau
The new generation motorcycle received:
- Direction indicator lights are a first in domestic practice;
- Semiconductor relay for controlling direction indicators (installed in the headlight);
- New size of wheels and tires (3.50x18 versus previous - 3.25x19);
- New brand increased capacity battery (old one on IZH Planet 2 - ZMT-6);
- And, of course, more engine power. The power unit now developed 18 hp.
Modifications
But the creator engineers did not stop there and, having released the five-millionth car from the production line, presented a modification of the IZH Planet 3-01.
Mirror and safety arches are the distinctive features of the new modification
Among the innovations it should be noted:
- Rear passenger footrests;
- Roll bars;
- Rearview mirror;
- New steering wheel design.
For reference: The buyer paid for the changes out of his own pocket. In particular, the price for IZH Planet 3-01 was 750 rubles, the version with a stroller was 1140, and the “rural version” was even more expensive. Fortunately, care instructions were included with purchase, which made maintenance easier.
BSZ on Izh Jupiter 3 6 volts
Creation and assembly of contactless ignition for a motorcycle)))
Well, let’s go ahead, I looked for information on many different resources and came across very interesting articles on adapting a motorcycle to BSZ. I quote a lot of information from the articles.
Installation is carried out on an equipment line already for a 12V circuit.
What we need:
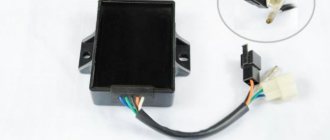
A). Switch for contactless electronic ignition of a front-wheel drive VAZ car. Take the switch only in its original packaging from a CAR STORE and with a warranty of at least a year. Average price 400 rub.
b). The opto-sensor (hereinafter referred to as OD) and the modulator are discussed below.
P.S. It can be replaced with a system with a Hall sensor, but this system will be more complex and reliable. If you are interested, search the Internet, there are many articles
V). The ignition coil is two-terminal, from the Gazelle, but always from the 406 engine. You can take it from the Oka for electronic ignition, there is absolutely no difference between them. (580 rub.)
G). Two silicone armored wires with rubber caps. Price from 300-500 rub. (I had them, so I didn’t buy them)
e) Instant diagnostics MD-1 (I had to look for this around the city, as I understand their production has been discontinued, so it is an extremely scarce product). Prices for this device are around 200 rubles
P.S. It is also possible to install an AZ-1 emergency start module, the point is that it produces a constant spark when the sensor fails, but I did not add it to my article because I don’t see much point in it, since the board has a “Hot” reserve of the opto-sensor . If you are interested, look for the information yourself.
g) Wiring kit with connectors for contactless ignition VAZ price 170 rub.
My total purchase amount came to 2000 rubles, taking into account the components of the board and modulator (ordered from a turner)
Well, have you soldered and bought everything, are you ready to assemble? Go.
The old ignition system (breaker contacts, ignition coils, capacitors, armored wires) is completely eliminated. The switch is installed in the right glove compartment, the ignition coil is under the tank. Unfortunately, there are no holes or fastenings for the bracket on the coil, so I couldn’t think of anything better than to attach it to the frame with a thick layer of copper wire.
We install the modulator and optosensor, install everything on a standard generator, as shown in the figure:
We put rubber caps on the armored wires, and insert the armored wires themselves (they should have special copper tips) into the candlesticks and into the coil. We pull the above-mentioned caps on top. If you don’t do this, you’ll be pushing the motorcycle on foot when riding in the rain. We immediately insert the spark plugs into the tips and ensure reliable contact with the “ground” of the motorcycle.
Using wiring, we simply connect the switch, opto-sensor, and coil. Moreover, we “pack” the wires into a PVC tube or simply wrap them with electrical tape. Of the entire purchased heap, we need to display on the “panel” only the general “plus” of the system. We “lead” it to the right “Move-Stop” switch, having previously unsoldered the standard wires from it. We connect the second wire from the switch to terminal “1” of the ignition switch (the second wire from the same terminal goes to the signal).
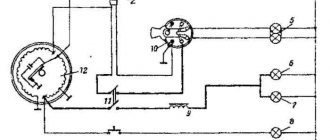
Here is the actual connection diagram:
2 ignition switch
3 spark plugs
4 ignition coil
6 Optosensor (depicted as a hall sensor, but not important)
Well, it looks like everything is assembled, you can configure it.
Checking functionality - we throw both spark plugs onto the cylinders, take any oblong material that will fit in the opening between the LED and the photoresistor, and insert it into the slot of the opto-sensor. At this moment there should be a spark (on both spark plugs).
Distinctive features of electrical equipment
The wiring diagram used on IZ Planet 3 was traditional, and the main parameters of the electrical equipment are presented below in the table.
| Ignition system | Battery, ZMTR-10 |
| Mains voltage | 6 volts |
| Electricity source | Generator G-35M7 (later replaced by a modified G-36M8), 45 W |
| Ignition coil | IZH 56 |
| Voltage regulator relay | IZH RR-1 |
| Electrical wiring IZH Planet 3 | Single-wire, with “-” output to ground |
Colored original diagram (clickable)
Lighting devices
The following lighting devices were installed on the IZH Planet 3 motorcycle:
- Left and right direction indicators with A6-6 lamps;
- Turn signal switch P201;
- Turn signal relay RS-419;
- Brake light bulbs A6-15;
- Side light bulbs A6-2;
Appearance of instruments and controls
- Light mode switch with sound signal button P200;
- Transmission position sensor (neutral) with warning lamp A6 0.25;
- Headlight lamp A6-32+32;
- Indicator lamp A6 0.25 generator operation;
- Side light lamp A6-2 (front);
- Speedometer scale illumination lamp A6-1;
Headlight and direction indicators
Attention! For lovers of the “original” and authenticity, the photo below shows the “native” black and white wiring diagram of IZH Planet 3 with a breakdown of all the elements.
Lighting devices for models with a stroller
Added to the existing list:
- Stroller brake light lamp A6-15;
- Stroller size lamp A6-2;
- Right direction indicator for stroller A6-6;
- Front side light of stroller A6-2.
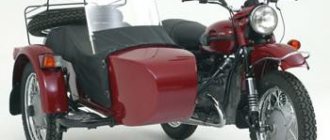
Option with stroller
Note! The standard wiring of the IZH Planet 3 provided for disconnecting the sidecar for operating the motorcycle without it in a two-wheeled version. At the same time, the connecting terminals required care.
In the presented video you can watch the repair of an old motorcycle, which received a new life in capable hands. According to the author of the video, complete restoration cost him the equivalent of $130. Moreover, he did most of the work with his own hands.
Changes made by owners
The unreliability of individual components and faulty wiring on IZ Jupiter 3 forced the owners to delve into all the intricacies of the modernized elements.
And the first to cause numerous complaints were changes in the primary circuit of power supplies:
- Battery;
- Generator.
As well as ignition systems and circuits for lighting devices of the trailer module - a cargo-passenger stroller. In most cases, the reason for the refusal was a banal manufacturing defect.
Battery charging system
Given the total shortage of spare parts for motorcycles that existed in those years, unplanned failure:
- battery;
- voltage regulator relay;
- ignition coils;
left the owners without transport for a long time. In addition, poor-quality assembly of individual elements led to unstable operation of all systems. This forced me to improve and polish the factory defects with my own hands (for example, see how to modernize the wiring diagram of IZH Planet 5).
Tip: the regulator circuit presented above has been tested on many motorcycles of the IZh family. Its peculiarity lies in the separate power supply - when turned on, the ignition circuit receives “+” from the battery. And the excitation windings are powered from the generator (terminal “I”) and do not discharge the battery when the engine is stopped.
Generator replacement
The operation of the standard G36M7 DC generator also caused a lot of comments. Frequent breakdowns and unstable operation forced the owners to look for a replacement.
The new modifications of the IZh family with 12-volt generators that appeared immediately attracted the attention of the owners of the IZH Jupiter 3, who were able to find a way to convert their motorcycle to a new operating scheme (see also the IZH Jupiter 5 wiring diagram).
And among those that were freely available was the generator 281.3701, suitable for all series of “Planets” and “Jupiters”.
To re-equip the work it was required:
- Working generator 12 V;
- Block BPV 14-10;
- New 12-volt battery 6MTS-9, or another battery ZMT-8 (standard);
- New 12-volt light bulbs (to replace standard ones with 6V ones);
- Steel adapter plate for mounting a new generator;
- Right engine cover from IZH Planet 5 or Jupiter 5 models.
Design
The motorcycle is equipped with a single-cylinder, two-stroke air-cooled engine with a return-loop two-jet purge, with the preparation of the working mixture in the carburetor and its ignition in the cylinder from an electric spark. The crankshaft is prefabricated and pressed. Carter is of block type. The crank chamber is located in the front part, and the gearbox is located in the rear part. The crankcase consists of two halves with a connector along the middle longitudinal plane. The foot shift pedal and kickstarter pedal are located on the left side of the gearbox housing, the engine is equipped with a 6 volt generator with a power of 45 watts. It is the first of a line of motorcycles to have turn indicators installed, has high structural strength, maneuverability, and is easy to repair and maintain.
Solved the problem with charging and switching to 12 Volts
A collective farm is not a collective farm, but it worksThis modification includes (the price is average and varies everywhere):
1) BSZ (Contactless Ignition System) (Total cost 870 rubles) (For me 180 rubles):
— Switch (250 rubles) (I got it for 0 rubles)
— Hall sensor (DH) (120 rubles) (I got it for 0 rubles, but it burned out and spent 120 rubles)
— Ignition coil (250 rubles) (I got it for 0 rubles)
— Wiring (250 rubles) (I assembled it myself and only spent 50 rubles on terminals and heat shrink)
— Plank (You can carve it yourself) (Condensed milk 70 rubles)
— Carburetor studs (10 rubles — 2 pcs.)
2) Charging system (650-3300 rubles) (For me 150 rubles):
— Generator VAZ 2108 (New 3000 rubles, you can buy it for 500 rubles) (I found it for 0 rubles)
— Wiring to the generator (100 rubles + terminals with shrinkage 50) (I made it from the remnants of previous terminals and shrinkage, so 0 rubles)
— Ignition switch VAZ 2101 (150 rubles) Not necessary if you have Izhevsky
— Alternator belt VAZ 2108 (75-135 rubles) (I rolled up the free belt and bought a new one for 135 rubles)
3) A little ingenuity, a drill, a hacksaw, a file and free time
…………………………………………………………………………………………………………………………………………………………………………………………….
Job:
Immediately drill a hole in the frame for the bolt from the generator (Preferably without backlash) We estimate it by eye and drill it perpendicular to the frame or slightly to the left (if viewed from the side of the ignition cover) (The position of the belt on the anchor will depend on this)
We remove the right cover and unscrew the generator with contacts, throw off the wiring and, with a wide swing, throw the generator away..
We see the anchor and our hole on the frame... So everything is correct
We put the generator on and place washers between the frame and the generator (on the armature side) - you can tighten it, BUT I wouldn’t recommend it
Now we estimate by eye how the belt will stand (Or install some kind of elastic band to accurately mark the slot locations and make the necessary margin (10-15 mm)), make markings on the right side of the crankcase and make slots for the belt (I advise you to do it with a margin, the stiffness you you won’t break it in any way, but if the belt gets loose, you’ll tear the belts and swear at this project in bewilderment)
We did it - well done, now the hardest part
Belt installation:
To make it a little easier to fuck with this process, I recommend heating the belt on the battery a little (it will become softer)…
Now, with the help of a screwdriver and a sidekick behind the kick, we try to throw the belt on - the first time it will be difficult, but you just need to get used to it (we rode on 1 belt every day for 2 months. We replaced it because it stretched)
And so you threw the belt, now turn it with a kick a couple of dozen times so that the belt takes its place (If it turns over, it’s not scary, after it stretches a little you can turn it over and increase its resource)
Now we try to try on the right cover and make slits if necessary
We put on the wiring according to the diagram and are glad that we have a charger...
Now BSZ:
We are looking for a piece of plastic and driving it into the cover at the place where the contact protection is attached (let it be a 3K) and fasten it with screws, having previously drilled holes for the bolts, DC and the CV (Crankshaft) terminal.
We connect the wiring and put the switch in the right glove compartment... we cut it according to the diagram and connect the output to the DH to the DH itself, this whole structure hangs on the right cover - now you can tighten it and replace the screws securing the air filter with the studs for mounting the air filter on the carburetor of VAZ series cars, install the lock nut add washers if necessary
Now we put the bar on a standard screw (Screw-bar-washers (if necessary)-cam shaft)
and adjust it, set the OZ and try to start it.
Started up? — Excellent, that means you assembled everything correctly, feel free to install the seal and tighten it onto the nuts from the same filter...
EVERYTHING, the system is assembled and working...
Don’t forget to change the belt regularly (once every season or two) and monitor its condition
Technical specifications
- Overall length 2115 mm
- Overall width 780 mm
- Overall height 1025 mm
- Wheelbase 1400 mm
- Ground clearance 135 mm
- Maximum speed 120 km/h
- Fuel tank capacity 18 l
- Cruising range on the highway 160-180 km
- Fuel consumption on the highway is no more than 5 liters per 100 km
- Fuel: Gasoline with autol 10-18 in a ratio of 25: 1
- Fording capacity 300 mm
- Battery:6 V
- Engine Stroke 85 mm
- Cylinder diameter 72.0 x 85.0 mm
- Number of cylinders 1
- Cylinder displacement 346 cm3
- Compression ratio 7.51
- Maximum power 18 hp. With. at 5000-5600 rpm.
- Air cooling
- Lubrication system combined with fuel
- Carburetor type K-36I, later K-62I
- Multi-disc clutch, oil bath
- The gearbox is four-speed, two-way.
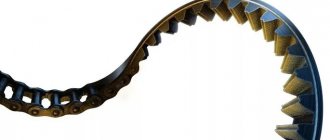
- Motor transmission rollerless double-row chain, gear ratio—2.17
- Transmission from the gearbox to the rear wheel is a roller chain, gear ratio—2.47
- The frame is tubular and welded.
- The front fork is a telescopic spring type with hydraulic shock absorbers.
- Rear suspension: spring with hydraulic shock absorbers
- Shoe brake type
- Wheel type: easily removable, with tangentially arranged spokes.
- Tire size 3.50-18″
Modifications
- IZH Planet 3-01 (from 1977 to 1981) - 400,842 motorcycles were produced
- IZH Planet 3-02 (from 1981 to 1985) 216,101 motorcycles were produced.
Izhevsk Machine-Building Plant
Izh Planet 2
Izh Planeta-4
Izh Jupiter is a middle-class road motorcycle designed for riding on roads with different surfaces. Produced by the Izhevsk Machine-Building Plant from 1961 to 1966. He laid the foundation for the IZH Jupiter motorcycle series - IZH Jupiter 5, the last motorcycle of which (IZH Jupiter-5) was released in 2008.
VESKO-TRANS.RU
There is no need to mention again how difficult it is to run a “planet” with improperly tuned inflammation. What strange cases occurred due to suppressed inflammation, whose slippers flew high into the sky, whose soles on the shoes exploded, sometimes there were even injuries, and at the same time they were very serious, there were even cases where the engine started backwards. You can avoid all these foot push-off problems by adjusting your ignition timing.
The easiest way to create the adjustment is with a special device, which has been long gone since the manufacturer supplied each bike, so you won't have to waste time looking for a device with a regular caliper.
We begin work on setting up the ignition by adjusting the gap between the contacts of the chopper (0.4-0.6 mm). To do this: Rotate the crankshaft over the alternator rotor bolt until the switch contacts are very different.
We unscrew the bolt securing the contact gap and open the contacts with an eccentric so that the probe is stuck between them, and slowly clamp the probe eccentric so that it enters and exits with little force. Once tuned, everything is perfectly clamped and we run up to adjust the ignition timing.
Story
In the second half of 1958, the designers of the bureau faced a new task - preparing for the release of the Izh Jupiter motorcycle. Izhevsk machine builders demonstrated a prototype of the new model at the World Exhibition in Brussels already in 1957. The motorcycle was first called “Izh-58”, and then was renamed “Izh-Jupiter”. The first prototypes showed very good results. Engine power was increased to 18 hp. The gearbox was also more convenient to use, and bearing lubrication was improved. Engine production was organized at the Izhevsk Mechanical Plant. Serial production of Izh Jupiter began in the second half of 1961. A total of 477,747 motorcycles were produced.
Design
The motorcycle retained the crew part of the Izh-56 motorcycle, but had a completely new engine - a two-cylinder, two-stroke, with a vertical in-line arrangement of cylinders, air-cooled with a return-loop two-jet purge, with the preparation of the working mixture in the carburetor and its ignition in the cylinder from an electric spark . The carburetor is closed with special casings (with a metal valve for access during start-up), the air filter is a contact oil filter. The parts of the connecting rod and piston group (piston, connecting rod, piston rings, piston pin, retaining rings, bearing rollers of the lower end of the connecting rod) are unified with the corresponding parts of the K-175 motorcycle engine. The two-arm foot shift pedal and kickstart pedal are located on the left side of the gearbox housing. Izh-Jupiter, like all subsequent two-cylinder models, was equipped with an automatic clutch release mechanism. The front sprung mud shield is attached on a cast bracket to the lower bridge of the front fork, which eliminates the possibility of it becoming clogged with dirt.
Required Parts
In order for the ignition system to work correctly, a number of auxiliary parts are required. They are listed below:
- Switch for BSZ VAZ cars. You should not choose exclusively from the low price segment. The Astro switch has a lot of positive reviews;
- Hall Sensor. The best option for Jupiter 5 is a similar manufacturer VAZ. By purchasing it in branded packaging, you protect yourself from counterfeits;
- Ignition coil with two terminals. You should choose between the gazelle engine number 406 or Oka with an electronic ignition system;
- A pair of silicone armor wires with rubber caps;
- The modulator is a butterfly-shaped plate made of iron.
Modulator
The most difficult stage is the production of the modulator. It is important to maintain the required shape. The more accurately the required dimensions are observed, the lower the likelihood of problems occurring after the system is implemented, that is, there will be no need to adjust it with a file. The ignition timing must match on any cylinder used.
The bolt hole must be located in the middle. Otherwise, the engine operation will not be synchronized. It is also recommended to check the integrity of the crankshaft bearings. If you find defects, you should immediately replace it.
The contact ignition is not able to work normally if the bearings are damaged. The thickness of the part should not exceed one and a half millimeters. If it is thin, it will not be possible to avoid deformation, and if it is thick, it will come into contact with the surface of the hall sensor housing.
To create the plate, it is allowed to use any material except steel. Aluminum and others should not be used as they are not magnetic. The drawing that must be followed can be found in the public domain. The presented diagram will be useful to those people who decide to modernize the vehicle ignition device. Below are methods for installing electrical ignition devices in Jupiter.
It must be turned by a professional turner. He will make a simple disk and draw on it the markings of elementary distances between the corners. Then, in accordance with it, you will cut out the necessary sectors at home. The cost of the modulator is seventy rubles.
It is not advisable to use an ordinary plate, since its width is less than twelve millimeters. This will not be enough to fully accumulate the energy resource in the coil. Of course, it can be installed, but achieving four thousand revolutions per minute will become impossible.
In addition to the above you will need:
- A stud with an applied thread of seven millimeters, pitch 1, as well as a pair of nuts with washers of the corresponding parameters. The priority material for these components is brass. This is explained by the least magnetization of the plate from the generator rotor. If you use a standard bolt, then difficulties may arise with the introduction of ignition. The bolt tends to follow the modulator as it is tightened. However, it is necessary to observe the leading indicator, maintain the same position of the rotor and modulator, and tighten the bolt. It is advisable to use a pin, since many are not able to perform all the necessary actions in total;
- A set of wires with connectors for ignition without contact from VAZ. This part can be purchased or made with your own hands.
Technical specifications
- Overall length 2115 mm.
- Overall width 780 mm.
- Overall height 1025 mm.
- Ground clearance 135 mm.
- Dry weight of the motorcycle is 160 kg.
- Maximum speed 110 km/h.
- Fuel tank capacity 18 l.
- Cruising range on the highway is 160-180 km.
- Fuel consumption on the highway is no more than 4 liters per 100 km.
- Fuel: Gasoline with autol 10-18 in a ratio of 25: 1
- Fordability 300 mm.
- Engine Stroke 58 mm
- Cylinder diameter 61.75 mm
- Number of cylinders 2
- Engine displacement 347 cm3
- Compression ratio 6.8
- Maximum power 18 hp. With.
- Air cooling
- Lubrication system combined with fuel
- Carburetor type K-28ZH
- Multi-plate clutch, oil bath with automatic release mechanism
- The gearbox is four-speed, two-way.
- Motor transmission rollerless double-row chain, gear ratio—2.57
- Transmission from the gearbox to the rear wheel is a roller chain, gear ratio is 2.33.
- The frame is tubular and welded.
- The front fork is a telescopic spring type with hydraulic shock absorbers.
- Rear suspension pendulum spring with hydraulic shock absorbers
- Shoe brake type
- Wheel type: easily removable, with tangential straight spokes.
- Tire size 3.25-19″