Author: Evgeny Zhivoglyadov. Date of publication: December 01, 2022. Category: Motor vehicles.
Some owners of “iron horses” consider the speedometer to be the main measuring instrument installed on a motorcycle. Of course, the speed at which you are moving is important information (especially for traffic police officers). However, only a tachometer, informing the motorcyclist about the number of engine revolutions, will help “tell” whether the gear is selected correctly for a given speed. Not all bikes are equipped with this useful device. Installing a tachometer on a motorcycle with your own hands is now quite simple.
Connecting a tachometer with your own hands: pros and cons
A tachometer is a device for measuring the rotation speed of engines, shafts, and other mechanisms.
The tachometer has been used in transportation technology for more than a hundred years. As a rule, it is installed on the dashboard. The device indicates the rotation speed of the internal combustion engine during operation. In modern cars equipped with electronic engine control systems, it is not always installed. However, the tachometer readings allow you to select the most suitable driving mode. In some cases, this allows you to save fuel or, conversely, switch to a more aggressive driving style. Therefore, experienced car enthusiasts and professional drivers often install dashboards with tachometers on their own. Let's look at how to independently connect a tachometer.
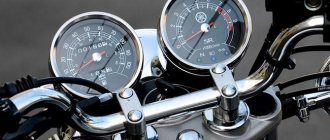
Tachometer
Connection diagram for tachometer to motorcycle
The diagram for connecting a tachometer to a motorcycle is not fundamentally different from its installation on a VAZ-2106 car. The input of the device is connected to the output of the primary winding of the coil, after which the positive and negative wires are connected to the battery. Installing the toggle switch on the positive line will significantly save battery power when the motorcycle is idle.
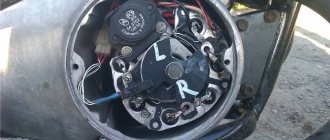
A two-cylinder unit with single-channel ignition must be equipped with a rectifier. The battery that powers the tachometer is connected to its output. When the TX-193 is directly connected to the generator, the device will fail in the shortest possible time.
In the case of dual-channel ignition, to transmit pulses from both cylinders it is necessary to create an identical tachometer input line. After drilling an additional hole in the bottom, connect the wire to the device terminal.
Three-cylinder motorcycles are usually equipped with three-channel ignition systems. In this case, the connection to the tachometer is made from any two coils. In the same way, pulses are supplied in multi-cylinder equipment, but here it is more advisable to use models designed for this type of engine.
Connecting a tachometer to a single-cylinder unit is a little more complicated. Here it is necessary to adjust the resistor R7, which is responsible for the sensitivity of the measuring device. If necessary (lack of power), you should double the power of capacitor C5, and then readjust the resistor.
The principle of operation of the tachometer
Currently, tachometers are distinguished:
- Mechanical. A mechanical tachometer receives information about engine speed using a rotating cable mechanically connected to the engine crankshaft. Nowadays such devices are practically no longer used in cars;
- Electromechanical. The operating principle of electromechanical tachometers is based on the conversion of electrical impulses from sensors installed on the engine or from other electronic devices. These signals are converted into magnetic pulses that deflect the needle of the measuring device like a pointer voltmeter;
- Digital. Digital tachometers are used as part of modern computerized panels and are controlled by software and hardware. Self-installation of this type of tachometer is almost impossible.
Tachometer selection
Tachometers are used primarily in cars. They are installed to control engine operation.
In order for the determination of engine operation to be as accurate as possible, it is necessary to take care of how to choose the right tachometer.
Many experienced motorcyclists who have extensive experience in tuning motorcycles suggest using domestic tachometers. This is due to the fact that they cause virtually no difficulties during installation. In addition, an important factor in favor of choosing a domestic tachometer is cost. It is very low and acceptable.
Many motorcyclists believe that it is best to choose an imported tachometer. It is believed to have more accurate readings. In addition, it is perfect for imported motorcycles.
Ways to turn on the tachometer
Information about the rotational speed of an internal combustion engine can be read from:
- generator;
- crankshaft speed sensor;
- camshaft speed sensor;
- ignition coil control pulse.
The generators of some cars (for example, Volkswagen T4) have an additional alternating voltage output, the frequency of which depends on the engine speed. In these cars, the signal to the tachometer is supplied from this point.
It is irrational to change the generator just to install a tachometer.
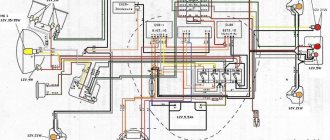
Tachometer connection diagram
The crankshaft and camshaft speed sensors operate on the electromagnetic principle. Earlier cars had sensors using the Hall effect. In any case, the electrical pulse generated by these devices has an amplitude of no more than 5V, and their internal resistance is at least 200 Ohms. In order to connect the tachometer to these sensors, an additional amplifier is required. It is most effective to use a more powerful impulse coming to the ignition coil.
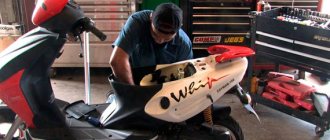
Installation and connection
Installation of tachometers additionally installed on a motorcycle is quite simple. A bracket attached to the body of the product allows you to easily install the device on one of the bolts securing the steering wheel to the fork.
Installing the products on the steering wheel in the most convenient place for viewing will allow the use of a special fastening coupling for installing additional equipment. It can be easily purchased for 200–300 rubles at any motorcycle accessories store. Some tachometer models have such fastening devices already included in the delivery kit.
Some manufacturers supply a complete set of a wide variety of fasteners and wires for connection along with the measuring device itself.
The connection diagram is quite simple and will not cause difficulties even for bikers who are not very “advanced” in electrical engineering (note: the colors of the wires are indicated for tachometers from Chinese manufacturers):
- We connect one short wire (usually black) to the switched “+” of the ignition switch;
- the second short one (green) – to the motorcycle frame (in a convenient place);
- the third short (black and yellow) - to the low-voltage contact of the coil going to the breaker;
- two long thin wires (black and red) - parallel to the speedometer light bulb.
Important! The tachometer connection wires from American and European manufacturers have different colors. But unlike Chinese suppliers, the kit necessarily includes a diagram for connecting the device.
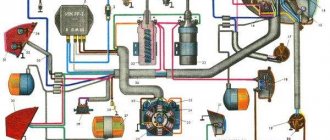
Ignition system for gasoline engines
Control of engine ignition processes can be organized by several methods:
- Distributor with one ignition coil;
- Distributorless with a dual (triple, quadruple depending on the number of cylinders divided by 2) ignition coil;
- Individual (for each spark plug).
In all cases, the coil receives a powerful pulse with an amplitude of 12V from a breaker (for cars before the 90s), a transistor switch, or directly from the engine control unit. It is from this point that the signal to the tachometer should be taken.
Your own and others' motorcycle experience.
Recent Entries
Recent comments
- Alexander on TACHOMETER TX-193 from VAZ-2103, VAZ-2106 cars
- [email protected] to entry Contactless ignition system 135.3734 “Sovek”
- [email protected] to entry Contactless ignition system 135.3734 “Sovek”
- Valery on Contactless ignition system 135.3734 “Sovek”
- Soviet motorcycles with rotary piston engines » Made in the USSR on Soviet motorcycles with rotary piston engines
Archives
Categories
Technical solution
Before connecting the tachometer, it is necessary to draw up an electrical connection diagram in order to mentally determine the starting and ending switching points and trace the conductor. Any ignition coil has a terminal (terminal) +15 (ignition on), to which battery voltage is supplied when the key is turned to the first (for some cars, second) position. Under no circumstances should you connect the tachometer to this point; the first time you turn it on, it may fail. High-voltage wires also pose a danger, even to humans. The signal input to which the tachometer should be connected must be precisely determined. In older coils it is designated by the letter "K", it is better to find the exact circuit diagram of the car.
The next, more difficult task is the electrical connection of the nodes. As a conductor, you should take a stranded copper wire with a cross-section of at least 2 sq. mm. with polyvinyl chloride insulation.
The connection points of the wire to the ignition coil are cleaned, mechanically twisted, soldered and carefully insulated. Lay the wire along any electrical harnesses, using plastic clamps, towards the engine compartment bulkhead near the dashboard. You can insert the conductor into the passenger compartment next to any electrical wiring harness. To do this, it is easier to use an elastic string. Finally, connect the conductor to the tachometer signal terminal. In some cars that include modifications with or without a tachometer, you can simply change the dashboard, find the stock wire and connect it to the ignition coil.
Connecting the device
The operating principle of an electronic tachometer is based on reading electrical impulses. In gasoline units, pulses are read and supplied in a certain amount to the ignition coil. As for the diesel engine, reading is carried out from a special terminal located in the generator housing.
To connect the tachometer to a diesel engine, it is advisable to carry out work on a lift or use an inspection pit. At the initial stage, it is necessary to remove the protection from the generator, avoiding dirt getting inside the device. The next step is a visual inspection of the generator coil, which has several terminals. The tachometer contact (input wire) should be connected to the terminal that is usually marked with the letter “W”.
Testing, tachometer adjustment
If the car is equipped with a distributorless or individual ignition system, the tachometer can be connected to any coil. In this case, the readings of the engine rotation speed (rpm) will be inadequate, since an impulse is supplied to the trammel ignition every stroke, while the individual ignition is four times less likely. However, it is possible to calibrate the measuring scale in a new way.
At the first stage of testing, start the engine and check the performance of the system (arrow deflection at idle speed). As a rule, the speed in this mode is in the range of 800 – 1000 rpm.
Next, adjust the reading level. If the tachometer needle deviates slightly, you can connect an additional capacitor with a capacity of about 1 μF between the signal wire and the vehicle ground. On the contrary, if the arrow goes off scale, connect a variable resistance of about 1 kOhm to the open signal circuit and scale the signal.
The next stage is sea trials. With the engine running, the maximum speed is reached. The tachometer needle should not go into the red zone. Otherwise, the adjustment is carried out again. Before starting operation, check the reliability of connections and insulation again. And remember, additional equipment means new problems.
Models, manufacturers and prices
The range of tachometers intended for installation on motorcycles, mopeds and scooters is very diverse both in price, design, execution (with an arrow or digital display), and in the number of manufacturers producing products for this purpose.
A universal electronic tachometer (from Chinese or “Kkmoon”) with LED backlight in a stainless steel case (Ø=56 mm, case height – 60 mm) costs only 540÷650 rubles.
For the same 500÷700 rubles you can purchase products with a digital indication of the number of revolutions per minute from Ironwalls or FCD.
Owners of expensive and prestigious brands of motorcycles (however, those not equipped with a standard tachometer) can purchase and install products from the world-famous and well-established Baron, Koso, J&P Cycles or Sunpro. However, the cost of these products will already range from 3,000 to 12,000 rubles.
How to connect an hour meter to a pit bike
To figure out how to connect an hour meter to a pit bike, you need to decide which meter is best to choose? Most motorcycle owners choose the first type, since vibration-activated meters, according to user reviews, leave much to be desired. If the running engine does not vibrate much, the meter may not work. But meters that are activated by power have less accuracy than other types.
Once you have decided which type of meter is right for you, we will figure out how to install an hour meter on a pit bike and begin to connect it.
We have a kit that includes the meter itself, a wire and two self-tapping screws with which we will mount it. You can order such a meter on the website PITBIKER.RU, as well as other accessories and spare parts. How to connect an hour meter to a pit bike? In fact, everything is very simple, even for a beginner. You need to take the meter, on it you will see a slot into which you need to insert the wire. We fix the meter itself in any place convenient for you; the most convenient way would be to fix it on the steering wheel. You can secure it with special adhesive tape on both sides or with super glue.
What is a tachometer on a motorcycle
A rev meter is an integral part of most modern motorcycles. The device allows you to monitor the load on the engine, which is very important when choosing speed and gear on a particular section of the road.
Installing a tachometer on models whose basic equipment does not provide for its presence is a very real and often practiced action among owners of domestic motorcycles.
How to install an hour meter
The hour meter itself is the size of a matchbox. And it is easy to install in any place suitable for you. The meter housing is waterproof. The battery is built-in and cannot be replaced. This means that the service life of this device depends on how long the battery lasts. Typically, the service life of an engine is five years.
When at rest, the device will show the engine hours that the engine has worked over the entire period of use, and the battery will not be consumed. When the engine is running, the crankshaft rotation speed will appear on the clock screen.
There are two buttons on the case, with their help you can set the number of cycles, turn off the tachometer, reset the operating hours, and set the time until the next service.
You need to set the operating mode of the engine hour meter as follows:
- Set the tachometer operating mode: Hold the left button for a couple of seconds until the values (1,2,3,4) appear on the screen. The first value is for working with engines in which the impulse is transmitted to the spark plug once per operating cycle. The second, accordingly, shows the value for two clock cycles. The third value shows the pulse that is applied to the spark plug once every four cycles. The fourth turns off the tachometer.
- We set the time until the next service, press the right button, as well as holding it. After the inscription “Service” appears on the display, hold down the left button until a number appears on the display indicating 1/10 hundreds, tens, units, thousands of hours until service.
Buy a tachometer for a motorcycle
Nowadays, it is not at all difficult to acquire a speed meter for further installation on a bike.
As a tachometer on the Izh Jupiter 5 and other Izhmoto models, as mentioned above, the speed meter that is equipped with the VAZ 2106 car (simply popularly called the “Zhiguli Six”) can be safely used. This product can fit well into the standard panel of these Russian Soviet motorcycles In this case, connecting the tachometer to the Izh involves cutting its body to half. All connectors that are connected to the light devices (indicators) of the dashboard must be lowered to the lower limit. After installation, the tachometer on the motorcycle must not sit unevenly, resting against wires and other elements standard design of the bike. We will also tell you how to connect a tachometer to an Izh. In the instrument panel itself (in the lower part) we drill a couple of holes for the standard mounting of this device that measures revolutions.
The option for connecting a tachometer to a motorcycle of the above type involves cutting off the cover with the warning lights of the motorcycle. You need to make approximately the same circle as the one that the factory designers created for the speedometer.
How to connect an hour meter to a motorcycle
Let's consider another option for mounting an hour meter on a pit bike or motorcycle. You can make fastenings using zip ties. In these cases, we don’t need the screws that come with the kit, and I think there’s no need to drill extra holes, because there are a lot of options for how to connect the hour meter. Then we stretch the wire from the coil that goes to the spark plug. And then you need to wind from three to five turns of wire (some wind more). It all depends on the length of the wire itself. You can also secure the wire with ties so that it does not dangle.
And so we figured out how to connect an hour sensor to a pit bike. If you have a question about how to connect an hour meter to a motorcycle , then the circuit is exactly the same, we attach it to an armored wire that goes from the coil to the spark plug. I hope you found this article useful.
What is a tachometer used for?
Before you figure out how to connect a tachometer to a motorcycle, you need to decide whether you need this device or not. It is worth noting that in order to install the tachometer correctly so that it works properly, you need to be patient and be prepared for the fact that you will have to spend a lot of time.
There is no device on the motorcycle dashboard to detect engine operation. A tachometer can be installed for this purpose.
It shows the number of engine revolutions. Thanks to this, every motorcyclist can see at certain moments of riding how powerful the engine of his bike is. In addition, using a tachometer, you can regulate the power of your engine so that it does not fail in a short time.
The tachometer plays an important role for any motorcycle equipment. It will help your motorcycle last for a long time. Most engines become unusable if you give them the wrong amount of load. The tachometer will not allow it to be overloaded and will ensure that it does not fail prematurely. The rider will control the load on the engine to prolong its life.
How to connect the engine hour sensor
The engine hour sensor can be connected to any wire where there is voltage while the engine is running. Connection options will be as follows:
- Connecting the sensor to the ignition
- Connecting the engine hour sensor to the emergency pressure sensor
If the engine hour sensor is connected to the ignition, the readings will be slightly inaccurate. Because the ignition can be turned on when the engine is not running.
You can also connect the engine hour sensor to the emergency oil pressure sensor. The disadvantage of this connection method is that the pressure is low at idle. The device will not take into account time.
Tachometer. Types and device. Application and troubleshooting
A tachometer is a measuring device used to determine the rotation speed of moving parts in mechanisms and assemblies. Typically, the results of its measurements are calculated by the number of revolutions per minute. The device is used in cars, motorcycles, tractors, combines, sea and river vessels, airplanes, helicopters and other equipment with an internal combustion engine. Its presence allows you to control the load limits in the operation of the motor, to increase its service life.
Why do you need a tachometer in a car?
The device can be found on the dashboard of almost every car with rare exceptions. It is used by the driver to monitor engine operation. The fact is that operating the engine at high speeds carries the risk of damaging it. By monitoring the tachometer, you can adjust the gas pedal pressure so that the crankshaft rotates in a safe mode.
The presence of a tachometer in a car provides:
- Extending the life of the motor.
- Optimization of fuel consumption.
- Selecting the correct driving mode depending on the load.
- Elimination of impact on the transmission when changing gears.
Car tachometers have a digital scale, the last numbers and divisions on which are marked in red. This is how the device highlights the critical speed for a given engine. When this operating level is reached, the crankshaft rotates at the maximum speed for the engine. This is accompanied by accelerated heating and increased vibration, which can damage the piston group, valves, timing belt, etc. By looking at the tachometer , the driver can prevent such a load and change to a higher gear in time, while releasing the gas pedal.
After a certain speed limit, different for each engine, it begins to burn fuel more intensively. By monitoring the rotation of the crankshaft using the tachometer, you can prevent an operating mode in which the car begins to consume more fuel.
Using a tachometer, the optimal engine speed is selected to start moving or climb downhill. The best moment to switch between gears depends on this data.
The tachometer reading is especially important when driving a vehicle with a trailer. In the technical documentation for the car you can see information of this kind “120 horsepower at 3500 rpm”. By achieving just such a rotation of the crankshaft, the highest traction force can be achieved from the engine. That is, by moving downhill at 3500 rpm, and not more, it is safe for the engine to pull out the load.
In cars without a tachometer, you have to monitor the load on the engine by ear, which is difficult if the interior is sufficiently soundproofed. The driver needs to determine the gain by the roar of the engine and only at this moment shift to a higher gear.
How to install a tachometer yourself
Connection via ECU
The process of installing a tachometer on a car with a gasoline engine differs from installing this instrument on a car with a diesel engine. Based on this, the article will discuss both installation methods.
Installation of a tachometer on a vehicle with a gasoline internal combustion engine
With a contactless ignition system
If a tachometer connection diagram is attached to the device, it is strongly recommended that you study it in detail and make the connection in accordance with the accompanying documentation. If there is no diagram, installation of the device is carried out in several stages:
- The device, depending on the type, is fixed either to the appropriate seat on the dashboard or on its surface.
- The black wire is connected to the body (ground) of the vehicle.
- The red wire connects to the ignition switch terminal, which will supply 12V when the ignition is on.
- The third wire of the device can be painted in any color. It must be connected taking into account what ignition system is installed on the car. If the system is contact, the tachometer must be connected to the distributor breaker. With a contactless ignition system, the device is connected to a voltage switch.
- To provide backlighting for the display, if provided by the manufacturer, the device should be connected to the terminal provided for this purpose on the ignition switch.
How to connect with a contact ignition system
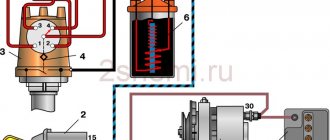
Installation of a tachometer on a vehicle with a diesel engine
The device should be connected to a generator, so it is best to install the tachometer on an inspection pit or overpass.
Before starting work, the generator protection is dismantled. Next, on the generator you need to find the terminal with the Latin letter “w” and connect the tachometer output wire to it. Tachometer rear panel diagram
The next step is to close the contact that comes from the oil pump.
This action is performed to ensure that the tachometer gives reliable readings. Diesel
It should be noted that sometimes it is not possible to find the generator terminal with the Latin letter “w”.
In this case, you need to disassemble the generator, connect one of the three wires that connect the winding and the rectifier to the tachometer cable and insulate the connection well. After this, the generator is assembled in the reverse order. Scheme for connecting a tachometer from Volga
In conclusion, it should be noted that installing a tachometer is not a very difficult job, however, it is strictly not recommended to start doing it without theoretical knowledge and some practical experience related to car repairs. Without firm confidence in your own capabilities, it is best to leave the car at the disposal of qualified workers at a specialized station who will be able to install a tachometer on your vehicle in the shortest possible time.
Installation and connection
Installation of tachometers additionally installed on a motorcycle is quite simple. A bracket attached to the body of the product allows you to easily install the device on one of the bolts securing the steering wheel to the fork.
Installing the products on the steering wheel in the most convenient place for viewing will allow the use of a special fastening coupling for installing additional equipment. It can be easily purchased for 200–300 rubles at any motorcycle accessories store. Some tachometer models have such fastening devices already included in the delivery kit.
Some manufacturers supply a complete set of a wide variety of fasteners and wires for connection along with the measuring device itself.
The connection diagram is quite simple and will not cause difficulties even for bikers who are not very “advanced” in electrical engineering (note: the colors of the wires are indicated for tachometers from Chinese manufacturers):
- We connect one short wire (usually black) to the switched “+” of the ignition switch;
- the second short one (green) – to the motorcycle frame (in a convenient place);
- the third short (black and yellow) - to the low-voltage contact of the coil going to the breaker;
- two long thin wires (black and red) - parallel to the speedometer light bulb.
Important! The tachometer connection wires from American and European manufacturers have different colors. But unlike Chinese suppliers, the kit necessarily includes a diagram for connecting the device.
Further according to the scheme
Resistors and their values may vary slightly. It depends on the diodes. A variable resistor makes it possible to change the sensitivity level of the resulting sensor. So, the “ground” is connected to a 33 kOhm resistor and a variable resistor, which, in turn, is connected to a wire that needs to be installed in front of the potentiometer. The negative of the LED is connected through the remaining resistor to ground, and the positive goes to the Arduino. So, we got three outputs - ground, plus and signal wire. This circuit uses an 8-bit shift register and display. It is advisable to consider recesses for the indicator in the case. Now a 270 Ohm resistor is soldered to the LED and then installed in pin 12 of the microcontroller. Now the electronic tachometer is ready. You can start programming and calibrating it. The program for Arduino can be found on automotive resources.
Another homemade tachometer
In order to measure the number of revolutions, as we already know, counting the pulses of the breaker or the voltage from the spark plugs is used. The frequency of these pulses is linearly related to the motor speed. You can also try to organize an inductive coupling with such a circuit, which will be demonstrated in this device. The basis for this option is a single-vibrator labeled LM 555.