SUZUKI ADDRESS V100 is a powerful and fast scooter from SUZUKI. Thanks to the 100 cc engine and large wheels, it easily accelerates to 100 km/h. In the class of scooters with large volumes, it occupies a leading position because... it contains the best combination of price, quality, and appearance. CE13A
Engine capacity (cc): 99 Engine model : E134 Engine type : 2-stroke Engine cooling : air Bore (mm)/stroke (mm) : 52.5×46.0 Max power (hp/rpm) : 9.0/6,000 Max torque (kgm/rpm) : 1.1/5,500 Compression ratio : 6.5 Transmission type : CVT Consumption per 100 km at 60 km/h (l) : 2.33 Gas tank volume (l) : 6.0 Oil tank volume (l) : 0.8 Front brakes : disc Rear brakes : drums
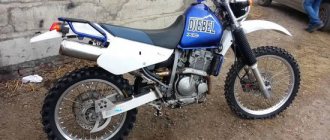
The line of scooters of the Japanese brand Suzuki is represented by several models, each of which has certain characteristics and riding style. One of the special models that received a strong difference in engine power can be called the Suzuki Address 110 scooter. And 110 in it is just the engine size. With its small size, positioning as a small scooter and simple design, the manufacturer managed to set good performance for the motor with the ability to accelerate to a speed of 100 km/h.
History of origin
Of course, it is important to familiarize yourself with the emergence of such a model for a more understandable perception. Suzuki Adress 110 first appeared in 1986 and is considered one of the first models of the Japanese company. At that time, the scooter was considered the best in many respects, and its great popularity was due to its very affordable cost. The scooter also gained popularity due to its modern design, which competitors could not boast of at that time. For the city it was the best representative, reliable, maneuverable and inexpensive. In 1991, they decided to suspend production.
Soon, from 1998 to 2003, Suzuki again began producing the scooter, which received an updated design, new characteristics and was an ideal representative of medium-sized scooters. Speed and agility have been increased by installing a sports engine using well-known 2-stroke technology.
Suzuki Address 50
Today, the Suzuki Adderss scooter, popular in Russia, with a 50 cc engine, will be subjected to a thorough analysis. To make the material more interesting, we specifically turned to a model that has not undergone pre-sale preparation: let's see what surprises an unprepared scooter can hide.
So let's get started. Address, a fairly popular scooter in our country, is equipped with a relatively spacious seat, a strict appearance (1-8) (in principle, corresponding to the content), and an engine exactly the same as that of Sepia. Roughly speaking, Address is not very different structurally from Sepia, but at the same time Sepia is a kind of hint of a street hooligan, and Address is a decent family man, not at all conducive to thoughts of adventure.
The device that came into our hands looks great externally, i.e. a B plus: the paint is original, there are minimal abrasions on the plastic, the brake handles are intact, etc. But malicious surprises awaited us inside; we’ll tell you about them below. Yes, before I begin the execution, I can’t help but mention the “wonderful” idea of Japanese designers, embodied in the front suspension of some Honda and Suzuki models - meaning a lever fork, which competed with a telescope for quite a long time. The advantages of such a fork are limited to a large stroke with a low height of the mechanism, but it has a critical effect on controllability. A device equipped with such a fork tends to fall over at low speed when maneuvering and a decent dive when braking (a sort of “barge”); also, when such a fork is used, the base of the moped changes, because The wheel axis constantly moves relative to the longitudinal axis of the scooter, which requires the driver to pay excessive attention and concentrate on control. Of course, this is a purely subjective opinion, but the practice of world motorcycle production shows a complete rejection of damping systems of this type.
Actually, disassembling this model is an average pleasure, it’s somehow not well thought out and crooked. But let’s put aside prejudices and get started.
Let's start with the battery, simply because the trunk light, after removing the saddle, will both disturb it and interfere with your further work: on the front inner plastic there is a special cover that is locked with one self-tapping screw (9), the battery and fuse are hidden behind the hatch (10) (a spare fuse (11) is also hidden in the housing). Unscrew the terminals (12) and, unhooking the rubber band, pull out the battery.
Now let’s free the front trim from the screws (13); if you look at the wing from below, you will easily find two self-tapping screws (14) and two more on top, in plain sight (15). Now release the latches on the sides of the part and remove it (16). Let's give a little advice: to remove any plastic part, first unscrew everything that can hold it, then inspect it again from all accessible sides, it is highly advisable to understand the structure of the latches, then try to move the plastic in all directions if it is ready for removal, it must move at least a little freely in all accessible directions, otherwise, something else is holding it except the latches, and there is a chance of breaking something you need, and then lamenting over the cracks and remembering the former beauty of your pet.
Remove the steering wheel trim: a long screw under the headlight (17), a self-tapping screw under the left handle (18), two more on the back side (19) and the last ones at the top of the dashboard (20). It's time to disconnect the headlight and turn signal terminals (21).
Next is the rear plastic; this model does not have the usual “skis” covering the upper visible part of the engine. First, let’s remove the trunk; to do this, unscrew the three nuts (22-23) with a “10” tube, do not lose the washers protecting the plastic (24).
So as not to be distracted, we take out the luggage compartment upholstery, look with interest at the foam insert on the bottom (25-26) and continue: two screws on the sides (27), two self-tapping screws under the tail (28).
It is better to immediately remove the filler neck trough - free it from the fastening elements (29-30), remove both plugs and, rocking, pull the part up; only the rubber seals (31) will hold it.
And we remove the rear plastic entirely, but here you will have to spend maximum attention, the fact is that it is attached to the metal body of the “toilet bowl” with hefty rubber clamps located exactly in the middle of the sides and hooks in the front lower part. The steps are as follows: gently pull the entire side towards you, pulling out the plastic pin and rubber ring, while turning the plastic counterclockwise. We repeat on the other side. (32). Now it’s the turn of the front “skis”, we climb under the scooter and find two self-tapping screws (33) at the back, go back forward and unscrew two more (34) and simply pull off the body kit element.
We grab our favorite “10” tube and remove the cover (35). The remaining plastic: unscrew the “screws” (36) hidden on the front, climb into the battery hatch, unscrew the screw (37) and finish the torment with the plastic by torturing the last screw (38) with a screwdriver.
The time has come to deal directly with the engine and the organs that feed it. Let's start with the air filter: use a screwdriver to straighten out the fasteners (39-40), then move the rubber clamps at the top of the box towards the nose of the device, remove the cover and admire the first surprise (41) - the inside next to the foam rubber, from where air is taken directly into the carburetor, heavily splashed with oil and dirt.
Moreover, this wild mixture also contained grains of sand that were noticeable to the touch, which is generally unacceptable, because... all this flies into the cylinder and scratches the walls. Apparently, the petal valve is faulty, the purpose of which is to prevent the mixture from escaping back into the carburetor, and dirt could appear there only if the foam rubber is damaged. However, the filter (although cut from a sheet of special foam rubber) did not appear to be dangerous, which means that the repair was not carried out correctly. The mood dropped - such a healthy-looking scooter turned out to be affected by the most common disease. But that is not all.
We remove the entire filter box (42-43), it is also a continuation of the fender liner (44), which protects the carburetor from dirt, and be sure to plug the diffuser with a clean cloth.. By the way, the pipe supplying the mixture to the carburetor runs in the dirtiest place of the scooter - people fly at it all road surrogates...
Next, it’s quite easy to remove the muffler, there’s also a strange thing here: why wasn’t this thought out - you can’t remove it without removing the air filter, the top bolt (45) is covered by a box (46-47), and you can’t remove the wheel without removing the muffler.
Now, having unscrewed the two nuts from the cylinder, we separate the muffler. And here is the second surprise - in the muffler there was 150-200 grams of a mixture of combustion products diluted with gasoline, most of it ended up on the floor, but the rest was photographed (48-49)! How do you like it? And the reason is simple - the vacuum valve practically does not keep gasoline in the tank, it bypasses the power system, accumulates in the crank chamber and pours into the muffler, the capriciousness of the engine at startup became clear (to be honest, it started up two or three times - before and after disassembly), if it started, it gurgled strangely and smoked (by the way, in the materials on the topic, you have the opportunity, using the example of disassembling a Suzuki Sepia, to see what serviceable components should look like). At the same time, it is not clear why the system for draining excess gasoline in the carburetor did not work, hence the difficulty in diagnosing problems - apparently nothing is flowing or dripping. (For example, what happened to me on Leningradka - my Jog suddenly stalled at full speed, and from the puddle of gasoline under the scooter it became clear that the drain screw from the float chamber had come loose, fixing it would take five seconds, and it would take half a lifetime of nerves ).
Okay, let's get back to the scooter. Remove the wheel (50) and check the brake pads and gearbox seal (51).
This Suzuki model has an interesting design feature - the oil tank and gas tank are mounted on a common pallet, which is quite convenient. We remove the hoses going to the mentioned components: the gas hose from the harmful valve (52), the one from the carburetor (53), unscrew the valve (54) so as not to interfere, the oil hose from the oil pump and unscrew the bolts holding the pan (56-57), and We remove the whole thing (58), by the way, the gas tank is plastic.
And now we admire the gutted scooter, ready to remove the engine (59). Once again we admire the foam insert in the “toilet” - a unique contraption, probably, instead of it you can hide jewelry or an alarm unit (60).
Another trouble with the device, and a very significant one: you won’t be able to unscrew the spark plug with a regular candlestick, don’t even try (the method is described in the Moto magazine for November 2004 and in the issue of SD the year before last). But the first way that comes to mind is to roll out the engine, so that’s what we’ll do. The shock absorber can be disconnected at the top point either at the beginning or at the end, but it is still more convenient to do this right away (61). We also immediately disconnect the rear brake cable (62-63),
loop-holder together with ground wire (64), throttle cable (65-66)
and the second loop (67), disconnect all the terminals (68-69) coming from the engine from the ignition coil - also (70). I’ll say a couple more “gentle” things about the coil: it is located in a dirty, unprotected place and, if one terminal is insulated, then the second one looks at the world naked, which leads to its oxidation and loss of contact and temporary failure of the ignition system. Until you, standing on the side of the road, covered in mud, clean the ill-fated contact. The same applies to the bulk wire, but to a lesser extent (71).
Now you can remove the power unit. We fix the axle with an open-end wrench (72) and unscrew the nut (73) with a wrench and roll out the engine (74-77).
This is what the supporting structure looks like without an engine (78). It is advisable to clean the areas affected by rust and treat them with an anti-corrosion compound in advance, because there are known cases when the body rotted through. It’s time to get to the cylinder-piston group; for this you need to remove the cooling casing, which is quite simple: we can easily remove the impeller cover (79-81),
We approach from the other side and unscrew the coil and the remaining screws (82-84).
We look with interest at the beauty that has opened up to us (85) and remove the cylinder head (86-87) and look inside (88-89), in our case we found small scuffs near the exhaust window - a consequence of dirt getting in. In principle, it’s not very scary if you clean the entire mixture supply system and forget about the scratches, but this is already an unhealthy sign.
Perhaps we can remove the carburetor: the gas hose (90), two bolts securing the assembly to the inlet pipe (91) and we have it in our hands.
The carburetor turned out to be clean and did not require further operations. This is what (92-97) the carburetor and its internals should look like. The reason for the inoperability of the gasoline drainage system during overflow could not be identified.
We take the valve: first we remove the inlet pipe (98-99), and the four bolts securing it also hold the valve (100-102), indeed, the petals did not fit tightly to the body of the lean-to “house”. You can look into the crank chamber (103).
Well, finally, let’s look into the variator: unscrew all the bolts (104) in a circle and remove the cover (105), trying not to damage the gasket; if you do tear it, it’s okay - you need to remove its remains and either install a new one, or lubricate everything sealant. The “underhood” space (106-107) of the variator pleased with the integrity of the components, the cheeks of the variator had slight wear. A new belt has been discovered, you could safely drive 5-7 thousand without looking there again, if not for a super surprise - oil leaks are clearly visible at the point where the crankshaft exits the mechanisms, but there shouldn’t be any oil in the variator. All this is a consequence of wear of the left cuff (oil seal) of the crank, and this is definitely the quick death of the engine and the most expensive engine-related repair.
Result: the scooter gets a B for appearance and a B+ for technical condition. The device is sent to the repairmen's slipway to rise from the trash.
Appendix: several photos reflecting the sequence of removing the front wheel, which is not particularly difficult and does not contain surprises (108-112).
Specifications
The main advantage of the scooter is its engine. The model is equipped with an F129 engine, which has a volume of 113 cc and a power rating of 11 horses. A traditional two-stroke system is used, 1 cylinder. The maximum speed limit was set at 100 km/h, but some craftsmen were able to reach 110 km/h.
Increased performance made it possible to increase the fuel tank capacity to 6 liters, and low fuel consumption allows you to drive for a long time around the city or over short distances. Engine cooling is standard air, reaching 6,000 rpm. There is an installed oil tank, capacity 1.3 liters.
The dimensions of the Suzuki Adress 100 are slightly larger than other single seat scooters. But this is due to the presence of a 1.5-seater seat and a good engine. As a result, the length of the scooter was 1,855 mm with a wheelbase of 1,256 mm. The model is equipped with rims with a diameter of 12 inches. All this allowed the scooter to weigh 90 kg.
Suzuki Address 110 review
Many who want to buy a Suzuki Address 110 scooter should know that this is one of the best scooter models. It is believed that the scooter is the most reliable in terms of design and engine, but the carburetor still remains the problem area. The fact is that the Address 110 is equipped with a Mikuni carburetor, which is also installed on the Suzuki Sepia model. Its setup and frequent breakdowns are considered the main problem of any owner. Reviews also say more positive things about the Suzuki Address 110. The main advantages include:
- 1.5 seater seat with the ability to travel for 2 passengers;
- high ground clearance of 100 mm;
- There is a drum brake at the rear and a disc brake at the front;
- Fuel consumption averages 2.2 liters;
- high maneuverability and maximum speed;
- the best model for those who love comfort and high speed.
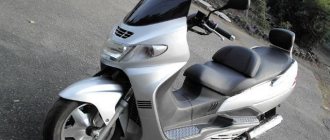
Suzuki Address V50G scooter review
Suzuki Address, both small-capacity and maxi-scooters, thanks to their dynamic engines, low weight and dimensions, are distinguished by high maneuverability. They are mainly used for fast travel in the city, especially in a metropolis.
Almost all Japanese 50cc scooters, since 2000, have been modernized to make them compliant with Euro standards. Suzuki was one of the first to update its line of small-capacity sports scooters Lets and Address, installing new four-stroke engines on them.
Popular Japanese scooters 100 cc Address V100 with a two-stroke engine, manufacturers stopped producing them in 1998. All maxiscooters released after 2005 already have fuel-injected 4-stroke engines.
A distinctive feature of four-stroke engines recently developed by Suzuki is their high efficiency. For the V100 model, with an E111 two-stroke engine, the scooter consumption is 5.2 liters, and for the V50G, with a new injection engine, only 1.25 liters per 100 km. Considering that the speed in a modern city rarely exceeds 60 km/h, then the option of purchasing a V50G scooter can be considered optimal.
Let's analyze the review of V50 scooters: built-in alarm, long saddle, modern damping system (telescopic front suspension), well-thought-out ergonomics of the driver's seat.
The scooter is adapted to Russian conditions, not only in terms of gasoline, but also with an adapted braking system, which, together with excellent shock absorbers, safely withstands speeds of 60 km/h on our roads. There is one feature that Japanese manufacturers did not take into account - air is taken into the carburetor without taking into account the quality of Russian roads.
The review of the Address V50 scooters will be complemented by data on appearance: the body design is distinguished by smooth lines, ergonomically located instruments on the dashboard - speedometer, fuel gauge and warning lamps.
Technical characteristics of Address V50 (JBH-CA44A body):
| Length — 1670mm Width — 605mm Height — 1005mm Seat height — 695mm Base — 1150mm Ground clearance — 105mm Gas tank — 4.5 liters Dry weight — 66kg Frame — tubular steel Front suspension — telescopic Rear suspension — pendulum Front/rear brake — drum front tire — 80901035J Rear tire — 80901035J | Engine - A404 Volume - 49.0 cm? Cooling — air Stroke — 4 Cylinder — 1 diameter 39 mm Piston stroke — 41.8 mm Power supply/distribution systems — injector/ONS Compression — 10.7 Power max — 5.2 hp at 8000 rpm Torque - 4.5 Nm at 6500 rpm Max speed - 60 km/h Kick starter/electric starter CVT automatic transmission |
The price of new scooters, the last years of production, is 80-95 thousand rubles. For Address V50 refurbished, the average cost of a scooter varies in a small price range from 25 to 40 thousand rubles.