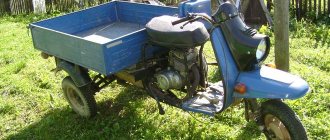
Modern youth hardly know what an Ant is. For immigrants from the USSR, this is one of the most popular helpers in the garden, as well as a sought-after two-wheeled vehicle.
Despite the fact that assembly began back in 1959, and the last copies were released in 1995, scooters are still in demand.
An important advantage is the elementary electrical circuit. Indeed, among the electrical equipment on the Ant scooter, nothing complicated or unusual is provided from the factory. Everything is standard, although quite poor. But this greatly simplifies the issue of maintenance and repair without the involvement of specialists.
Motor scooters Ant Repair manual + parts catalog
Introduction 3 Chapter 1. Brief information and technical characteristics 5 Technical characteristics of Ant scooters 8 Motor scooter controls 10 Maintenance of the throttle handle 17 Control cables 18 Maintenance and repair of control cables 18 Maintenance of the scooter 20 Chapter 2. Power unit, engine 22 Removal power unit 22 Disassembling the power unit 26 Inspection and sorting of parts after disassembly 27 Engine 27 Crank mechanism 31 Cylinder and cylinder head 31 Piston 34 Piston rings 35 Piston pin 38 Connecting rod 39 Crankshaft 41 Connecting rod bearing rollers 44 Crank pin 44 Crank pins chat shaft 46 Carter 47 Lubrication system 51 Lubricants 51 Cooling system 52 Possible engine malfunctions and methods for eliminating them 55 Chapter 3. Power and exhaust system 57 Gas valve 58 Carburetor 59 Carburetor K-28G 59 Carburetor K-36G 62 Operating principle of the carburetor K-36G 65 Disassembly and carburetor assembly 66 Carburetor repair 67 Carburetor adjustment 68 K-62G carburetor 69 Removing and disassembling the carburetor 72 Carburetor adjustment 72 Checking the tightness of the carburetor mount 72 Setting the fuel level in the float chamber 72 Adjusting the idle speed 73 Adjusting the position of the metering needle 74 Carburetor K-65 G 75 Design and the principle of operation of the K-65G carburetor 76 System for supplying and maintaining a constant fuel level 77 Main metering system 77 Idle system 78 Engine starting and warming up system 78 Float quencher 79 Removing and disassembling the carburetor 79 Installing the carburetor 79 Adjusting the K-65G carburetor 80 Setting the fuel level 80 Idle speed adjustment 80 Adjustment of the metering needle position 81 Air cleaner 81 Exhaust system 83 Basic carburetor malfunctions and methods for eliminating them 86 Chapter 4. Transmission 88 Forward gear 88 Motor chain 89 Clutch 89 Clutch adjustment 92 Clutch malfunctions 92 Clutch repair 93 Clutch drive drum 93 Discs clutch 94 Clutch spring 94 Clutch release rods 95 Gearbox 96 Gearbox operation 99 Gear shift mechanism 101 Gearbox maintenance 102 Oil change 102 Gearbox disassembly 102 Gearbox repair 103 Gearbox assembly 10З Starting mechanism of the Ant scooter 106 Intermediate gear 107 Lubrication intermediate drive chains 109 Adjusting the tension of the intermediate drive chain 109 Main gear and differential 110 Maintenance of the final drive and differential 116 Disassembling the final drive and differential gearbox 116 Repairing the final drive and differential 116 Differential cups 116 Planetaries 118 Final drive axle gears 118 Differential assembly 118 Gearbox assembly main drive 118 Drive axle 120 Driven axle 120 Rear wheel drive 121 Repair of the cardan joint 124 Maintenance of the cardan drive 124 Chapter 5. Chassis 125 Frame 125 Front suspension 128 Spring-hydraulic shock absorber 132 Rear suspension 134 Maintenance of the front suspension 138 Maintenance of the rear , pendants 138 Brakes 138 Maintenance and repair of the brake system 143 Replacing brake linings 144 Wheels and tires 146 Chapter 6. Electrical equipment 148 Battery 150 Electrical circuit for powering the battery charge warning lamp (red) 152 Main types of battery malfunctions 153 Dynastarter 154 Dynastarter maintenance 157 Regulator relay 160 Checking the starter relay 164 Checking the reverse current relay 165 Procedure for checking the VSU-10 and D-104-20 diodes that regulate the reverse current in the relay-regulator 2903.3702 165 Checking the voltage regulator 166 Ignition system 168 Ignition coil 168 Breaker 169 Adjusting the gap in the breaker 170 Capacitor 170 High-voltage wire 171 Spark plug 171 Setting the ignition timing 172 Adjusting the ignition timing for scooters of the TGA and Ant family 172 Adjusting the ignition timing for scooters of the Ant-2 family 173 Lighting and signaling devices 175. Headlight 175 Electrical power supply circuit for low and high beam lamps 175 Electrical power supply circuit for the brake light lamp 175 Horn 175 Tail light 176 Direction indicators, indicator breaker 176 Applications 178 Literature 186
Source
The main disadvantages of a scooter and its modernization
The Ant scooter, like any technology, in addition to its positive qualities, also had disadvantages. At the same time, the existing shortcomings could be attributed both to structural ones, originally inherent in the device, and to operational ones, arising during the operation of the equipment.
According to reviews from owners, structural defects that required rework or the most frequent repair of a particular unit include:
- an unsuccessful electrical circuit of the scooter, often leading to failure of components (din-starter, relay-regulator, ignition coil), especially in rainy weather;
- an undeveloped gearbox device often with poor-quality factory assembly led to a crash during 2nd or 3rd gear operation. To fix it, the owners had to study the structure of the box itself, as well as how to properly disassemble and then reassemble the gearbox after repair;
- a small difference in fuel levels between the tank and the carburetor chamber led, when there was little fuel in the tank, to running on a lean mixture or stopping the engine.
The most common operational deficiencies are:
- unstable ignition on the Ant requiring frequent adjustments;
- short service life of brake pads;
- loss of hydraulic fluid from shock absorbers, requiring disassembly, refilling and reassembly of shock absorbers for repairs;
- malfunction of the electrical equipment of the starter dyno under the influence of dirt, water, dust. Repairs were carried out by disassembling and reassembling, checking the electrical circuit, searching for and replacing the failed element;
- occurrence of cracks in the frame;
- oil leak in the gearbox.
Very often, the owners, having gained experience in operating the Ant scooter, carried out modernization. But before starting to implement the changes, the following issues were resolved:
- How much is it?
- What will the modified Ant look like?
- How to find and collect the necessary materials for upgrading?
- How much will the scooter weigh after the modification and how will this affect the technical characteristics?
- How long will it take to remodel?
After receiving positive answers to these questions, work on changes was carried out. Tuning the Ant scooter, which made it possible to give it additional properties, boiled down to the following basic alterations:
- Installation of a dump body for transportation of bulk cargo.
- Change of appearance design.
- Installation of a coupling device that allows you to work with various trailed and semi-trailer devices and equipment.
Versatility, cost and maintainability allowed the TMZ Ant scooter to be compared in terms of production volume and popularity with such best Soviet models of motor vehicles as the heavy M 72 Ural motorcycle and the light road motorcycle for the Minsk 125 village.
Previous entry Izh Jupiter 3 - technical characteristics, review Next entry Izh Jupiter 4 - technical characteristics, improvement
Discounts from the help desk
When you mention ACC you can get discounts on parts and services
Automotive Help Desk: auto news, spare parts in Krasnoyarsk for foreign and domestic cars, disassembled cars, car repairs, addresses and phone numbers of companies, bulletin boards, spare parts catalogues, service and repair manuals.
All information presented on the site is for informational purposes only and under no circumstances constitutes a public offer.
Source
Suspension
Front suspension is lever type. In terms of ease of control and smoothness, it has no equal
The rear suspension is the same as the front suspension of the lever type. Unlike the front, the rear is much worse, primitive and does not withstand even the slightest criticism
What pressure should be in the tires of an Ant scooter?
During the times of the former USSR, although the “Ant” caused a lot of trouble for its owners, people bought it and even drove it. Where were the people supposed to go? Those who built the house, those who ran the farm, brought their last money to the store and drove with one hand, and with the other, wiping away tears, exploited these Soviet scabs.
The design for those years is much better than many modern designs
If the factory design is not comme il faut, numerous collective farm tuning studios offer their variations. In the same place, as additional options you can order a trailed and automatic chain tensioner...
Photo report Conversion of Ant scooter on magneto
I just finished overhauling the Ant engine and decided to write a short report on installing a magneto. Of course, the engine had to be half charged with spare parts made by no one. I suspect that the counterfeit goods with which I had to tinker for the last two days are being produced in some garage in Rostov-on-Don, or that the local workers are secretly making this nonsense at the factory. In any case, according to my information, traders bring this disgusting stuff from Rostov.
The engine to which I have devoted the last two days has already been converted to a magneto. Plus, there was another “Ant” in my yard, also converted by someone to use a magneto, but the store spacer to which the magneto is attached was “pinned” from it at one time... I had to buy a new spacer and the owner at the same time bought a coupling . I don’t know why he bought it - I didn’t ask him for it. The old one was in good condition. Well, since I bought it, we’ll install it.
The feasibility of installing a magneto
It’s none of my business, of course, but I have an extremely negative attitude towards this kind of collective farm tuning. Moreover, the magneto does not solve the problem with the reliability of the standard ignition system, but only replaces it with another problem. And this, in my opinion, is complete stupidity: convert the engine to a magneto, and then suffer even more with it...
Yes, the dyno starter is not an ideal device. Which also needs to be constantly monitored and, if necessary, serviced. So what? Well, I cleaned the collector and breaker contacts at the beginning of the season and that’s it. Are there fewer problems with the magneto? More than a hundred times!
- Firstly, due to the fact that the rubber coupling constantly breaks, the ignition timing is lost, and this entails detonation, loss of power, overheating and increased fuel consumption.
- Secondly, after installing the magneto, they usually stop monitoring the dyno starter, deprive it of its battery, and it eventually dies completely... Accordingly, the on-board network of the scooter is deprived of its power source. And this means that “there is no light - there will be no cinema”...
- Thirdly, due to the fact that this whole alteration is a complete collective farm - the axes in which the magneto rotor and the dynostarter rotate diverge within significant limits. And this leads to the fact that the parts of these two devices begin to work with a large axial misalignment relative to each other, which is why the magneto’s output shaft of the rotor constantly breaks off and its support bearings fall apart.
- Fourthly, the magneto was not initially designed for long-term operation, much less to work with such a horse-like misalignment along the axes, which leads to an increased radial load on the rotor, which is not typical for a magneto.
- Fourthly, a magneto is very expensive - plus you need to buy a spacer and a coupling.
We buy a spacer at the nearest store (it costs 450 rubles), a coupling (100 rubles) and a magneto (used from 1500 and above...).
Installation
We screw the coupling to the dynostarter rotor directly on top of the fan. The option of fastening the coupling with bolts in a hidden way, in my opinion, looks more preferable.
Than the option with regular bolts.
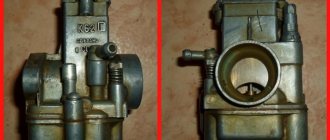
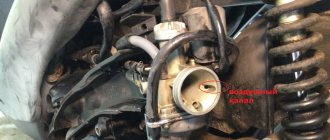
We break out the protective grille from the cooling volute.
Using a round file, we align the snail from the inside so that the spacer fits into it. We insert the spacer into the volute, mark the holes along the spacer mounting eyes. We drill holes and cut M6 threads into them, the main step.
We install the magneto and voila!
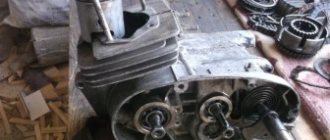
Engine characteristics
In fact, the engine itself is not bad: moderately reliable, simple, maintainable and not whimsical. If it were not for its extremely unreliable and capricious dyno starter, which, according to the good old collective farm tradition, is usually abolished and a magneto is installed
- Type - two-stroke, single-cylinder with three-channel purge
- Cooling - air, forced by fan
- Cylinder diameter - 62 mm
- Piston stroke - 66 mm
- Working volume - 199 cm
- Compression rate - 7.6 kg/cm
- Power - 13 l. s./9.6 kW at 5200 rpm
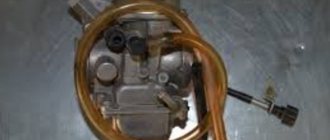
- Carburetor - K62G
Electrics
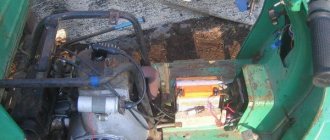
The most problematic part of the Ant has always been considered its electrics, in particular the voltage regulator relay and dyno starter (generator and starter rolled into one). Due to their design features, the dyno starter and relay regulator require constant attention and qualified maintenance. If the dyno starter is not serviced on time, then it begins to undercharge the battery literally in the first season
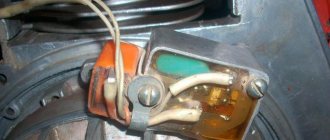
On older models, the relay-regulator was of a mechanical type
On the latter, more advanced - electronic type
Contact ignition. The contacts are located in the cooling casing
The ignition coil and capacitor are located on the frame. In terms of repair and maintenance it is very convenient
Adjusting the free play of the cable
On the left side of the engine, remove the cover, unscrew the locknut on the adjusting bolt and, depending on what problems you had with your clutch, adjust the free play of the clutch lever.
- If the clutch was moving, tighten the adjusting bolt
- If the clutch is slipping, unscrew it
We tighten and unscrew the adjusting bolt exactly until the free play at the end of the clutch lever is 5-10mm. After adjusting the bolt, fix it with a screwdriver and tighten the locknut
Engine assembly
Unlike a dynastarter, repairing an Ant scooter engine with your own hands is difficult to do according to the operating book. Therefore, it is worth seeking the advice of experienced motorcycle owners. Most often, the engine has to be disassembled when there are problems with the clutch mechanisms, the operation of the gearbox, as well as wear on the crankshaft, bearings or oil seals. The most important rule is not to be afraid to disassemble the engine yourself. Using these instructions, disassembling and assembling the engine of the Ant scooter will not be difficult.
So, the procedure for disassembling the engine:
- To begin, prepare your workspace. If you want to achieve proper and trouble-free operation, keep all parts clean and tidy. Remember and complete the disassembly order.
You can see how to assemble an Ant scooter engine in more detail in the visual video at the end of the article. The essence of assembly is in the reverse order, but it is important to tighten the parts with a certain force and synchronize the parts with the marks. Under no circumstances should you assemble an engine without detailed instructions written by the manufacturer.
With frequent breakdowns, owners think about what engine can be installed on the Ant scooter. Instead of a native motor, you can use Chinese analog motors . Since the Ant has many copies in Asian countries, replacing the engine can be a great option to save money in case of irreversible damage. True, you will have to make the fastenings yourself and, in some cases, remake the bridge for the left-hand arrangement of the chain. This is not very difficult, considering that the Tula plant provided for the possibility of rearranging the bridge.
general information
The Soviet cargo scooter has a reliable metal trike, made in the form of a platform with a tailgate. Ant's trike is quite roomy. The platform's carrying capacity is 250 kilograms, which allows the Ant scooter to be actively used for household needs. Thus, a cargo scooter allows you to transport:
Motor vehicles are distinguished by maneuverability and unpretentiousness. In the garage, the Ant scooter takes up about the same space as a bulky motorized vehicle with a sidecar. Ant's turning radius is about 3.5 meters.
Characteristics of the Ant scooter
In winter, a cargo moped operates using a mixture of M6/3-10G/1 engine oil and A-76 gasoline, and in summer it requires the M8B grade.
If we compare the Ant scooter with a sidecar motorcycle, then in terms of operational fuel consumption the advantages will be on the side of the former. A cargo moped “eats” 8 liters/100 kilometers. It is also much lighter than a motorcycle with a sidecar - its weight is 240 kilograms.
see also
Comments 36
Hello, tell me how the Bright engine has proven itself? I want to install a similar one on a homemade product, but I haven’t found any information on it on the Internet.
Has it become quiet (in terms of noise) and economical? But it’s a cool idea to convert both two-wheeled electrons and tourists
The noise is probably the same, it all depends on the muffler, mine is homemade. But the exhaust sound is more pleasant, you can immediately hear that the powerful engine is working, reminiscent of powerful Japanese motorcycles.
Thank you very much for your experience... it will be very useful to me)))
I installed 125 cc 4-stroke on my ant, I had to assemble the gearbox in a mirror image so that the star would be on the other side, gear shifting under the original foot, a home-made exhaust for it, now you can quietly sneak up on a person on an ant and you can’t hear him, it starts with just a push and I don’t bother with spark plugs, I only need Akum to start from the button, it works without Akum,
( 1 rating, average 4 out of 5 )
Photo report: Replacing the rear chain of an Alpha moped
Torque chain transmission is always a problem. But low cost, ease of maintenance, coupled with low weight, and for a motorcycle - weight is a very significant parameter - outweigh all the disadvantages and the chain drive of the rear wheel, just like many years ago, is dominant in the motorcycle industry. And we are unlikely to get away from this in the coming decades.
As already said: the chain is always a problem. The infection is spreading and nothing can be done about it. And if only it drags on, it begins to eat the teeth of the stars and if it is not replaced with a new one in time, then it will literally eat the stars in one season.
Transmission
The rear wheels are driven by a chain
The chain transmits torque to the lowering reverse gearbox and then, through axle shafts and rubber couplings, the torque is distributed between the rear wheels. A characteristic feature of this gearbox is the presence of reverse
The reverse lever is located on the right side
Specifications
The Soviet moped, which has recently enjoyed great popularity, has the following technical characteristics:
- Length - 2680 millimeters.
- Width - 1250 millimeters.
- Height - 1075 millimeters.
- Dry weight - 240 kilograms.
- Load capacity - 250 kilograms.
- Speed - 25-35 kilometers per hour.
- Engine type is 2-stroke, power is 11 l/s.
- Transmission - 4-speed gearbox.
- The brakes have a diameter of 15.0 centimeters. Drum-type, each wheel has a mechanical drive.
Typical faults
Among the typical malfunctions of this unit, the following are worth noting:
- Return spring failure
A broken return spring causes the winding lever to no longer return to its place after starting the engine.
- Broken or worn ratchet teeth. Breakage or wear of the flywheel teeth causes the winding lever to slip
- Worn thrust bolt. Wear of the thrust bolt leads to the fact that after starting the engine, the carriage hitting it does not slide, but continues to be engaged
- Another common malfunction is shaft breakage. Unfortunately, I don’t have photos of the torn shaft at the moment.
Possible faults
If we talk about the main possible malfunctions of the electrical equipment of the Ant scooter, they can be divided into several categories.
- Mechanical breakdowns. This is the result of natural wear, burnout of windings and destruction of contact groups. Troubleshooting is done manually. It is necessary to replace components or restore contacts by soldering.
- Structural. This includes all breakdowns associated with the design features of electrical equipment.
- Failure of the relay regulator. A fairly common malfunction that almost all Ant owners have encountered. But the plus is that it is quite easy to eliminate it.
The most unpleasant are breakdowns that are mechanical in nature. Most often, on Ant scooters, a short circuit occurs between the turns, the winding burns out, and the commutator wears out or is destroyed.
But wear and hanging of brushes, contamination of the commutator, breakage and oxidation of wires, as well as terminals, can be dealt with without unnecessary hassle.
Is this a complex or simple circuit? Has anyone experienced electrical equipment breakdowns on Muravye? How were they eliminated?
Maintenance and repair
Due to its low weight, this moped, if necessary, can be “put on its side” even alone. Also, given that Ant disc wheels consist of 2 halves bolted together, replacing a damaged tire is quite simple. To connect the tube and the spare tire, it is necessary to separate the parts of the removed wheel.
Motor scooter repair Ant
Tools
In order to properly repair a Soviet moped, you will need the following tools:
- double-sided wrenches (set), 4-22 millimeters;
- screwdrivers - 3 pcs. (large, medium, small);
- hammers, 2 pcs. (100 and 300 grams);
- combination forceps;
- wooden stick;
- wire cutters;
- pliers;
- socket wrenches (4 pcs.);
- velvet files - 2 pcs. (flat).
Motor scooters Ant Repair manual + parts catalog
CONTENTS OF THE BOOK REPAIR MANUAL MOTOR SCOOTERS ANT + PARTS CATALOG
Introduction 3 Chapter 1. Brief information and technical characteristics 5 Technical characteristics of Ant scooters 8 Motor scooter controls 10 Maintenance of the throttle handle 17 Control cables 18 Maintenance and repair of control cables 18 Maintenance of the scooter 20 Chapter 2. Power unit, engine 22 Removal power unit 22 Disassembling the power unit 26 Inspection and sorting of parts after disassembly 27 Engine 27 Crank mechanism 31 Cylinder and cylinder head 31 Piston 34 Piston rings 35 Piston pin 38 Connecting rod 39 Crankshaft 41 Connecting rod bearing rollers 44 Crank pin 44 Crank pins chat shaft 46 Carter 47 Lubrication system 51 Lubricants 51 Cooling system 52 Possible engine malfunctions and methods for eliminating them 55 Chapter 3. Power and exhaust system 57 Gas valve 58 Carburetor 59 Carburetor K-28G 59 Carburetor K-36G 62 Operating principle of the carburetor K-36G 65 Disassembly and carburetor assembly 66 Carburetor repair 67 Carburetor adjustment 68 K-62G carburetor 69 Removing and disassembling the carburetor 72 Carburetor adjustment 72 Checking the tightness of the carburetor mount 72 Setting the fuel level in the float chamber 72 Adjusting the idle speed 73 Adjusting the position of the metering needle 74 Carburetor K-65 G 75 Design and the principle of operation of the K-65G carburetor 76 System for supplying and maintaining a constant fuel level 77 Main metering system 77 Idle system 78 Engine starting and warming up system 78 Float quencher 79 Removing and disassembling the carburetor 79 Installing the carburetor 79 Adjusting the K-65G carburetor 80 Setting the fuel level 80 Idle speed adjustment 80 Adjustment of the metering needle position 81 Air cleaner 81 Exhaust system 83 Basic carburetor malfunctions and methods for eliminating them 86 Chapter 4. Transmission 88 Forward gear 88 Motor chain 89 Clutch 89 Clutch adjustment 92 Clutch malfunctions 92 Clutch repair 93 Clutch drive drum 93 Discs clutch 94 Clutch spring 94 Clutch release rods 95 Gearbox 96 Gearbox operation 99 Gear shift mechanism 101 Gearbox maintenance 102 Oil change 102 Gearbox disassembly 102 Gearbox repair 103 Gearbox assembly 10З Starting mechanism of the Ant scooter 106 Intermediate gear 107 Lubrication intermediate drive chains 109 Adjusting the tension of the intermediate drive chain 109 Main gear and differential 110 Maintenance of the final drive and differential 116 Disassembling the final drive and differential gearbox 116 Repairing the final drive and differential 116 Differential cups 116 Planetaries 118 Final drive axle gears 118 Differential assembly 118 Gearbox assembly main drive 118 Drive axle 120 Driven axle 120 Rear wheel drive 121 Repair of the cardan joint 124 Maintenance of the cardan drive 124 Chapter 5. Chassis 125 Frame 125 Front suspension 128 Spring-hydraulic shock absorber 132 Rear suspension 134 Maintenance of the front suspension 138 Maintenance of the rear , pendants 138 Brakes 138 Maintenance and repair of the brake system 143 Replacing brake linings 144 Wheels and tires 146 Chapter 6. Electrical equipment 148 Battery 150 Electrical circuit for powering the battery charge warning lamp (red) 152 Main types of battery malfunctions 153 Dynastarter 154 Dynastarter maintenance 157 Regulator relay 160 Checking the starter relay 164 Checking the reverse current relay 165 Procedure for checking the VSU-10 and D-104-20 diodes that regulate the reverse current in the relay-regulator 2903.3702 165 Checking the voltage regulator 166 Ignition system 168 Ignition coil 168 Breaker 169 Adjusting the gap in the breaker 170 Capacitor 170 High-voltage wire 171 Spark plug 171 Setting the ignition timing 172 Adjusting the ignition timing for scooters of the TGA and Ant family 172 Adjusting the ignition timing for scooters of the Ant-2 family 173 Lighting and signaling devices 175. Headlight 175 Electrical power supply circuit for low and high beam lamps 175 Electrical power supply circuit for the brake light lamp 175 Horn 175 Tail light 176 Direction indicators, indicator breaker 176 Applications 178 Literature 186
BUY BOOK REPAIR MANUAL FOR SCOOTERS ANT + PARTS CATALOG
Source
Engine
The Ant engine is somewhat different from Soviet engines of that time. The most significant difference is in the starting system: here it can be done using an electric starter (this was very cool in the 50s) or using a manual kickstarter. There was no trace of an electric starter on any Soviet motorcycle of those years.
The engine is started with the starter just like a regular car: insert the key into the ignition, turn the key all the way to the right and the engine starts.
The second difference is the forced cooling of the engine
The fan drives air through the casings, cooling the cylinder and cylinder head. The cooling system works tolerably
Mechanical clutch with cable drive from a lever on the steering wheel
The gearbox is manual, the shift lever is located on the left directly under the driver’s foot. The switching algorithm is as follows: first, second, third and fourth gears are switched up. Neutral gear is at the very beginning and to engage it you need to push the gear lever down. Controversial decision, but that's how it's done here
Twin-shaft gearbox with constant gear meshing
The engine is as simple as a broom