ShinDoctor > Blog > The best ways to weld motorcycle frames that you need to know
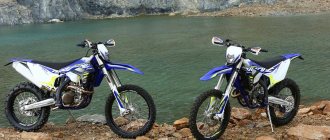
What is the best way to weld motorcycle frames? There are several different processes that can be used to weld frames most efficiently. These processes are called gas metal arc welding (GMAW) and gas tungsten arc welding (GTAW). These welding methods are excellent for connecting the tubes that make up the motorcycle frame, and we use them in our service (city of Dolgoprudny).
While GMA and GTA are considered two of the best options for motorcycle frames, several different methods can be used depending on the needs of the project. The key is to make sure you have the proper equipment, work space, and safety gear before making any changes to your shredder.
#1 - MIG Welding (GMA)
MIG welding goes by several names, such as argon metal arc welding (GMAW), although MIG stands for metal inert gas and is its more common name.
The attractive aspect of this welding process for DIYers is that it is one of the simplest forms of welding that can be performed successfully by beginners.
This is a very fast process that involves gas shielding a specific type of filler metal. The gas protects the filler metal from corrosion and harmful elements of nature. This indicates that GMA is not the best type of welding outdoors. However, since you will most likely be working on your bike in the garage, this shouldn't be a problem.
After selecting a job site and preparing all the frame elements to be welded together, the following breakdown provides a brief explanation of how the GMA welding process works to join motorcycle frame tubes:
- The welding machine has a spool of consumable wire that is fed through the welding torch rod.
- The welding torch creates an arc or heated flash that melts the fed wire at the tip of the tube.
When injected into the base metal, the filler metal, or molten wire as it is called, helps connect the various elements of the motorcycle frame. As the wire passes through the hole, the welder can control the speed and create smooth, straight welds along the bike frame.
Due to their versatility and simplicity of the process, GMA welding machines are among the most popular and easiest to sell on the market; we work with them in our workshop on Dmitrovskoe Highway. Additionally, GMA is well suited for connecting your motorcycle's frame tubes, regardless of the thickness of the metal you'll be working with.
Motorcycles Ural and Dnepr
- Ridik @ IKOV+DNEPR=HELP.
- person @ IKOV+DNEPR=P .
- Pilon (Tomsk) @ I can’t leave.
Sections
- Old forum Engine
- Carburetors
- For beginners
- Are common
- Talkers
- Transmission
- Chemistry
- Chassis
- Electrics
New on the Forum
- New logo / Forum is 11 years old
- one of the cylinders on the Dnieper works intermittently
- My Dnepr-11 (standard)
- Sale of cast spare parts for boxers.
- Dnepr MT10-36. He's Malysh, he's Double, he's Danilych!
No. 2 - TIG Welding (GTAW)
TIG stands for Tungsten Argon Arc Welding (GTAW). The main appeal of the GTA welding process for motorcycle frames is that it is extremely clean as no filler metal is used and does not leave unsightly spatter or bonding lumps at the weld site.
This leaves your finished motorcycle with a smooth frame, no matter how many welds were required to connect the tubes.
Like GMA welding, GTAW is best done in a garage (GMA). Since this is one of the few welding processes that does not require a filler metal, it is necessary to use gas to facilitate welding of the seams. Therefore, protecting the weld requires an external reservoir to maintain gas flow during the GTAW welding process, so this gas must be kept inside and away from the elements.
The downside to GTA welding is that it is one of the more difficult welding processes because welding without filler metal is not as intuitive and requires more practice to get it right. Thus, it will be more difficult, but we are ready to help (non-cash payment is available).
Frame from scratch
Summer is coming to an end and it’s time to start new projects. Many people here ask how to make a frame from scratch? So I decided to write a short article on this matter. In principle, there are different ways to do this, I will describe the method that I use and so far, it has not let me down.
Summer is coming to an end and it’s time to start new projects. Many people here ask how to make a frame from scratch? So I decided to write a short article on this matter. In principle, there are different ways to do this, I will describe the method that I use and so far, it has not let me down.
I usually start by selecting units for a future project. By components I mean - (front fork, wheels, tank, engine, gearbox, shock absorbers) After that, I take measurements of all these devices and draw them to scale on drawing paper. Of course, you can do this in different programs, like Pavel Obozov from https://www.brayvo.ru, but I’m still not good at modeling it, since he and I do everything on graph paper. In principle, when starting to make any boxer, you can take the engine drawing from any book about these motorcycles as the basis for the layouts. Such a book is taken and a drawing is copied from it (so as not to spoil the book), after which this copy is pasted onto whatman paper and cut out along the contour, preferably with maximum accuracy. Now you can start calculating the scale. Since in books the engine drawing is given without distortion (checked), we can safely measure a couple of parts on the engine and on the drawing, after which, to obtain a scale, we divide the dimensions taken from the original by the dimensions of the drawing. We get a number that is scaled (1:5). Of course, there will be errors, but they will be very insignificant, no more than 5-10 mm. In our case, this is not such an error that we should pay attention to it. It would also be nice, if you are making a frame for yourself, to make a model of yourself, also to scale. This helps a lot with frame layout and for the best fit. So, now we have something to start from, that is, an engine, there is a scale, and there is someone who will drive it all (also on a scale). Next, we measure all the extracted parts and calculate their sizes on a scale. Now you can start drawing the frame. First you need to make a side view of it. This will make it much easier to work with, and you will immediately understand what to put where and what it will look like. After the side view is constructed, you can draw the bottom view, top view, front and rear views. I don’t do this, because for me, in the process of drawing a side view, all the other views in the sketches are formed and this is enough for me, especially during the welding work, since something new will definitely come up.
Now I want to talk a little about the materials (pipes) from which to make the frame. Many people are looking for solidly drawn pipes, but as practice shows, this is not at all necessary, since foreign car manufacturers make them from seamed pipes (tested by cutting imported frames). I use pipes of the DIN 2440 brand, here they can be found in Russia - https://www.metaltorg.ru (this is not an advertisement) For the frame I use pipes of two diameters - 33.7 mm, wall 3.2 mm and 26.9 mm, wall 2.6 mm. You can also use corners of the same brand; they are very convenient for making sharp 90-degree turns without racking your brains about how and where to bend the pipe so beautifully. Smoother bends are made using a simple pipe bender. I would also like to note that in load-bearing areas it is necessary to make inserts at the joints of the pipes and leave a gap of 3-4 mm between the pipes for the welding seam. It is better to bend pipes according to templates made in full size from cardboard or plywood. Now that the pipes have been purchased and bent, you can proceed to assembling the frame on the slipway. The construction of the slipway was laid out on the opposite side and if anyone is too lazy to look, here it is - https://www.oppozit.ru/modules.php?name=News&file=article&sid=1040
Of course, before assembly you need to stock up on all the parts you want to have on the frame. Namely, the steering column, all kinds of brackets, and so on. Of course, it is better to weld the frame using a semi-automatic machine, but if someone does not have access to such a unit, then it is possible to use electric arc welding. Cooking with gas is not a very good option, unless of course it is argon.
How to weld a car frame or.
This article will not be of interest to owners of passenger cars, it’s a completely different story, but owners of trucks, dump trucks, and truck cranes will find this quite useful. Everyone knows that it is supposedly impossible to weld a frame. But if these “talkative experts” had seen how much we had digested in our time, they would have changed their minds or mumbled something incomprehensible. Although in some ways they may be right, because the frame is a non-welded structure and if it breaks they say that it needs to be replaced. But who would agree to lose profit and time, because there are no spare frames lying around on the road and hardly anyone has any in stock.
In my practice, this most often happened with KrAZ trucks and it was not necessary that they were old. It’s just that in the days of self-financing and “ton-kilometers” everyone wanted to earn money, and they had to build, materials were required, and the roads were mostly winter roads. Not everyone knows what it is. So the painters put containers in the back of the car to carry diesel fuel, and they also carried road slabs, and the especially zealous ones took a double load and were with us after the flight. the frame is cracked. Most often, frames broke in the area of the second pair of wheels, approximately the center of the car; this is the weakest point for fracture. Of course, the frames of other cars also broke, but less often. Equally, only the Kirov trawls, mainly the ganders, broke. Well, they've already broken it, now we need to repair it.
First, you need to free up as much space as possible where the welding will take place. Roll out the wheel, if necessary, remove all tubes and anything that may interfere with a full repair. If the frame has fallen apart, then it’s more difficult, because you have to put everything back in place, and so that the car doesn’t go sideways. These are all precautions and necessary. Now, actually, preparation for welding.
MOTORCYCLE PHYSIOLOGY: METAL FRAMEWORK
Like toys on a Christmas tree, all the components and assemblies of a motorcycle are strung on a single base - the frame. The load-bearing function is the main one, but not the only one. The frame sets the geometric characteristics of the motorcycle, ensuring parallel movement of the wheels (not only statically, but also dynamically, due to its rigidity, resisting attempts to lead the wheels “astray”), setting the angle of the steering column (a parameter that directly affects handling - see "Moto", 2002, No. 3, p. 42). Since the design of the frame determines the layout of the machine, it directly affects the location of the center of gravity and center of mass.
It is clear that such an important component appeared simultaneously with the birth of the motorcycle. In fact, even earlier, since the bicycle served as the model for the chassis of the first motorcycle crews. An unexpected exception is the very first motorcycle in the world with an internal combustion engine - Gottlieb Daimler's Reitwagen, built in 1885. Even his contemporaries were shocked by the extremely archaic design of the wooden (!) chassis, copied not even from bicycles, but from their ancestors - scooter runners of the early 19th century. The current engineer is shocked by something else. The configuration of this frame is the same as that of modern sportbikes: two powerful elements running diagonally from the steering column to the rear wheel and covering all the most important components of the motorcycle.
But this is only an exception, and it is caused by the fact that Herr Daimler was not at all interested in the development of bicycle technology. The overwhelming majority of motorcycle creators of the late 19th and early 20th centuries quite adequately accepted both the bicycle frame design and the method of its manufacture (not by the usual electric welding, but by soldering). What attracted them? Firstly, proven production technology. Secondly, this classic design, formed by two tubular triangles, successfully combines low mass with high rigidity (flexural, but not torsional).
Tuning (Customizing) of motorcycle frames.
Geometry of a motorcycle (chopper) frame.
First, a little theory and a little history. Not so long ago, only in the eightieth year of the twentieth century, none of the chop builders of those years had deep scientific knowledge about the geometry of the front part of the motorcycle frame and the so-called Trail and its effect on handling. Surprisingly!, but all the customizers did everything by eye, and naturally, that’s why some long-fork motorcycles handled poorly, others very poorly. Let us note that the laws of that time, especially European ones, allowed no more than a 35-degree fork angle, but you understand that for radical chopper customizers this was catastrophically small and they did not care about the legislation.
But here’s the catch - raising the steering column to lengthen the fork higher and higher is also not an option, the silhouette of such devices became more and more cartoonish and there was no question of any functionality. In addition, there was a danger of getting stuck under bridges, and the motorcycle was in danger of spending the night on the street, since choppers did not fit through the garage doors. (just kidding).
At that time, in an interesting and mysterious country called the Kingdom of Sweden, there lived a Swedish citizen, Tolle Denis, who was passionate about radical handsome choppers. He was the first to think about the influence of the trail on handling and, acting thoroughly, began experimenting with various combinations of fork and steering column angles, theoretically calculating some, testing others in practice, and finally settled on the formula : 43 - steering column tilt + 7.21 degrees yoke angle = 50.21 degrees total fork rake. But this is the so-called ideal, “honed” by Tolle, which is common for choppers of the Swedish school of customization.
American customizers have more extensive data, and if you want to build a chopper with a beautiful silhouette, but at the same time maintain normal handling, then do not go beyond the trail from 2 to 7 inches or 5 to 17.8 centimeters, according to our standard.
Now it’s time to explain what a Trail (trail) is - this is the distance between the points of intersection with the ground level of two imaginary lines, one of which is a continuation of the longitudinal axis of the steering column, and the other is a vertical drawn through the axis of the front wheel, perpendicular to the surface of the earth. When the Trail is too small it’s bad, and when it’s too big it’s not good either.
The motorcycle either behaves poorly at low speeds, or “wobbles” at high speeds. And when the rake (steering column angle) is more than 40 degrees, then the trail must definitely be reduced, which in turn is also fraught, because a negative trail also does not have the best effect on handling.
Why did Tolla need all this? Yes, the holy goal is to prove the ignorant lawyers wrong and convince them that the handling of a motorcycle is influenced not by individual steering column angles or fork angles, but by the entire front geometry of the motorcycle as a whole.
The persistent man got the authorities so fed up that in 1982, the Swedish Road Transport Institute (VTI) conducted a series of comparative tests of the handling of a chopper made by Tolle from an old BSA and a BMW motorcycle, which was in service with the local police. In the end, the result shocked everyone! : a chopper equipped with sheer lawlessness instead of a fork (a long telescope) showed better results than a production BMW.
And what is most surprising in this story: government experts recognized that the handling of a motorcycle is affected not by the angle of the fork, but by the Trail, and on this basis, the restriction on the rake was removed from the legislation! Finally, the green light was given to choppers and their manufacturers to install forks of any length. And our hero Tolle, don’t be a fool, quickly founded the company Tolle Scandinavian Motorcycles AB, which to this day is the most authoritative manufacturer of chopper corner traverses and Swedish forks assemblies.
Rake.
Rake is the angle of the steering column and is measured like any angle in degrees. May be the same or may differ markedly from the front fork angle. In the second case, the value of the fork angle increases due to the so-called extra rake or angle made (for the fork legs) in the traverses - the so-called traverse rake.
The ratio of rake and extra rake affects an important indicator from the point of view of motorcycle handling - Trail. The trail can be changed not only by changing the angle set in the holes for the fork legs (in the traverses), but also by changing the distance D (see photo), by making traverses with a larger or smaller D-distance.
In general, a change in the trail of a few millimeters is difficult to feel in handling, but a change in the rake is noticeably noticeable. The larger the angle, the larger the turning radius and the greater the tendency of the motorcycle to stall at low speeds and the greater the stability at high speeds, and, accordingly, the less maneuverability of the device, but such choppers have a beautiful silhouette, so beloved by the American and Scandinavian school of customization. They are more suitable for long straight sections of American roads (highways).
With a small angle of inclination of the steering column, on the contrary, controllability at low speeds is better and the maneuverability of the motorcycle is better, the turning radius is smaller, but stability at high speed is slightly worse. These devices are more suitable for hectic city trips. (beavers). Which rake to choose is up to you, think about where you will drive most, in narrow city streets or on straight intercity routes. Well, what is most important for many is which chopper silhouette do you like best, because the beauty of a motorcycle, just like the beauty of the woman you love, overshadows all its and her shortcomings. Good luck.
Refinement of the frame of domestic heavy motorcycles.
If you want to ride for a long time and without problems on a Ural or Dnepr motorcycle (without a sidecar), and at the same time enjoy normal handling, then the frame of these motorcycles should be modified at least to the minimum, which I will describe (I wrote about different types of motorcycle frames here) .
First, check the alignment of the steering column and the down pipes of the frame for parallelism (when viewed from the front), then for perpendicularity (at an angle of 90 degrees) with respect to the surface of the slipway or slab (the same when viewed from the front).
Traverse template.
When a steering column device is attached to the cones (see the article on the slipway here), irregularities are usually immediately detected; those who do not have a device can check it with a laser pointer. If irregularities are found, then we heat the pipes around the steering column with a gas cutter and insert a crowbar into the steering column and fix the jamb.
If the irregularities are too large, then you will have to cut off the column at the seams and re-fasten it to the slipway and weld it in a new way, heating and first leveling the down pipes or the tank pipe (depending on the irregularities)
The frame may be damaged from many years of dragging a loaded stroller, and some examples come across crooked from our “high-tech” factories. Therefore this check is necessary. It is also necessary, using a height gauge (see tools), to check for uniformity and alignment of the pendulum mounting points, before doing this, throwing away the rubber silent blocks - the so-called pendulum. You will never see normal handling with them. In their place, it is necessary to grind bronze bushings (see drawing), press them into the frame and secure them from turning with grease cans screwed into the mounting points of the pendulum (by cutting the thread accordingly)
Next, you need to get rid of some more pseudo-bicycle-type bearings, which are located in the steering column cups. Factory bearings are only applicable on a bicycle, and with the 220 kilogram weight of a boxer motorcycle, the bearing balls take on a triangular or square shape after a couple of months of use. For a long time now, all foreign motorcycles have had powerful tapered roller bearings for the steering column.
Bearings of this type are suitable for both vertical and horizontal loads. To properly install such bearings, you need to cut off the factory cups from the frame and grind new ones to fit the outer diameter of the tapered bearing and its height (I wrote more about this in a separate article here). I advise you to take bearings a number larger (more powerful) than those found in standard wheels of the Urals or Dnieper. I advise you to read this useful article on how to choose the right bearings, as well as how to learn to understand bearing markings.
The cup is sharpened in such a way that it then becomes very tightly packed (pressed with tension) into the steering column pipe. This will allow you to subsequently weld it to the steering column (remove the chamfer on the steering column with a grinder for the weld) evenly without distortions, even if you cut the old factory cup (both cups) crookedly.
A more powerful bearing usually has a slightly larger inner diameter of the inner race, so it will be necessary to machine a thicker rod (to fit the inner diameter of the bearing inner race) and press it into the lower crossmember (I made and chromed new crossmembers).
Tapered bearings are inserted above homemade traverses and covered with stainless steel cups.
After assembling all this equipment on new powerful bearings, it will be easy for you to turn a loaded motorcycle, holding the steering wheel with one hand and the throttle handle with two fingers (tested in practice).
It remains to make a third modification to the frame - useful for those who want to ride very far and at the same time not experience discomfort from vibration fatigue that is annoying on a long road. In addition, after this modification, fasteners (bolts, nuts) will no longer be constantly unscrewed and the mirrors will always have a clear (not blurry) picture. To do this, you need to install rubber silent blocks from the VAZ 2108 chassis into the frame, and hang the engine on them (see photo).
You will need 4 silent blocks from the eight and a fifth silent block from the shock absorber of domestic motorcycles (mine is from Java), which is located under the tank (the upper motor mount is on two M 8 studs.) On the M8 studs of the motor you can attach the fork of the silent block (with a welded plate), cut off from shock absorber, and weld a bushing with the silent block itself onto the frame (extending it with a tube). Everything is done locally, so there is no point in giving exact dimensions.
The main thing is to maintain the alignment of the engine mount, although during production at the factory the engine is slightly offset from the central axis. As you can see in the photo, I reinforced the welding places for the bushings of the eight silent blocks with powerful gussets made of 10 mm steel so that the frame does not lose its rigidity. After the modification, you feel a special pleasure when the boxer engine is running at minimum idle speed and behaves as if alive, swaying slightly from side to side, waving the cylinders (like a car engine mounted on rubber mounts).
Pendulum . The pendulum, as I already said, is suspended on two bronze bushings, and we insert pre-lubricants. When lubricated with a syringe once a season through these oil nipples, the unit practically does not wear out. In addition, grease fittings secure the bushings from turning in the body.
The silent block bushing in the frame is reinforced with two gussets made of 8 mm steel.
In the drawing (see photo) the internal diameter for the fingers of the pendulum is the size for the fingers of my pendulum and often the diameter of the fingers on the pendulum is different for everyone. Therefore, I advise you to first polish the fingers on your pendulum to a mirror shine (you can’t look at the factory quality of the fingers without tears), and then accurately measure their diameter with a micrometer, and order bushings with an internal diameter that is 0.03 - 0.04 mm larger than the diameter of the fingers.
If you are a fan of long-distance driving and like to listen to high-quality music with normal adult car sound, then I advise you to do what I did with my pendulum. I lengthened the Dnieper pendulum (the same applies to the Urals) by 16 centimeters and thanks to this I increased the base of the motorcycle, it is the same as on the Goldwing - 1700 mm.
61 amp battery (will fit 65 amps) on my Dnepr motorcycle
This made it possible to increase the stability of the motorcycle at high speeds - the device flies after hundreds with the confidence of a steam locomotive, and when braking sharply with the rear brake, it does not turn around, as was previously the case with a short pendulum. But the point is not only this, thanks to the lengthening of the pendulum, it became possible to move the rear wheel with the fender back by 16 cm and, as a result, increase the size of the saddle, and install a 65 amp battery under it (see photo).
Now you can install a high-quality amplifier for full-fledged music, as well as a starter, and also enjoy a soft saddle on long trips.
drawing of bronze bushings for the Dnieper pendulum
To effectively lengthen the pendulum, it is necessary to cut it strictly in the middle (both pipes) and cut off two oval pipes from the donor pendulum, 16 cm long. Next, we press oval inserts made from steel rod into the pipes to a depth of approximately 50 mm (into each pipe) All that remains is to assemble it all on a flat plate using clamps and boil it thoroughly.
The Dnepr pendulum, unlike the Uralovsky one, has a cone shape and, when lengthened, also expands, which allows, after lengthening, to shift the rear axle and cardan to the right by 28 mm and install a rear wheel with a 150 mm wide tire.
In addition, the shock absorbers take a beautiful angle of inclination and become softer, and the center of gravity of the motorcycle is lowered (since the pendulum goes slightly upward), and thanks to this, the center of gravity is lowered and the seat is lowered closer to the surface of the ground, which is very convenient when landing and stopping. When you sit on a motorcycle, we place our feet on the ground with the entire surface of the foot and in a semi-bent, relaxed state.
After working with the pendulum, you will need to order an extended driveshaft from the turner; it is difficult to find high-quality steel for this, so I used the axle shaft from a Lada as a blank.
The steel is high-quality and designed for torsion; the cardan made of this steel had to be sharpened with a diamond cutter, but it has been serving for the tenth year without any complaints. All spline sizes and diameters are the same as on the original part, only the length is 160 mm longer. I advise you to read about expanding the frame to install a wider wheel here.
Below you can clearly see my Dnepr motorcycle in the video, and anyone can read about its improvement here. I hope this article about frame geometry and remaking domestic frames will be useful to beginning customizers, good luck to everyone!
If this article is useful to you, please share it on social media. networks by clicking the buttons below. Thank you.
RќСЂР°РІРёС‚СЃСЏ
Transmission
All-wheel drive is not mandatory, but in conditions of constant snow drifts or deep mud it is very desirable. It is convenient to leave the gearbox that was equipped with the selected engine, but you have to make the transfer case for the 4x4 drive yourself, since the car unit will be too important and large. As transmission shafts (to each wheel or between units), you can use standard automobile CV joints with covers. Experienced turners and welders can reduce the length of shafts without disturbing alignment.
Even if you need a vehicle exclusively for off-road use, it should have body kit elements, at least to protect it from dirt and water flying from the wheels.