Starting system
The 634 model had its own feature - a float quencher.
It served to start the engine in the cold season. The Java 638 does not have such a system, but there is an additional carburetor to start the engine. It is located inside the main one. When starting a cold engine, it makes the fuel mixture more saturated. For it to start its work, a special toggle switch is turned on. After warming up it is turned off. This system only works well when the throttle is lowered, otherwise the starting carburetor will not perform its function. It is important to keep the jet clean. Its close location and pressed fit in the float chamber ensures injection into the diffuser hole
The amount of emulsion supplied depends on the location.
It is important not to forget that adjusting the YAVA 638 carburetor greatly affects the fuel supply and thereby creates the correct air-fuel mixture. In cases where a lack of power is noticeable or popping noises are heard in the exhaust system, it is necessary to adjust the needle valve that injects fuel into the combustion chamber
Rework and repair
A significant drawback of the Ikov 2829CE carburetor is poor starting of the motorcycle in cold weather due to the imperfect design of the enricher. Difficult starting is noted not only by the owners of 638 models, but also by the owners of some Kovrov motorcycles on which such carburetors were installed from the factory. The thing is that fuel is taken to enrich the mixture from a separate channel in the float chamber, to which it is connected by a nozzle.
Also, a ventilation duct located on the side of the carburetor is used to draw air to the enricher. The cross-section of this channel is so large that the vacuum in the enricher is not enough to suck fuel through the nozzle. As a result, it is not the enriched mixture that enters the channel behind the throttle, but gasoline vapor mixed with cold air, which of course does not contribute to successful engine starting.
In this case, the vacuum will be sufficient to suck the required amount of fuel from the chamber. You don't have to worry about chamber ventilation, because... On the other side of the carburetor there is the same channel.
Another alternative solution to this problem is to install a float suppressor, as on old carburetors (more details in the photo).
Army and weapons
How do you tune your Jikov carburetors?
The question is most likely for Java developers, I’ll try to explain the essence. I’ve been driving similar ones for several years, the longest on one that burned out, and now I bought a pair of the same ones in appearance, but apparently there are differences. The first one had jets 68 and 92, it has excellent dynamics at high speeds and low consumption, I also noticed that one of the channels from the factory was plugged, on all the others there was a tube in this channel. I tried using these jets on other carburetors, it seemed similar, but something was wrong. All of them have one thing in common - if you set the idle speed, you have to supply a rich mixture so that the low speeds stabilize, then the top floods.
In general, as I understand it, there are several models, including those installed at sunrise with a smaller cubic capacity. But it’s impossible to find normal information on the Internet. I have the motorcycle itself with modified purge, the factory defects of the Jupiter have been eliminated, the cylinders work smoothly, if you feed a rich mixture it holds smoothly even at 900 rpm. How about it, can you share your experience?
Jupiter 5 is one of the most successful creations of Soviet motorcycle production. Today, like 30 years ago, the device is often found on the streets of both remote outbacks and large cities, and, in most cases, the owner prefers to handle its maintenance independently.
The carburetor, being one of the most important components of any motor vehicle, is subject to intensive use and increased wear. Considering the great age of some models, replacing this module very often becomes an inevitable condition for extending the life of the unit.
The motorcycle is equipped with Izhevsk carburetors K-62D, K-65D, K-68D , or the Czechoslovak model Jikov-2928SE . There are few differences between the first two options: the design of the top cover; enrichment jet diameter; needle fastening (K-65D comes with a nozzle). The K-68D differs from its predecessor:
- Enlarged diffuser.
- A round (not square, like the K-65) damper.
- Lateral (more convenient for optimization) location of the idle screw.
- Threaded (for quick needle adjustment) top cover.
Setting the fuel level in the float chamber of the carburetor Java 638 2928ce
Theory (Java 638 2928CE carburetor adjustment): The float mechanism consists of a double plastic float, a float chamber and a needle valve. In order to correctly adjust the fuel level in the float chamber, the carburetor is disconnected from the engine and the bottom cover is removed from the carb. The level must be set at a distance of 11 mm from the plane of the connector between the carburetor body itself and the plastic float chamber.
Solution (Java 638 2928CE carburetor adjustment): place the body with floats on the edge of a half-liter glass jar and connect it to the fuel tank with a thin hose.
Open the tank tap and wait for the fuel level to settle. Considering that the height of the collar at the bottom of the body is 2 mm, it should be 9 mm from the top edge of the can.
If the level does not work out this way, then you need to bend the tongue between the floats until the level is 9 mm from the edges of the can
Carburetor idle adjustment Java 638 2928ce
First, using the spool stop, we set the minimum stable speed (screw_1) (for a run-in engine this is 600-1000 rpm). Then, by rotating the quality screw (screw_2), we look for the position at which the speed will be maximum. This is done slowly. Each time the screw must be turned no more than 1/4 turn and wait a while until the rotation speed stabilizes. Of course, we determine the speed using the standard tachometer. Keep in mind that unscrewing the quality screw (screw_2) more than two turns is ineffective; with further unscrewing, there will be practically no depletion. After the position of the highest speed is found, lower the spool slightly until the speed drops to the previously set one. Then you can try to increase the speed with the quality screw, that is, clarify the position of the quality screw. Adjustment of the Java carburetor is carried out only on a warm engine.
Adjusting the mixture quality of the carburetor Java 638 2928ce
The composition of the mixture at full and medium lift of the spool can be influenced in two ways - by changing the size of the main jet or the position of the needle. Moreover, the size of the nozzle has a greater impact on the composition of the mixture when the diffuser is fully open (raising the spool), and the position of the needle affects mainly at medium. Since when the spool is not fully raised, maximum power from the engine is not required, but efficiency is important, it is necessary that the mixture be lean. But excessive leaning will cause a “failure” in the engine’s operation at partial throttle opening modes. Therefore, it is necessary to choose a needle position such that the mixture is lean, and the engine operation remains stable in all modes, without “failures”. Lowering the needle (moving its latch upward) causes depletion, and raising it causes enrichment. Usually, after running in, the needle is lowered, moving the latch up one notch
However, it will be better if, when adjusting the carburetor in Java, moving the needle, you pay attention to the operation of the engine before and after the change, try different positions of the needle. It is advisable to make a selection, since this affects both the quality of engine operation and the overall fuel consumption of the motorcycle
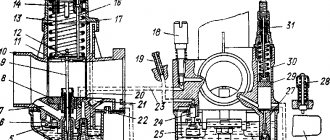
Designations in the figure: 1 cylindrical spool; 2 needle valve; 3 idle jet; 4 additional system jets; 5 main jet; 6 spool needle; 7 needle guard.
The Java-638-5 carburetors have a main jet of size 90, and on the Java-638-0 it is increased to size 92.
JAVA-638-5 produced in 1984 - 1985, the starting nozzle was size 72, i.e. diameter 0.72 mm. In the new carburetor, the size of the starting jet was increased to 85 mm. There were practically no problems with launching the YaBE-638-0 at temperatures down to -10° C.
- Main jet – 92
- Additional system jet – 72
- Air the jet will be supplemented, systems – 120
- Economizer jet – 50
- Starting jet – 85
- Idle jet - 40
- Idle output jet – 80
1 – spool assembly; 2 – needle valve assembly (Ø2 mm); 3 – idle jet (40); 4 – additional system jet (72); 5 – main jet (92); 6 – spool needle; 7 – needle lock.
When the diffuser is fully opened, maximum power is needed, so the mixture must be enriched.
Motorcyclists who demand power can, in addition to the basic adjustment of the JAVA 638 2928CE carburetor, do an additional adjustment - selecting the main jet.
note
It is usually made from a standard one, increasing the cross-section using a homemade triangular reamer from an ordinary sewing needle treated with emery. It is best to flush the carburetor with clean gasoline. The jets can be cleaned using a pointed match or a soft copper wire.
Do-it-yourself carburetor adjustment
That is why the procedure for adjusting such a unit is quite in demand for motorists. A dilemma often arises: should you adjust the carburetor yourself or entrust this procedure to specialists?
Carburetor device. Before you perform any actions with the carburetor, you need to study its structure. Internal combustion engines do not operate on pure fuel, but on a mixture of fuel and air. The main task of the carburetor is to prepare this very mixture. Subsequently, it will be sent to the power plant, where it will burn and have an effect.
The simplest versions of carburetors consist of two sections: mixing and float. The float chamber serves as a place for the following actions:
- From the reserve, fuel is sent to the float chamber using a gasoline pump, passing through a filter along the way;
- The float moves upward, fixing the needle in one position and stopping the fuel supply using the needle valve;
- After a certain level of fuel has been consumed and its quantity reduced, the valve will open again to allow a new portion of it to enter;
- This process is repeated in a cycle.
At the top of the chamber there is a balancing hole, with the help of which the optimal level of fuel pressure is maintained.
Both chambers - float and mixing - are connected to each other by a special pipeline. The task of the mixing unit is to create a working mixture, which will then be delivered to the engine cylinders.
Basic carburetor malfunctions. There are a number of problems that, if detected, require immediate adjustment of the carburetor:
- Detection of fuel leaks. If fuel is leaking, one of the most likely causes is a defect in the float reservoir or a sudden increase in pressure. If the pressure is normal, then you need to check the float assembly and replace it if necessary;
- Dirty spark plugs with the formation of carbon deposits with an unpleasant odor. This may indicate that excess fuel is being supplied. The cause most often is an incorrect position of the float or a burnt-out valve. Other possible causes of the problem could be improper float adjustment, excessive fuel pressure, or a malfunction in the float reservoir;
- Instability when idling.
Self-configuration. Before you start making adjustments, you need to warm it up well, since working on a cold device will not give a positive result. Next you will need to remove the gas pedal flap, ventilation tube and make sure there is no vacuum.
Next, you need to find the screws responsible for adjusting the mixture composition and start tightening them clockwise. This should be done until a strange and unstable roar from the motor appears, after which you should stop tightening and turn the screw back one turn. Make sure the unit operates smoothly.
This action must be repeated with all screws until the problem is resolved.
Conclusion. Adjusting the carburetor is a rather delicate and difficult process. In order to completely solve problems with setting up the power plant, it may take more than one week. Therefore, it is necessary to pay attention to the operation of the power plant and respond even to minor malfunctions in it.
What did they put on the motorcycles from the factory?
A distinctive feature of all Czechoslovak carburetors is the cylindrical shape of the throttle valve. It is driven by a mechanical cable drive, which determines their belonging to slide carburetors.
There are numerical and alphabetic indices on the case, which are deciphered as follows:
- the first two digits (29) – carburetor with throttle valve (with variable vacuum);
- 26 (24.28) – diffuser diameter;
- SD - carburetor with a starting device and a main fuel jet located under the nozzle;
- SBD – carburetor without starting enrichment. The main fuel jet is located under the nozzle.
Communities › Kulibin Club › Blog › Attention, motorcyclists! Simple accelerator pump for K-68
Quite a long time ago I decided to install 4 K68 carburetors on my “six”. And all this time I was somewhat saddened by the lack of an accelerator pump on them, and, accordingly, by the failure when the throttle was sharply opened.
When searching on the Internet, only one implemented solution was found - an accelerator pump from a Zhiguli carburetor with a rather complex drive system.
I didn’t want to make such a system at all, so another, very simple solution was found
— to enrich the mixture when the gas suddenly opens, you need to increase the pressure in the float chamber at this moment. On the K-68 this turned out to be very easy to do - you just need to connect the space above the throttle valve with the float chamber. The cylindrical throttle moves tightly in the throttle well and will act as a piston forcing air into the float chamber. And so that when lowering the throttle, a vacuum is not created in the float chamber, you need to add a valve to this entire system that will let air into the space above the throttle when it is lowered.
Such a system is suitable for any carburetor with a cylindrical throttle, for example, a Java Jikov or a moped carburetor.
Now let's talk about how to do this in practice:
In order not to make unnecessary holes, we will blow into the float chamber through the ventilation channel of the float chamber.
The resistance of all channels should be minimal in order to ensure the most rapid increase in pressure in the float chamber, so we pull the fitting out of the channel and drill out the channel to 5mm.
We replace the old fitting with a new one, with a diameter of about the same 5mm.
To make a new fitting, you can take a tube of a suitable diameter from a telescopic antenna. I didn’t have an antenna, so I took a tube from the choke drive rod of the Zhiguli carburetor.
We cut the same fitting into the throttle well cover. The thread on the cap is single start, so every time you screw the cap on it will turn back to where you originally made it.
If the carburetors are new, it is possible that when the cap is screwed on, the sealing ring will be squeezed out. In advance, before cutting into the fitting,
we cut the cap, because the trimmed cap will twist to a different angle, and the fitting will not be where it is needed.
It should not stick out inside the lid, because... This is where the throttle comes out when fully opened, so before gluing it you need to trim it, something like in the photo:
I glued both fittings with thick epoxy glue, something like “cold welding”.
For such a system, a check valve is needed that would create as little resistance as possible. The greater the resistance, the more noticeable the dip will be when closing the damper. Finding such a valve is quite difficult, so we will remake valve 2108-1156010 to our requirements, like this:
Let's disassemble the valve. To do this, we saw off a plastic “donut” from it around the valve itself. It takes up too much space and prevents us from disassembling the valve. I sawed off with a jigsaw, lubricating the file a little with oil, because... This plastic cuts very poorly. If it is possible to use a lathe, it is better to do it with it.
Types of BSZ
— Single-channel (one Hall sensor, two-lobe modulator, one switch, one two-terminal ignition coil operating on two cylinders at once)
— Two-channel (two Hall sensors, one, or better yet two, modulator lobe, two switches, two ignition coils, one for each cylinder)
It is preferable to install a single-channel system, since it will be more stable, because here you won’t have to adjust each cylinder (which you have to do at KSZ); here, if the modulator is made correctly, then only one cylinder is adjusted
Also, in a single-channel one, fewer wires are used, its parts take up less space, and energy consumption is lower (which is very important for 6-volt generators). There are many people who like to “get confused” who install a two-channel one, shouting at the same time that this way they can configure it more accurately, etc.
I assure you that these are unnecessary hassles, and there will be no accuracy here (why is indicated above)
There are many people who like to “get confused” who install a two-channel one, shouting at the same time that this way they can configure it more accurately, etc. I assure you that these are unnecessary hassles, and there will be no accuracy here (why is indicated above)
Spark plug. I said above that spark plugs “live” longer, which begs the question “Why?”
Actually the answer is simple. If you decide to install a single-channel BSZ (or a two-channel one with a two-lobe modulator), then this is what will happen:
When igniting in one cylinder, in the other, a spark will also strike at BDC, since it strikes simultaneously on both spark plugs, that is, spark twice per revolution on each spark plug.
We install the ignition from the scooter to Java
First of all, we check whether our adapter plate is suitable, if so, then we attach it, install the rotor and stator. The latter should fit completely into the rotor; for convenience, we adjust the distance with washers. We install the sensor and make sure that everything rotates with a reserve and does not touch anything.
Now we need to modify the rotor. From the existing mark on the rotor, after 180 degrees we install a new mark. To maintain the accuracy of the procedure, it is best to use special devices that measure the angle of rotation; you can also use a lathe for this. We solder or weld the mark, obtaining 100% reliability of the unit.
ADJUSTING THE QUALITY OF THE MIXTURE OF THE CARBURETOR JAVA 638 2928CE
The composition of the mixture at full and medium lift of the spool can be influenced in two ways - by changing the size of the main jet or the position of the needle. Moreover, the size of the nozzle has a greater impact on the composition of the mixture when the diffuser is fully open (raising the spool), and the position of the needle affects mainly at medium. Since when the spool is not fully raised, maximum power from the engine is not required, but efficiency is important, it is necessary that the mixture be lean. But excessive leaning will cause a “failure” in the engine’s operation at partial throttle opening modes. Therefore, it is necessary to choose a needle position such that the mixture is lean, and the engine operation remains stable in all modes, without “failures”. Lowering the needle (moving its latch upward) causes depletion, and raising it causes enrichment. Usually, after running in, the needle is lowered, moving the latch up one notch
However, it will be better if, when adjusting the carburetor in Java, moving the needle, you pay attention to the operation of the engine before and after the change, try different positions of the needle. It is advisable to make a selection, since this affects both the quality of engine operation and the overall fuel consumption of the motorcycle
Designations in the figure: 1 cylindrical spool; 2 needle valve; 3 idle jet; 4 additional system jets; 5 main jet; 6 spool needle; 7 needle guard.
Czechoslovakian carburetor jikov adjustment
Work should be carried out strictly in a certain sequence, because many adjustments depend on the previous ones.
- Throttle valve drive of the second chamber
- Setting the initial state of the throttle valve of the second stage is performed with the following screw. I can’t imagine how to set the opening to 0.08 mm without a device, so if possible, it’s better not to touch it :). I set it to the light - as soon as a gap formed, I covered it a little.
The forced return of the second stage is weakened by bending the fork: Gap “1” (“Z”) is set to 0.4 mm, gap “2” (“Y”) - 0.8 mm.
- Pre-tension of the 2nd stage rod It seems like it’s written in the primer, it’s not adjustable, only replacing the vacuum, but in theory it should be adjusted by screwing in or unscrewing the ball joint, but for some reason it turns for me :(. Try it, I don’t know.
- Checking the choke gap and Pulldown trigger
- Set the adjusting screw to the highest step of the step pulley, disconnect the upper (“B”) connection from the starter
Create a vacuum with your mouth - the Pulldown will begin to grunt, and the air damper will open slightly to the first stage (small gap “a”) (and how it is adjusted. It’s like rotating the lid, but you need to create a vacuum of exactly 110 mbar.)
- Plug the upper Pulldown pipe with your finger - the air damper will open slightly to the second stage (large gap “A”) Adjustable with a hex bolt (probably 2.5 or 3)
- Adjusting the Step Pulley Position
- To make subsequent adjustments, you can put a rubber band on the air damper drive lever to simulate the operation of a spring.
Install the screw on the highest step of the stepped pulley, close the upper Pulldown fitting with your finger, and create a vacuum in the lower one with your mouth. Open the throttle (“press” the gas) without stopping to create a vacuum. After releasing the throttle, the adjusting screw should be set to a position of 0 to 0.1 mm from the edge of the second highest step of the pulley (red dot in the photo)
- If necessary, make adjustments by bending the lever
- Adjusting the forced opening of the air damper
- The gap is controlled when the throttle valve is fully opened
If necessary, it can be adjusted by bending the lever in one direction or another (the closer the lever is to the throttle sector, the smaller the gap)
- Carburetor lubrication
- All dampers must move freely. Lubricate the air damper drive springs with silicone grease, the damper axles (1), the drive levers of the second chamber and the accelerator pump (2), the second chamber drive fork (3) and the springs (4) with graphite. Lubricate the ball joints a little with graphite, but not too much. , because it may interfere with latching
- Adjusting the accelerator pump
- Adjustment of the amount of fuel injected by the accelerator pump is adjusted after connecting the pipelines and filling the carburetor chamber by releasing the screw (1) and moving the lever
The design and jets of the carburetor Java 350 638 2928 CE
The Java-638-5 carburetors have a main jet of size 90, and on the Java-638-0 it is increased to size 92.
JAVA-638-5 produced in 1984 - 1985, the starting nozzle was size 72, i.e. diameter 0.72 mm. In the new carburetor, the size of the starting jet was increased to 85 mm. There were practically no problems with launching the YaBE-638-0 at temperatures down to -10° C.
The coolest Izh Customs
Custom Dirt Tracker Izh Planet 3
Style: Dirt Tracker. Basis: Izh Planet 3.
For this custom motorcycle, the frame and pendulum were redesigned, which allows the shock absorbers to be tilted. A slightly boiled gas tank and a generator from Minsk were installed. A complete overhaul of the engine was carried out, the wiring was simplified and the battery was completely removed, the central gearbox was polished, and the brakes were modified.
Homemade fenders, tail, exhaust, seat, racks, steering wheel, speedometer housing, air filter, turn signals, footrests and headlight mount were made especially for the custom.
The borrowed parts included a kick starter from an Izh K-16, a headlight from an old motorcycle made in the GDR, a fork from a Soviet motorcycle and a side stand from an Izh 56.
New ones were also installed: clutch, motor chain, Mikuni carburetor, soft ProGrip handles, carbon mud guards. The front wheel has 100x80x18 tires, and the rear wheel has 120x80x18 tires with a 20mm welded rim.
Sectional view of Java 350 carburetor
- Main jet – 92
- Additional system jet – 72
- Air the jet will be supplemented, systems – 120
- Economizer jet – 50
- Starting jet – 85
- Idle jet - 40
- Idle output jet – 80
1 – spool assembly; 2 – needle valve assembly (Ø2 mm); 3 – idle jet (40); 4 – additional system jet (72); 5 – main jet (92); 6 – spool needle; 7 – needle lock.
When the diffuser is fully opened, maximum power is needed, so the mixture must be enriched. Motorcyclists demanding power can, in addition to the basic adjustment of the JAVA 638 2928CE carburetor, do an additional adjustment - selecting the main jet. It is usually made from a standard one, increasing the cross-section using a homemade triangular reamer from an ordinary sewing needle treated with emery. It is best to flush the carburetor with clean gasoline. The jets can be cleaned using a pointed match or a soft copper wire.
How to install a carburetor
Before installing the carburetor on IZ Jupiter 5, make sure it is completely clean and all parts are present. First, remove the carburetor cover with the three-hole throttle body. The round hole located in the center is intended for placing and fixing the needle, the shaped one, located on the side of the cutout, is for attaching the cable coming from the throttle handle, the T-shaped one is for installing the screw rod. The new carburetor on the IZH Jupiter 5 has a limiter located in the cover, which is removed after the break-in period.
After fixing the carburetor to the engine, a cable is attached to the shaped hole of the throttle and the cover is tightened. The throttle is checked for the ability to fully open the diffuser and not jam in all positions of the throttle stick.
Next, the fuel line is connected to the fitting. The joints are checked for the slightest leak, after which the starting device is opened.
Apply a few light presses on the claw, then start the engine normally. After checking the functionality of the device and the uniformity of fuel distribution on a warm engine, the ignition can be turned off.
What will you need?
To install the ignition from a scooter in Java, we will need a specific conversion kit. First of all, there is the generator itself; there are two models to choose from. The simpler QMB-139 will perform all the necessary functions, but problems may arise with the light at night, since the winding for the head light is rather weak and will greatly depend on the speed. If this parameter is important to you, then choose a stator from the QMI-157 or 152QMI model - they will be sufficient to achieve your goals.
You will also need an ignition coil with two terminals, here again there is plenty to choose from. For our purposes, motor coils ZMZ-406 or from Oka are suitable.
You will need a 12 volt battery. We don't need a new one; any used motorcycle or new Chinese battery will do. Its role is to smooth out voltage drops in the turn signal and stop signal circuits.
Also, do not forget about the set of wires/terminals. It is better to take the latter from Japanese scooters.
The last item is the adapter plate. Alas, it cannot be found on sale, but kind people have prepared the exact drawings presented below, according to which you can assemble your own adapter plate or order it. The thickness of the metal is 4 mm, this is an important parameter, because if you make the plate larger or smaller, some elements of the system may not fit or work incorrectly.
Main dosing system
When the throttle rises to a height of five millimeters, the main dosing system is activated. Here a complete mixture is created for enhanced engine performance. However, before creating the mixture, the fuel passes through an annular channel. A small amount of air gets into it there. After entering the diffuser, the fuel is enriched with air from the main flow.
The quality of the mixture can be influenced by changing the angle of the injection needle or the size of the main hole. In this case, the hole plays the main role of enriching the mixture when the throttle is raised, while the needle only plays a role in the middle position. When the diffuser is fully open, maximum output must be achieved. This can be achieved with a higher quality of the combustible mixture. In this case, you can select the jet of the required size and install it. Usually the new jet is a standard one, in which the hole is enlarged.
Synchronizing carburetors on a motorcycle
Synchronizing motorcycle carburetors is a precise procedure, but not very difficult. To carry out this action you will need a synchronizer. This is a set of meters that check for sparsity. And the meter itself is a vacuum sensor with a valve that smoothes out the oscillations of the needle. Sets with two or four heads are used. A four-head device is best.
Synchronization procedure:
- The motorcycle warms up to the required temperature.
- The tank is removed, then the filter.
- Now you need to choose the places where to connect the device heads. What is the essence of synchronization? It is necessary to set the same rarefaction formed in the collector. Because through it the combustible mixture enters the inlet cylinders from the carburetor. Therefore, connection points must be selected in the collectors.
- The device connects to the found collection points. It happens that it is difficult to get to these points, and then the carburetors can be raised. To do this, they are pulled out of the pipes, and after connecting the device, they are seated in place.
- The motorcycle starts. The valves of all sensors need to be adjusted. It is necessary that they react to any changes in sparseness, but do not fluctuate much. The valve is released if the arrow does not respond to any changes.
- Three screws can be seen on the carburetor. It is with their help that synchronization is carried out. One of them, the first, is located between the first two carburetors. We synchronize them. To synchronize the second pair of carburetors, the third and fourth, a third screw is used. He is between them. The central screw synchronizes all carburetors with each other.
- The first pair of carburetors is synchronized.
- The second pair of carburetors is synchronized.
- All readings are now aligned using the center screw.
- After the synchronization is completed, we apply gas, sharply raise the speed and reset again. All readings are synchronous.
- If this is not the case, the procedure, starting from the seventh step, must be repeated.
You can change the oil or carry out the synchronization procedure yourself. But adjusting a motorcycle carburetor is the more difficult part of the repair. And if you don’t have the skills to do this kind of work, it’s best to turn to professionals.
How to Adjust the Carburetor on Izh Planet 5
Jupiter 5 is one of the most successful creations of Russian motorcycle production. Now, like 30 years ago, the device is often found on the streets of remote and large cities, and its owner, almost always, prefers to do without outside help.
Carburetor . Being one of the important components of at least some cars, it is susceptible to hard work and excessive wear. Given the high age of certain models, replacing this module very often becomes an inevitable condition for extending the life of the device.
The bicycle is equipped with Izhevsk carburetors K-62D, K-65D, K-68D , or the Czechoslovak model Jikov-2928CE . There are several differences between the first two options: the design of the top layer; enrichment nozzle diameter; needle mounts (K-65D comes with an attachment). The K-68D differs from its predecessor:
- Extended diffuser.
- Round (not square, like the K-65) valve.
- Lateral (easier to optimize) placement free screw
to move. - Threaded (for quick needle adjustment) top cover.
Econostat
The econostat is a system that enriches the mixture at a high throttle position. Its device is very simple. The essence of the work is to take fuel from the float chamber with a pipe. Through the channels, the fuel rises into the diffuser and is sprayed in front of the throttle. This helps air bypass the throttle when it opens low.
In conclusion, we note that after each work carried out, adjusting the YAVA 638 carburetor is very important, see the video about which at the end of the article. It is also necessary to carry out timely maintenance of the carburetor, the essence of which is to clean the main working elements. Washing should be done as often as possible, preferably with diesel fuel or gasoline. It is better to treat resinous areas with caustic substances, for example, acetone. Otherwise, the system will not cause you problems.
For Java 638, a new type of carburetor was created in order to increase engine power. The diffuser diameter was increased to 28 mm (previously 26); introduced additional systems and complications. The only element left from the previous carburetor is a cylindrical spool, which, in comparison with Soviet K-62 carburetors, ensures uniform and fine atomization of the mixture. The carburetor is attached to the engine through an insert ring made of gasoline- and oil-resistant rubber. By turning the carb 90 degrees, it is very easy to remove the cover, move the needle to a different position, clean the jets and float chamber. (See continuation)
Carburetor adjustment Izh Jupiter 5
Adjusting the IZ Jupiter 5 carburetor is the simplest, but at the same time the most important process. Whether it is K-62, K-65 or K-68, you must first warm up the engine to operating temperature, and then perform a sequential series of actions :
- Set low but fairly stable engine speeds by rotating the screw that adjusts the throttle position.
- By changing the position of the idle screw, set the engine to maximum speed.
- Repeat these steps 4-5 times, gradually reducing engine speed.
- Check with sharp jerks that the adjustment is correct.
Java motorcycle carburetor
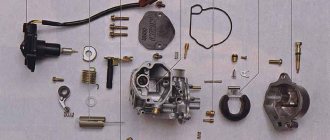
Java 638 motorcycles use a Jikov-2928 CE carburetor. The carburetor consists of the following main parts. Float mechanism with float chamber, double plastic float and needle valve.
The fuel level is checked with the carburetor removed and should be 11 millimeters from the joint surface of the carburetor body and the float chamber. To check, pour gasoline into a regular glass jar, leaving 15-20 millimeters short of the brim.
Next, place the motorcycle carburetor on top of the can, connect the gas tank to the carburetor, and open the tap. We wait for the flow of gasoline to stop and measure the distance from the edge of the can.
The Java 638 motorcycle often gets clogged in the carburetor, and even the fine fuel filter, which can be installed by cutting the gas line and inserting it in the middle, does not help.
A filter for a Java motorcycle can be installed, for example, from a Zhiguli car. To clean the carburetor without removing it from the motorcycle, you need to close the tap while continuing to move and open it when the engine does not have enough fuel and it starts to fail.
Important
The flow of gasoline should wash away the speck and normal carburetor operation will be restored.
The carburetor does not have a float suppressor, as on the Java 634 motorcycle. Instead, there is a lever that rises up when starting a cold engine, which is much more convenient. There are no problems with starting up to minus 5-10 degrees. There is another way to enrich the fuel mixture - you need to cover the drainage hole with your hand, located near the starting device under the lever.
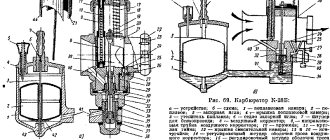
Float mechanism and starting device: 1 - enrichment nozzle 2 - float chamber 3 - enrichment 4 - enrichment lever 5 - fitting 6 - float 7 - needle valve.
When the throttle opening is small (about 0.5 mm), the idle mechanism operates. On a Java 350 motorcycle, it consists of a size 40 jet, an idle speed adjustment screw, emulsion tubes and channels.
The idle speed is adjusted as follows: warm up the engine, use the spool stop screw to set the engine speed to 800 -1000 rpm. Then, slowly turning the quality screw, we find the position where the engine speed will be maximum.
Each time the screw must be turned no more than ? revolutions and wait until the engine speed is established. We control all this using the tachometer. When the maximum position is found, we lower the spool with the screw until the revolutions return to their previous value.
Then, using the quality screw, you can once again try to raise the speed, thereby clarifying the adjustment.
Idle system: 2 - emulsion tube 4 - additional emulsion tube 5 - throttle lift screw 6 - carburetor body 7 - quality screw.
To prevent a “failure” in the Java motorcycle carburetor when the throttle is lifted slightly, a transition system is provided. It has air and fuel jets. The air to the transition and idle systems comes from a single channel, then part of it goes to the idle system, and part of it goes through the air nozzle to the additional system.
Main dosing system and econostat: 1 - main jet 2 - needle 3 - spool 4 - spring 5 - cover 6 - econostat 7 - econostat jet
The main metering system of the Java motorcycle begins to work when the throttle is raised more than 6 millimeters. The composition of the mixture at medium and full throttle opening is affected by the size of the jet and the position of the needle.
When the engine is not fully opened, the efficiency of the engine is more important than its power, so the mixture should be lean, but not excessively, otherwise there will be interruptions at small openings. This is regulated by moving the needle; when lowering, the mixture becomes leaner; when raising, it becomes richer.
Experiment with the position of the needle and find the position that suits you best.
Unlike the carburetor of the Java 634 motorcycle, the carburetor on the Java 638 motorcycle is equipped with an econostat that operates at large diffuser openings (more than 14 mm). The ecostat enriches the fuel mixture, increasing engine power.
Fuel is taken through a tube from the float chamber and then rises through channels above the diffuser and is injected in front of the spool.
The Java econostat atomizer is located in the upper part of the diffuser, so with small openings it practically does not work.
Motorcycle exhaust system - what is it?
Spark plugs for motorcycle
Motorcycle exhaust systems
This entry was posted in Engine. Bookmark the permalink.
Carburetor Jikov 2924
The Jikov 2924 carburetor is installed on two-cylinder two-stroke engines of the Java-43-350 motorcycle.
The carburetor is horizontal, spool type. Adjustment of the mixture composition is carried out by mechanically changing the cross-section of the nozzle in interaction with regulation
vacuum in the main fuel system behind the nozzle.
The Jikov 2924 carburetor consists of four main parts: the carburetor body, made integral with the float chamber body, carburetor covers and the float chamber and the nozzle chamber located in the carburetor body. All parts are made of zinc alloy. In Fig. 100 shows a carburetor diagram.
A special feature of this carburetor design is the presence
float mechanism of a car and an original idle speed control system.
Float 16, made of brass in the form of a horizontal cylinder, is suspended by means of a lever on an axis. Shut-off valve 17 is located in the float chamber cover.
The float acts on the shut-off valve through a special tongue located on the lever. By bending the tongue, the fuel level in the float chamber is adjusted.
The design of the float mechanism ensures a stable level of fuel in the float chamber during operation.
A float stopper 1 is installed on the float chamber cover, pressing which increases the fuel level in the float chamber and, consequently, enriches the combustible mixture.
A float stopper is usually used when starting a cold engine.
The main jet 15 is located obliquely inside the float chamber. When using a carburetor on an overhead valve engine, the jet is rearranged. It is installed externally under the screw plug, and the hole for the jet in the float chamber is plugged. The location of the main jet when installing a carburetor on an overhead valve engine is shown in the figure with a dashed line.
The carburetor throttle valve 4 is placed in a vertical channel. Spring 5, clamped between the cover and the throttle valve, presses it to the lower starting position.
The throttle valve is made of light alloy silumin. The profiled needle is fastened to the throttle valve by a fixing spring, which fits into one of the grooves located in the upper part of the needle. There are five such grooves.
By rearranging the fixing spring in the grooves, the composition of the combustible mixture is adjusted.
A nozzle chamber 5 is installed on top of the carburetor body, which is pressed against it by means of three screws screwed in from the outside at the bottom of the carburetor.
Compensation sleeve 6 is pressed into the center of the nozzle chamber.
Before installing the nozzle chamber, the main system sprayer 13 is installed.
In the front part of the carburetor (in the air intake pipe) there are two openings of the air channels: the main system 2 and the idle system 14.
When the main dosing system operates, air enters through channel 2 into the annular cavity of the nozzle chamber. Under the influence of vacuum, air from the annular cavity passes the annular gap between the compensating sleeve 6 and the main jet nozzle 13, delaying the growth of vacuum at the mouth of the nozzle and preventing the enrichment of the combustible mixture when the engine speed increases or its load changes.
When the engine is idling, the number of revolutions is controlled by the throttle valve stop screw. The composition of the mixture is regulated by two screws, one of which 10 regulates the amount of air flowing from the air channel 11 into the emulsion channel 8, and the second screw 9 regulates the amount of fuel flowing from the fuel channel 12 into the emulsion channel.
As can be seen from the above, the carburetor provides air and fuel adjustment of the idle system.
This universal adjustment allows the Jikov 2924 carburetor to be used on engines with different displacements.
SETTING THE FUEL LEVEL IN THE FLOAT CHAMBER OF THE JAVA 638 2928CE CARBURETOR
Theory (Java 638 2928CE carburetor adjustment): The float mechanism consists of a double plastic float, a float chamber and a needle valve. In order to correctly adjust the fuel level in the float chamber, the carburetor is disconnected from the engine and the bottom cover is removed from the carb. The level must be set at a distance of 11 mm from the plane of the connector between the carburetor body itself and the plastic float chamber.
Solution (Java 638 2928CE carburetor adjustment): place the body with floats on the edge of a half-liter glass jar and connect it to the fuel tank with a thin hose. Open the tank tap and wait for the fuel level to settle. Considering that the height of the collar at the bottom of the body is 2 mm, it should be 9 mm from the top edge of the can. If the level does not work out this way, then you need to bend the tongue between the floats until the level is 9 mm from the edges of the can
Installation of two
Among the ideas of domestic tuner enthusiasts, there are sometimes quite interesting attempts to install two carburetors on Java. The essence of the idea is clear. Two carburetors should give a significant increase in power. But the matter will not be limited to installing carburetors alone.
The intake geometry of Java is designed for the installation of one manifold. Two carburetors simply won't fit there. In addition, you will need to install reed valves, otherwise the backflow of the mixture will reduce power. And for this you will need to make additional windows in the pistons on the intake side.
In general, this tuning option is not structurally suitable for the Java engine, unlike the same Izh. However, some people managed to make some semblance of a Yamaha RD 350 from Java.
Jawa 634 - review, device and setup
Java 634 motorcycles were equipped with simplified Ikov 2926SBD carburetors. The main difference from the later model Ikov 2928CE is the smaller number of working systems (idle system and main fuel system), the size of the float chamber and its location on the side, relative to the diffuser (with strong lateral rolls, this affected the operation of the engine), as well as the presence of a float stopper ( analogue of the enrichment agent when starting the engine).
Carburetor adjustment is carried out according to the factory table from the user manual.
The table shows the adjustment data for the Java 634 motorcycle carburetor
The break-in period for this engine is approximately 2000-2500 km. After this, you need to change the position of the needle in the groove of the lock (2) and unscrew the quality screw (4) according to the table. The free play of the throttle cable is adjusted with a screw (1) and should be 1.5-2 mm. By default, the throttle lift adjustment screw (5) must be lowered to the minimum stable engine speed.
Carburetor cross-section
A similar adapter was installed on Voskhod 3M motorcycles, which at one time were produced from the factory with Czech carburetors. You can look for it at motor showrooms.
Idle mixture adjustment screw
The final (fine) adjustment of the idle air system is made using a special screw with a conical tip, which regulates the throughput of the air channel of the idle air system. Some carburetor models are equipped with a screw that regulates the amount of fuel, already pre-mixed with air, supplied by the idle system.
Idle mixture adjustment screws. Two screws on the left regulate the amount of mixture, two on the right control the composition of the mixture.
Since in one case the screw regulates the composition of the mixture, and in the other - the amount of the fuel mixture, opposite adjustment methods are used. If the screw regulates the throughput of the air channel, then to enrich the mixture it is necessary to reduce the amount of air by tightening the screw. In order to make the mixture leaner, the screw must be unscrewed. If the screw regulates the amount of fuel supplied, then, on the contrary, to enrich it, it is unscrewed, and to become lean, accordingly, it is tightened.
It is very simple to understand by what principle adjustment is carried out on a particular carburetor. The air adjustment screw is located closer to the carburetor inlet, which is connected to the filter, while the fuel adjustment screw is located closer to the engine mounting flange.
Location of the idle mixture adjustment screws: a — mixture adjustment screw, b — mixture amount adjustment screw