We replaced the fluids, installed the battery and off we went.
If you, like most of your motorcycle brethren, have neglected maintenance, then the pre-season is the best time to remember that operating a motorcycle involves not only drive and speed, but also taking care of the iron horse. Therefore, when preparing a motorcycle for the season, you need to inspect it very carefully and make sure that everything is in order with it.
How to do this, what to pay attention to and how to eliminate possible problems - we will tell you in this article.
Sunny days have arrived, which means the start of the season is coming soon. If your bike was in a warm garage, properly preserved and prepared for wintering, you’re doing great. Most likely, your motorcycle is almost ready for the season. We replaced the fluids, installed the battery and off we went.
If you, like most of your motorcycle brethren, have neglected maintenance, then the pre-season is the best time to remember that operating a motorcycle involves not only drive and speed, but also taking care of the iron horse. Therefore, when preparing for the season, you need to examine it very carefully and make sure that everything is in order with it.
How to do this, what to pay attention to and how to eliminate possible problems - we will tell you in this article.
What to do if you neglected conservation?
There are many useful tips on how to prepare your motorcycle after the end of the season. For example, fill a full tank of 98 (required) gasoline, lower the tires, remove the battery, etc.
We think everyone knows about the battery and even removes it. But, as a rule, few are familiar with the remaining recommendations.
If, for one reason or another, preparing your motorcycle for winter passed you by and you were unable to take advantage of the preservation tips, then preparing your motorcycle for the season should definitely begin with checking all the main components and maintenance.
The motorcycle starts and immediately stalls
The engine may suddenly stall due to an ignition or power failure. Mechanical breakdowns of the chassis are much less common. The engine immediately stalls if it does not have enough fuel or, conversely, there is too much of it, and the reason for this may be a malfunction of the spark plugs, carburetor, fuel pump or hoses. Tuning and flushing the carburetor will be the most likely solution. If the spark plugs are cleaned and the carburetor is working properly, the breakdown will probably be found in the ignition coil or starter enrichment.
Visual inspection
The main rule is not to rush to start the motorcycle. Re-opening a motorcycle after winter does not tolerate fuss and haste. To assess its technical condition before the start of the season, first conduct a visual inspection.
Important! Almost everything that will be discussed in the article will be suitable for those readers who plan to buy a used motorcycle second-hand.
Roll out the motorcycle to a lighted place and provide access to it from all sides. Using a flashlight, inspect it carefully.
If during the initial visual inspection you notice leaks of technical fluids, this is a bad sign. It is necessary to carefully examine each problem area. In our article we will tell you in detail what you need to pay attention to and how to correct this or that situation, as well as how to maintain your motorcycle.
Motorcycle won't start when hot
The opposite situation also happens: a cold bike starts without problems, but after a short stop you need to wait 5–10 minutes. In this case, the larger the engine volume, the more pronounced this difficulty becomes. It is rare on maxi-scooters and 250 cc cars, but much more common on powerful bikes (for example, the 1198 cc Ducati Diavel or 1170 cc BMW R1200RT). The solution is to adjust the valve clearance, which, when expanded, does not provide the necessary compression. Also, for a “hot” start, motorcycle manufacturers install a Hot Start lever; use it if it is installed on your model.
Checking the condition of the air filter
The air filter cleans the air entering the engine.
What you need to pay attention to:
Air filter condition.
Filters are disposable and serviceable. It is recommended to change disposable ones before the start of the season, regardless of the service life indicated by the manufacturer.
With serviced filters the situation is slightly different. They can be taken out, cleaned and soaked in special oil. With the help of such oil, the filter retains the smallest dust, and larger particles get stuck in the filter fabric. Proper maintenance of such a filter can extend its service life.
Important! Use only filters specified by the manufacturer. A lack of air-fuel mixture negatively affects engine performance. Oil impregnation increases the filter resistance, reducing the supply of oxygen.
To visually assess the condition of the air filter, open the ventilation duct and remove the filter. Assess its cleanliness and general condition. If there is dirt (and after the season there will definitely be dirt), clean the filter in accordance with the instructions included with it. If the filter is disposable, replace it.
Adhere to the following rules:
- Do not use gasoline for cleaning.
- Do not twist or squeeze the filter.
- Do not blow dry or expose to high temperatures.
- Do not use machine oil for impregnation.
How to wash?
We'll tell you about the chain after washing the motorcycle, when it needs to be lubricated. For now, let’s talk about cleaning the bike itself.
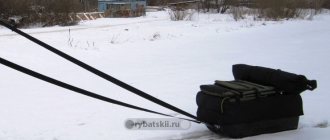
“The motorcycle must be clean - it is both aesthetically pleasing and prevents the development of corrosion. But in hard-to-reach places a lot of dirt usually accumulates. Trying to knock it all down with a high-pressure washer with a powerful cutter means driving water along with dirt into the seals and bearings. Therefore, we take a cloth, a cleaner and wipe everything with our hands. Constantly washing your motorcycle at self-service car washes is harmful. It is necessary to wash it periodically, but it is better to knock off the dust from a distance and then wipe it with a cloth. Pressure washing negatively affects the durability of motorcycle parts and components.”
The most important thing is not to do as in the photo below.
In this way, we drive water and dirt into the bearings, thereby “killing” them. No need to bring the cutter close! On older motorcycles this can also remove the paint.
This is a quick way to wash a motorcycle. I wash from afar with water under pressure, knocking down dirt. Then we coat it with chemicals and let it work for five minutes. We also wash it off from afar. We blow out the remote controls with compressed air, if possible. Then wipe with a soft cloth - you're done.
Checking the condition of the fuel filter
The fuel filter ensures that the gasoline entering the engine is clean.
What you need to pay attention to:
- Availability of gasoline in the tank.
- The presence of corrosion and rust in the tank.
If you filled a full tank of 98 gasoline before winter, you're doing great again. If not, you will have to read this paragraph carefully.
Why 98 gasoline? There is an opinion that during the six months that the motorcycle is not used, the octane number of gasoline decreases. They filled up the 98th, and by the beginning of the season it became the 95th. And if you fill it with 95, it will become 92 and lower. There is a possibility that the motorcycle simply will not start.
If the tank was full, then its internal walls were not corroded. If it was empty or half-empty, use a flashlight to inspect it from the inside. A small amount of rust is acceptable. But if there is a lot of it, it will inevitably clog the fuel filter.
In this case, it is necessary to clean the tank of rust. Since such work will require removing the tank, we recommend contacting a service center.
If the design of the motorcycle allows, visually assess the condition of the fuel filter. It should be free of dirt, rust, and foreign objects.
If it's difficult to access, here are some signs that might suggest there's a problem:
- Increased fuel consumption.
- Uneven acceleration, failures.
- Stalls at idle and requires higher revs.
How to start a motorcycle after winter storage
Clueless
- this is when a motorcycle is placed in a damp garage for the winter without any preparation, and in the spring it is expected to start in a jiffy. But this is only possible with new motorcycles, and even then not with all of them.
Intelligent storage
- this is when a person spent an hour of time in the fall to avoid multi-day hemorrhoids in the spring, and carried out all the necessary measures on his motorcycle.
In the middle
is an intermediate method based on regularly starting the motorcycle every week or two in winter.
In order to combat the causes of spring motorcycle negligence, you must first understand its possible causes. There are only two reasons for the spring failure to start (provided that the motorcycle was started in the fall, and if mechanical damage is excluded):
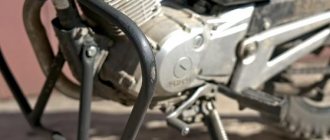
Visual inspection of the engine
We think that even those who are starting their first season know why a motorcycle needs an engine.
What you need to pay attention to:
- Presence of smudges
- The sound of the engine
Inspect the engine carefully. There should be no traces of oil or other technical liquids anywhere on it. First of all, look for fresh tracks. If the engine has them, the problem is with it or with any of the components located above it.
Looking ahead, let's say that upon completion of the visual inspection, you will need to start the motorcycle. Listen carefully to see if there are any extraneous sounds in the engine: knocking, clattering, etc. If there is the slightest sign of malfunction, turn off the motorcycle and contact a service center.
Photo gallery
We hope this article was quite useful and informative for you, and now you can easily prepare your “iron horse” for the new season. In conclusion, we offer a small photo selection.
Checking and tightening threaded connections
During periods of storage and especially operation of the motorcycle, loosening of threaded connections occurs.
What you need to pay attention to:
Bolt condition
Depending on the storage conditions of the motorcycle, there is a slight possibility that the threaded connections have become loose due to temperature changes. Most often, this happens with equipment that is stored in an unheated garage or outside.
Much more often, loosening of connections occurs from vibration during movement. If, at the end of the season, you have not checked the condition of the bolts, now is the time to do it. Check the forums for your motorcycle model to find out any problem areas that need more attention. If it is not possible to do this, carefully tighten all the bolts that you can reach. Pay a little more attention to the bolts that secure the motor to the frame.
Important! Do not under any circumstances overtighten. Repairing broken threads is an expensive proposition. If possible, use a torque wrench.
If during the inspection you find a bolt that is not tightened well, we advise you to completely unscrew it and treat it with thread locker. Use the red fastener for those bolts that you do not plan to remove. And it is better to lubricate the bolts that need to be unscrewed to replace consumables with a blue locking agent.
Tips for replacing spark plugs
Many bikers have problems with thread tightening - experienced motorcyclists know very well how many problems this can cause.
You can simply break the thread or, in the worst case, break the candle altogether. You will have to spend a lot of time cutting a new threaded connection or removing a broken part.
Advice! Buy products with rubber bands or magnets - according to statistics, in 99% of situations, they will help avoid damage to the ceramics on the spark plug.
A driver, or simply a ratchet key, needs to be purchased or borrowed. This tool will help you avoid over-tightening the spark plug and breaking its thread.
The second, and no less necessary tool is a feeler gauge designed to measure the spark plug gap.
In the service manual for the motorcycle (a book that is issued when purchasing a bike with all its technical characteristics and repair rules), you can easily find all the necessary numbers, including the clearance level.
A detailed overview of technical characteristics and reviews of the Yamaha YZF R6, from the Japanese manufacturer.
A brief overview, estimated prices, and technical characteristics of the Honda CBR600RR motorcycle.
Inspection of chain and sprockets
The motorcycle has 2 stars: small and large. Using a small star, torque is transmitted from the motor shaft to the rear wheel.
What you need to pay attention to:
- Wear of large and small stars
- Circuit Condition
- Chain tension
Both sprockets wear out at approximately the same rate. But a large star is more at risk of various damages, since it is not as well protected as a small one. Therefore, it is advisable to begin examining the condition of the sprockets by assessing the condition of the rear sprocket.
The teeth should resemble hills or waves. If they look more like sharp needles, the star's service life has come to an end.
Bent, broken, or very different teeth from others clearly indicate the need to replace the sprockets.
Important! If financial capabilities allow, it is recommended to change both stars and the chain at once. The old chain will quickly “kill” the new sprockets, and the old sprockets will quickly stretch the new chain. Check chain tension. It should “walk” 1-2 centimeters up and down. If there is more play, tighten the chain, this may help. But if the sprockets are worn, most likely the chain has stretched and its tension will be uneven. Turn the wheel - the chain is tense, turn it again - it's slack.
Riding with a stretched chain will, at a minimum, not give you pleasure - the motorcycle will twitch. And at the most, the chain breaks while driving.
It is also a bad sign if there is no mobility at the junction of its links. The rubber seals are probably damaged or there are lubrication problems. Remember how often you lubricated your chain during the season? It is recommended to do this every 500 km or after exposure to rain.
Clean the chain from old lubricant using special means. Then apply new grease. First of all, it should get on the rubber seals. Excess grease can be removed with a dry cloth.
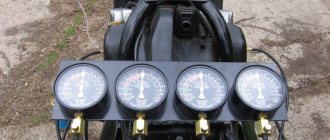
Now the ignition
The ignition system, in the part that is accessible to the kettle for inspection and repair, consists only of spark plugs and a battery, so we’ll limit ourselves to that. The condition of the battery is the most important factor for trouble-free starting, so I recommend not neglecting it. A car battery, “lit” through the wires, will help, but will not give the same effect as a well-charged motorcycle battery of your own. Not to mention the fact that a battery that has self-discharged over the winter will not crank the engine, it will also not provide the necessary voltage to the “brains,” which as a result will refuse to work correctly and give a spark. So it’s better not to even try with a discharged battery.
Let me remind you that it is best to charge the battery with a current of 10% of the rated capacity for 10 hours, i.e. A battery with a capacity of 9 A/h is best charged with a current of 0.9 A for 10 hours. The recommended charging current is written on the battery cover, so it makes sense to look. The Moto.Ru Store has a special device for charging motorcycle batteries, everything is free, come and charge. It is better not to use car “automatic” chargers - they are designed for the capacity of a standard car battery (50 A/h), and when you connect a relatively weak motorcycle battery to them, they think that they have a very dead car battery in front of them, which they are trying to invigorate with mega-current.
Some batteries can be charged in accelerated mode for an hour with a current of half the capacity (for example, for a Yuasa battery with a capacity of 9 A/h it will be 5 A for an hour), but only if this is written directly on it. Almost all Yuasa batteries, standardly installed on Hondas, have this capability. When charging, by the way, do not forget to remove the caps of the cans (if they can be pulled out!!!). The same Yuasa are equipped with a special “tablet” that allows the released gas to pass through, but does not allow liquid to pass through.
Further, for a good starting current, the battery must have a good electrolyte density (this is if the battery is serviceable). To measure the density of the electrolyte, there are hydrometers, sold for 20 rubles in any auto parts store. The density of the charged battery should be 1.27, if not, then you need to add distilled water - it costs 10-15 rubles for 1.5 liters. Be careful with electrolyte - it can easily damage your clothes if you wipe your hands stained with it on your pants.
If the battery is weak (it seems to spin, but dies quickly), you can try to revive it with products like Electro Start or Amper Plus. Do not overdo it with the dosage - they are designed for car batteries. Pour liquid or powder into the holes of the cans (if the battery is maintenance-free, you will need to gain access to the holes by barbarously tearing off the very strip on which “maintenance-free” is written ;))).
Tire pressure and rubber condition
Good tires will help you more than once or twice on the track, especially if you get caught in the rain. Your safety greatly depends on their condition.
What you need to pay attention to:
- Year of issue
- Tire integrity
- Tread depth
- Tire pressure
Even if the tires visually look new, remember that they have an expiration date. After it expires, the rubber begins to crack. The more difficult the operating and storage conditions were, the faster microcracks will appear.
To find out when a tire was made, look for the four-digit number on it. The week number will be written in the first two digits, and the year – in 3 and 4 digits. For example, if you see the numbers 0120, that means the tire was manufactured in the first week of 2020.
Important! The optimal tire service life is 3 years. Maximum – 5 years.
If the tire age is within normal limits, carefully inspect the tires of both wheels. They should not have any cuts, delaminations, etc.
The remaining tread depth must be at least 0.8 mm. Otherwise, it is impossible to ensure effective removal of water from the contact patch. Driving in the rain on such tires is strictly not recommended.
Check tire pressure. It must match what is stated in your motorcycle's technical manual. Often these numbers can be found on the frame, swingarm or chain guard.
Check the technical condition!
The motorcycle has started and you want to go? Wait! Check the chain tension and lubricate it. Apply the brakes and see if the handle and lever are soft - this may indicate aeration. The best thing to do is change the brake fluid! How to do it? More on this later. In any case, it is worth it - the costs are very low, and you will be sure that there will be no water in the fluid and you will not “float” with the prepared brakes. Check if there are any suspicious greasy marks on the joists. If so, this indicates that the sealants are worn out. Don't underestimate this, the oil from the lags will flow very quickly through the hanger pipe directly to the brake calipers and therefore it will have a short path to the pads and rotors. You might be surprised.
First start of the engine after winter
Be prepared for the fact that after winter the motorcycle will not start immediately.
What you should pay attention to:
- Gasoline quality
- Battery status
- Condition of the candles
As we already wrote above, gasoline should be filled with the maximum octane number. Another good idea would be to add a special liquid to it - a fuel stabilizer. Now it’s too late, but next time you’ll definitely flood it, right?
So what to do now. You need to get rid of the old gasoline and pour in new one. To do this, you need to drain it through the hose leading to the carburetors. If the word “hose” is familiar to you, but with “carburetor” everything is not so clear, it is better to call a mechanic. He will drain the old fuel from the tank through a hose, and then, unscrewing the drain screws of the float chambers, drain the remaining fuel from these same chambers.
Put everything back as it was, fill it with fresh gasoline. Does it start? If yes, congratulations, if not, read on.
If the battery spent the whole winter with the motorcycle in a cold garage, this is, to put it mildly, not very good. Try removing it, charging it with a special device, returning it to its place and connecting it. It would be a good idea to measure the voltage at the terminals. For a healthy battery it will be around 12.8 volts.
Try starting again. If it doesn’t work, the problem may be with the battery – it didn’t survive the winter. Measure its voltage under load. If it sags noticeably, carefully disconnect it and go get a new one.
If the voltage is OK, you should check the spark plug block. Let’s say right away that on many motorcycles they are hidden quite deeply. To get them, you need to remove the tank and unscrew the spark plugs with a special key. You won't be able to check them by eye either. Therefore, if you have already reached the candles, the best solution would be to contact the service.
Important! We have already advised you to contact the service several times. No, we are not its owners, it’s just that some types of work are extremely difficult to perform without equipment. It's in the service. And you?
If you are sure that the spark plugs are fresh, the battery is in order and the gasoline is of excellent quality, there is a way to start the motorcycle that our parents used - from a pushrod!
To do this you will need a companion and a dry road. You turn on the ignition, depress the clutch and engage 2nd gear. You don't release the clutch. Your assistant begins to speed you up. Once you reach running speed, release the clutch smoothly but firmly. The motorcycle will start. Do not turn it off for 15-20 minutes, let the engine warm up and charge the battery.
If all this doesn’t help, you’re heading straight to a motorcycle service center.
A cheat sheet with some useful tips
The spark plug gives a spark, but a very weak one. The problem is that the ceramic insulator can become damp. And therefore, part of the energy simply flows down it, and the rest is not enough to ignite the fuel. It is this property that, in most cases, makes candles that worked flawlessly in the fall inoperative. If the candle is damp, you can try to dry it on an electric stove, but the correct thing to do is to replace it with a new one.
Before sending the moped for the winter, it is advisable to drain the remaining gasoline from the tank. Because this substance can be exhaled. In other words, the light fractions evaporate, and the remaining gasoline performs a chemical reaction with oxygen. As a result, gasoline changes its color, becomes dark and loses its ignition properties. This change is especially noticeable if the gasoline was not stored in a sealed or half-empty container.
If gasoline remains in the fuel tank over the winter, then in the spring it is drained and replaced with fresh one. Old gasoline can be added in small quantities to new gasoline, but in the warm season.
If all of the above manipulations helped and the iron horse started, then before the first spring trip you should check the oil level, cooling fluid, and of course the tires. After the manipulations have been completed, you can safely hit the road.
Pre-season motorcycle maintenance
If the re-preservation was successful, it’s time to move on to pre-season maintenance. In preparation for the season, it is recommended to completely replace all fluids in the motorcycle, check the battery, spark plugs, tires and brake pads.
Flushing the fuel system
The fuel system is flushed using special additives. Such additives are added to fuel and effectively clean injectors, reduce condensation formation, and clean the combustion chamber and exhaust valves.
Replacing technical fluids
There are two liquids that you can and should add yourself. This is oil and antifreeze. Check their levels regularly and replenish them in a timely manner.
If the task arises of changing technical fluids completely, then it is better to contact a service center. Simply draining the old one and pouring in a new one will not work.
- When replacing antifreeze there is a risk of burns.
- When replacing brake fluid, there is a risk of damage to the brake system.
- When changing the oil, it is imperative to clean the engine of used oil.
Adjustment of valves
During operation of the motorcycle, valve clearances may change. If this happens, you will hear popping or knocking noises. The motorcycle will be difficult to start. Self-adjustment of valves requires special equipment and knowledge. Therefore, we recommend entrusting this work to a service center.
Checking the battery and electrical appliances
It is unlikely that anyone will have difficulties with this. Start the motorcycle and consistently check the operation of the headlights, brake lights, turn signals, and horn.
If the motorcycle does not start and the problem is definitely with the battery, replace it with a suitable one.
Removing carbon deposits
If carbon deposits have formed on metal parts, it can be effectively removed using special cleaning products. Another good option is a visit to a specialized car wash. These sinks use professional chemicals that not only remove carbon deposits, but also protect against their appearance for some time.
Adjust chain tension
To adjust chain tension, place the motorcycle on a center stand or stand. Loosen the rear wheel nuts. After this, loosen the chain tensioner locknuts. Now, by turning the adjusters 1–2 turns, achieve the desired chain tension (you can find it in the instructions for your motorcycle). Lock the locknuts and secure the wheel.
Clean hydraulic shock absorbers
If during operation the motorcycle suspension becomes less responsive, or, conversely, becomes too soft, you should check the adjustments of the front and rear shock absorbers. If this is not provided by the manufacturer or working with it does not give the desired result, you must contact the service. There the shock absorbers will be disassembled, washed and the reason for the malfunction will be found.
Replacing spark plugs
The service life of spark plugs is 10-15 thousand kilometers. After this they need to be changed. The procedure is not complicated, but it cannot be called simple either. To access the spark plug block you will have to remove the tank and plastic. You will then need a wrench to remove the old spark plug. It is advisable to install a new one using a torque wrench, so it is better to entrust this work to a motorcycle service center.
Checking the brake system
The braking system is the basis of your safety.
What you need to pay attention to:
- Brake fluid level.
- Presence of leaks.
- Brake pad wear.
Press the handbrake lever several times. If it fails or behaves unusually, air has probably entered the brake system. It must be pumped out yourself or at a service center (preferably).
Important! The handbrake of some motorcycles equipped with ABS should only be checked after the ignition is turned on. Otherwise, the lever will fail even on a working system.
The brake fluid level can be visually assessed by inspecting the brake fluid reservoir. The fluid level should be between the maximum and minimum marks. Only in this case the manufacturer guarantees the effective operation of the motorcycle braking system. If the level exceeds the maximum mark, excess liquid must be drained through a special drain hole. You should not do this yourself; brake fluid is quite caustic and can damage the paintwork of the frame or the plastic of the motorcycle.
If the fluid level is lower, do not rush to add. You need to understand where the liquid went. Option 2. The brake pads have leaked or are worn out.
Carefully inspect everything related to the brake system. First of all, brake hoses and their joints. If there are leaks at the joints, try tightening the clamp a little more. If there are leaks on the hoses themselves or cracks and damage are visually visible, they will have to be replaced.
Replacing a brake hose yourself is not the easiest procedure and is beyond the scope of this article. For our part, we recommend contacting the service.
The second possible reason is worn brake pads. The higher the wear, the more brake fluid goes into the working area to ensure full brake operation. Try to visually assess the remaining friction layer on the brake pads of the front and rear wheels. If you can't tell the thickness, the pads may be completely worn out. Replacement is required and as soon as possible. If you continue to drive like this, braking efficiency will significantly decrease, and repairing brake discs will cost a pretty penny.
Let's get back to brake fluid. If a visual inspection does not reveal any defects, and the fluid level is below normal or at a minimum, it needs to be topped up. The type of fluid used in the motorcycle is written on the reservoir cap. Typically this is DOT3 or DOT4.
Important! Experiments with mixing them are unacceptable.
If there is even the slightest doubt, it is better to drain the old brake fluid and fill in new one. After this, you will need to bleed the brakes to get rid of any air trapped in the brake system. It is not recommended to do this operation yourself. This is a service job.
By pressing the handbrake lever and the rear brake pedal, make sure that the brake cylinders are movable and have normal movement. Dried dirt may interfere with them. In this case, remove it using improvised means.
After these checks, make sure that the brake light comes on when you press the brake pedal and handbrake lever.
Checking lighting fixtures
To check the lighting, you need to start the motorcycle, then check the operation of the low and high beams.
Important! Most motorcycles only have one headlight on when low beam is turned on.
Checking the validity period of documents
Before leaving after the season, make sure your insurance is valid. If you did it just yesterday, keep in mind that it only starts working after three days.
The motorcycle does not start and the muffler shoots
This also happens: the bike completely refuses to start and makes “shooting” sounds. This result is caused by improper care of the ignition system, the use of low-quality gasoline, breakdown of the electronics that regulate the supply of gasoline, and fuel accumulation in the muffler. And this is not just about the aesthetic impression of your car. If you drive for a long time with a dirty carburetor or on bad gasoline, the compression of the engine cylinders will be disrupted, which will lead to engine failure.
What to do?
- We check whether the pipes and exhaust tract are sealed (air enters the system through the cracks).
- We clean the air filters and carburetor.
- We look at the candles and, if necessary, dry them or replace them with new ones.
- Let's find out if the fuel supply is obstructed.
If you have a rev limiter, part of the fuel-air mixture enters the exhaust system, where it ignites from the hot metal. This effect is used by the creators of shows in which bikes have flames flying out of the exhaust pipe.
To prevent problems with starting the engine, check the level of oil, brake fluid, and antifreeze before driving. Leaky connections can allow moisture to get inside, which is the main cause of rust. Store the bike with a full tank of fuel, otherwise it will cause condensation. Before long-term storage, remove the battery and leave it charged in a cool place at above-zero temperatures. And remember, most often the reason for the engine’s reluctance to start is the inattention of its owner.
First departure
After a long winter, you really want to turn off the gas and remind the city of yourself. We kindly ask you not to rush. Preparing for the season is important. Spend two to three days regaining the skills you lost over the winter.
- It would be a good idea to stop by the site and ride around there for a bit.
- Remember, at the beginning of the season the nights are still cold and the asphalt does not have time to warm up, the grip of the wheels on it is minimal.
- Do not make sudden maneuvers until the tires are warmed up.
During your first rides, try not to go far from home, carefully observing the behavior of the motorcycle. After completing the trip, check to see if there are any leaks of technical fluids. Checking additional modules (attachments: cases, holders for smartphones and accessories, etc.)
Once you have checked the technical condition of the motorcycle and performed pre-season maintenance, take a few more minutes and examine the condition of the additional equipment.
Check the fastening of the phone holder, navigator, case. Make sure the panniers are secure and easy to lock. If you installed various equipment yourself (additional light, cigarette lighter), check the connection points to the on-board electrical network.
Checking additional modules
If everything went as normal when starting the engine, you can safely check the additional modules:
- Air filters. If a small amount of oil appears inside the filter, everything is normal. If there are greasy areas on the outside of the filter and the fins are colored gray, the element will need to be replaced with a new one;
- Rubber. If you let the air out of your tires in winter, then there should be no problems with the tires. If such measures have not been taken, then you need to inspect the rubber for cracks. To make it easier to find defects, inflate the wheels to working condition. Leave the bike for a couple of hours and then measure the pressure again (this will allow you to check the serviceability of the nipple);
- Chains and stars. If the rear sprocket is equipped with bent teeth or chipped, it will require replacement for safe driving. The front sprocket also needs checking, but it is covered with a chain and only a few teeth are visible. Now about the chain - there are two types of chains: with and without seal. If you notice a falling seal between the links, it will need to be replaced. If the chain is simple, check its tension and tighten if necessary.
Additional Information
Finally, I would like to say about changing the oil (if necessary, fill in a new one, first draining the old one), brakes, check the turn indicators, brake lights and headlights.
Don’t forget about the horn and other sensors - over the winter some contacts could have oxidized and something might not work.